

Peacock stencil evaluation

Pick the peacock construction your size can hold

A peacock lives or dies on archetype fit and eye-spot separation. Compare full-train display against bust and single eye-feather, vet crest, neck, and train silhouette, space the eyes so each one survives, then prep an exact-size stencil that transfers as one readable bird.

Built for working artists preparing peacock pieces. This page covers peacock archetype choice, crest, neck, and train vetting, eye-spot spacing with barb readability, and peacock-specific exact-size prep only, not tattoo application or healing advice. Generic bird pose logic, single-plume feather depth, and general print mechanics each live with their own owners and are linked, not repeated, below.

Full train, bust, or single eye-feather

Choose the construction the placement can actually hold.

Archetype is the highest-cost decision on a peacock stencil. Set it against width, body axis, and available height before refining a single eye.

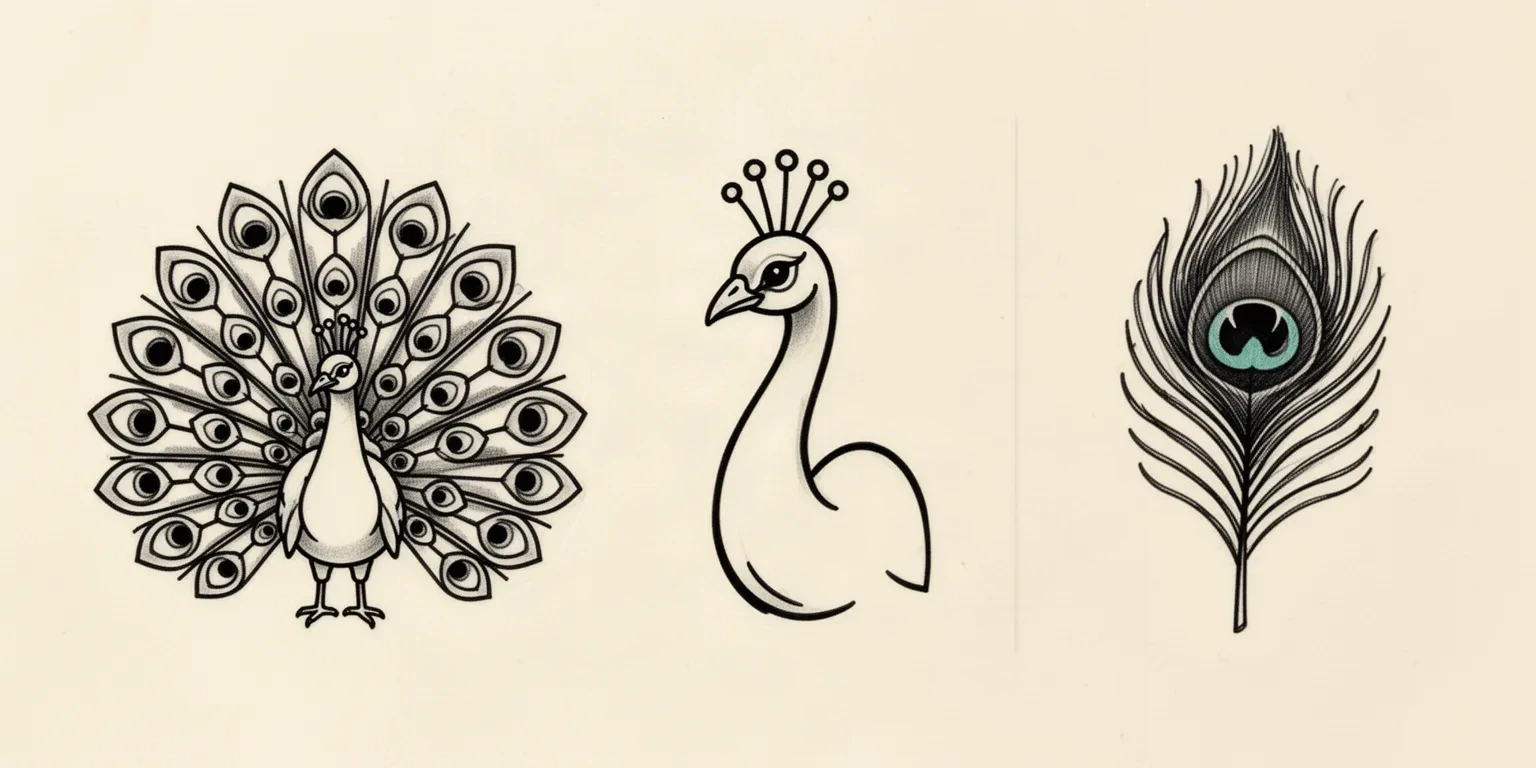
Three peacock stencil constructions compared side by side: a full tail-train display with ranked eye-feather rows, a head-and-neck bust with crest and S-curved neck, and a single upright eye feather with a concentric eye-spot.
Left to right: full train, bust, single eye-feather. Original comparison illustration drawn for this guide, not a printable stencil file or app output. Compare how much structure each archetype asks you to protect before you commit to a size.

Full train display

Best for: Back, thigh, and upper-chest showpieces where the fan can spread wide and the body stays small inside it.

Build: Small upright body with crest and neck centered, train fanning outward as ranked eye-feather rows. Protect body angle, neck flow, outer fan outline, and the largest eye-spots first.

Failure mode: Eye-spots crowd where rows overlap near the body, and lower barbs merge into one dark fan. Keep fewer, larger eyes with open skin between every row.

Size floor: Needs the most room. Holds from about 12 cm upward; below that, recrop to a bust or a single eye-feather instead of shrinking the fan.

Bust and neck portrait

Best for: Shoulder, calf, and forearm pieces where the client wants species read without the wide fan.

Build: Head with crest, S-curved neck, and upper breast, cut cleanly above the train. Protect crest fan shape, beak separation, eye placement, and one continuous neck contour.

Failure mode: Crest filaments close into a blob and neck shading merges with the breast edge. Hold crest separations open and convert neck wash into one contour or light stipple.

Size floor: The most flexible mid-size choice. Holds from about 6 to 10 cm when crest gaps and the eye ring stay countable at 1:1.

Single eye-feather

Best for: Narrow limb fields, ribs, ankles, and behind-ear accents where one vertical mark fits the body line.

Build: One shaft with ranked barbs and one eye-spot as the focal read. Protect shaft path, vane taper, and the eye as concentric separations with open skin between each ring.

Failure mode: Eye rings touch and fine barbs fill around them, so the eye reads as a solid oval. Rank barbs down to one family per side and protect the skin breaks inside the eye first.

Size floor: Fits narrow fields. Holds from about 5 cm upward as a simplified eye; detailed multi-ring eyes with full barbules need about 8 cm and above.

Generic flying-versus-perched logic stays on the bird owner. Single-plume feather construction without eyes, crest, or train structure stays on the feather owner. This comparison exists to place a peacock body correctly, not to replace those owners.

Crest, neck, and train silhouette

Vet the outline before judging any eye.

No eye detail survives a merged crest, a bridged neck, or a solid fan. These three checks predict whether the peacock reads as peacock after reduction, print, and transfer.

Crest fan separation

The crest reads as a small fan of distinct stalks tipped with paddles, set above the head. Photo reference shows fine filaments and soft tips that look delicate on screen but close into one cap on transfer. Stencil viability comes from countable stalk gaps, because the crest is small and every closed channel removes a large share of the read.

Check: Cover the head. If the crest still reads as a fan of separate tips at true size, separation holds. If it becomes one knob, reopen stalk gaps or reduce stalk count before touching the head.

Neck flow and head junction

The neck is one continuous S-curve from breast to beak, and the head junction carries species through beak shape and eye placement. Failure starts where neck shading touches the breast edge or the beak edges close against the head. Transfer needs one unbroken neck contour on each side plus a beak with two separated edges and an eye ring that keeps its own skin break.

Check: Trace each neck contour edge to edge at true size. If both lines run unbroken from breast to head with open skin beside them, flow holds. If shading bridges either contour, convert it to open skin or stipple first.

Train outline before eye detail

The train reads first as one fan outline with ranked rows, and only second as individual eyes. Screens forgive overlapping rows that paper and skin print as one mass. Judge the outer fan edge, the row structure, and the spacing between neighboring eyes before judging any single eye, because no eye detail survives a merged row.

Check: Squint at the reference at the exact physical width until fine barbs disappear. If the fan outline plus row structure still reads as peacock, the silhouette holds. If rows merge into a solid fan, reduce row count or enlarge before refining eyes.

Eye-spots and barb density at final size

Space the eyes so each one survives transfer.

Screens forgive crowded eyes that paper and skin print as one mass. Set the size first, then judge every eye and barb channel at true physical size with scaling off.

One eye, one skin channel

Every eye-spot needs open skin reaching it from open air: a visible gap between neighboring eyes plus a skin break between each concentric ring inside the eye. When two eyes share one field with no gap, or inner rings touch, the pair prints as one oval.

Test: At 1:1, trace from open skin to each eye without crossing ink. If any eye is fully ringed by touching barbs, reopen the approach gap or remove that eye.

Fewer, larger eyes beat many small ones

A fan with five to seven well-spaced eyes at 12 cm reads as peacock from across the room. A fan with fifteen small eyes at the same width reads as texture up close and as one dark mass at distance, because small eyes lose their inner rings first.

Test: Count the eyes that keep all rings separated at true size. If only half qualify, keep that half at larger size and convert the rest to ranked barb rows or open skin.

Barb density follows eye spacing, not the reverse

Barbs between eyes are support, not structure. Keep one ranked barb direction between neighboring eyes with visible channels, and convert fine cross-barbules into spaced stipple or remove them. Dense fill between eyes is the fastest way to close every eye gap at once.

Test: Squint until barbs blur. If the eyes still sit as separate marks inside a calm fan, density is sound. If the fan between eyes turns solid, thin barbs before touching any eye.

About 5 to 7 cm

Single eye-feather accents and small bust marks on wrist, ankle, finger, and behind-ear fields.

Carry one eye with simplified rings plus one ranked barb family per side, or one small bust with a clean crest and open neck contours. If any eye ring, crest stalk gap, or beak edge closes at 1:1, enlarge or reselect rather than forcing reduction.

About 8 to 11 cm

Common forearm, calf, and shoulder peacock pieces.

Room for a detailed single eye with counted rings or a bust with fuller crest and neck, but not for a full fan. A partial fan with three to five held eyes can work only when every inter-eye gap stays open at true size.

About 12 cm and above

Back, thigh, chest, and ribs showpieces with room for the fan.

Room for a ranked full-train display with counted eyes, but only when open skin separates every eye, every row, and every barb group. Extra width does not rescue touching eyes, merged rows, or a filled crest.

Reference to clean stencil

Build from the archetype outward, then protect the gaps.

Work in this order so one change at a time can be judged at the same size. Stop when archetype, silhouette, eyes, barbs, and curve fit each read correctly.

  1. 01

    Lock archetype, size, and placement first

    Name the construction in one line (full-train display, bust, or single eye-feather), set the intended physical width or height in millimeters, and name the body area. A fan that holds at 14 cm on a back can fail at 8 cm on a forearm with no line being wrong on its own. Use the size calculator when target dimensions are still open.

  2. 02

    Vet crest, neck, and train silhouette at 1:1

    Confirm crest stalk gaps, both neck contours, beak edges with the eye ring, and the outer fan outline with its row structure at true size. Resolve merged crest tips, bridged neck shading, and touching fan rows before touching eye detail or line weight.

  3. 03

    Rank eye-spots and thin barbs

    Keep only the eyes that hold every ring separation at final size, space them with open skin between neighbors, and reduce barbs between eyes to one ranked direction. Mark one removable eye or barb row that can go if gaps close, and convert fine cross-barbules to stipple or remove them.

  4. 04

    Verify curve fit on the body line

    Align full fans with flat panels, busts with the limb or shoulder axis, and single feathers with the rib or limb line. Preview on a body photo while edits are still cheap, because wrap distortion closes outer eye gaps and crest contacts first on curved placements.

  5. 05

    Verify print and transfer path

    Export a true-size PDF with no fit-to-page scaling, inspect the narrowest crest gap, the tightest eye-ring separation, and the smallest inter-eye channel on plain paper, then measure the physical print with a ruler. If the digital file passes and only paper fails, move to print-stage evidence instead of simplifying again.

Placement and composition decisions

Wide fans want flat panels, busts and feathers want a body axis

A peacock is either a horizontal fan, a vertical neck column, or one shaft line. Flat placements preserve all three with little compensation, while wrapped placements demand the matching construction.

Back and thigh

Broad panels where a full train can fan with ranked rows and counted eyes. Edge curvature still distorts outer eyes first.

Check: Center the body on the flattest span, spend width on inter-eye gaps and row channels, and verify every outer eye at 1:1 before print.

Forearm and calf

Long wrapped fields where busts and single eye-feathers run well along the limb axis. Wide fans crowd fast and cross-limb eyes merge.

Check: Align the neck or shaft with the limb line, keep fans partial with three to five held eyes at most, and confirm crest and eye clearance at the exact millimeter size.

Chest, shoulder, and ribs

Curved breathing panels where busts suit the shoulder cap and single feathers follow rib lines. Flat fan reference distorts when wrapped.

Check: Preview wrap on a body photo, keep eyes clear of fold lines, and verify neck contours plus eye rings after the curve preview, not before.

Wrist, ankle, finger, and behind ear

Small fields where only simplified single eyes or minimal busts survive. Multi-ring eyes and full fans merge first.

Check: Carry one simplified eye or one clean crest with open neck lines and no extra rows. Enlarge or reselect at the first closed ring or stalk gap.

Stencil-ready checklist

Approve the peacock only when every line passes

Run this short sequence with scaling off and a ruler in hand. One failed line means fix, enlarge, or reselect before transfer.

  • Confirm archetype, intended millimeters, named placement, and the peacock read.
  • Confirm crest stalk gaps and beak edges stay open at 1:1.
  • Confirm both neck contours run unbroken with open skin beside them.
  • Confirm every kept eye holds ring separations plus an open gap to its neighbors.
  • Confirm barbs between eyes read as one ranked direction with visible channels.
  • Export a true-size PDF with scaling off and measure the physical print.
Archetype fits placement first Verify eyes and gaps at 1:1 Crest, neck, train stay separate

FAQ

Peacock stencil decisions, answered

Short answers for the archetype, silhouette, eye-spacing, barb, and placement checks that recur when a peacock reference moves toward transfer-ready output.

Match the construction to the placement and the available room. Full-train displays suit broad flat panels such as the back, thigh, or upper chest from about 12 cm upward. Busts suit mid-size limb and shoulder fields from about 6 to 10 cm where species read matters more than the fan. Single eye-feathers suit narrow or small fields from about 5 cm upward where one vertical mark follows the body line. When the placement is still open, decide archetype first, because switching constructions rebuilds the whole stencil while eye edits only refine it.

Next steps

Use the neighboring owners for adjacent jobs.

This guide covers peacock archetype choice, crest, neck, and train vetting, eye-spot spacing with barb readability, and peacock-specific exact-size prep. Use the links below for related jobs such as sizing, print checks, paper, and placement.

Generic bird pose depth, single-plume feather depth, 28-animal gallery comparison, and general printing mechanics stay in their specialist owners. The links above hand off instead of repeating that detail.

From evaluated reference to working stencil

Turn the approved peacock into a stencil draft.

Start from the peacock that passed the archetype, silhouette, eye-spacing, and barb checks, then continue on iPhone for body fit, exact-size print, mirror and professional export.