

Single-plume stencil evaluation

Vet one feather before it becomes a stencil

A feather lives or dies on barb separation, shaft flow, and tip clarity. Check density against your exact length, confirm the curve holds its gaps, simplify fray into countable marks, then prepare a fine-line stencil that transfers as one clean plume.

Built for working artists preparing single-feather pieces. This page covers single-plume barb, shaft, curvature, gap, and tip preparation only, not tattoo application or healing advice. Whole-bird species work, cross-subject outlining, and photo conversion each live with their own owners and are linked, not repeated, below.

What makes a single plume stencil-viable

Barbs, shaft, and tip decide the result.

A feather is one shaft arc plus one readable vane. These three pillars predict whether that combination survives reduction, print, and transfer.

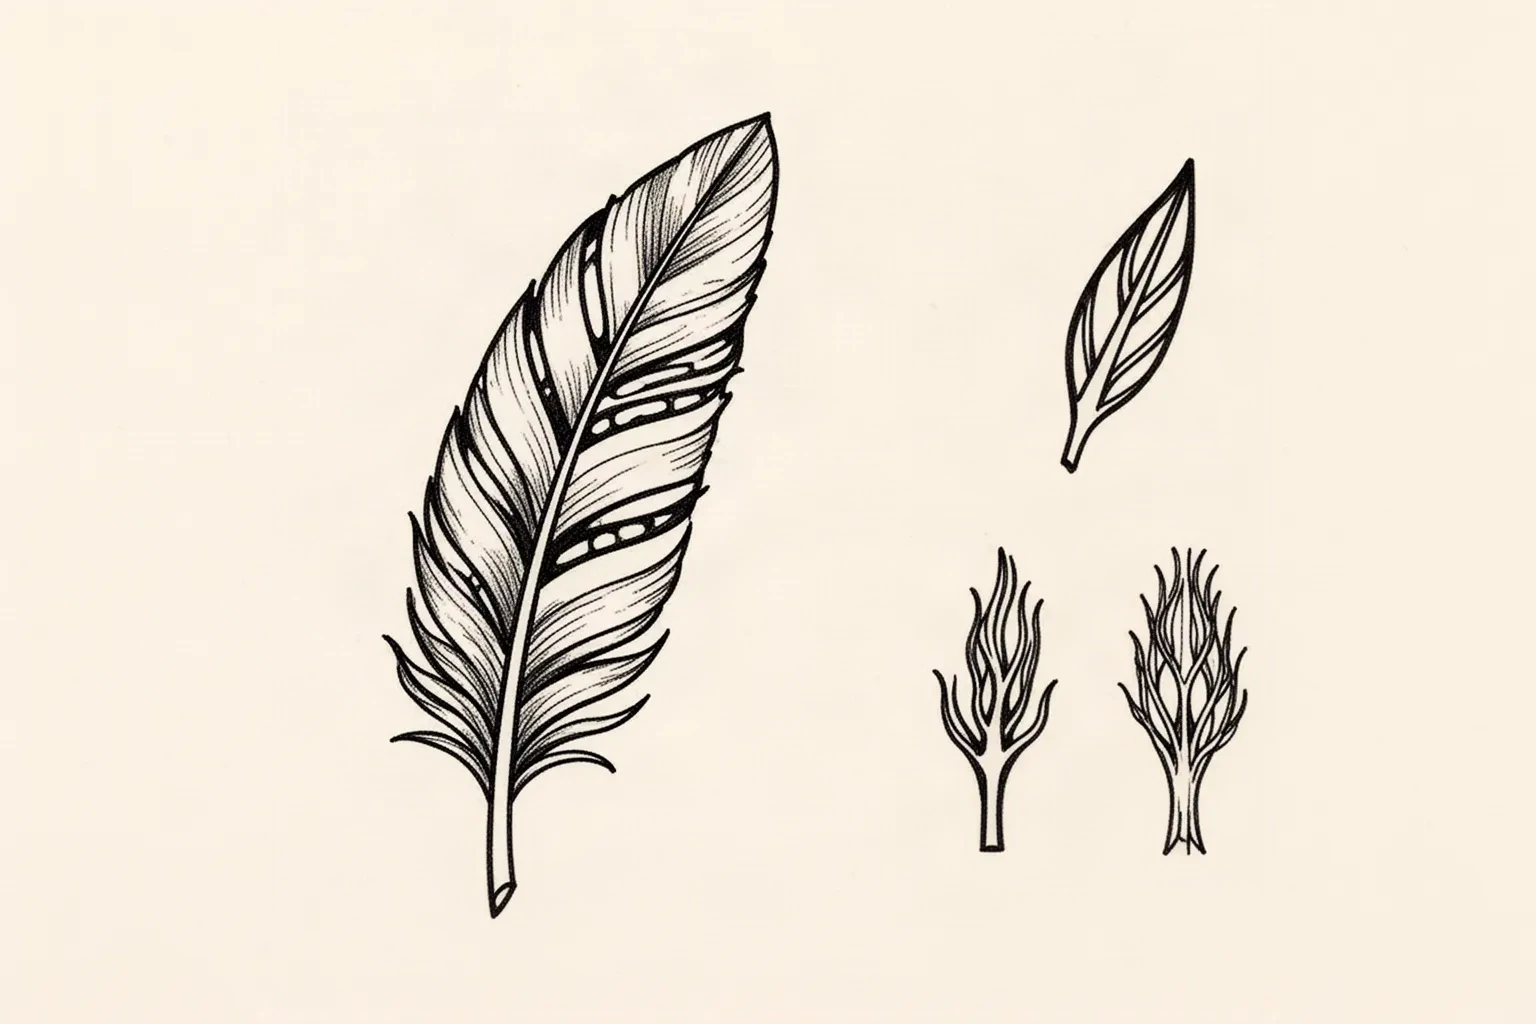
Fine-line stencil illustration of a single feather with a continuous tapered shaft and ranked barb groups separated by open gaps, beside small studies comparing a clean pointed tip with frayed split tips.

How to read the illustration

Original synthetic illustration, not client work or app output. The large plume shows the read order: one continuous tapered shaft, ranked barb groups with open gaps, and a single tip silhouette. The small studies compare a clean point with frayed, merged tips that close first at short lengths. Judge every separation at 1:1 on paper.

Barb density and gap ownership

A single plume reads as one central shaft with ranked barbs on both sides and open skin between the groups that matter. Photo reference shows hundreds of interlocked barbules and soft down that look delicate on screen, but a stencil can only carry separations that stay open through print, transfer, and skin. Viability comes from naming which barb groups carry the read and which gaps must stay open at the intended millimeter length, because every closed channel prints as one band.

Check: Cover the shaft. If the remaining barb groups still suggest one feather direction with visible separations at a glance, density is sound. If removing the shaft leaves gray texture with no countable gaps, thin barb rows before touching shaft mass.

Shaft flow and rachis continuity

The rachis is the load-bearing line of the whole piece. It sets curve, taper, calamus placement, and the angle at which each barb leaves the shaft. Stencil failure starts here when the shaft thins into the vane, kinks at a bend, or loses its lower quill to shading. Transfer needs one continuous shaft path from quill base to tip with a clear taper, plus barb angles that stay consistent on each side of each bend.

Check: Trace the shaft edge to edge at true size with one finger. If the path runs unbroken from base to tip with barbs leaving it at readable angles, flow holds. If the shaft disappears into vane texture or kinks where barbs crowd, rebuild the shaft first.

Final-size outline and tip read

Small feathers are judged by silhouette, not barb count. Vane width, curve direction, tip shape, and the calamus base carry the read from across the room. Frayed tips, split vanes, afterfeather fluff, and decorative curls are second-read detail that must each keep its own skin break, or the tip prints as one blob. Screens forgive crowding that paper and skin do not, so this pillar is always judged at the exact physical length.

Check: Squint at the reference at the exact physical length until fine barbs disappear. If curve, width taper, and tip shape still read as one feather, the outline holds. If the tip or base merges into texture, reopen those contacts first.

Single-plume evaluation framework

Score the reference in minutes, then act on the weakest check.

Four single-plume constructions at labeled lengths. Each one names the protected structure, the fix, and the go or no-go verdict at that exact length. Confirm with a measured 1:1 print.

HOLDS AT STATED SIZE

Smooth single plume with open barb groups at 10 cm

Intended length 100 mm

Reference read

One gently curved feather with a continuous shaft, evenly spaced barb groups, a defined tip, and a short quill base. Calm on screen because vane edges are clean and barb angles stay consistent down the shaft.

Protect
Shaft path from quill to tip with its taper, vane width on both sides, tip shape, and the widest barb separations that carry the read.
Fix
Keep one ranked barb family per side with open skin between groups, hold the tip to one clean point or one held notch, and keep the quill short with open skin around it. If one barb channel closes, shorten only the shortest overlapping barb before changing vane mass.
Candidate stencil
Same plume with one ranked barb family per side, a continuous tapered shaft, a clean or counted tip with skin breaks, and any script or motif cue kept outside the vane silhouette at transferable mass.
Final-size verdict
Holds at 10 cm after a gap-clearance check. Every ranked separation stays open at 1:1, the shaft reads as one path, and the curve carries the piece from a normal viewing distance.

THIN BARBS FIRST

Dense soft plume with fluffy base at 8 cm

Intended length 80 mm

Reference read

Full soft feather with dense down near the base, many thin parallel barbs through the mid vane, and a narrow tip. Rich on screen because fine barbules fill every gap, which is exactly what closes first on paper.

Protect
Shaft flow with its curve, overall vane width taper, tip position, and the two or three widest barb separations per side.
Fix
Convert base down into open skin or one clean calamus contour, reduce mid-vane barbs to one ranked family per side, and convert the finest barbules into spaced stipple or remove them. Do not keep full down plus full barbules plus a detailed tip together at 8 cm.
Candidate stencil
Same plume with one ranked barb family per side, a continuous tapered shaft, a clean or counted tip with skin breaks, and any script or motif cue kept outside the vane silhouette at transferable mass.
Final-size verdict
Not stencil-ready until base fluff and mid-vane density are reduced. Shaft curve and vane taper can stay, because barb channels and the quill contact merge first at this length.

REFLOW CURVE OR ENLARGE

Tightly curled plume with crowded inner barbs at 9 cm

Intended length 90 mm

Reference read

Feather bent into a tight curl with barbs compressed on the inside of the bend and splayed on the outside. Dynamic on screen, but inner-bend channels share one narrow field and touch before print.

Protect
Entry angle at the quill, exit direction at the tip, vane width at the bend apex, and the two outer-bend separations that carry the motion read.
Fix
Open the curl radius until every inner-bend channel holds open skin at 1:1, or straighten the shaft into a gentler arc and re-hang the barbs at consistent angles. If the curl must stay tight, enlarge past the point where inner channels transfer as separate marks.
Candidate stencil
Same plume with one ranked barb family per side, a continuous tapered shaft, a clean or counted tip with skin breaks, and any script or motif cue kept outside the vane silhouette at transferable mass.
Final-size verdict
Holds at 9 cm only after the bend is opened or the piece is enlarged. Curve energy comes from one clean shaft arc with countable barbs, not from barb count inside a kink.

ENLARGE OR RECROP

Frayed tip with split vane and fine filaments at 5 cm

Intended length 50 mm

Reference read

Small feather with a split tip, several hairline filaments past the vane edge, and fine notches along both margins sharing one short field. Delicate on screen with hairline separations that share the same room.

Protect
Shaft direction with tip placement, and the vane width that gives the feather its body.
Fix
Enlarge past the point where every tip filament and margin notch transfers as open skin, or recrop to the shaft plus one clean tip with filaments removed. Do not keep split tips plus loose filaments plus margin notches together at 5 cm.
Candidate stencil
Same plume with one ranked barb family per side, a continuous tapered shaft, a clean or counted tip with skin breaks, and any script or motif cue kept outside the vane silhouette at transferable mass.
Final-size verdict
At 5 cm the filaments function as one scratch and tip notches fill in. Enlarge, recrop to one clean tip, or choose a bolder smooth construction for this length.

Barbs, shaft, curve, and tip at final size

Judge the white space at the length you will print.

Screens forgive crowding that paper and skin do not. Set the length first, then inspect each feature below at true physical size with scaling off.

About 5 cm and below

Finger sides, behind-ear marks, wrist accents, and small gap fillers.

Carry one smooth plume with one ranked barb family, one clean tip, and a short quill. If a barb channel, tip notch, or quill gap closes at 1:1, enlarge or reselect rather than forcing reduction.

About 6 to 10 cm

Common forearm, ankle, shoulder, and rib feather pieces.

The most flexible band for single plumes. A ranked vane with a held tip or a gentle curve can work when every barb separation, shaft edge, and tip gap is verified at true size.

About 12 cm and above

Thigh, upper back, chest, and showcase fine-line compositions.

Room for a longer shaft with a held curl, a split tip with counted filaments, or paired plume-and-script spacing, but only when open skin separates every barb group, every tip mark, and every cue contact. Extra length does not rescue merged barbs or filled tips.

Feather feature checks by length band
FeatureAbout 5 cm and belowAbout 12 cm and above
Barb groupsOne ranked family per side only. Keep the heaviest mass on the outer vane edge; if that edge disappears, the feather becomes a plain blade.Two ranked groups maximum with open skin between them. Mirror density sensibly rather than copying barb for barb across the shaft.
Shaft and quillOne continuous shaft with a clear taper plus a short quill with open skin around it. If shaft and vane share one mass, the feather loses its spine.Same priority plus hollow-quill read when the design needs it: one outer plus one inner quill edge with open skin between them.
CurvatureGentle arcs only. Tight curls compress inner barbs into one band at this band, so open the radius or straighten before thinning barbs.One held curl allowed when every inner-bend channel stays countable at 1:1. Protect entry and exit angles before adding barb detail.
Tips and frayOne clean point or one held notch. Loose filaments, splits, and margin notches merge first and should be removed at small lengths.Counted filaments allowed only when each keeps its own skin break at 1:1. Split tips need a skin channel from the notch to open air.

Reference to clean stencil

Build from the shaft outward, then protect the gaps.

Work in this order so one change at a time can be judged at the same length. Stop when shaft, vane, curve, tip, and cues each read correctly.

  1. 01

    Lock length, placement, and plume read first

    Set the intended physical length in millimeters, name the body area, and name the plume in one line: smooth contour feather, soft downy plume, curved accent feather, or frayed tip study. A plume that holds at 10 cm on a forearm can fail at 5 cm on a finger with no line being wrong on its own. Use the size calculator when target dimensions are still open.

  2. 02

    Verify shaft flow against the placement

    Match the curve to the body line: straight or gently arced shafts follow limb axes and rib lines, while held curls suit flat panels with room for the bend. Confirm the shaft fits the available length, then rank the composition: shaft path and vane taper first, barb groups second, tip detail and cues third. Resolve kinks, vane contact, and cue overlap before touching line weight.

  3. 03

    Set shaft-versus-vane roles

    Assign every mark a role: shaft and vane outline that carry the first read, support barbs that shape the vane, and texture that can be removed. Strengthen the shaft edges, outer vane edge, and tip outline first, keep inner barbs lighter, and mark one removable barb row or fluff patch that can go if gaps close.

  4. 04

    Simplify barbs, curve, and tip at 1:1

    Reduce barb families, open the curl radius until inner channels hold, hold the tip to counted marks with skin breaks, and keep script, birds, or floral cues outside the vane silhouette. Run a squint check: step back until fine barbs disappear and confirm the shaft arc, vane taper, and tip still read. The line-weight guide covers fine, normal and bold behavior on the same stencil.

  5. 05

    Verify print and transfer path

    Export a true-size PDF with no fit-to-page scaling, inspect the narrowest barb gap, the tightest inner-bend channel, and the smallest tip separation on plain paper, then measure the physical print with a ruler. Keep lines at a transferable mass for fine-line work and avoid hairlines that look clean on screen but skip on skin. If the digital file passes and only paper fails, move to print-stage evidence instead of simplifying again.

Placement and composition decisions

Straight plumes want a limb axis, curls want flat width

A feather is either a vertical shaft line or one held arc. Flat placements preserve curls and tip detail with little compensation, while wrapped placements demand the matching shaft line.

Forearm and calf

Long fields where a straight or gently arced plume runs well along the limb axis. Cross-limb curves crowd vane edges fast and tendon movement punishes fine barbs.

Check: Align the shaft with the limb line, shorten cross-limb barbs while edits are still cheap, and confirm tip and quill clearance at the exact millimeter length.

Ribs and side torso

Curved breathing panels where the shaft arc must follow the body line. Flat reference curls distort when wrapped, and inner-bend barbs compress further.

Check: Open the curl radius past the point where inner channels hold on a curve preview, keep the tip clear of the underarm fold, and verify every barb gap at 1:1 before print.

Shoulder, thigh, and back

Broad panels with room for longer shafts, held curls, and plume-and-script spacing. The extra room tempts extra barb rows that still need separations.

Check: Spend the extra length on barb channels, tip filaments, and cue spacing first, then decide whether a second barb family earns its detail.

Wrist, ankle, finger, and behind ear

Small wrapped fields where only smooth minimal plumes survive. Fray, splits, curls, and paired cues forced into these bands merge first.

Check: Carry one ranked barb family with one clean tip and no extra cues. Preview on a body photo before locking the layout, and enlarge or reselect at the first closed gap.

Stencil-ready checklist

Approve the feather only when every line passes

Run this short sequence with scaling off and a ruler in hand. One failed line means fix, enlarge, or reselect before transfer.

  • Confirm intended length in millimeters, the named placement, and the plume read.
  • Confirm ranked barb groups with open skin between separations at 1:1.
  • Confirm one continuous shaft path with a clear taper from quill to tip.
  • Confirm curvature holds every inner-bend channel open with no kink contact.
  • Confirm the tip reads as one clean point, held notch, or counted filaments with skin breaks.
  • Export a true-size PDF with scaling off and measure the physical print.
Ranked barbs first Verify gaps at 1:1 Shaft, curve, tip stay separate

FAQ

Feather stencil decisions, answered

Short answers for the barb, shaft, curve, tip, and placement checks that recur when a single plume moves toward transfer-ready output.

It holds when three checks pass at the exact physical length: ranked barb groups keep open skin between separations at 1:1, the shaft runs unbroken from quill to tip with a clear taper, and the tip plus any curl keeps every channel open without kink contact. If any check fails, the fix list on this page names what to thin, reflow, enlarge, or recrop before transfer.

Next steps

Use the neighboring owners for adjacent jobs.

This guide covers single-plume barb density, shaft flow, curvature, negative space, tip-fray checks, and fine-line transfer prep. Use the links below for related jobs such as sizing, print checks, paper, and placement.

Whole-bird species comparison, owl eye and disc depth, cross-subject outline generalities, photo-conversion mechanics, flash gallery browsing, paper manufacturing detail, and placement mechanics stay in their specialist owners. The links above hand off instead of repeating that detail.

From evaluated reference to working stencil

Turn the approved feather into a stencil draft.

Start from the plume that passed the barb, shaft, curve, and tip checks, then continue on iPhone for body fit, exact-size print, mirror and professional export.