

Franchise stencil evaluation

Vet the landmarks before the franchise becomes a stencil

Franchise pieces live or die on countable landmarks. Confirm the sphere, insignia, hair, and face construction that carries the read, convert flat color into transfer-safe lines with explicit floors, verify readability at final size, then prep a clean transfer.

Built for working artists handling client-requested franchise motifs. This page covers landmark vetting and stencil preparation only, not tattoo application or healing advice. Work from an original interpretation or a properly licensed reference. No franchise artwork is reproduced on this page. Sphere, insignia, face, and dragon options are judged as different constructions inside one landmark-first framework.

What makes a franchise motif stencil-viable

Landmarks, conversion, and gaps decide the result.

A franchise motif is one compact landmark set with ranked support. These three pillars predict whether that combination survives reduction, print, and transfer.

Landmark-first recognition

A franchise piece reads through two or three structural landmarks, not through shading or screen color. A wish-sphere reads through its outer circle plus star count and star spacing. A fighter face reads through spiked hair silhouette plus brow and eye construction. An insignia reads through its enclosing circle plus one inner mark. When any of those landmarks closes, crowds, or merges at final size, the piece stops reading as the franchise and becomes generic linework.

Check: Cover all shading, color fills, and aura effects. If the bare outline still names the intended element from two meters, the landmarks hold. If the read depends on orange fills, glow bands, or screen shading, the landmarks need repair before line weight changes.
Flat color becomes line or open skin

Franchise references store information as flat cel regions: filled spheres, blocked hair masses, solid insignia discs, costume panels. Transfer paper stores only lines and open skin, so every flat region must convert to one of three outcomes: a boundary line, a sparse tone mark, or open skin with the fill dropped. Cel shading bands that survive only as tone steps with no boundary line vanish on transfer and leave unstructured skin.

Check: List every flat region in the reference. Each one needs a named outcome (boundary, tone, or dropped). If two adjacent regions share one thin edge with only a color change between them, draw the missing separation or accept the merge before print.

Final-size gaps decide the verdict

Most franchise failures are inside the smallest third of the design: star points inside a sphere, eye corners and brow gaps on a face, hair-spike valleys, insignia inner counters, dragon whisker and scale separations. At final size these close into filled pockets. Stencil viability comes from counting those separations at 1:1 and keeping only the ones that stay open after healing.

Check: Print at the exact size, then count every inner gap with a loupe or phone zoom. Each counted gap must show daylight around it. Any gap that touches a neighbor is reopened, removed, or paid for with more size.

Franchise evaluation framework

Score the reference in minutes, then act on the weakest check.

Four landmark directions at labeled sizes. Each one names the protected structure, the fix, and the go or no-go verdict at that exact size. Confirm with a measured 1:1 print.

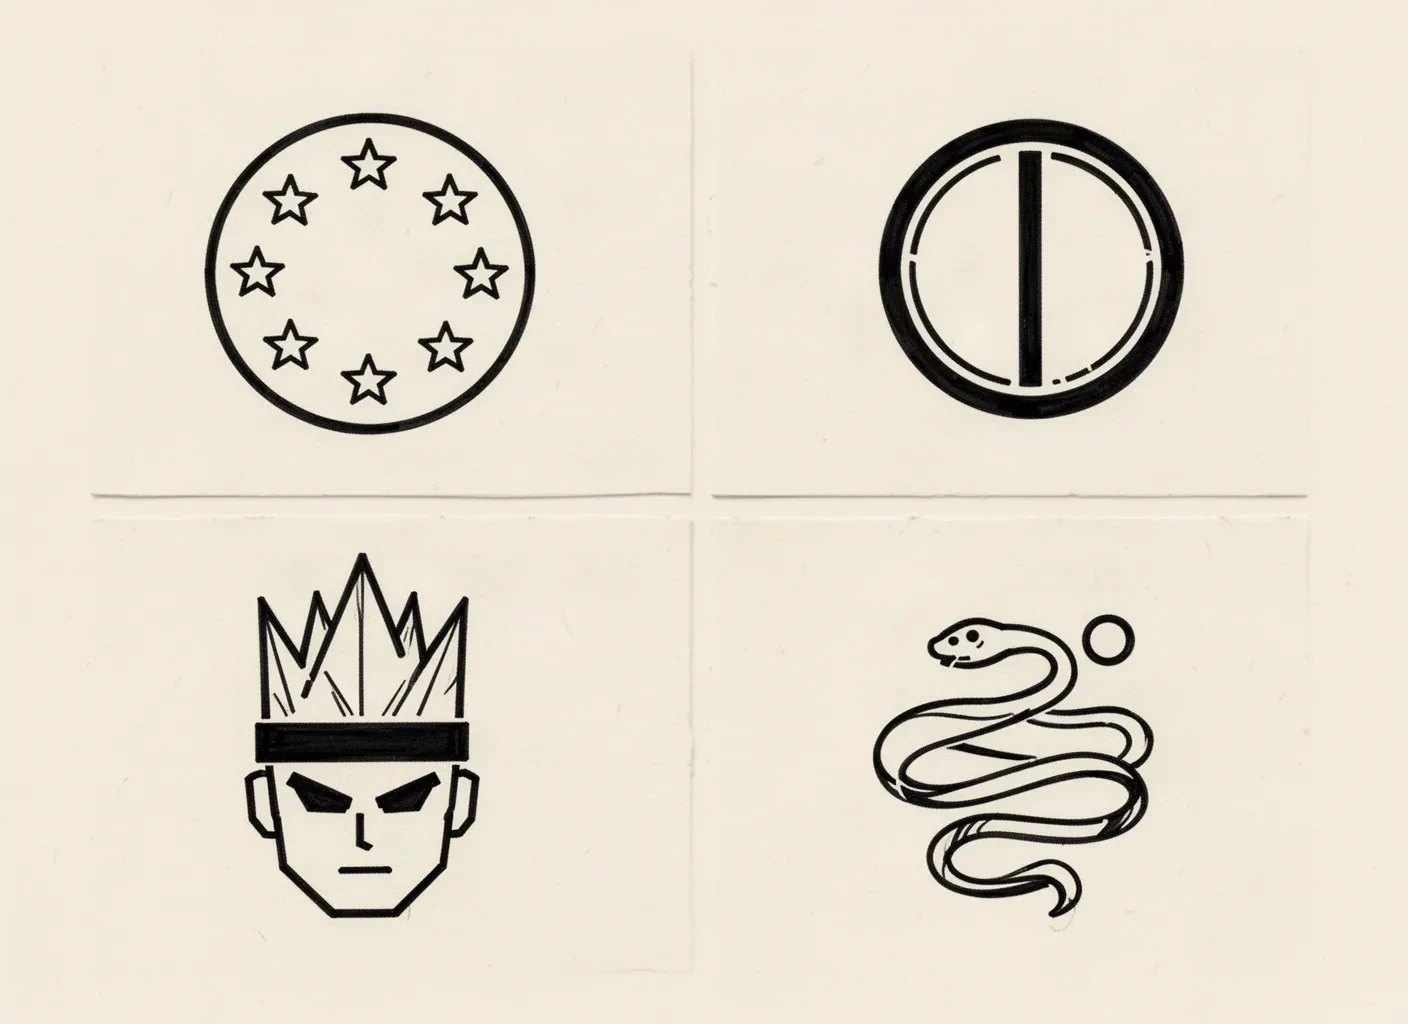
Original hand-inked construction plate with four abstract stencil studies: an open circle enclosing five separated star outlines, a closed ring with one inner mark, a generic spiked-hair fighter head with brow band and angular eyes, and a simplified serpentine coil beside a small circle accent.
Construction plate: four landmark families drawn as bare outline studies. Top left, a sphere read through its outer circle and separated stars. Top right, an insignia read through its ring and one inner mark. Bottom left, a face read through hair silhouette, brow band, and open eye corners. Bottom right, a coil read through a single open ribbon path. Synthetic editorial illustration made for this guide: abstract construction study, not franchise artwork and not app output.

HOLDS AT STATED SIZE

Wish-sphere with counted stars at 5 cm

Intended diameter 50 mm

Source pattern: Original stencil interpretation of a plain circle enclosing several small five-point star marks arranged inside it. Strong franchise read with simple geometry: one outer contour, open interior, and repeated star shapes as the only interior detail.

Protect
The outer circle as one continuous contour, open interior skin around every star, and each star point kept sharp with clearance to its neighbors and to the rim.
Fix
Reduce the star count or enlarge the sphere until every star keeps open skin on all sides at 1:1. Never thin the outer circle to save crowded stars; remove or respread a star instead.
Candidate stencil
Same landmarks with the outer contour held continuous, inner gaps bounded with open rims, flat color converted to line or open skin, and protected landmark contours held at transferable mass.
Final-size verdict
Holds at 5 cm once every star verifies open at true size. The most forgiving franchise direction and the best choice for wrists, ankles, and behind-ear fields.

REOPEN INNER GAPS

Fighter face with spiked hair and brow construction at 9 cm

Intended height 90 mm

Source pattern: Original interpretation: tall spiked hair silhouette, heavy brow band, narrow angular eyes, small nose hint, and a firm mouth line. Convincing on screen, but hair-spike valleys, brow-to-eye gaps, and eye corners share merged edges with shading bands or speed marks.

Protect
The full hair silhouette with readable spike valleys, the brow band as its own span, and both eye shapes with open corners plus the mouth line kept clear of the chin edge.
Fix
Reopen every hair valley and both eye corners until each shows skin at true size, reduce the face to one brow plus one eye pair plus one mouth line, and remove shading bands or aura ticks that touch the hair or brow. Do not thin the hair contour to save extras.
Candidate stencil
Same landmarks with the outer contour held continuous, inner gaps bounded with open rims, flat color converted to line or open skin, and protected landmark contours held at transferable mass.
Final-size verdict
Holds at 9 cm once hair valleys, brow gaps, and eye corners each keep daylight at 1:1. Brow-to-eye contact is the most common transfer failure for this landmark set.

SIMPLIFY AURA FIRST

Battle-ready figure with aura and motion marks at 12 cm

Intended height 120 mm

Source pattern: Original full-torso interpretation with layered hair panels, costume folds, boot and glove separations, plus flame-like aura bands and motion ticks around the body. Dramatic as illustration, but aura bands carry no stencil separation and costume folds crowd the torso read.

Protect
Body and hair silhouette, one brow and eye construction, costume panel direction, and the single widest gap in the composition.
Fix
Convert aura bands into two fully separated outer marks clear of every limb or remove them, reduce costume folds to one contour per panel, and keep hands to simplified masses with one separation each. Verify limb-to-torso gaps at 1:1 before print.
Candidate stencil
Same landmarks with the outer contour held continuous, inner gaps bounded with open rims, flat color converted to line or open skin, and protected landmark contours held at transferable mass.
Final-size verdict
Not stencil-ready until aura tone becomes spaced line or open skin. Aura bands merge into one pocket at transfer while the silhouette and face construction can stay.

ENLARGE OR RECROP

Serpentine dragon with whiskers and scale rows at 8 cm

Intended length 80 mm

Source pattern: Coiled serpentine dragon with layered scale rows, whisker sweeps, claw separations, and a sphere accent. Attractive on screen but built from a dozen sub-5 mm marks with almost no open skin between scales, whiskers, and claws.

Protect
The body coil path and the head placement that give the composition its direction.
Fix
Enlarge past 14 cm so scales, whiskers, and claws each keep clearance, or recrop to head plus one coil or sphere plus one coil with no scale rows. Do not keep whiskers, scale grids, and claws together at 8 cm.
Candidate stencil
Same landmarks with the outer contour held continuous, inner gaps bounded with open rims, flat color converted to line or open skin, and protected landmark contours held at transferable mass.
Final-size verdict
At 8 cm the scales and whisker roots function as one band and the claws print as filled nubs. Enlarge, recrop, or choose a single emblem direction for this length.
Sphere vs face vs dragon decision
ChoiceChoose whenStrengthsCosts
Sphere or insignia emblemSmall placements, first franchise pieces, or symmetric panels where a fast read matters.Simplest construction, gaps are geometric and easy to verify, holds smallest, heals most predictably.Less character drama, needs clean circles and counted stars, weak spacing reads as a generic ball or badge.
Fighter face or bust centerpieceMedium placements where the client wants character recognition without a full scene.Strong silhouette read through hair plus brow, scales into medium compositions.Needs more height, fails first at spike valleys and eye corners, shading must convert to line or open skin.
Dragon or full-figure compositionLarge placements where the whole creature or battle pose is the point and coils plus costume can spread.Strong panel anchor, room for coils and accents, works as a thigh or back centerpiece.Needs the largest size, scales and aura bands fail first, every gap must be verified at 1:1.

Broad anime character comparison stays on the anime collection. Literal dragon anatomy and composition stays on the dragon subject owner. Fantasy silhouette and detail control stays on the fantasy collection. This framework exists to judge franchise landmark separation and flat-color conversion at a stated size, not to replace those owners.

Outlines, color, and landmarks at final size

Judge the white space at the size you will print.

Screens forgive crowding that paper and skin do not. Set the size first, then inspect each feature below at true physical size with scaling off.

About 5 cm and below

Wrist and ankle accents, behind-ear marks, finger panels, and small gap fillers.

Carry one emblem only: a wish-sphere with counted stars or a circle insignia with one inner mark. Keep one contour family and two inner separations maximum. If a star point or insignia counter closes at 1:1, enlarge or reselect rather than forcing hair spikes, eyes, or scale rows.

About 6 to 10 cm

Common forearm, calf, shoulder, and ankle-to-calf franchise pieces.

The most flexible band. Fighter faces, bust crops, and simplified insignia pairs can work when every inner gap verifies open at true size. Check spike valleys, brow gaps, eye corners, and star spacing before approving aura or costume texture.

About 12 cm and above

Thigh panels, back pieces, chest, and full sleeve sections.

Room for a full figure with restrained aura or a serpentine dragon with simplified scales, but only when open skin separates every spike, fold, whisker, and claw at 1:1. Larger height never rescues merged eye corners, joined insignia counters, or a dot-covered sphere.

Franchise conversion floors by size band
FeatureAbout 5 cm and belowAbout 12 cm and above
Hero outline and hair silhouetteHeaviest lines on the page. The outer sphere circle, hair silhouette, or insignia ring must stay continuous. If a hero contour breaks, the franchise read is lost and no interior detail can restore it.Same priority. Larger panels allow slightly finer interior rims, but separability still beats uniform thinness across every spike valley and ring edge.
Flat fills and cel shading bandsConvert fills to open skin bounded by real lines; carry at most one sparse tone cluster. Shading bands inside hair or costume merge into one pocket at small sizes.One tone zone per region can work when every band keeps an open gap at 1:1 and adjacent regions never share a single-weight edge they both depend on.
Eyes, brows, stars, and insignia marksProtect open skin around each eye, at both eye corners, around every star, and inside every insignia counter. Merge means a bolder anchor pair or a larger size, not thinner detail.Extra brow modeling or additional stars can join when each keeps its own clearance at 1:1. Check the full emblem at arm's length on the physical print.
Aura, whiskers, scales, and propsKeep no aura field and no second prop. One small sphere accent needs its own clearance at this size, otherwise recrop it to the sphere or the figure alone.One aura sweep, one whisker pair, or one sphere accent can add tone when the landmarks dominate clearly. Equal-weight effect bands or scale grids need hierarchy work before print.

Reference to clean stencil

Build from the landmarks outward, then rank the support.

Work in this order so one change at a time can be judged at the same size. Stop when sphere, insignia, face, and dragon gaps each read correctly.

  1. 01

    Lock size, placement, and landmark set first

    Set the intended physical width, height, or diameter in millimeters, name the body area, and choose one lead landmark set before judging the reference: wish-sphere, circle insignia, fighter face, or dragon coil. A sphere that holds at 5 cm on a wrist and a dragon that needs 14 cm on a thigh are different decisions. Use the size calculator when target dimensions are still open.

  2. 02

    Assign the recognition carrier

    Decide which single shape carries the read, then rank everything else as support. Protect the carrier geometry first: sphere circle plus star spacing, hair silhouette plus brow band, or insignia ring plus inner mark. Resolve star-to-rim contacts, brow-to-eye contacts, and whisker-to-scale contacts before touching line weight.

  3. 03

    Convert flat color to line outcomes

    Give every flat region one role: boundary line, sparse tone, or dropped open skin. Promote every color-only edge to a real line at interior weight or merge the regions openly, reduce cel shading bands to one sparse cluster maximum, and mark one removable tone group that can go if gaps close.

  4. 04

    Simplify at 1:1 and run the gap checks

    Reduce stars, spike rows, aura bands, scale grids, and insignia texture before thinning contours. Keep open skin inside the outer shape and around each inner mark, then run a squint check: step back until fine texture disappears and confirm the landmarks still read. The line-weight and density guides cover fine versus bold behavior and final-size readability on the same stencil.

  5. 05

    Verify print and transfer path

    Export a true-size PDF with no fit-to-page scaling, inspect the narrowest star gap, both eye corners, the tightest spike valley, and the smallest insignia counter on plain paper, then measure the physical print with a ruler. If the digital file passes and only paper fails, move to print-stage evidence instead of simplifying again.

Placement and landmark decisions

Emblems want axis, figures and dragons want width

Compact spheres and insignias want a clear axis that survives curvature, while faces, figures, and dragons want centered panels that preserve symmetry. Narrow limbs demand a vertical crop.

Thigh and back

Broad flat fields where a dragon coil or a full figure with one sphere accent can spread symmetrically. Width is the asset, so coil loops and aura sweeps need spacing checks rather than compression.

Check: Center the lead landmarks on the flattest span, mirror paired hair spikes or coil loops, and verify tip and loop spacing at 1:1 before print.

Outer forearm and calf

Long narrow fields where the composition should follow the limb axis. Wide coils and spread aura wrap fast and crowd inner gaps.

Check: Choose a vertical face crop, sphere stack, or slim insignia for these fields, align the landmark axis with the limb, and shorten cross-limb coil or aura width while edits are still cheap.

Chest and shoulder

Large curved panels with room for a bust with an accent or a medium dragon head. The curve compresses one side of wide compositions in photos and transfers.

Check: Center the lead landmarks on the flattest span, let support coils or aura fall toward the slope, and keep costume detail to one panel family maximum.

Wrist, ankle, hand, and behind ear

Small wrapped fields where only a recrop survives. Dragon scale grids, full faces with shading, and aura forced into these bands merge first.

Check: Recrop to a wish-sphere, a circle insignia, or a minimal hair-plus-brow mark without aura or scales, then run the small-size checks at the exact width.

Stencil-ready checklist

Approve the motif only when every line passes

Run this short sequence with scaling off and a ruler in hand. One failed line means fix, enlarge, or reselect before transfer.

  • Confirm intended size in millimeters, the named placement, and the single lead landmark set.
  • Confirm the outer contour stays continuous with open skin inside it at 1:1.
  • Confirm each star, eye corner, spike valley, and insignia counter reads separately with open skin around it.
  • Confirm aura, scales, whiskers, and costume folds stay countable with no merged bands.
  • Confirm accents total support only, with no contact on landmark edges.
  • Export a true-size PDF with scaling off and measure the physical print.
Verify gaps at 1:1 One landmark set leads

FAQ

Franchise stencil decisions, answered

Short answers for the landmark, conversion, floor, size, original-art, and step checks that recur when a franchise motif moves toward transfer-ready output.

Counted stars inside a clean sphere circle, a spiked hair silhouette with open valleys plus a brow and eye construction, and a circle insignia with one inner mark identify best. Reject references where star points touch the rim or each other, brow bands fuse with eyes, hair valleys fill in, insignia counters close, or whisker and scale rows share edges. If a landmark needs shading or color memory to read, it is not stencil-ready at that size.

Next steps

Use the neighboring owners for adjacent jobs.

This guide covers franchise landmark checks, flat-color conversion floors, sphere versus face size rules, and reference-to-stencil preparation. Use the links below for related jobs such as conversion, dragon depth, sizing, print checks, paper, and placement.

Broad anime comparison, literal dragon composition, fantasy silhouette method, generic cartoon bold-line steps, paper manufacturing detail, and placement mechanics stay in their specialist owners. The links above hand off instead of repeating that detail.

From evaluated reference to working stencil

Turn the approved landmarks into a stencil draft.

Start from the landmark set that passed the gap, size, and placement checks, then continue on iPhone for body fit, exact-size print, mirror and professional export.