

Dragon Tattoo Stencil Ideas
This collection compares four dragon stencil directions so you can choose a composition that will still read after simplification, transfer, and tattooing at your size a…
- 4
- Practical
- Artist-first
This collection compares four dragon stencil directions so you can choose a composition that will still read after simplification, transfer, and tattooing at your size and placement. Use it to judge first-read silhouette, scale texture against line hierarchy, head and claw legibility, and coil flow against the body zone before you generate a stencil from your own reference.
Choose a First-Read Silhouette Before Adding Detail
Every dragon here stays recognizable for a different reason. Decide which large structure should carry your design first, then let smaller detail support it.
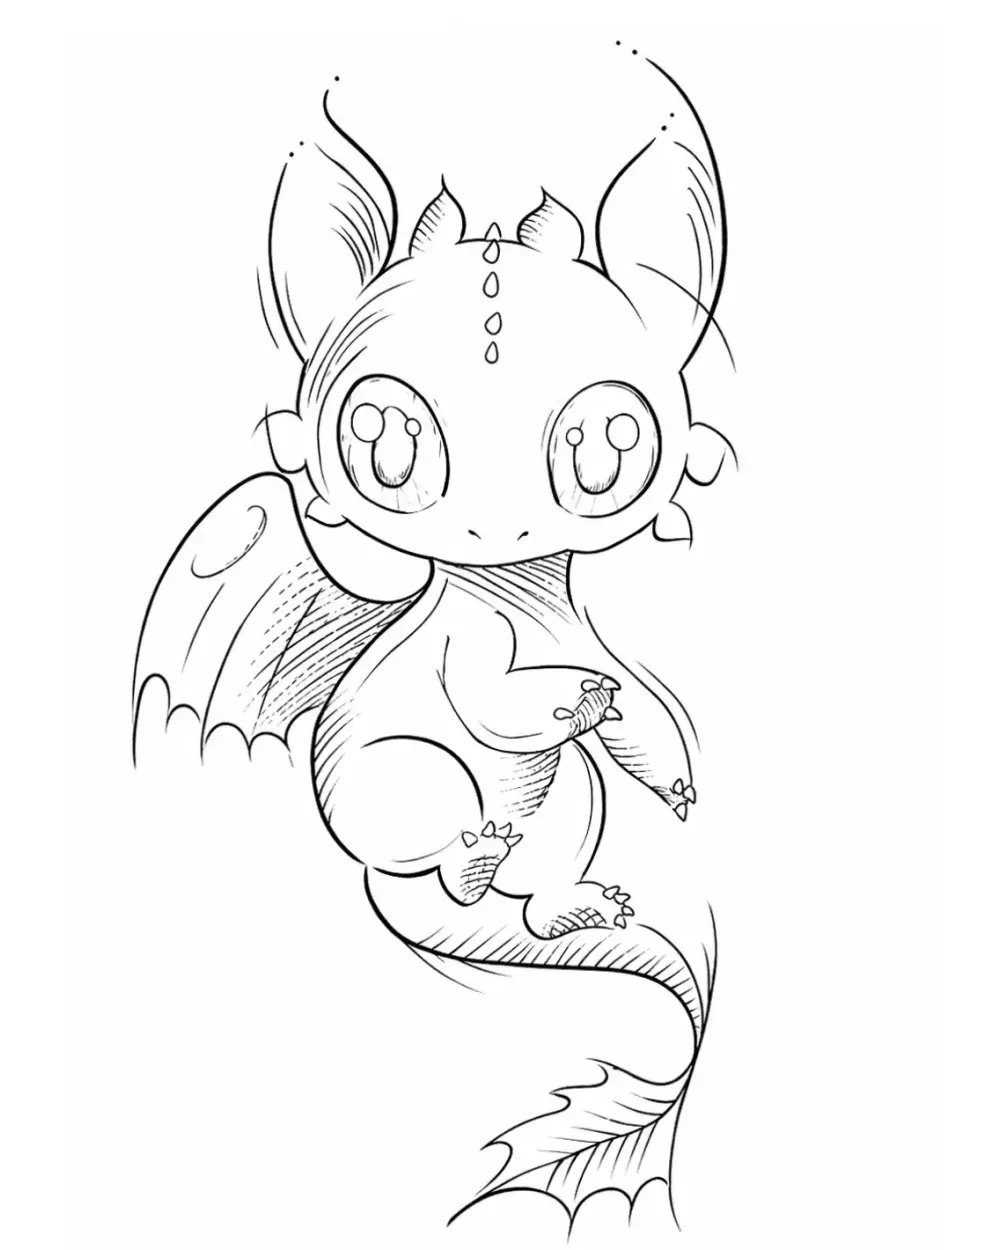
- Compact rounded dragon: the open baby dragon and the cute flash examples read through horns, wing silhouette, eye placement, and one continuous body curve. Choose this direction for small flash, wrist, ankle, behind-ear work, or any placement where the line budget is tight and the dragon must land in one glance.
- Serpentine coil with peony: the coiled dragon reads through an S-curve body, scale rows that follow the bends, and a head that leads the flow. Choose this direction for forearm, calf, thigh, and back work where the body zone gives the coil room to travel without doubling back on itself.
- Front-facing eastern head with flowing body: the frontal example reads through paired eyes, teeth grouping, horn spread, and whisker direction above a scaled body. Choose this direction for chest, upper back, and shoulder work where a head can anchor the composition and the body can extend or wrap below it.
If you are comparing across creatures rather than within dragons, browse the broader fantasy stencil collection to see how dragons, kitsune, winged deer, hybrid warriors, and witchy creatures handle silhouette and detail control differently.
Let Line Hierarchy Lead and Scale Texture Follow
Dragon scales fail when they are treated as equal to the main structure. In the serpentine and eastern examples, the stencil works only when the outer body contour, head shape, and limb or tail direction are established before scale rows are read.
A practical order for stencil prep is:
- Keep the outer body contour and head shape continuous and dominant.
- Keep the head landmarks (eyes, nose, teeth grouping, horn bases) separated with real negative space.
- Keep wing membranes and tail tip edges open so they do not merge into the torso.
- Add scale texture last, as a rhythm that follows body volume rather than as uniform fill.
Scale rows should get wider and simpler on inner bends, where compression makes tight marks close first. This matches the common pro warning that scales must follow body volume lines and stay spaced enough to survive line spread over time. When in doubt, remove a full row of small scales before weakening the contour, head, or wing edge that identifies the dragon.
Use the Tattoo Stencil Line Weight Guide when the question is which close lines are most likely to merge, and the final-size detail diagnostic when the whole design feels dense at the intended width.
Keep Head, Claws, Wings, and Tail Legible
Viewers identify a dragon from a small set of cues. Horns, eyes, teeth, wing shape, claw separation, and tail tip shape do more work than any individual scale.
- Head: paired eyes, nose width, mouth line, teeth grouping, horn placement, and whisker direction should each have their own separation. In the frontal eastern example, teeth and whiskers are the tightest cluster. Simplify those before touching eye and horn structure.
- Wings: the membrane edge should read as one shape before interior finger lines matter. In the compact examples, the wing survives because the outer edge is clean even though interior detail is minimal.
- Claws and feet: keep toe separation visible at final size. Small talon divisions are among the first marks to fill on skin.
- Tail tip: protect the gap between tail edge and nearby body, peony petals, or wave accents. The serpentine example depends on that separation to keep the coil from becoming one dark mass.
Adapt Coil and Flow to the Body Zone
A dragon that looks good flat can still fail on the body when the coil fights the anatomy. Pick the silhouette that fits the zone, then adjust the flow before generation.
- Forearm and calf: favor the serpentine coil running along the limb. Let the head sit near the wider end, keep the S-curve gentle, and avoid sharp hairpin bends where scales stack. Check the wrap from two viewing angles so the tail does not disappear behind the limb.
- Thigh and back: these zones accept the longest coil or a head-led composition with more scale texture. This is where the peony pairing helps, because the flower can fill a broad plane without forcing the dragon to double back.
- Chest, shoulder, and upper back: favor the frontal head to anchor symmetry or one shoulder, then let the body extend along the collarbone, shoulder cap, or spine. Keep horn tips and wing points clear of the neck edge and armpit fold.
- Wrist, ankle, hand, and behind ear: favor the compact rounded direction with almost no scale texture. If horns, wing membranes, or tail tip start to close at the test size, the design needs a larger placement or a simpler silhouette, not finer lines.
For the reasoning behind wrap, taper, rotation, and body-line checks, use the placement guide as the owner for body fit. For exact width, page layout, and a true-size PDF, use the Tattoo Stencil Size and Print Calculator to inspect the finished stencil at real physical size before printing.
Run the Small-Size Readability Check
Do not judge a dragon stencil zoomed in. Reduce the finished stencil to the intended physical width and inspect the tightest clusters first.
- Print or preview at 1:1 scale and check scale rows on inner bends, teeth and whisker zones, claw separations, wing membrane gaps, and any peony or wave accents touching the body.
- Simplify the first cluster that closes. That usually means removing small scales, secondary petal veins, wave ticks, or shading dots before changing the head, contour, or wing structure.
- Keep at least one clear channel of skin between the dragon and any supporting flower, wave, or cloud shape. Negative space is what prevents the transfer from reading as texture.
- Re-check after every simplification pass. A dragon often needs two rounds: one for the tightest texture, then one for the next competing layer.
If the paper or print path is still unresolved, keep those decisions separate. The paper guide owns media selection, and generation owns converting your reference into a stencil.
Bring a Prep-Checked Direction Into Generation
These are curated dragon stencil examples for visual comparison, not a separate dragon generator. When your direction is settled, prepare your own reference with the photo-to-stencil workflow, then generate one stencil online when the source is ready.
A clean handoff includes:
- chosen silhouette (compact, serpentine coil, or frontal head-led) and why it fits the zone;
- intended physical width and placement, checked at 1:1 scale;
- which detail stays (head landmarks, contour, wing edge, tail separation) and which texture was already removed;
- reference images with clear dragon structure, not just mood or color;
- paper and print checks left for their own step rather than mixed into the design decision.
FAQ
Which dragon silhouette will still read after stencil simplification at my size?
The silhouette with the simplest large structure for your width usually wins. Compact rounded dragons survive smallest because horns, wings, eyes, and body curve carry recognition with few lines. Serpentine coils need limb, thigh, or back length so the S-curve and scale rows stay separated. Frontal eastern heads need chest, shoulder, or upper-back room so the face map and body flow do not compress into one dense block.
How do I keep scales, head, and claws legible without over-detailing the stencil?
Establish contour, head, wing edge, and tail separation first, then add scale texture as a secondary rhythm that follows body volume. Widen scale spacing on inner bends, preserve eye and teeth separation, keep toe divisions open, and remove the tightest secondary cluster at final size before weakening the main structure.
How do I adapt coil and flow to the chosen body zone?
Match curve length to available anatomy. Run serpentine flow along forearms and calves, give longer coils and peony support to thigh and back, anchor frontal heads on chest or upper back with the body extending below, and reserve compact rounded dragons for wrist, ankle, hand, and behind-ear placements. Verify wrap and viewing angle with the placement guide before generation.
What do I bring into generation so the stencil transfers cleanly?
Bring a chosen first-read direction, the intended physical width and body zone, a note on which head and contour landmarks must survive, a simplified reference where the tightest texture is already reduced, and a 1:1 size check. Use the photo-to-stencil workflow to prepare the source and the generator to convert it, then verify size, gaps, and line weight before printing.
Can I turn my own dragon reference into a stencil here?
This page is a comparison gallery, not a separate dragon generator. Use the photo-to-stencil workflow or the online generator for your own reference, then use these examples to judge silhouette choice, scale density, head and claw hierarchy, placement flow, and final-size readability.
How is this different from the fantasy collection?
The fantasy collection compares across creatures to show how different subjects handle silhouette and detail control. This page stays inside dragons to solve dragon-specific prep: first-read silhouette choice, scale texture against line hierarchy, head and claw legibility, coil flow by body zone, and a generation-ready checklist.
Examples
Dragon stencil examples
Compare the linework, spacing and detail choices that make each stencil read differently.
A compact rounded dragon where horns, wings, eye placement, and body curve carry recognition before any surface texture matters.
Explore more fantasy tattoo stencil group stencils
- The dragon reads immediately because the horn pair, wing silhouette, and curled body outline stay separated with generous open spacing.
- Small to medium dragon flash where a friendly first read must survive with a light line budget.
- Eye highlights, wing membrane edges, and tail tip separation are the first details to close; protect those gaps before adding scale marks.

A longer coiled dragon where body rhythm, scale rows, and head direction need to stay ahead of the peony support.
Explore more fantasy tattoo stencil group stencils
- The coil creates natural placement flow because the S-curve leads the eye from head through scaled body to tail while the peony sits as a secondary mass.
- Forearm, calf, thigh, and back placements where an extended serpentine flow can follow muscle direction.
- Scale rows along inner bends and petal edges near the body can merge; keep scale spacing wider on curves and let the peony simplify before the dragon structure weakens.

A head-led eastern dragon where eyes, teeth, whiskers, and horn spread establish the subject before body scales and wave accents.
Explore more fantasy tattoo stencil group stencils
- The frontal head holds attention because paired eyes, nose, teeth grouping, and horn spread form a stable map above the flowing scaled body.
- Chest, upper back, and shoulder placements where a frontal head can anchor a vertical or wrap composition.
- Teeth, whisker lines, wave edges, and small scale divisions compete at the same density; preserve eye and mouth structure first and simplify the tightest secondary cluster at final size.

A minimal cute dragon where a short body, small wings, and clear head shape must read with very few lines.
Explore more fantasy tattoo stencil group stencils
- The design stays unmistakably dragon because horns, wings, and tail shape are present even though the line count is low.
- Tiny flash, wrist, ankle, and behind-ear tests where only the strongest dragon cues can be kept.
- At very small sizes the horns, wing membranes, and tail tip can vanish; if any of those cues close, the design drifts toward generic creature flash.
Related galleries
Keep browsing nearby stencil ideas.
FAQ
Quick questions about dragon stencils.
The silhouette with the simplest large structure for your width usually wins. Compact rounded dragons survive smallest because horns, wings, eyes, and body curve carry recognition with few lines. Serpentine coils need limb, thigh, or back length so the S-curve and scale rows stay separated. Frontal eastern heads need chest, shoulder, or upper-back room so the face map and body flow do not compress into one dense block.
Next step
Turn your own reference into a clean stencil draft.
Use what reads clearly here as direction, then start from your own reference.