

Curse-mark stencil vetting

Pick the variant that survives transfer

A curse mark reads through thin flame tendrils and the skin gaps between them. Choose the variant your placement allows, prove every gap at final size, then lay out a transfer-ready stencil that keeps its symmetry on neck or shoulder.

Built for working artists preparing fandom-symbol pieces from original stencil linework. This page covers curse-mark variant choice, symmetrical flame-tendril shaping, thin-gap retention, and neck plus shoulder transfer prep only. It does not reproduce copyrighted artwork and does not cover tattoo application or healing advice.

Variant choice first

Three constructions, three symmetry demands.

Curse-mark requests arrive as one vague ask and stencil as three different geometries. Name the variant before judging any line, because each one fails in a different place.

Compact three-mark seal

Three small comma-shaped marks grouped in a tight triangle inside a compact field. This is the restrained pre-spread state: no flame tendrils, one readable cluster, minimal symmetry demand. It suits small neck placements where tendril geometry cannot hold separations.

Easiest to stencil and transfer at small sizes. Loses the dramatic flame read, so clients expecting spread tendrils need the expectation set before the session.

Check: If the field is under about 4 cm wide, start here. Verify each mark keeps its own skin break at 1:1 before considering any tendril extension.
Single-direction flame run

The mark cluster anchors one end while tapered flame tendrils run in one direction along the neck or shoulder line. Asymmetric by design, so the stencil judgment is flow and taper, not mirror symmetry. Tendril count stays low and each tip stays blunt enough to transfer.

Fits narrow neck-to-shoulder corridors well and wraps less than a spread. Requires disciplined taper: hairline tips vanish in transfer and needle-point tips blow out.

Check: Trace each tendril centerline at true size. If any tip narrows to a hairline or any two tendrils share one channel, widen, shorten, or remove one before print.

Symmetrical flame-tendril spread

Flame tendrils extend on mirrored paths from a central anchor, giving the broad wing-like spread associated with the activated state. This is the highest symmetry demand on the page: left and right tendrils must mirror in length, curve, and spacing while keeping open skin between every pair.

Strongest visual payoff on shoulder and upper-back fields with room for the span. Highest failure risk at small sizes because every tendril pair is a parallel-gap check, and one bridged gap collapses the symmetry read.

Check: Fold-test the layout at 1:1 along the centerline. If any mirrored pair differs in length or any inter-tendril gap closes, correct symmetry before judging line weight.

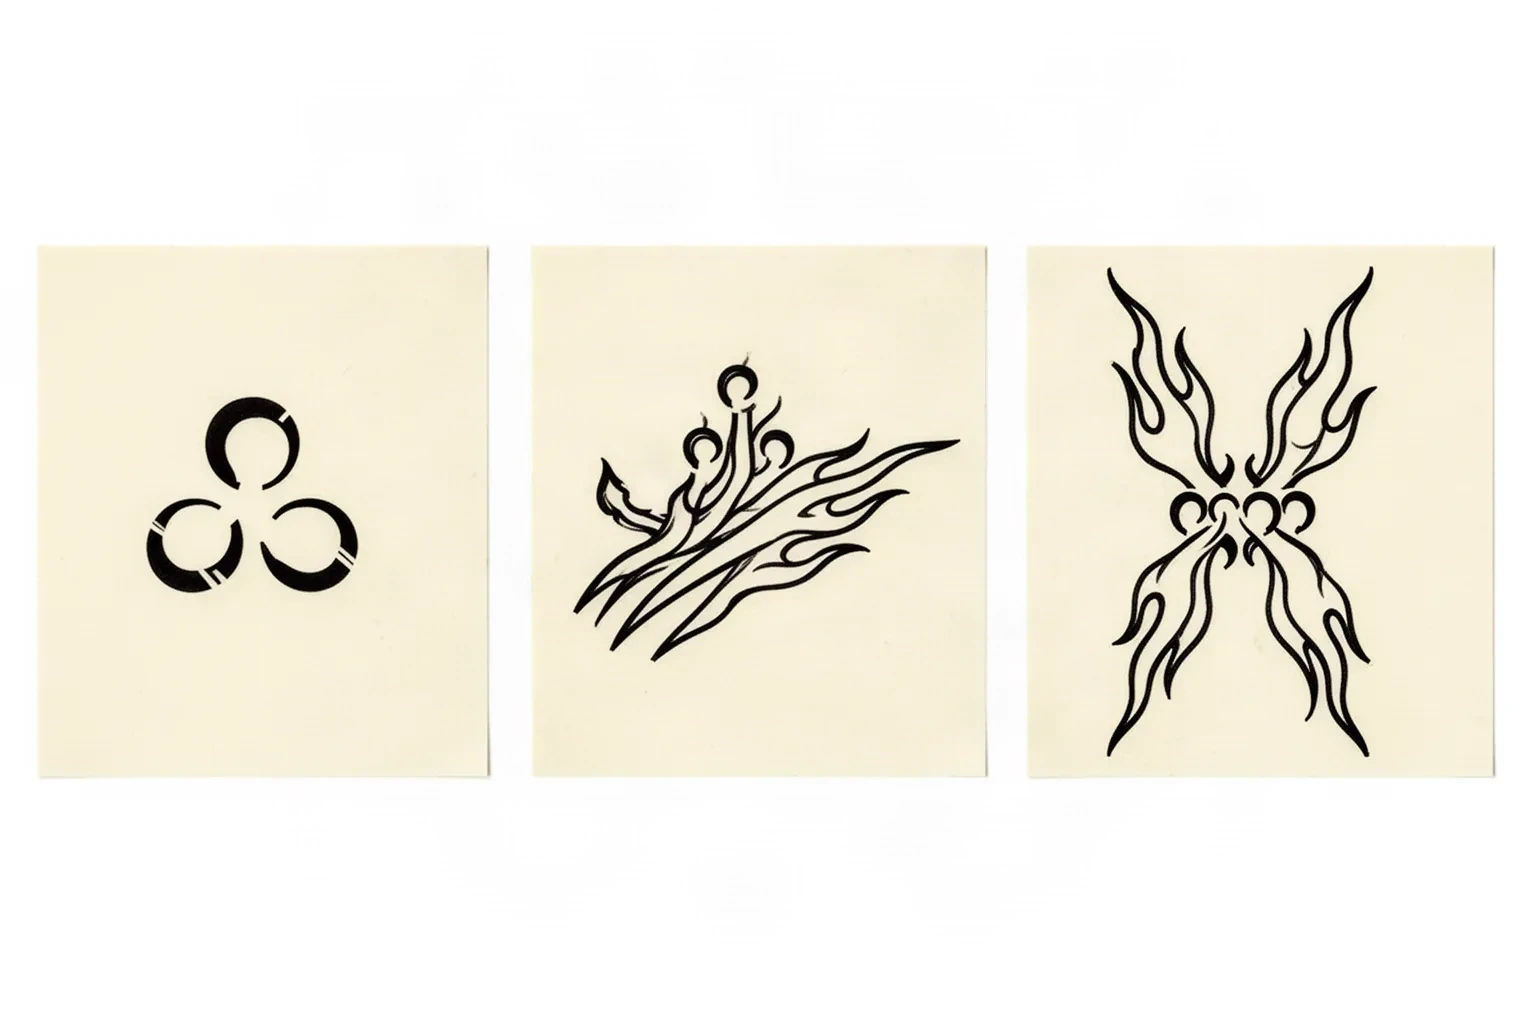
Three original black ink stencil studies on warm paper: a compact three-mark seal, a single-direction flame tendril run, and a mirrored symmetrical flame tendril spread.
Original StencilStudio linework illustration of the three construction families above, left to right: compact three-mark seal, single-direction flame run, mirrored spread. These are geometry studies only. They are not app output, not exact size proofs, and not reproductions of any published artwork.

How this differs from neighboring owners: the death-moth owner judges a skull island inside a furry body with wingspan symmetry, and broad anime gallery browsing compares characters across a collection. Neither owns flame-tendril gap retention or neck plus shoulder transfer layout for this geometry, which is judged here.

Thin-gap retention framework

Judge the white channels, not the black flames.

Flame spreads fail in the gaps first. These three rules plus three labeled-size constructions name the protected structure, the fix, and the verdict at that exact size.

Minimum tendril width at final size

Each tendril is a tapered black shape, and the narrowest surviving section decides the stencil. Taper reads beautifully on screen and disappears on skin when the tip section goes below transferable mass. Judge the thinnest third of every tendril, not the bold base.

Check: Measure the narrowest third of each tendril on a 1:1 print with a ruler. If a tip section cannot be seen as its own shape at arm's length, blunt the taper or shorten the tendril rather than thinning the outline.

Inter-tendril gap retention

Flame spreads read through the pale skin channels between tendrils, not through the tendrils themselves. Parallel tendrils drawn close together share one channel that fills first on thermal transfer and closes further on skin. One merged channel turns two flames into one blob.

Check: Cover all tendril fill and confirm every channel between tendrils reads as its own open lane at 1:1. If two tendrils share a channel anywhere along their run, reopen the lane, remove one tendril, or enlarge the field.

Anchor-cluster separation

The central mark cluster carries the identity of the piece. Comma shapes packed without skin breaks merge into one round patch, and tendril bases that touch the cluster erase the anchor read. The cluster must hold internal separations plus clearance from every tendril root.

Check: Confirm each mark in the cluster keeps its own skin break and every tendril root stands clear of the cluster edge at true size. If the cluster reads as one blob, reopen internal gaps before adjusting any tendril.

HOLDS AT STATED SIZE

Compact seal plus short run at 5 cm on side neck

Intended width 50 mm

Source
Original stencil-style layout: three comma marks in a tight triangle with two short tapered tendrils running one direction along the neck line. Tendril tips stay blunt, each inter-tendril channel is visibly open, and the cluster keeps internal separations. Described as an original linework construction, not a reproduction of published artwork.
Protect
The three internal cluster gaps, the open channel between the two tendrils, and the blunt tip sections with transferable mass.
Fix
None required at this size beyond a 1:1 confirmation. If a channel narrows anywhere, reopen that lane before print rather than redrawing the whole run.
Final-size verdict
Holds at 5 cm. Cluster identity and both tendrils transfer as separate shapes with open skin between them.

WIDEN GAPS OR SHORTEN

Single-direction run with hairline tips at 4 cm

Intended width 40 mm

Source
Original stencil-style layout: compact anchor cluster with three longer tendrils tapering to fine points in one direction. Attractive on screen because the taper looks sharp, but the final third of each tendril narrows below transferable mass and two tendrils converge near the tips.
Protect
Anchor-cluster separations and the base half of each tendril, which already carry enough mass.
Fix
Blunt each tip to a countable width, shorten the longest tendril so tips stop converging, and reopen the tip channel to match the base channel. Do not keep three full-length hairline tapers together at 4 cm.
Final-size verdict
Holds at 4 cm once every tip section is blunt and every channel stays open at 1:1. Taper character comes from curve and spacing, not from needle points.

ENLARGE OR RECROP

Full symmetrical spread forced into a 4 cm neck band

Intended width 40 mm

Source
Original stencil-style layout: mirrored flame tendrils spreading both directions from a central cluster with six tendril paths in a narrow band. Tendril pairs share channels, mirror lengths drift, and the cluster touches two tendril roots. Ambition exceeds what the field allows at this width.
Protect
Centerline direction and the cluster position that gives the piece its intent.
Fix
Enlarge past the point where every mirrored pair and every channel holds open skin, or recrop to the compact seal or a single-direction run for this band. Do not keep six mirrored paths plus hairline tips together at 4 cm.
Final-size verdict
At 4 cm the spread reads as one filled patch after transfer. Enlarge, recrop to fewer tendrils, or choose the compact seal for this placement.

Printer behavior referenced briefly: when the 1:1 file passes and only paper fails, filled gaps point to the thermal-gap troubleshooting owner and stray marks point to the random-lines owner. Full print-failure depth stays there, not here.

Final-size hold checks

Set the millimeters, then inspect at true size.

Screens forgive crowding that paper and skin do not. Confirm size first, then run each check below on a measured 1:1 print with scaling off.

About 4 cm and below

Side-neck bands, compact seals, and two-tendril runs.

Carry the compact seal or a two-tendril run with blunt tips only. Keep two clusters of separation maximum: cluster gaps plus one open channel. If any tip or channel closes at 1:1, shorten or remove before thinning any contour.

About 5 to 8 cm

Common side-neck runs and small shoulder-cap pieces.

The most flexible band for this geometry. A single-direction run with open channels works when every tip section and every cluster gap is verified at true size. Spreads need shoulder-flat width even in this band.

About 9 cm and above

Shoulder-cap and upper-back spreads with mirrored pairs.

Room for a symmetrical spread with countable tendril pairs, but only when every mirrored pair matches and every channel holds open skin. Extra width does not rescue merged channels, drifting mirrors, or hairline tips.

Reference to clean stencil

Lock the variant, then earn the tendrils.

Work in this order so one change at a time can be judged at the same size. Stop when cluster, channels, and tips each read correctly.

  1. 01

    Lock variant, size, and placement first

    Choose compact seal, single-direction run, or symmetrical spread, set the physical width in millimeters, and name the neck or shoulder area before judging any reference. A spread that holds on an upper back can fail on a side neck with no line being wrong on its own.

  2. 02

    Shape symmetry or flow deliberately

    For spreads, fold-test the centerline so mirrored tendrils match in length, curve, and spacing. For single-direction runs, confirm one clean flow line with consistent taper instead of mirror matching. Resolve variant geometry before touching gap widths.

  3. 03

    Verify gaps and tips at 1:1

    Print at true size with scaling off, then check every inter-tendril channel, every cluster separation, and the narrowest third of every tendril. Reopen, blunt, or remove before changing anything else. The line-weight and gap guides below cover the measurement logic.

  4. 04

    Lay out a transfer-ready sheet

    Place the approved layout at true size on the sheet with a millimeter scale note, a placement-side label, and a mirror note where the transfer method requires it. Export a true-size PDF with no fit-to-page scaling and measure the physical print with a ruler.

  5. 05

    Confirm the print path before transfer

    Inspect the narrowest channel and thinnest tip on plain paper first. If the digital file passes and only paper fails, the fault sits in the print stage, and the printer-gap owners below name the exact failure instead of another redesign round.

Placement decisions

Narrow neck runs, wide shoulder spreads

This geometry is a compact cluster with directional flames. Flat wide placements preserve spread symmetry, while wrapped neck placements demand fewer, shorter tendrils.

Side and back of neck

Narrow, highly visible, curved corridor where the head-turn line stretches one side. Compact seals and short single-direction runs fit; full spreads wrap and crowd fast.

Check: Anchor the cluster on the flattest span, run tendrils with the neck line rather than across it, and confirm every channel stays open while the head turns. Keep total field small and tendril count low.

Shoulder cap and trap edge

Broader sloped panel with room for a symmetrical spread when the field is wide enough. The slope compresses the downhill side, so mirror symmetry must be judged on the body, not only on paper.

Check: Center the anchor on the flattest span, mirror tendril pairs across the centerline, and let support tendrils fall toward the slope. Verify mirror lengths at 1:1 before locking the file.

Upper back shoulder-to-shoulder

Widest flat option for this geometry, suited to a full spread with countable tendril pairs. Spine-line placement makes asymmetry immediately visible.

Check: Center the cluster on the spine line only when the design is truly mirrored, keep every inter-tendril channel open at the exact millimeter width, and confirm the spread reads from a normal viewing distance.

Collarbone and front shoulder

Tight curved field near clothing lines where long tendrils catch friction and distortion. Short runs outperform spreads here.

Check: Choose a compact seal or a two-tendril run, keep tips clear of the collarbone ridge, and confirm the layout while the shoulder moves before print.

Stencil-ready checklist

Approve the curse mark only when every line passes

Run this short sequence with scaling off and a ruler in hand. One failed line means fix, enlarge, or reselect before transfer.

  • Confirm the variant choice (seal, single run, or spread), the millimeter size, and the named neck or shoulder placement.
  • Confirm mirrored tendril pairs match in length, curve, and spacing at 1:1 (spreads) or one clean flow line with consistent taper (runs).
  • Confirm every inter-tendril channel reads as its own open lane at true size.
  • Confirm the anchor cluster keeps internal separations plus clearance from every tendril root.
  • Confirm the narrowest third of every tendril carries transferable mass with blunt, countable tips.
  • Export a true-size PDF with scaling off, label placement side and mirror state, and measure the physical print.
Variant first Verify channels at 1:1 Blunt tips survive

FAQ

Curse-mark stencil decisions, answered

Short answers for the variant, gap-retention, size, placement, and transfer-layout checks that recur when a curse-mark request moves toward a working stencil.

Match the variant to the field width and the symmetry it allows. Compact three-mark seals suit narrow neck bands under about 4 cm where tendrils cannot hold. Single-direction runs suit neck-to-shoulder corridors where flow matters more than mirroring. Symmetrical flame-tendril spreads suit shoulder and upper-back fields wide enough for mirrored pairs with open channels between every tendril.

Next steps

Use the neighboring owners for adjacent jobs.

This guide covers curse-mark variant checks, flame-tendril gap retention, final-size hold rules, neck plus shoulder placement, and transfer-ready layout. Use the links below for related jobs such as sizing, print checks, paper, and placement.

Printer troubleshooting depth, grid and photo-quality tooling, broad gallery browsing, paper manufacturing detail, and placement mechanics stay in their specialist owners. The links above hand off instead of repeating that detail. Sak yant and polynesian systems are separate cultural geometries and are intentionally not covered here.

From evaluated variant to working stencil

Turn the approved curse mark into a stencil draft.

Start from the variant that passed the symmetry, gap, and tip checks, then continue on iPhone for body fit, exact-size print, mirror and professional export.