Troubleshooting

Tattoo Stencil Print Missing Details: Find Where They Disappeared

Compare the same tattoo stencil detail from final-size digital file through print preview and paper to find whether it disappeared before printing or in physical reproduction.

tattoo stencil print missing detail · tattoo stencil printer missing lines · thermal stencil printer fine detail · broken stencil lines

Tattoo Stencil Print Missing Details: Find Where They Disappeared
August 23, 2026
16 min

Where did the detail disappear?

Follow the same feature until its state changes.

Pick one missing landmark, stroke, opening, or contour segment. At each checkpoint call it present, faint, missing, or merged. The first checkpoint that changes is more useful evidence than changing several printer variables at once.

01

DESIGN

Is the feature actually represented in the approved source or finished stencil?

02

FINAL SIZE

Is the same feature still clearly separate at the intended physical dimensions?

03

DOCUMENT

Did the exact export or print master keep the feature?

04

PREVIEW

Is it still present immediately before the physical print?

05

PAPER

Does the feature disappear or break while stronger nearby structure survives?

Same geometry, five states

Presence is not the same variable as strength or crowding.

PresentFaintMissingMerged

A

Intended

Primary contour, eyelid crease, and small lash cues are all present.

B

Faint

The fine feature survives in the right geometry but loses visual strength. Use the faint-lines diagnostic.

C

Missing

Strong eye structure survives, but the lower crease and tiny cues are absent. This is selective missing detail.

D

Broken

The lower crease is dark where present but loses continuity in several segments. Treat the gaps as missing information.

E

Crowded digitally

The feature is already merged at the final-size baseline. Fix the digital size/detail relationship first.

Missing-detail morphology

Describe the pattern before assigning a cause.

Global selective loss

Only the finest marks disappear across the page

Check final-size digital geometry first, then compare similar fine control marks.

Local loss

One physical region loses detail

Compare the same region in the client file and a known control before assigning a hardware cause.

Intermittent loss

Strong lines contain dark segments separated by gaps

Verify digital continuity, then compare long-line continuity on the Test Sheet.

Faint, not missing

The mark is present but pale

Use the faint-lines diagnostic because the geometry survives even though visual strength is weak.

Upstream size failure

Digital final-size view is already merged or ambiguous

Use the final-size detail diagnostic. Paper is not the first missing checkpoint.

Clipping / layout

A whole edge or rectangular page region is absent

Use print-area and layout troubleshooting rather than fine-detail reproduction.

Client missing + control survives

Move upstream before changing hardware variables.

Re-check the exact client file, final physical size, local geometry, export, and import path. The control proves that the physical setup reproduced some comparable fixed geometry, not that every client feature is automatically valid.

Inspect the client file

Client missing + similar control fails

The physical reproduction path moves higher.

Independent known geometry now shows a similar loss. That narrows the layer, but it does not prove a broken printhead or any other specific device cause. Check paper, feed, device, and app behavior model by model.

Check the physical path

Do not max density first

A global correction can hide the boundary you are trying to find.

Increasing output intensity can thicken surviving structure, close gaps, and still fail to restore a mark that disappeared upstream. Freeze the client file, find the first missing checkpoint, then change only the layer that failed.

Print known control

The strong parts printed. One eyelid crease, letter stroke, ornamental segment, or cluster of fine guidance did not.

That is a missing-detail problem when intended information is absent or interrupted enough on the physical stencil paper that you can no longer follow its geometry reliably, while stronger structure around it survives.

Do not start by turning up output intensity or redrawing the whole stencil. Pick one missing feature and answer a narrower question:

Where is the first version of the stencil in which this exact feature is actually missing?

Follow that same mark through the workflow. If it is already gone before paper, the printer is not the first failure. If it is clear digitally at the intended physical size, survives the prepared document and preview, then disappears on paper while stronger marks remain, you have isolated a physical reproduction mismatch.

First classify what you actually see

Several failures can look like "the printer lost detail" when you glance at the whole sheet.

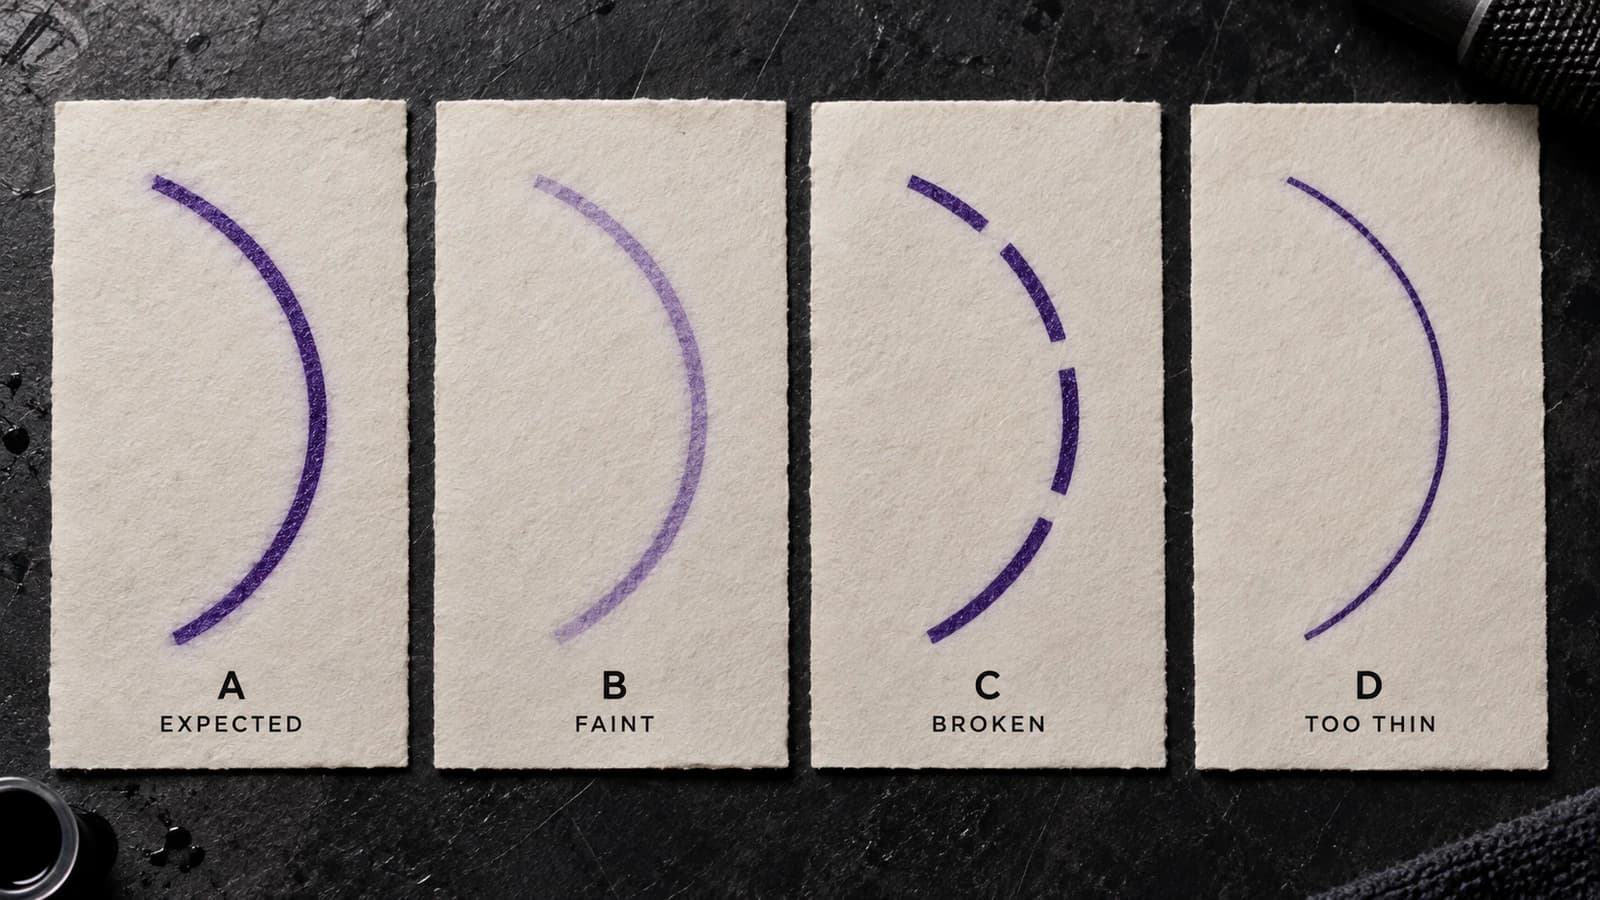
Faint means the intended mark is still visible in roughly the correct place and shape, but it is pale or weak. The geometry survives. Use the printer faint-lines diagnostic.

Missing means the intended mark, segment, opening, or landmark is absent enough that its geometry cannot be followed reliably. Stronger nearby structure may still look normal.

Broken or discontinuous means a line survives in some segments but contains gaps. If continuity along one intended path is the main symptom, use the broken-line continuity diagnostic. If the actionable question is which feature or information disappeared, keep following the missing-detail checkpoints here.

Too thin means the mark exists and is dark enough, but the reproduced geometry is narrower than intended. That is a line-geometry question, not automatically missing detail. The line-weight guide separates the mass of a surviving line from whether the line exists at all.

Too detailed at the final size means the digital stencil is already crowded, merged, or ambiguous at the intended physical dimensions. That failure exists before paper. Use Tattoo Stencil Too Detailed for the Final Size.

A large edge or rectangular region is absent is different again. If a whole strip, page edge, or bounded area was omitted, think layout, crop, printable area, or clipping rather than selective internal detail loss. Use the Printer Troubleshooter.

The useful boundary is specific information missing while stronger surrounding information survives.

Follow one missing mark, not the whole stencil

Choose one feature whose intended shape you can identify unambiguously. A tiny lower-eyelid contour is better evidence than saying "the portrait lost detail." A missing crossbar is better evidence than saying "the lettering printed badly."

Carry that exact feature through this chain:

SOURCE / DESIGN -> FINISHED STENCIL -> FINAL-SIZE DIGITAL -> EXPORTED DOCUMENT -> PRINT PREVIEW -> PAPER

At every checkpoint, classify only that feature as present, faint, missing, or merged.

1. Source or design

Was the information actually present in the source or approved design?

For a portrait, you might be checking the edge of a nostril, an eyelid crease, or a contour break. For lettering, it might be a crossbar, dot, punctuation mark, serif, or stroke that defines an opening. For geometry, it might be one repeated segment.

If the source never contained a trustworthy feature, printing cannot restore it. Do not turn uncertain source information into a printer diagnosis.

2. Finished stencil

Is the feature still represented in the exact stencil file that will be printed?

Do not inspect an earlier generation preview while sending a different export to the printer. Open the actual final PNG, JPG, WebP, PDF, or document in the print path.

If conversion, tracing, cleanup, or simplification already removed the feature, stop here. Fix the digital stencil rather than the physical setup.

3. Final-size digital view

Now evaluate the same feature at the physical size you intend to print.

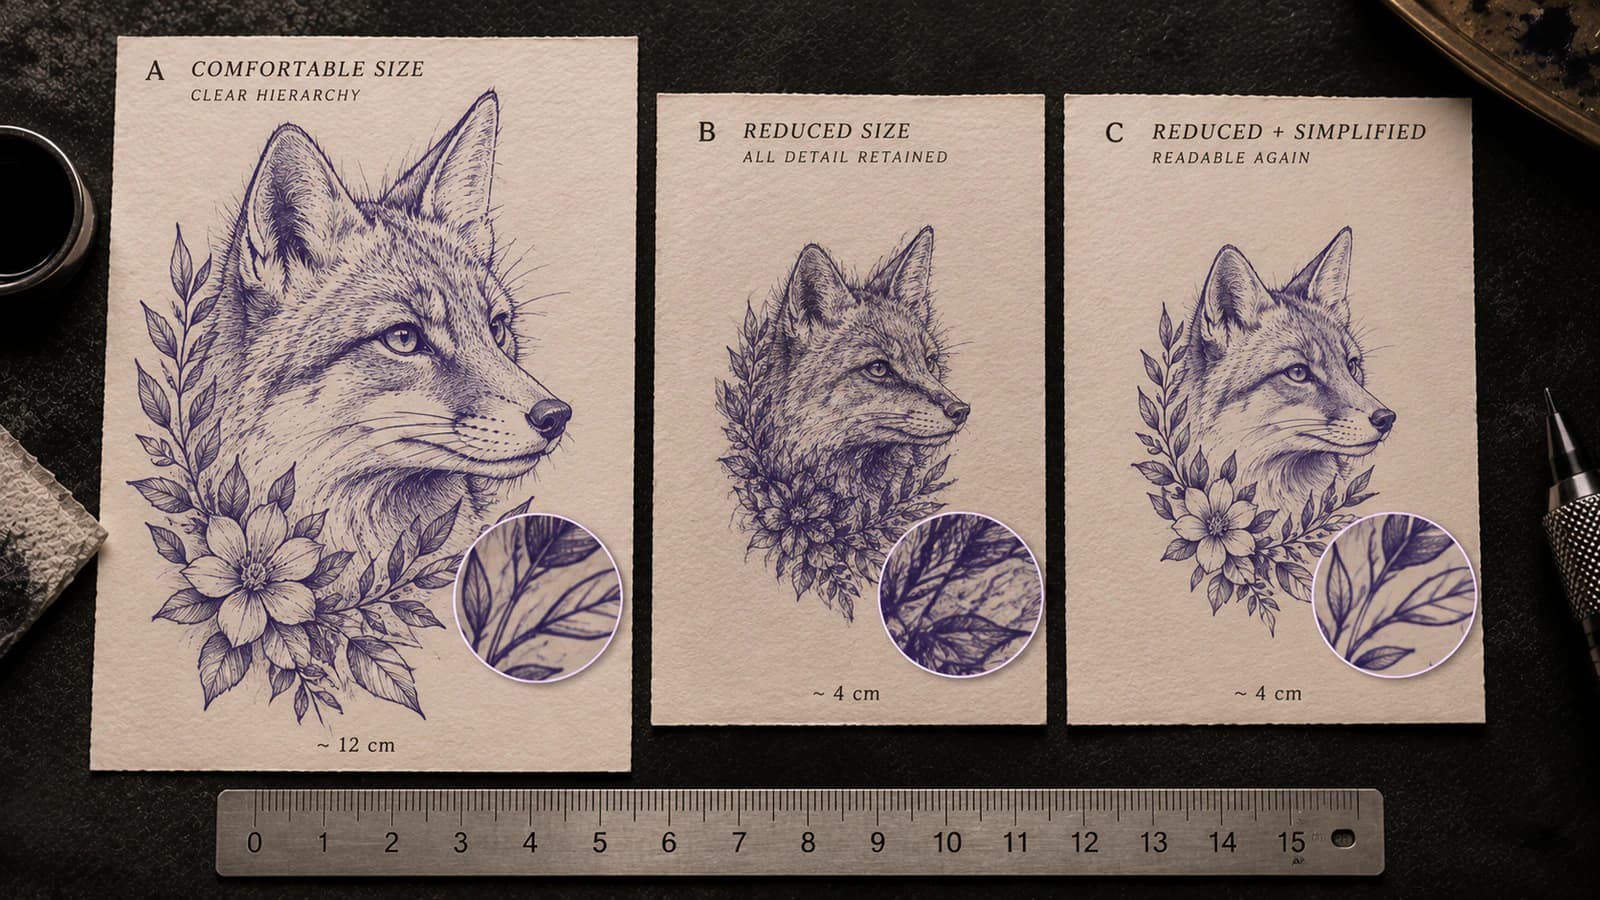
A mark can look obvious when enlarged and become a tiny, ambiguous piece of geometry once the whole design is assigned its real physical dimensions. The fact that pixels still exist in the file does not mean the feature remains useful at final size.

If the feature merges into neighboring marks, loses separation, or becomes marginal digitally at the intended size, the first failure is not paper. Use the final-size detail diagnostic and the Tattoo Stencil Print Checker before changing printer variables.

4. Exported document

Open the actual file or document being sent into the print path.

Confirm that the feature survived export, placement, and any intermediate conversion. An unintended smaller raster export, resampling step, reduced-resolution derivative, or visible conversion can remove information before the physical printer receives it.

Do not assume every app transforms files in the same way. Inspect the artifact you actually have. If the feature is already missing in the exported document, you have direct evidence that paper is not the first mismatch.

5. Print preview

Does the preview still show the same feature?

A preview can prove a useful negative: if the detail is already absent there, the physical sheet cannot be the first place it disappeared.

A preview cannot guarantee the opposite. A feature visible on a backlit screen may still fail to reproduce physically. Treat preview as a checkpoint, not a promise.

6. Physical paper

Finally, compare the same location on the printed stencil.

If the feature was clearly separate in the final-size digital file, survived the exported document and preview, then becomes absent or discontinuous on paper while stronger nearby structure remains, the paper handoff is the first observed mismatch.

That is the selective missing-detail case this guide is designed to diagnose.

The digital-versus-paper fork

Once you have followed the same feature, the next investigation should be clear.

Detail missing digitally at final size

This is not primarily a printer reproduction problem.

Inspect information density, local separation, scale, simplification, and how the mark is represented. The too-detailed-for-size guide covers the case where the design itself stops reading before a physical print failure is established.

Detail clear digitally at final size, missing on paper

Keep the artwork fixed. You now have evidence that the print path changed a feature that still existed immediately upstream.

Compare the client feature with known control geometry before deciding whether to edit the stencil or investigate paper, printer, app, or device behavior.

Detail present on paper but weak

That is faintness, not absence. Use Why Is My Tattoo Stencil Printer Printing Faint Lines?.

Detail present but physically narrower or heavier

The information still exists, but its reproduced geometry changed. Inspect line geometry and local negative space rather than describing the mark as missing.

Entire output is the wrong physical size

Confirm scale first. An unexpectedly smaller print can make every small feature physically more fragile. Use Tattoo Stencil Printed the Wrong Size? before diagnosing selective reproduction at a size you did not intend.

Final size is a real checkpoint, not a zoom setting

Keep four concepts separate:

  • screen zoom changes how large the artwork appears on the display;
  • source pixel dimensions describe the raster data available;
  • intended physical size describes how large the stencil is supposed to be on paper;
  • physical reproduction is what the printer and paper actually produced.

A fine line can occupy a comfortable width on a zoomed display and become physically tiny once the full design is printed at its intended dimensions.

That does not create one universal safe line width, one required DPI, or one thermal printer threshold. Files, line structures, printers, papers, apps, and intended jobs differ. The useful test is comparative:

Does this exact feature remain clearly separate in the digital stencil at the physical size you intend to use?

Use the Size & Print Calculator when physical dimensions are uncertain. Use the Print Checker when you need file-side evidence about source sampling, very fine geometry, threshold-sensitive detail, dense regions, and page fit.

Neither tool can certify what a specific printer will put on paper. That is why the paper comparison still matters.

Read the shape of the failure before choosing the next test

Missing detail has useful morphology. Describe the pattern before trying to name a cause.

Only the finest details are missing across the design

The main contour and medium structure survive, while the smallest marks disappear in several places.

Possible layers include final-size geometry, weak or threshold-sensitive file information, export/import transformation, or the practical reproduction limits of the physical path. The pattern alone does not tell you which one.

Check the same class of marks digitally at final size, then compare similar fine geometry on a known control.

One local region loses information

For example, one side of a stencil loses secondary marks while comparable marks elsewhere survive.

That is different evidence from a page-wide fine-detail cutoff. Inspect the exact client file and preview in that location, then see whether a known control also loses geometry in the same physical region of the sheet.

Do not jump from "one side is missing" to a remote diagnosis of a printhead, roller, paper, or other component. The local pattern tells you what to compare next, not what part to replace.

Strong lines contain intermittent gaps

A line may be dark where it exists but discontinuous along its path.

First verify that the gaps are not already present in the finished file, final-size view, or preview. If the digital line is continuous and the paper line is not, use the broken-line continuity diagnostic to test whether the break follows the feature, the line class, or a physical output region, then compare long-line continuity on the Printer Test Sheet.

This is different from a continuous pale line. The missing segments have destroyed continuity even though the surviving segments are strong.

Texture disappears but landmarks survive

A realism stencil may contain primary contours, form landmarks, and tertiary texture. If only the smallest texture cues disappear, do not automatically treat the entire print as unusable.

First ask whether those marks were intended to perform a working function. If the final-size digital version was already marginal, simplify or restructure upstream. If the marks were clear and necessary before paper, keep investigating the physical reproduction path.

One identity- or function-critical feature disappears

A single missing feature can matter more than twenty missing texture marks.

Examples include:

  • an eye corner or nostril edge that anchors a portrait;
  • a crossbar that changes a letter;
  • the stroke that defines a small counter;
  • punctuation or the dot over an i;
  • a symbol opening;
  • one contour break that defines an overlap;
  • a distinctive marking boundary in an animal reference.

Classify importance separately from print severity. "Most of the stencil printed" is not enough if the missing information changes identity, content, orientation, or construction.

Everything weakens together

That is closer to global faintness than selective missing detail. Use the faint-lines diagnostic.

A large rectangular or page-edge region is gone

That is not fine-detail reproduction. Check layout, printable area, crop, page fit, or clipping with the Printer Troubleshooter. Do not treat a whole omitted region as selective detail loss simply because lines are missing inside it.

Use a known control to separate the client file from the physical path

The Tattoo Stencil Printer Test Sheet gives you fixed geometry for fine strokes, long-line continuity, small counters, gaps, dots, dark mass, and physical scale.

Use it as a comparison, not as a universal pass/fail standard.

Client detail missing, similar control geometry prints correctly

That result moves attention upstream toward the client-specific path:

  • the exact finished stencil file;
  • final physical size;
  • local line geometry;
  • the exported document;
  • the import or layout path used for that client file.

It does not prove the client artwork is badly designed. It shows that the same physical setup reproduced at least some comparable known geometry, so re-checking the client path is better supported than immediately changing hardware variables.

Client detail missing, similar control geometry also fails

Now the evidence broadens toward the physical reproduction path because independent fixed geometry shows a similar failure.

Use the Printer Troubleshooter to check paper/feed, device/app, and model-specific layers. Follow current manufacturer instructions for the exact printer and compatible media when the investigation becomes device-specific.

The control does not prove the printhead is broken. It narrows the layer. That distinction is important.

Repeatability adds another piece of evidence

Does the same detail disappear in the same place on a controlled repeat?

If yes, you have a repeatable relationship worth following. Ask whether:

  • the same digital feature is marginal in the same location;
  • the same export or document contains the same loss;
  • the control fails in a comparable way;
  • the failure follows one physical region of the page;
  • the same class of marks disappears across otherwise different designs.

If the failure moves unpredictably between prints, that is different evidence from a fixed missing feature. It broadens the physical-path investigation but still does not identify a specific hardware cause remotely.

Do not waste a stack of stencil paper searching for certainty. One controlled repeat plus a known control is usually enough to decide which layer deserves the next test.

Check export and import only when the evidence points there

Information can disappear before paper even when the source artwork is correct.

Defensible file-side mechanisms include:

  • simplification or cleanup removed the mark;
  • an export was unintentionally downsampled or resized;
  • raster resampling reduced a very small feature until it no longer has a stable representation;
  • a lower-quality preview or derivative file was printed instead of the intended master;
  • a very light or partially transparent mark became effectively absent through a monochrome or threshold-oriented conversion;
  • document scaling made an already small feature physically smaller;
  • a specific app import/export step visibly changed the mark.

Do not accuse a printer app of hidden conversion because another app behaves that way. Compare the exact file before and after the step when possible. If you cannot observe a transformation, keep it as a hypothesis rather than a diagnosis.

Portrait example: eyelid crease versus lash texture

Suppose the finished portrait stencil contains:

  • the eye contour;
  • a lower-eyelid crease;
  • the iris edge;
  • several tiny lash marks.

On paper, the eye contour and iris survive. The lower-eyelid crease and lashes disappear.

Do not conclude "the printer cannot handle portraits."

Follow the crease first because it may carry more structural value than the lash texture.

  1. Is the crease represented in the finished stencil?
  2. Is it clearly separate from the eye contour at intended physical size?
  3. Does it survive the exported document and preview?
  4. Does a control line of comparable practical prominence reproduce?
  5. Do the lashes fail at the same checkpoint, or were they already marginal digitally?

If the crease is clear through preview and disappears only on paper while comparable control geometry also fails, investigate the physical path. If the crease becomes ambiguous at final size before paper, return upstream.

The method protects likeness-critical structure without turning a print diagnosis into a portrait-likeness tutorial.

Lettering example: one missing stroke can change the content

Imagine a word where every major letter shape prints except one thin crossbar, punctuation mark, or counter-defining stroke.

The print can be mostly complete and still be unusable.

For lettering, a small missing mark can change a character, number, date, or word. Treat those marks as function-critical even when their area on the page is tiny.

Follow the exact stroke through the same checkpoints. If it is clear digitally at final size and survives the document, compare a control feature of similar scale. Do not globally thicken the word before you know whether the missing stroke was a client-file exception or a physical reproduction failure.

A global weight increase can close other counters while solving nothing about an upstream missing export.

Ornamental and geometric example: systematic versus local loss

Suppose a repeated motif contains many similar short interior segments.

On paper, several segments disappear in one physical region while the same motif prints correctly elsewhere.

That local pattern deserves a different test from a design where the same class of short segment disappears everywhere.

Compare:

  • whether the repeated marks are actually equivalent in the digital file;
  • whether one class is already weaker after export;
  • whether the loss follows the motif or follows a physical region of the sheet;
  • whether comparable repeated geometry on the control shows the same spatial pattern.

This is why "some details are missing" is not a sufficient diagnosis. The spatial pattern contains evidence.

Texture example: missing is not always catastrophic

A realism stencil may intentionally carry tertiary guidance such as hair direction, fine wrinkles, fabric texture, or short tonal cues.

If the smallest texture marks disappear but primary structure and required landmarks remain, ask three questions before rebuilding the print path:

  1. Were those marks necessary for the working stencil?
  2. Were they clearly readable at actual physical size before printing?
  3. Does equivalent control geometry reproduce through the same setup?

If those marks were already marginal at final size, use the final-size detail diagnostic. If they were deliberate, clear, and necessary before paper, continue investigating physical reproduction.

Information priority prevents overreacting to harmless texture loss while still protecting a tiny feature that changes the job.

Do not solve missing detail by maxing out density

Increasing output intensity globally can make surviving marks stronger. It can also:

  • thicken strong contours;
  • narrow or close negative spaces;
  • merge neighboring lines;
  • turn texture into dark mass;
  • make a previously balanced stencil too dark;
  • leave the missing feature absent if it was already removed upstream.

Before touching a global control, find the first missing checkpoint.

If the feature exists on paper but is merely weak, use the faint-lines guide. If the question is the mass of a surviving line, use the line-weight guide. If the digital stencil is already overcrowded, use the final-size detail diagnostic.

Do not use one global correction to hide several different failure modes.

Should you make the missing line thicker?

Sometimes selective strengthening is reasonable. It is not the first diagnostic step.

Ask two questions first:

  1. Does this mark need to exist at this physical size?
  2. If it does, what representation preserves its function without damaging neighboring geometry?

Depending on the design, the answer may be to:

  • simplify redundant nearby texture so the important mark has more room;
  • represent the feature with one clearer structural cue;
  • reposition or reshape a secondary guide while preserving the intended relationship;
  • selectively strengthen one essential mark;
  • increase final size when the information genuinely needs more physical space.

Do not thicken every line because one feature failed. A correction that restores one eyelid but closes a letter counter elsewhere has traded one failure for another.

Printer, paper, and settings come after the boundary test

Once the client feature is proven present through final-size digital, export, and preview, and a known control also shows missing or broken geometry, it is reasonable to investigate the physical path.

That still does not create a universal recipe.

Printer models and companion apps differ in supported media, loading, density or darkness controls, power behavior, firmware, maintenance, and service procedures. Transfer papers differ too. Follow current instructions for the exact printer and compatible media.

Use the Printer Troubleshooter to decide which layer to inspect next. The broader thermal stencil printer workflow covers preparation, loading, calibration, QC, and model-specific boundaries.

This guide does not tell you to disassemble a printer, alter heating elements, bypass safety systems, or perform electrical repairs.

A studio recovery workflow

When strong structure prints but specific information does not, use this sequence:

  1. Choose one missing feature. Name the exact contour, stroke, opening, landmark, or texture cue.
  2. Confirm physical size. If the print is unexpectedly smaller or larger, solve the scale mismatch first.
  3. Inspect the finished stencil file. Confirm the feature still exists in the exact file being sent.
  4. Inspect it at intended physical size. If it is already marginal, fix the digital information-density problem first.
  5. Inspect the exported document. Make sure the actual print master still contains the feature.
  6. Inspect print preview. If it is gone here, paper is not the first failure.
  7. Compare paper. Decide whether the feature is present, faint, missing, merged, or broken.
  8. Print one known control. Compare similar fine geometry and continuity through the same physical path.
  9. Classify the first mismatch. Upstream absence, digitally marginal detail, paper-only dropout, faintness, geometry change, wrong scale, and clipping each require a different next test.
  10. Correct that layer, then verify minimally. Reprint only enough to prove the feature and its neighboring spaces now survive before committing to the full client stencil.

The objective is not to make the printer "stronger." It is to preserve the intended information from the approved stencil to the physical sheet and know exactly where that preservation failed when it does not.

Author

Founder and product builder at StencilStudio

Andrea builds StencilStudio and documents the source-to-stencil workflow by checking product behavior, real transformations, readability and the limits of the web and iPhone tools.

In the App

Compare the client stencil with known control geometry

Use the Printer Test Sheet to see whether similar fine lines, counters, and continuity patterns survive the same physical print path.