

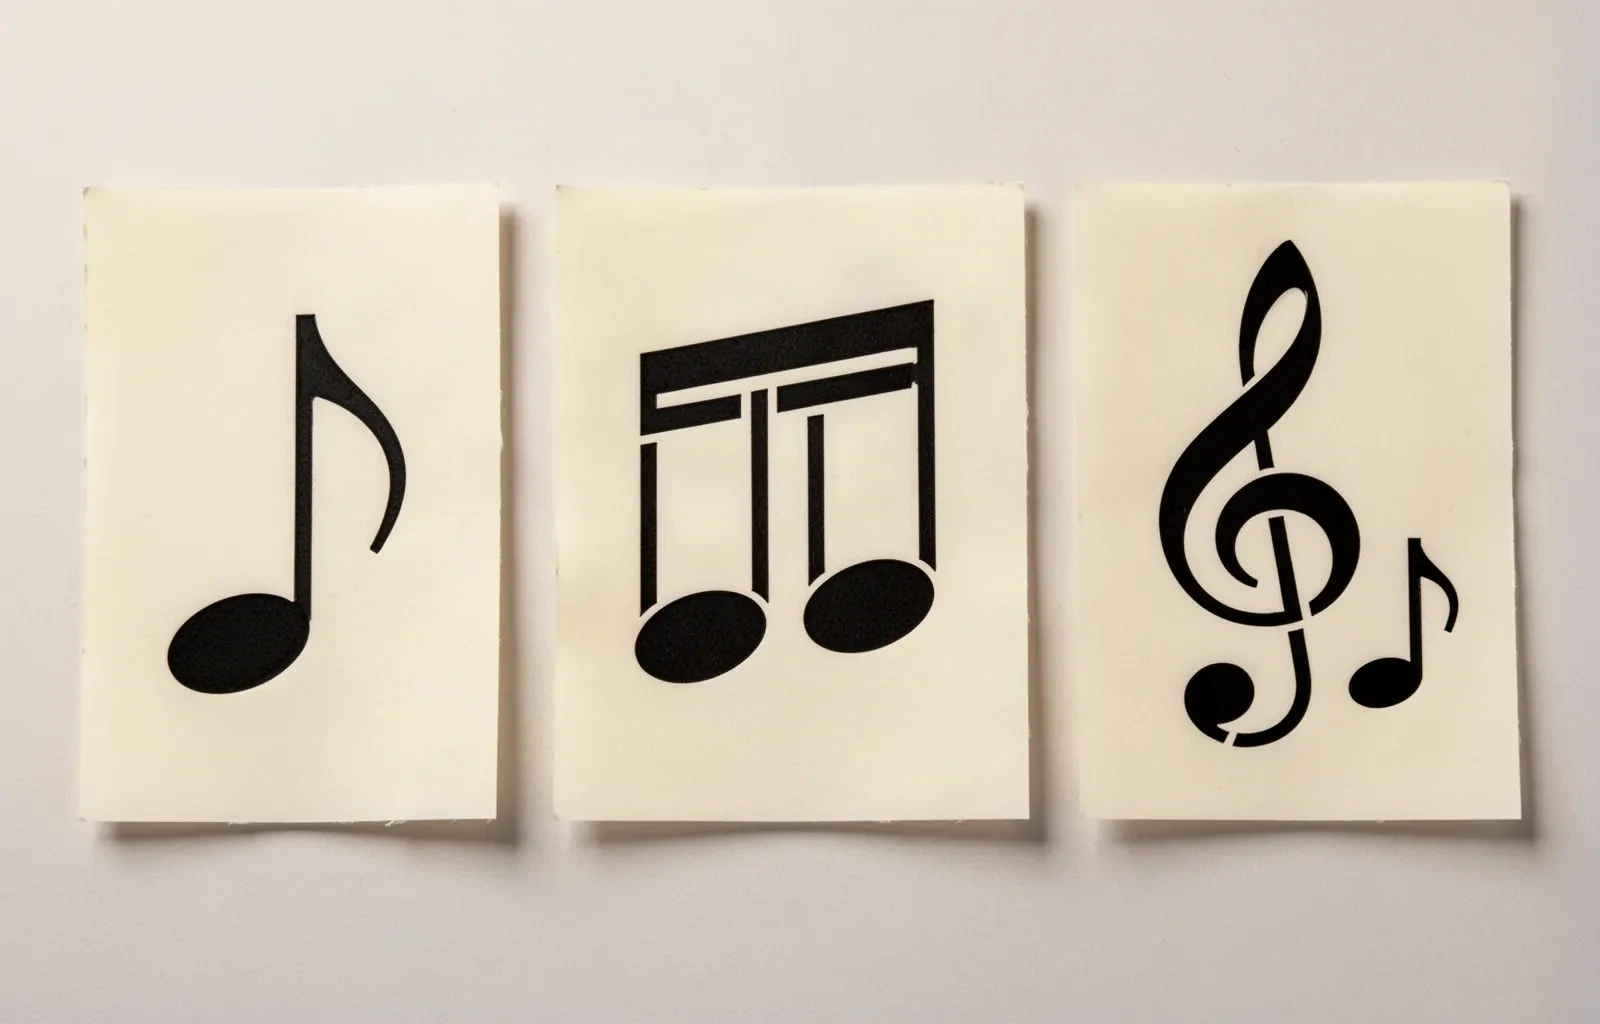
Music-note variant map

Pick the music-note variant that fits size and placement

An isolated eighth note, a beamed pair, and a treble-clef pairing fail in different ways at small sizes. Compare the three options below, check stem, beam, dot, and gap thickness at your exact size, then prep one clean transfer-ready stencil for narrow fields at 2 to 4 cm.

Built for working artists choosing between music-note directions. This page compares the three options with comparative final-size vetting at 2 to 4 cm. Full single-reference evaluation stays on the music-note stencil page, broad symbol comparison stays on the symbols hub, and broad gallery browsing stays on the stencils and subject hubs.

Variant map

Three music-note directions, three different size contracts.

Choose from construction cues first. Each card names the visual contract: where it fits, what to protect, and which failure to expect at true size.

Illustration of three music-note stencil constructions side by side on paper: an isolated eighth note, a beamed pair of two notes, and a treble clef with a small note held outside the curl.
Illustrative construction comparison, not app output and not a measurement sample: isolated eighth note, beamed pair, and treble-clef pairing, all drawn without staff lines. Use the size floors and gap gates below for the real numbers.

Isolated single note

One filled head, one straight stem, one flag or dot family maximum.

Best at 2 to 3 cm on behind-ear, finger side, wrist, and ankle fields.

Keep: Keep head closure, stem direction and mass, and the single flag or dot separation.

Fails when: Fails when the flag tip thins into a scratch or a dot drifts onto the head edge. Shorten the taper or reopen the ring before touching head or stem mass.

Beamed pair

Two filled heads with parallel stems joined by one solid beam.

Best at 3 to 4 cm on forearm, wrist band, collarbone, and ankle runs.

Keep: Keep both head closures, both stem directions, and the beam as one continuous heavy bar with an open channel between the stems.

Fails when: Fails when the beam thins, touches a head, or traps a staff remnant between the stems. Rebuild the beam first and clear the channel before changing heads or stems.

Treble-clef pairing

One treble clef with an open spiral and tail plus one or two small notes held outside the curl.

Best at 5 to 6 cm and above on forearm, shoulder, upper back, and sternum-adjacent fields.

Keep: Keep the spiral opening, the tail direction, and a continuous skin break between clef body and every note.

Fails when: Fails when the spiral closes or small notes crowd into the curl. Reduce the interior to one counted opening and move notes fully outside before thinning anything.

Variant, size floor, field, and staff trade-offs
VariantMinimum sizeFieldStaff ruleGaps to protectWhen it closes
Isolated single noteAbout 2 cm floor, most reliable at 2 to 3 cm.Tiny curved fields: behind ear, finger side, small wrist accents.No staff lines. One partial accent at most, fully outside the note.Head closure, stem-to-air along its length, one flag tip or dot ring.Already minimal. If it closes, enlarge rather than redrawing thinner.
Beamed pairAbout 3 cm floor, most reliable at 3 to 4 cm.Horizontal runs with room for two stems plus a beam: forearm, collarbone, ankle.No staff lines. Clear the inter-stem channel to open skin completely.Both head closures, both stem gaps, beam-to-head clearance at each joint.Drop to one isolated note when width falls under 3 cm.
Treble-clef pairingAbout 5 to 6 cm floor. Recrop under 4 cm.Taller flat fields: shoulder, upper back, sternum-adjacent, long forearm.No staff lines. One short partial accent at most, outside the curl.Spiral opening, tail clearance, skin break between clef and each note.Recrop to clef alone or to notes alone when height is short.

Full single-reference scoring with worked examples stays on the music-note evaluation owner. This map exists to compare variants against each other at a stated size, not to replace that depth.

Small-size thickness and gap rules

Six pass or fail gates at 2 to 4 cm.

Screens forgive crowding that thermal print and skin do not. Run every gate below at the exact physical size with scaling off. One failed gate means reopen, enlarge, or remove before transfer.

Heads stay closed solids

Every note head prints as one filled shape with no outline break and no staff line crossing it. An open or crossed head loses the musical read before any other mark matters.

Stems carry their own mass

Each stem is one solid mark, equal to or heavier than any flag on the same note, with open skin along its full length. Hairline stems print as scratches or dotted breaks at 2 to 4 cm.

One countable beam or flag

A beam reads as one continuous bar and a flag as one tapered but countable shape. Needle flags and thinning beams are the first structures to vanish in print and transfer.

Every dot ringed by skin

Each augmentation dot holds a full visible ring of open skin at true size. A dot touching a head, stem, or beam becomes one merged blob on skin.

Staff lines stay out

Five thin parallel staff lines fill first at small sizes. Remove them for isolated notes and beamed pairs, and keep at most one short partial accent fully outside the note structure.

Clef spiral stays open

For clef pairings, the spiral holds one counted opening and every note sits outside the curl with a continuous skin break. A closed spiral plus touching notes reads as one dark mass.

Narrow-field placement fit

Isolated notes want tiny flat axes, beams want horizontal runs.

A music note is either one vertical stem or one horizontal rhythm bar. Flat placements preserve both with little compensation, while wrapped placements demand the matching variant.

Behind ear and finger side

Orientation: Stem along the flattest axis of the recess.

Clearance: No staff lines. Dot ring checked against the curve, since dots drift toward head edges on convex skin.

Check: Isolated note only. Confirm the flag tip and any dot ring stay open at the exact millimeter size.

Wrist and ankle

Orientation: Isolated stem vertical to the limb, beamed-pair beam along the limb, never across it.

Clearance: No staff lines. Keep dots and flags clear of tendon movement and footwear friction edges.

Check: Isolated note or one compact beamed pair. Verify both stem gaps and beam mass at 1:1 before print.

Forearm and collarbone

Orientation: Beam runs with the limb axis so rhythm reads along the body line.

Clearance: Inter-stem channel held as open skin. Staff remnants removed rather than thinned.

Check: Beamed pair territory. Protect the channel between the stems as the highest-value gap on the stencil.

Shoulder, upper back, sternum-adjacent

Orientation: Clef centered on the flattest span, tail kept inside flat skin so it never overhangs a bone edge.

Clearance: Notes held outside the curl with a continuous skin break. Body midline makes clef asymmetry visible, so center deliberately.

Check: Clef pairing only at 5 cm and above. Preview on a body photo before locking spiral and tail position.

Final-size print protocol

Prove the stencil on paper before skin

Run this short sequence with scaling off and a ruler in hand. One failed line means fix, enlarge, or reselect before transfer.

  1. 01

    Lock size, variant, and field in one line

    Write the intended height or width in millimeters, the named body area, and the chosen construction, for example 30 mm, wrist, isolated eighth note. A beamed pair that holds at 40 mm on a forearm can fail at 20 mm behind an ear with no line at fault. Use the size calculator while dimensions are still open.

  2. 02

    Export true size with scaling off

    Produce a PDF at exact physical dimensions with any fit-to-page or shrink-to-fit option disabled. A file that measures correctly on screen but prints scaled proves nothing about the stencil.

  3. 03

    Inspect the three smallest contacts on plain paper

    Find the narrowest stem gap, the tightest beam or flag contact, and the smallest dot ring, and judge each at arm's length plus under normal reading light. If a flag tip closes, a dot touches a head, or a beam touches a stem outside its joint, reopen the gap, enlarge, or remove the weakest mark before reprinting.

  4. 04

    Measure the physical print with a ruler

    Confirm the printed height or width matches the intended millimeters before judging any line. If the file passes and only the paper output fails, move to print-stage evidence such as faint output, broken continuity, or added-line diagnostics instead of simplifying the design again.

  5. 05

    Confirm orientation on the body before transfer

    Preview stem direction, beam run, and clef clearance on a body photo while edits are still cheap. A construction that measures correctly on paper can still crowd once the field wraps, so the fit preview is part of the print check, not an optional extra.

Stencil-ready checklist

Approve the variant only when every line passes

Run this short sequence with scaling off and a ruler in hand. One failed line means fix, enlarge, or reselect before transfer.

  • Confirm intended size in millimeters, the named placement, and one variant from the map above.
  • Confirm closed note heads with no staff line crossing any head.
  • Confirm solid stems with open skin along each stem at 1:1.
  • Confirm one countable beam or flag with no head or dot contact.
  • Confirm each dot ringed by open skin and each clef spiral open, where present.
  • Export a true-size PDF with scaling off and measure the physical print.
Variant fits size first Verify gaps at 1:1 Staff lines stay out

FAQ

Music-note variant decisions, answered

Short answers for the variant, thickness, staff-line, orientation, and print checks that recur when a music reference moves toward transfer-ready output.

Match the construction to the size and the field. An isolated single note suits 2 to 3 cm placements such as behind the ear, finger side, wrist, or ankle, where one head plus one stem must carry everything. A beamed pair suits 3 to 4 cm horizontal runs such as forearm, collarbone, or ankle, where two stems plus one beam have room. A treble-clef pairing needs about 5 to 6 cm or more, because the spiral plus tail plus separate notes only survive with real height. Under 4 cm, recrop a clef lockup to notes alone or the clef alone.

Next steps

Use the neighboring owners for adjacent jobs.

This guide covers cross-variant choice, comparative size floors, small-size thickness and gap gates, narrow-field fit, and final-size print validation. Use the links below for related jobs such as full evaluation, sizing, print checks, paper, and placement.

Full single-reference scoring stays on the music-note evaluation page, generic compact-symbol comparison stays on the symbols hub, generic conversion stays on the photo-to-stencil owner, reference-board and quality-check mechanics stay with the tool owners, beginner theory stays with its owner, and broad gallery browsing stays on the stencils and subject hubs. The links above hand off instead of repeating that detail.

From chosen variant to working stencil

Turn the approved music-note variant into a stencil draft.

Start from the variant that passed the size, gap, and fit checks, then continue on iPhone for body fit, exact-size print, mirror and professional export.