

Leopard stencil evaluation

Judge any leopard reference before it becomes a stencil

Leopards live or die on rosette spacing, head and profile readability, and paw plus tail separation. Vet the rosette density at your exact final size, simplify the spotted coat without borrowing stripe logic, then prepare a clean stencil that transfers as one readable leopard.

Built for working artists preparing leopard pieces. This page covers leopard rosette vetting, head and profile readability checks, spotted-coat simplification, and transfer-ready prep only, not tattoo application or healing advice. Cross-species animal comparison stays on the animals owner, tiger stripe and floral translation stays on the tiger owner, and photo conversion stays on the photo owner, linked below.

What makes a leopard stencil-viable

Rings, head, and gaps decide the result.

A leopard is broken dark rings with open centers on one clean body construction. These three pillars predict whether that combination survives reduction, print, and transfer.

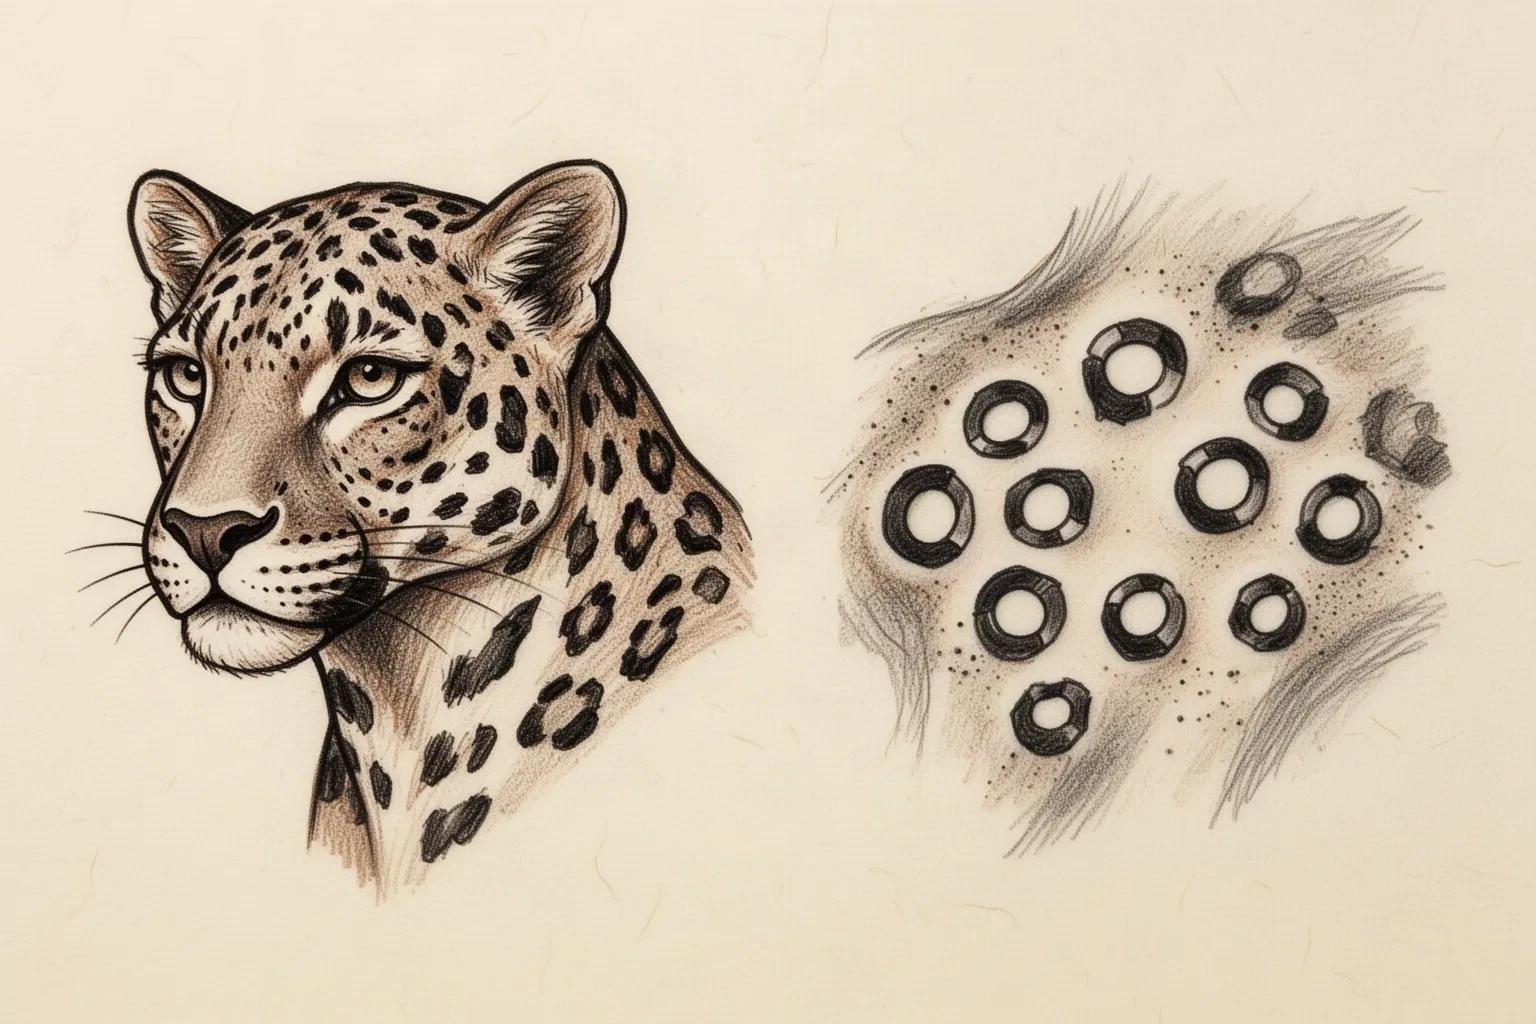
Original stencil-style study of a leopard head and a flank coat patch, with rosettes drawn as broken dark rings that keep open centers and clear spacing between neighboring rings.
Original illustration, not an app export. It shows the hierarchy the checklist protects: one head contour with a broad muzzle, separated eyes, and rounded ears, plus rosette rings spaced far enough apart to hold open centers. Judge density on your own reference at true print size.

Rosette density plus spot breakup

A leopard reads first as broken dark rings with paler centers scattered over a buff coat, with the head, eye line, and body angle as second-read anchors. Reference photos show dozens of small rosettes packed along the back, flanks, and legs, plus soft fur value between them. Transfer needs countable ring fragments with open skin inside and between them, because crowded rosettes plug into solid blobs when reduced.

Check: Cover the head and legs and look at one palm-sized patch of coat at true size. If every rosette still shows its own center gap and its own separation from its neighbors, density is sound. If three or more neighbors share one outline, that patch needs merging or removal before print.

Head and profile silhouette plus eye anchor

Leopard heads carry a broad muzzle, rounded ears, a defined nose, and forward eyes with strong lid lines. Full-body views add a long low back, deep chest, and a heavy roped tail. Stencil viability comes from one clean head contour with separated eyes and ears before any coat work, because rosette texture cannot rescue a head that already reads as a generic cat.

Check: Cover every rosette and look at the head plus body outline alone. If the muzzle width, ear placement, and back-to-tail line still read as leopard at a glance, the hierarchy is sound. If removing spots leaves a generic feline, lock head and body construction before touching the coat.

Spotted-coat simplification versus stripe logic

Stripes are direction: long tapered lines that follow muscle flow and can be thinned into fewer bands. Rosettes are density: many small closed shapes that fail by plugging, not by direction. Leopard stencils simplify by merging neighbor rosettes, opening centers, and converting faint fur value into open skin or spaced stipple, while stripe workflows simplify by removing or re-aiming whole bands.

Check: Ask whether the fix changes count or direction. If the answer is fewer, larger, better-spaced rosettes with open centers, the simplification is spotted-coat logic. If the fix talks about band angle or stripe flow, it belongs to a stripe workflow instead.

Head versus profile versus resting

Choose the construction the placement can actually hold.

View choice is the highest-cost decision on a leopard stencil. Set it against width, limb axis, and coat density before refining a single rosette.

Leopard head

Best for: Shoulder, outer forearm, calf, and chest-corner panels where one close feline read matters more than coat coverage.

Build: One head angle with broad muzzle, nose placement, forward eyes with lid lines, rounded ears, and a short neck or shoulder cutoff. Protect muzzle width, eye separation, and ear placement.

Failure mode: Inner eye detail, nose texture, whisker dots, and forehead rosettes crowd the face first. Rosettes touching the eyes or nose bridge erase the landmarks that carry the species read.

Size floor: Holds from about 8 cm upward for bold head work; below that, recrop tighter or drop forehead spots before touching eyes or muzzle.

Full-body profile in motion

Best for: Thigh, side, back, and rib panels with room for a long horizontal body, deep chest, four legs, and the heavy tail.

Build: One walking or standing profile with a level back line, deep chest, four separated legs, and the tail following one clean curve. Protect back line, chest depth, leg separation, and tail path.

Failure mode: Flank rosettes plus leg spots plus belly fur compete for the same lower field, and paws close into one dark pad. Leg and tail contacts merge before the back does.

Size floor: Holds from about 13 cm upward when leg gaps and tail separation stay countable at 1:1; do not force a full body into a narrow limb band.

Crouched and resting leopard

Best for: Forearm, calf, flank, and shoulder-blade placements where a compact coiled body fits the available height better than a long stride.

Build: One compact body mass with folded legs, paws tucked near the chest, and the tail wrapped along one edge. Protect the outer body mass, head placement, and the tail gap from the belly.

Failure mode: Folded legs, paws, tail wrap, and dense shoulder rosettes stack into one dark center. The tail touching the belly or paws touching the chin closes the only skin breaks in the piece.

Size floor: Holds from about 10 cm upward when paw gaps and the tail-to-belly channel stay open at 1:1; below that, recrop to the head alone.

Cross-species big-cat comparison stays on the animals owner. Tiger-face translation with stripe rhythm and floral framing stays on the tiger owner. This comparison exists to place one leopard construction correctly, not to replace those owners.

Leopard evaluation framework

Score the reference in minutes, then act on the weakest check.

Four leopard constructions at labeled sizes. Each one names the protected structure, the fix, and the go or no-go verdict at that exact size. Confirm with a measured 1:1 print.

HOLDS AT STATED SIZE

Leopard head portrait at 10 cm

Intended height 100 mm

Reference read

Close three-quarter leopard head with broad muzzle, defined nose, forward eyes, rounded ears, and scattered forehead and cheek rosettes. Strong on screen because eyes and muzzle carry high contrast, but forehead spots and cheek fragments narrow every separation near the face at this height.

Protect
Muzzle width with nose placement, both eye shapes with the bridge gap between them, and both ear placements on the head contour.
Fix
Reduce each eye to one outline plus one inner ring, hold forehead rosettes to spaced fragments with open centers, and convert cheek stipple into open skin or a few spaced dots. Do not keep whisker dots plus nose texture plus full forehead rosettes together at 10 cm.
Candidate stencil
Same leopard with an open-bridge face, separated ears, spaced open-center rosettes, grouped paws with gaps, an open tail channel, and any grass, branch, or foliage cue kept outside the body silhouette at transferable mass.
Final-size verdict
Holds at 10 cm once eyes and muzzle are single-path construction at 1:1. The broad muzzle plus ear placement carries the leopard read while spaced forehead fragments keep the spotted identity without touching the face landmarks.

MERGE ROSETTES BEFORE PRINT

Walking leopard profile at 14 cm

Intended width 140 mm

Reference read

Full-body walking leopard in side profile with a level back, deep chest, four legs in stride, heavy tail trailing, and dense flank and shoulder rosettes. Demanding on screen because back and flank spots stack rows of small closed rings that share walls at this width.

Protect
Back line with head placement, chest depth, all four leg separations, and the tail path with its gap from the rear leg.
Fix
Merge touching neighbor rosettes into fewer larger rings with open centers, open every rosette center to skin, and convert faint belly fur value into open skin. Keep leg gaps and the tail channel fully open and shorten only the shortest overlapping rosette arm where two touch.
Candidate stencil
Same leopard with an open-bridge face, separated ears, spaced open-center rosettes, grouped paws with gaps, an open tail channel, and any grass, branch, or foliage cue kept outside the body silhouette at transferable mass.
Final-size verdict
Holds at 14 cm after a density merge. Legs keep their own skin breaks at 1:1, the tail stays separated from the body, and the flank reads as spaced rings rather than one plugged field.

OPEN PAW AND TAIL GAPS FIRST

Resting leopard with wrapped tail at 11 cm

Intended height 110 mm

Reference read

Compact resting leopard with folded forelegs, tucked paws, chin near the paws, and the tail wrapped along the belly edge. Strong composition for narrow fields, but paws, chin, tail wrap, and shoulder rosettes share one crowded center at this height.

Protect
Outer body mass with head placement, both paw shapes with gaps between them and the chin, and the tail edge with its channel from the belly.
Fix
Group paw shapes into countable forms with visible gaps, hold the tail to one clean edge with an open channel along its full length, and remove or merge the three densest shoulder rosettes first. Do not keep full paw separations plus tail wrap plus dense shoulder spots together at 11 cm.
Candidate stencil
Same leopard with an open-bridge face, separated ears, spaced open-center rosettes, grouped paws with gaps, an open tail channel, and any grass, branch, or foliage cue kept outside the body silhouette at transferable mass.
Final-size verdict
Holds at 11 cm once paws and tail each keep their own skin breaks at true size. The coiled mass reads as leopard while opened gaps keep the center from printing as one dark knot.

ENLARGE OR RECROP

Dense realistic leopard with full coat detail at 6 cm

Intended height 60 mm

Reference read

Dense realistic leopard with full rosette coverage, layered fur value, fine eye and whisker detail, plus paws and tail sharing one small field. Rich on screen with hairline rosette walls and soft shading sharing the same room.

Protect
Head direction with eye placement, and the back-to-tail angle that gives the piece its intent.
Fix
Enlarge past the point where every rosette center, eye gap, paw separation, and tail channel transfers as open skin, or recrop to the head alone without body coat. Do not keep full rosette coverage plus fur value plus paw detail together at 6 cm.
Candidate stencil
Same leopard with an open-bridge face, separated ears, spaced open-center rosettes, grouped paws with gaps, an open tail channel, and any grass, branch, or foliage cue kept outside the body silhouette at transferable mass.
Final-size verdict
At 6 cm the rosette walls function as one dark field and paws print as a single pad. Enlarge, recrop to the head alone, or choose a bolder minimal construction with a few spaced rosettes for this height.

Rosettes, face, paws, and tail at final size

Judge the white space at the size you will print.

Screens forgive crowding that paper and skin do not. Set the size first, then inspect each feature below at true physical size with scaling off.

About 6 cm and below

Finger-adjacent panels, behind-ear marks, and small gap fillers.

Carry a recrop only, such as a head fragment with spaced forehead marks or one minimal resting mass with a few open-center rosettes. If a rosette center, eye gap, or paw separation closes at 1:1, enlarge or reselect rather than forcing reduction.

About 8 to 12 cm

Common shoulder, outer forearm, calf, and chest-corner leopard heads and compact resting bodies.

The most flexible band for head portraits and resting work. A muzzle-led head with spaced forehead fragments or a resting leopard with grouped paws and an open tail channel can work when every face gap and body separation is verified at true size.

About 13 cm and above

Thigh, side, back, and rib panels with room for full-body profiles and dense flank coverage.

Room for walking profiles with full rosette fields, but only when open skin separates every rosette, every leg, and the tail path. Larger size does not rescue plugged centers, closed eye gaps, or texture-bridged paws.

Leopard feature checks by size band
FeatureAbout 6 cm and belowAbout 13 cm and above
Rosette rings and centersKeep a few spaced ring fragments with open centers and open skin between neighbors. Full rings plus inner spots plus shared walls merge first and should be merged or removed at small heights.More complete rings can work when each keeps its own center gap and its own separation from neighbors at 1:1. Verify centers with a squint test at true size.
Eyes, nose, and muzzleKeep one eye outline plus one inner ring with a clear bridge gap, and one clean nose shape with open skin around it. Whisker dots, iris ticks, and nostril texture merge first and should be removed at small heights.Two ranked rings per eye plus a defined nose edge can work when each keeps its own spacing at 1:1 and the muzzle contour stays dominant over nearby spots.
Legs, paws, and tailGroup paws into countable shapes with visible gaps and keep the tail to one clean edge with an open channel. Individual toes and tail spots should go before paw gaps close.Separated toes and spaced tail marks can work when each gap keeps its own spacing. Paws and tail still need their own skin breaks from belly and leg lines.
Fur value and background cuesKeep no shaded fur value, grass texture, branch detail, or moon and foliage cues. Plan any coat modeling as open skin or a few spaced dots on the stencil itself.Spaced stipple can carry coat depth when each mark keeps its own spacing. Ground, branch, or foliage cues need their own skin breaks outside the body silhouette.

Spotted coat versus stripe coat

Fix density for leopards, fix direction for tigers.

This is the boundary that justifies a distinct leopard owner. Same big-cat family, opposite failure mode and opposite fix.

Spotted coat: merge and open

Fix crowding by merging neighbor rosettes into fewer larger rings, opening every center to skin, and converting faint fur value into open skin or spaced stipple. Count is the lever: fewer, better-spaced marks with open centers.

Stripe coat: remove or re-aim

Fix crowding by removing whole bands, shortening tapered ends, or re-aiming bands along muscle flow. Direction is the lever: fewer bands with clean taper and clear flow carry the tiger read.

What not to borrow

Do not treat rosettes as short stripes or stripes as stretched rosettes. Re-aiming rosette fragments along the back creates snakeskin-like banding, and breaking tiger bands into dots creates a spotted look neither species owns.

Tiger-face translation with stripe rhythm and floral framing stays on the tiger owner. This section exists so a leopard reference is never simplified with stripe logic.

Reference to clean stencil

Build from the head outward, then protect the gaps.

Work in this order so one change at a time can be judged at the same size. Stop when head, rosettes, paws, tail, and cues each read correctly.

  1. 01

    Lock view, size, and placement first

    Set the view in one line (head, full-body profile, or resting), the intended physical width or height in millimeters, and the named body area. A walking leopard that holds at 14 cm on a thigh can fail at 6 cm on a wrist with no line being wrong on its own. Use the size calculator when target dimensions are still open.

  2. 02

    Verify the view against the placement

    Match long walking bodies to wide flat fields and head or resting masses to narrow or curved fields. Confirm the view fits the available span, then rank the composition: head plus body silhouette first, rosette spacing second, fur value and background cues last. Resolve paw crowding, tail contact, and rosette plugging before touching line weight.

  3. 03

    Set lead versus support roles

    Assign every mark a role: lead structure that carries the first read, support that shapes the animal, and texture that can be removed. Strengthen head contour, eye and nose shapes, outer body edge, and tail path first, keep rosette rings lighter than the silhouette, and mark one removable rosette cluster or cue that can go if gaps close.

  4. 04

    Simplify rosettes, face, paws, and tail at 1:1

    Merge touching rosettes, open every kept center to skin, group paws with visible gaps, and hold the tail channel open along its full length. Run a squint check: step back until fine rings blur and confirm the head, back line, and tail still read. The line-weight guide covers fine, normal and bold behavior on the same stencil.

  5. 05

    Verify print and transfer path

    Export a true-size PDF with no fit-to-page scaling, inspect the tightest rosette center, the narrowest eye gap, the smallest paw separation, and the tail channel on plain paper, then measure the physical print with a ruler. If the digital file passes and only paper fails, move to print-stage evidence instead of simplifying again.

Placement and composition decisions

Long bodies want flat width, heads want a cap or limb axis

A leopard is either a long walking profile, a close head portrait, or a compact resting mass. Flat placements preserve stride and tail with little compensation, while curved placements demand the matching view.

Thigh and side

Large panels with room for full-body walking profiles and dense flank rosettes. The flat span preserves leg separation and tail path with little compensation.

Check: Center the body on the flattest span, spend the extra room on rosette spacing and leg gaps first, then decide whether belly value or background cues earn their detail.

Shoulder and chest corner

Curved cap fields where a leopard head or compact resting mass follows the deltoid curve well, while long walking bodies wrap fast and crowd paws and tail tips.

Check: Choose a head portrait or resting recrop aligned with the cap flow, keep forehead spots clear of the eyes, and confirm head, paw, and tail clearance at the exact millimeter size.

Back and ribs

Tall panels where resting or standing bodies fit the vertical axis. Breathing movement shifts the read, so tail and paw contacts that look open on paper can touch on skin.

Check: Align the spine with the body axis, keep the tail channel wider than the paper minimum, and verify every paw gap at 1:1 before print.

Forearm, calf, wrist, and ankle

Narrow wrapped fields where only head portraits or minimal resting masses survive. Full walking bodies, complete rosette fields, and tail plus paw detail forced into these bands merge first.

Check: Recrop to head plus a few spaced rosettes or one minimal resting mass with grouped paws or none, align the body axis with the limb line, then run the small-size checks at the exact height.

Stencil-ready checklist

Approve the leopard only when every line passes

Run this short sequence with scaling off and a ruler in hand. One failed line means fix, enlarge, or reselect before transfer.

  • Confirm the head, profile, or resting choice with intended size in millimeters and the named placement.
  • Confirm every kept rosette shows its own center gap and its own separation from neighbors at 1:1.
  • Confirm eyes stay separated with an open bridge gap and the muzzle plus nose keep their own skin breaks.
  • Confirm paws group into countable shapes with visible gaps and the tail holds an open channel from the body.
  • Confirm fur value and background cues total one hint or zero with no merged channels.
  • Export a true-size PDF with scaling off and measure the physical print.
Open centers first Verify gaps at 1:1 Paws and tail stay separate

FAQ

Leopard stencil decisions, answered

Short answers for the rosette, head, spotted-versus-stripe, size, and placement checks that recur when a leopard reference moves toward transfer-ready output.

It is ready when four checks pass at the exact physical size: every kept rosette shows its own center gap and its own separation from neighbors, both eyes stay separated with an open bridge gap, paws group into countable shapes with visible gaps, and the tail holds an open channel from the body. If any check fails, the fix list on this page names what to merge, reopen, enlarge, or recrop before print.

Next steps

Use the neighboring owners for adjacent jobs.

This guide covers leopard view choice, size-tied rosette, face, paw, and tail vetting, spotted-versus-stripe differentiation, placement decisions, and reference-to-stencil preparation. Use the links below for related jobs such as sizing, print checks, paper, and placement.

Cross-animal comparison, tiger stripe and floral depth, subject-indexed browsing, photo conversion mechanics, board curation, paper manufacturing detail, and placement mechanics stay in their specialist owners. The links above hand off instead of repeating that detail.

From evaluated reference to working stencil

Turn the approved leopard into a stencil draft.

Start from the leopard that passed the rosette, head, paw, and tail checks, then continue on iPhone for body fit, exact-size print, mirror and professional export.