Diamond stencil evaluation

Pick the diamond that survives transfer

A diamond reads through four sharp corners, a level vertical axis, and open gaps inside every facet channel. Choose the variant for your height, prove symmetry and voids at true size, then transfer with a diamond-specific placement plan.

Built for working artists preparing diamond emblem pieces. This page covers diamond variant choice across faceted, minimal outline, and ornamental or paired constructions, facet line, symmetry, and internal-gap vetting at final size, plus diamond transfer prep only, not tattoo application or healing advice. Sacred geometry direction stays with the geometric owner and cross-symbol comparison stays with the symbols owner.

Diamond versus neighboring jobs

Name the shape job before judging the reference.

A diamond emblem is a symmetric gem judged on corners, facet separation, axis, and upright orientation. These boundaries keep it out of neighboring owners that solve different stencil problems.

Covered here

Diamond variant choice across faceted, minimal outline, and ornamental or paired constructions, facet line, symmetry, internal-gap, and small-size hold checks at final size, and transfer-ready sizing, print, and placement notes scoped to the diamond shape.

Neighboring owners keep

Sacred geometry and dotwork direction stays with geometric depth, cross-symbol silhouette and readability comparison stays with symbols depth, and cross-subject library browsing stays with subjects depth.

Geometric owner for direction depth, symbols owner for cross-symbol depth, and subjects owner for library browsing depth.

Diamond evaluation framework

Pick the variant first, then act on the weakest check.

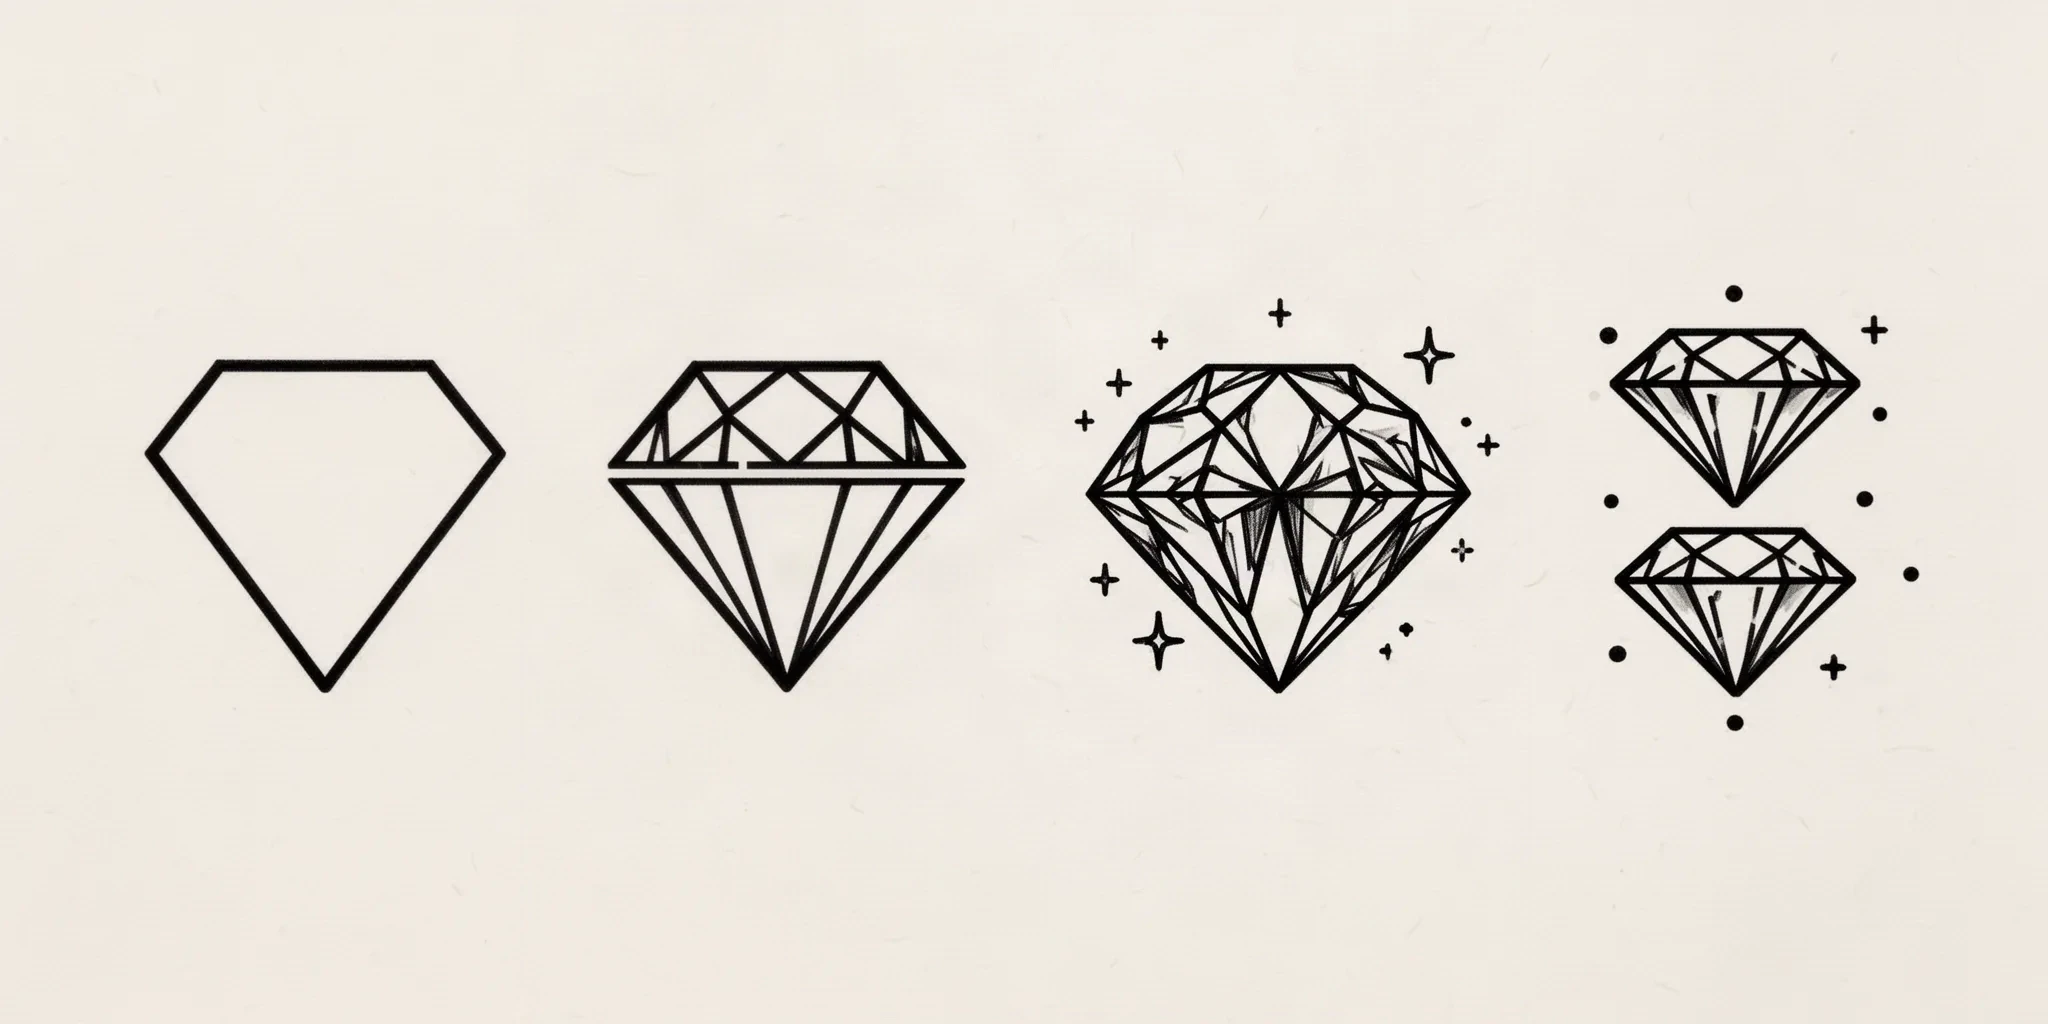
Four diamond constructions at labeled heights. Each one names the protected structure, the fix, the placement fit, and the go or no-go verdict at that exact size. Confirm with a measured 1:1 print.

Line-art comparison of four diamond constructions in a row: a minimal outline diamond with an empty interior, a faceted classic diamond with a flat table and girdle line, a dense brilliant cut surrounded by separated sparkle accents, and two stacked diamonds with spaced dot accents.
Illustrative construction reference only, left to right: minimal outline, faceted classic, brilliant cut with sparkle accents, and a stacked ornamental pair. Synthetic artwork, not app output or a measured stencil file. Proportions are indicative, so prove facet channels, symmetry, and internal gaps on a true-size print of your own reference before transfer.

MOST FORGIVING STARTER

Minimal outline diamond at 3 cm

Intended height 30 mm

Source
A clean gem silhouette: four straight outer edges with pointed top and bottom, no interior facet lines. Reads as a diamond through the outline alone, so it survives fingers, wrists, behind-ear fields, and small gap fillers.
Protect
Four straight edges meeting at four sharp corners, level vertical axis, and open skin inside and outside the single contour.
Fix
Keep one outline with no doubled inner line. Set the top and bottom points on the vertical axis first, then match left and right corners as a mirrored pair. Remove any interior tick or dot that touches the outline before shrinking the piece.
Candidate stencil
Same diamond with leveled axis, mirrored halves, single outline contour, ranked facet and accent zones held at transferable mass.
Placement fit
Best for: finger side, wrist, ankle, behind ear, and small gap fillers on a straight run.
Trade-off
Avoid when: the client wants visible gemstone cut detail, because there is nowhere for facets to live at this height. Choose a faceted variant only with a larger field.
Final-size verdict
Holds at 3 cm once all four edges print as continuous marks at true size and every corner stays sharp. When an edge breaks, fix the outline before adding any facet detail.

CHECK FACET GAPS

Faceted classic diamond at 5 cm

Intended height 50 mm

Source
A recognizable cut gem: flat table top, crown facets above the girdle, and pavilion facets tapering to the bottom point. Strong on screen because the facet network carries the read, but neighboring facet lines bridge into gray patches when the height drops.
Protect
Outer silhouette with four sharp corners, girdle line level across the middle, table shape centered on the vertical axis, and open channels between neighboring facet lines.
Fix
Lock the silhouette and girdle first, then thin the facet count rather than the facet spacing. Merge the shortest inner facet ticks before redrawing the table, and keep every facet line clear of its neighbor with visible skin between them at 1:1.
Candidate stencil
Same diamond with leveled axis, mirrored halves, single outline contour, ranked facet and accent zones held at transferable mass.
Placement fit
Best for: forearm, outer calf, shoulder cap, and chest panels with a flat run for the full facet field.
Trade-off
Avoid when: the field wraps fast or forces the diamond below 4 cm, because pavilion facets pinch shut near the bottom point. A minimal outline survives narrow fields better.
Final-size verdict
Holds at 5 cm once each facet channel traces as its own separation at true size with the table covered. Facet count decides the minimum height, so never rescue a closing channel by adding more facets.

NEEDS THE MOST ROOM

Brilliant-cut diamond with sparkle accents at 8 cm

Intended height 80 mm

Source
A high-detail gem: dense crown and pavilion facet web plus small sparkle ticks or dot accents around the silhouette. Rich on screen with many small enclosed voids, and every accent edge is a potential bridge at stencil size.
Protect
Full outer silhouette with mirror symmetry, ranked facet web with one readable table, and sparkle accents held outside the silhouette with open skin on every side.
Fix
Rank one facet family and demote the rest to plain outline. Keep sparkle ticks countable and separated from the silhouette at 1:1, convert the smallest dots to spaced single marks or remove them, and hold open skin between the facet web and every accent.
Candidate stencil
Same diamond with leveled axis, mirrored halves, single outline contour, ranked facet and accent zones held at transferable mass.
Placement fit
Best for: thigh, upper back, chest, and outer upper arm panels with flat area for the facet web plus accents.
Trade-off
Avoid when: the placement forces the diamond below 6 cm, because facet webs fill and sparkles merge into the outline. Recrop to a classic faceted or minimal diamond for smaller fields.
Final-size verdict
Holds at 8 cm once the facet web reads as separate lines at true size with accents covered. The smallest sparkle decides the minimum height.

CHECK UNIT SPACING

Ornamental and paired diamonds at 6 cm

Intended composition height 60 mm

Source
A decorative arrangement: two stacked or side-by-side diamonds, or one diamond dressed with dot rows, fine flourishes, or a thin frame. Recognition-led because the pairing rhythm must read as intentional, and every gap between units must survive as open skin.
Protect
Each diamond unit with its own sharp corners and axis, the pairing rhythm with even spacing, and every dot or flourish held as a separate mark with open skin around it.
Fix
Set unit spacing before judging any single diamond. Build one diamond, copy its proportions to the partner, then open the channel between units until it reads at 1:1. Remove the weakest flourish or dot row before shrinking the composition.
Candidate stencil
Same diamond with leveled axis, mirrored halves, single outline contour, ranked facet and accent zones held at transferable mass.
Placement fit
Best for: sternum drops, spine runs, collarbone lines, and forearm bands with a straight directional run.
Trade-off
Avoid when: the field is short or curves across the pairing axis, because the far unit compresses and the gap between diamonds pinches shut. A single diamond fits short or curved fields better.
Final-size verdict
Holds at 6 cm once both diamonds read as separate units at true size and every dot and flourish holds its own separation. Shared spacing carries the read, so never rescue a crowded pair by thickening outlines.


Sacred geometry direction, dotwork shading systems, cross-symbol comparison, and broad library browsing stay in their owners. This framework exists to judge diamond variant fit, facet and corner spacing, and symmetry at a stated height, not to replace those guides.

Internal-gap and symmetry vetting

Mirror every pair before approving the diamond.

Diamonds fail on three contacts first: bridged facet lines, rounded corners with doubled outlines, and filled table voids, plus one tilt axis when halves or paired units drift off center. Run each check below at true size.

Facet lines and channels

Fails as: Neighboring facet lines share one edge and print as a single gray patch, or the shortest inner facet ticks touch the table outline and trap the channel between them.

Fix: Reduce facet count before touching line mass. Keep every facet channel traceable as open skin at 1:1, merge the weakest inner ticks first, and hold each surviving facet line clear of the table and girdle.

Silhouette corners and edges

Fails as: The top or bottom point rounds off, one edge bows, or a doubled inner line prints as one thick bar so the diamond reads as a soft lozenge.

Fix: Carry one outline contour with four straight edges and four sharp corners. Set the top and bottom points on the vertical axis, remove the second inner line rather than thinning it, and recheck corners at the exact millimeter height.

Symmetry axis

Fails as: Left and right halves differ in edge length or facet count, so the diamond leans even when the points sit on center, and paired diamonds tilt away from each other.

Fix: Draw the vertical midline first, build one half, and mirror it across that line before adding any facet or accent. Size facets and jewels from the center pair outward so both sides stay matched.

Table and girdle voids

Fails as: The flat table top fills into a solid bar because its enclosing lines are too close for the height, or the girdle line merges with crown and pavilion facets above and below it.

Fix: Keep the table as one countable opening with open interior at true size, and hold open skin on both sides of the girdle. When a void closes, enlarge the field or simplify the facet web, never shift the silhouette to meet a drifting table.

Sparkle and dot accents

Fails as: Sparkle ticks touch the silhouette and trap the gap between accent and edge, or dot rows print as one textured band because neighboring dots share edges.

Fix: Hold every accent clear of the outline with a visible break, and keep dots countable as separate marks at 1:1. Convert the smallest accents to spaced single marks or remove them before approving the composition.

Paired-unit spacing

Fails as: Two diamonds share one edge or sit so close that the channel between them prints as a single blob, so a deliberate pair reads as one malformed stone.

Fix: Open the inter-unit channel until it traces from open air to open air at true size. Keep unit spacing even along the pairing axis, and remove a flourish or dot row that competes with that channel.

About 3 cm and below

Finger sides, wrists, ankles, behind-ear pieces, and small gap fillers.

Carry a minimal outline diamond only, with one contour and four sharp corners. Keep no facet web, no sparkle rows, and no paired second unit. If an edge breaks or a corner rounds at 1:1, enlarge or reselect rather than forcing reduction.

About 4 to 6 cm

Common forearm, calf, shoulder, collarbone, and sternum-drop diamond pieces.

The most flexible band. A faceted classic or a compact ornamental pair can work when every facet channel, corner, and inter-unit gap is verified at true size. Check mirror symmetry before approving any accent.

About 8 cm and above

Large thigh, back, chest, and upper-arm panels.

Room for brilliant-cut facet webs with sparkle accents and wider ornamental pairings, but only when open skin separates silhouette, facet web, table, and every accent at true size. Extra height does not rescue bridged facets or merged pairs.

Reference to clean stencil

Work in this order so one change can be judged at size.

Diamond preparation is sequencing work. Lock the variant, prove symmetry, rank decoration, then prove the print.

  1. 01

    Lock variant, height, and placement first

    Set the intended physical height in millimeters, name the body area, and choose minimal outline, faceted classic, brilliant-cut, or ornamental and paired construction before judging the reference. A brilliant-cut diamond that holds at 8 cm on a thigh can fail at 3 cm on a finger with no line being wrong on its own. Use the size calculator when target dimensions are still open.

  2. 02

    Set the axis and mirror the silhouette

    Draw the vertical center, place top and bottom points on it, then mirror edges and facets left to right before judging any sparkle. Fix asymmetry by mirroring the stronger half, not by adding more facet lines to the weaker one.

  3. 03

    Rank structure over decoration

    Assign every mark a role: silhouette and girdle that carry the first read, facet web that shapes the cut, and sparkles or flourishes that finish it. Protect corners, axis, and table first, then decide which accent earns its room at this height.

  4. 04

    Hold gaps at 1:1 with a true-size print

    Export a true-size PDF with no fit-to-page scaling, inspect the narrowest facet channel, the tightest corner, and the smallest accent gap on plain paper, then measure the physical print with a ruler. Run a squint check: step back until fine ticks disappear and confirm the diamond still reads as a diamond.

  5. 05

    Verify print and transfer path

    If the digital file passes and only the paper print fails, move to print-stage evidence: the print checker and the paper guide linked below. Do not simplify the diamond further to compensate for a scaling or printer setting error.

Placement notes

Upright diamonds need a level axis and a planned anchor

A diamond is a directional gem: the points must read upright on the body, so axis alignment and anchoring are part of the stencil, not an afterthought.

Forearm and outer calf

Long straight fields where the vertical axis can sit level along the limb. Facet lines read cleanly here with little compensation.

Check: Align the diamond axis with the limb axis, keep full point height inside the flat run, and mirror facet spacing at 1:1 before print.

Chest and sternum

Broad or vertical panels with room for larger faceted and brilliant-cut diamonds, but the body midline becomes part of the design and any lean shows immediately.

Check: Center the diamond axis on the body midline, hold sparkles clear of the silhouette, and preview on a body photo before locking facet count.

Hand, finger side, and wrist

Small curved fields where only minimal outline diamonds survive. Facet webs fill and tall pavilions overhang the bone line.

Check: Carry a minimal outline diamond with four sharp corners, keep the interior empty, and confirm every edge stays continuous at the exact millimeter height.

Thigh and upper back

Large panels with room for brilliant-cut webs, sparkle fields, and ornamental pairings. Extra room suits detail, but facet and spacing checks still apply.

Check: Spend the extra room on facet channels and inter-unit spacing first, then decide whether sparkle rows or a second diamond earn their detail.

Transfer-ready checklist

Approve the diamond only when every line passes

Run this sequence with scaling off and a ruler in hand. One failed line means fix, enlarge, remove an accent row, or reselect before transfer.

  • Confirm the variant, intended millimeter height, and named placement with the reason for the choice.
  • Confirm all four corners stay sharp and every outer edge prints continuous at 1:1.
  • Confirm left and right halves mirror across the vertical axis with matched facet counts.
  • Confirm every facet channel and the table void hold open separation at true size.
  • Confirm sparkles, dots, and paired-unit gaps hold their own breaks from the silhouette.
  • Export a true-size PDF with scaling off and measure the physical print with a ruler.

Transfer a diamond without dragging the axis

Anchor the top point or the lead edge first, smooth toward the free end in short passes, and lift to confirm the axis before the second unit touches skin. Long pairings smear when the free end slides, so recheck spacing against body landmarks after placement. If the first contact looks faint or patchy, diagnose the layer with the transfer troubleshooter instead of pressing harder.

Open the transfer troubleshooter
Mirror every pair first Verify gaps at 1:1 Anchor the top point level

FAQ

Diamond stencil decisions, answered

Short answers for the variant, gap, symmetry, small-size, and transfer checks that recur when a diamond reference moves toward transfer-ready output.

Match the construction to the available height. A minimal outline diamond suits fields at about 3 cm and below because the silhouette alone carries the read. A faceted classic diamond suits forearm and calf fields near 5 cm when every facet channel stays open. A brilliant-cut diamond with sparkles needs about 8 cm so the facet web and accents keep their separation. An ornamental or paired diamond needs about 6 cm so the channel between units reads as open skin.

Next steps

Use the neighboring owners for adjacent jobs.

This guide covers diamond variant choice, facet, corner, and internal-gap checks, symmetry verification, and diamond transfer prep. Use the links below for related jobs such as sizing, print checks, and specialist depth.

Sacred geometry direction, cross-symbol comparison, library browsing, photo conversion mechanics, paper manufacturing detail, and placement mechanics stay in their specialist owners. The links above hand off instead of repeating that detail.

From evaluated reference to working stencil

Turn the approved diamond into a stencil draft.

Start from the diamond that passed the variant, gap, symmetry, and placement checks, then continue on iPhone for body fit, exact-size print, mirror and professional export.