

Troubleshooting
Why Does My Tattoo Stencil Printer Get Darker on Later Prints?
First stencil print looks right, but a second or later identical print gets darker, heavier, or more filled? Freeze the job, compare the sequence, and change one supported variable at a time.
tattoo stencil printer later prints darker · tattoo stencil printer darker second print · repeated stencil prints · thermal stencil printer sequence drift
- September 7, 2026
- September 18, 2026
- 8 min
If Print 1 looks right but Print 2 or a later identical copy becomes darker, heavier, or more filled, freeze the job before changing the artwork or assuming hardware failure.
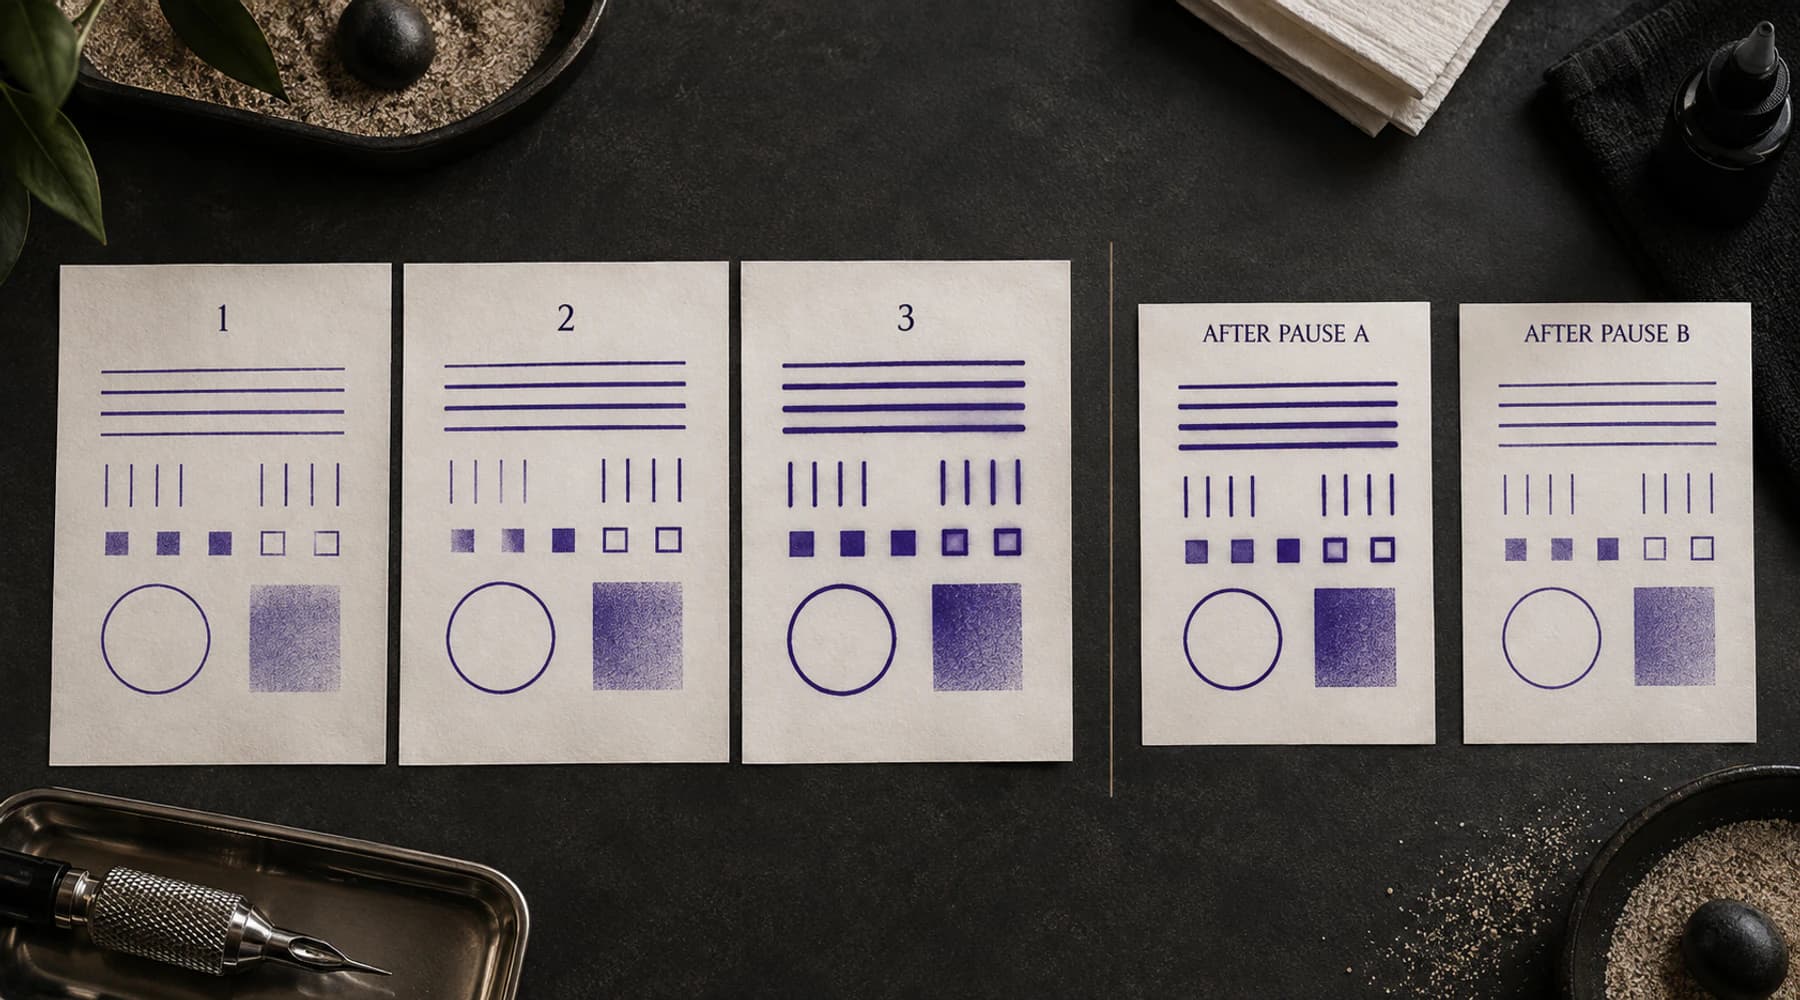
A qualifying sequence does not need to get darker after every single sheet. It may step darker on Print 2 and plateau, worsen only after several prints, partly move back toward Print 1 after a pause, or become intermittent. The defining clue is that Print 1 passes and later output changes with run sequence or elapsed printer state while the practical job stays nominally the same.
Do not immediately thin the artwork or assume the printer is overheating. This pattern narrows the investigation, but it does not identify a failed component by itself.
First keep the job as unchanged as possible and confirm that the output really changes across repeated prints:
- same exact file;
- same physical size;
- same mirror state;
- same tattoo transfer paper and preparation;
- same app or driver path;
- same supported printer setting.
Then compare the same line, gap, counter, or dark region on each sheet.
The useful question is:
After a passing Print 1, does the same unchanged job change as the run continues or after a recorded pause?
If Print 1 is already wrong, use the static diagnostic instead:
- Tattoo Stencil Too Dark if the first sheet is already heavy;
- Printer Filling In Gaps if clean gaps are already closed on Print 1;
- Broken Lines if lines are already discontinuous;
- Print Missing Detail if features are already absent;
- Printer Faint Lines if the first sheet is globally weak.
Stay here when the first sheet is usable and later nominally identical prints change.
Freeze the file before another test
Do not change the client stencil while you are trying to see whether repeated printing changes the output.
Keep these fixed where practical:
File and layout
- exact final file;
- physical dimensions;
- mirror state;
- rotation and page placement;
- export actually being sent to the printer.
Printer path
- same printer;
- same app, driver, or companion app;
- same documented mode;
- same supported darkness/density setting.
Paper
- same exact transfer-paper product;
- same preparation and layer setup;
- same sheet size;
- same loading direction.
Also note anything obvious that does change during the run, such as battery level, a warning light, a restart, a long pause, or a switch from battery to external power.
You do not need a lab notebook. A few labels on the sheets are enough.
Make Print 1 the reference sheet
Before printing more copies, choose a few features on the first acceptable sheet:
- one medium line;
- one fine line;
- one known gap or counter;
- one dense area;
- one small detail that matters.
Label that sheet Print 1.
Do not rely on a general impression like "it looks good." You want to be able to compare the same marks on Print 2 and Print 3.
A simple sequence note can look like this:
| Print | What changed? | |---|---| | 1 | Gap open, medium line looks normal | | 2 | Gap narrower, line heavier | | 3 | Gap closed, dense area expanded |
That is more useful than guessing percentages.
Describe what is actually getting darker
"Darker" can mean several different things.
The whole sheet becomes heavier
Most lines and dark areas gain visual weight together.
Lines get wider
Existing marks become physically broader, even when their position stays the same.
Gaps and counters close
Two marks that were separated on Print 1 grow into each other on later sheets.
Solid areas spread
A dark block extends farther into nearby detail.
Only one area changes
One region becomes heavier while similar marks elsewhere remain stable.
Continuity changes
A line that printed continuously on the first sheet later develops gaps or another continuity problem.
A new mark appears
A stripe, streak, or black line appears later even though it is not in the file.
Once you know the visible change, you can route it correctly. For example, gap closure belongs with Printer Filling In Gaps, while a genuinely new mark belongs with Black Lines or Streaks.
The reason to stay on this page is that the problem changes with print order after an acceptable first sheet.
Look for one of four simple sequence patterns
Keeps getting heavier
Print 1 is acceptable, Print 2 is heavier, Print 3 heavier again.
That is a genuine repeated-run pattern worth investigating. It still does not tell you the cause.
Changes once, then stays similar
Print 1 is good, Print 2 becomes heavier, Prints 3 and 4 look roughly like Print 2.
Describe that as a one-step change followed by stability rather than "gets darker every print."
Moves back toward Print 1
A later sheet becomes closer to the original acceptable output, especially after a recorded pause or restart.
That tells you the effective print condition changed again. It does not prove which hidden condition changed.
Changes randomly
Print 2 is heavier, Print 3 looks better, Print 4 changes in another way.
That is not strong support for a simple "every print gets darker" pattern. Keep the file fixed and use the broader Printer Troubleshooter.
Run one pause-and-recovery check
If Print 1, 2, and 3 show a clear repeatable progression, make one deliberate pause without changing the file, paper setup, or nominal printer setting.
Record roughly how long you paused, then print the same job again and compare the same features.
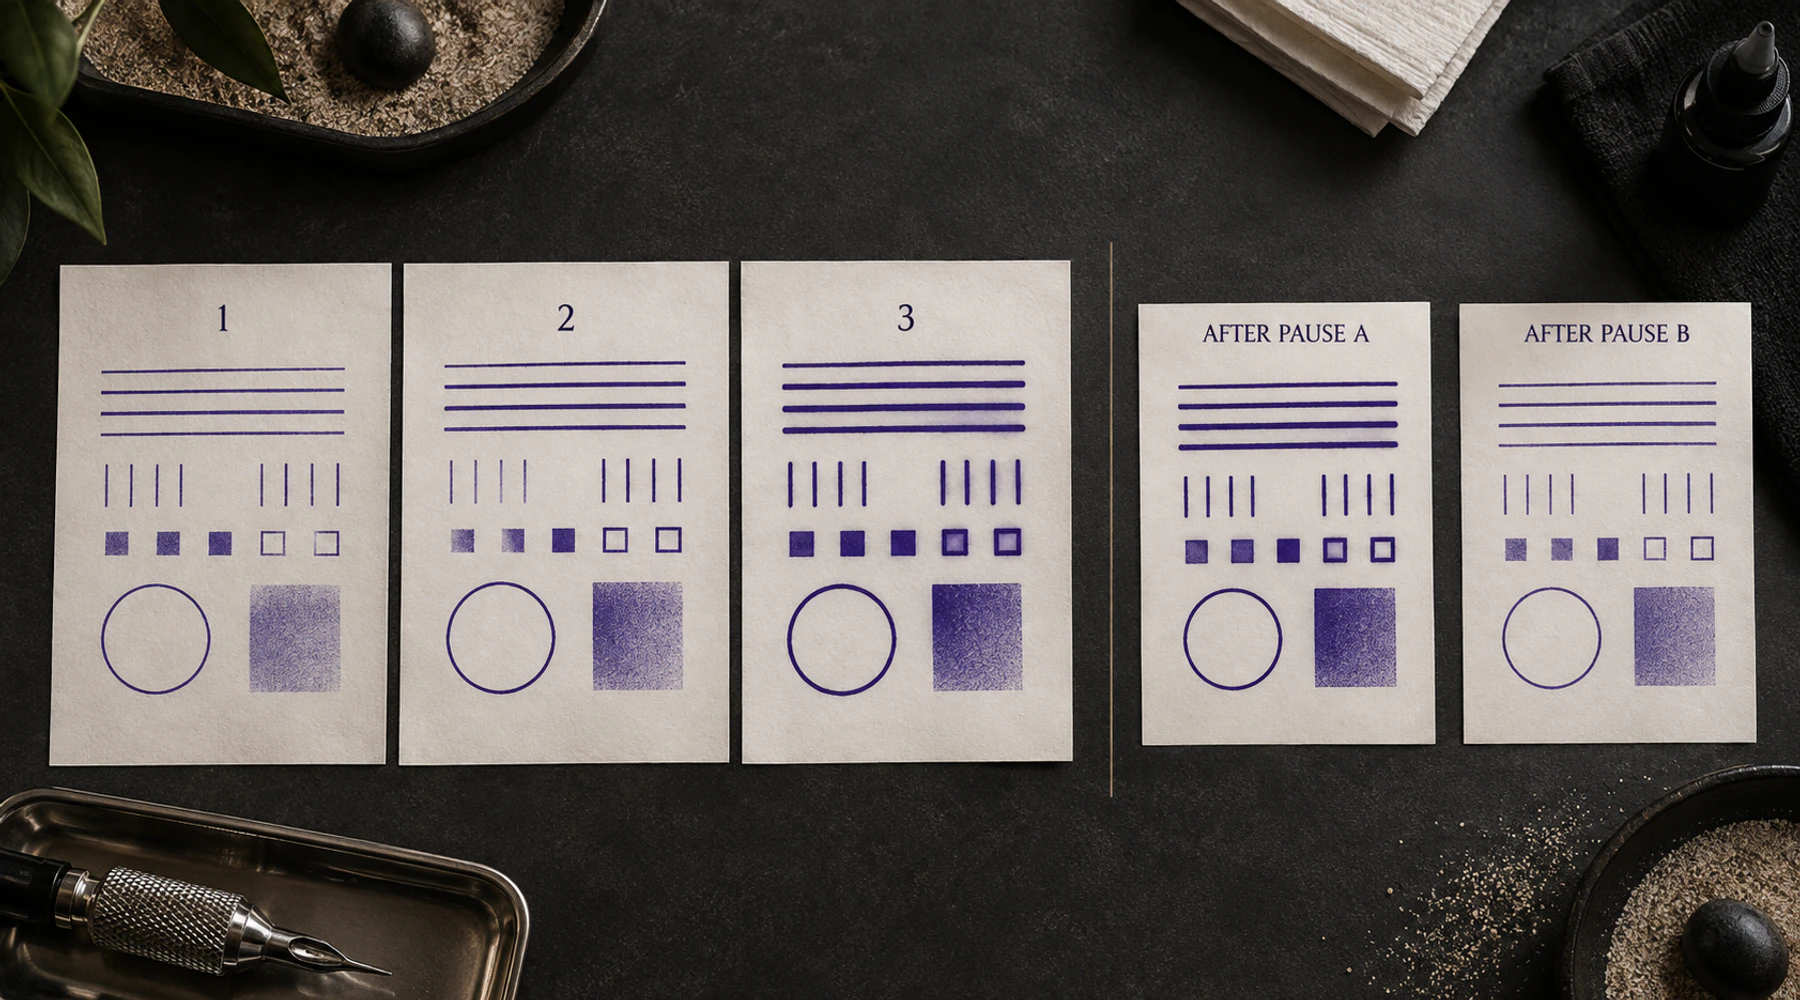
Possible outcomes:
Still heavy after the pause
The pause did not bring the visible output back toward Print 1 under the conditions you tested.
Partly returns toward Print 1
Something about the effective printing condition changed during the pause.
Looks like Print 1 again
The heavier output was not permanently fixed across the test. That is useful, but it is not proof of overheating.
Changes in a new random way
Treat the result as inconsistent and broaden troubleshooting rather than forcing a simple sequence explanation.
Do not turn your pause duration into a universal cooldown rule. If the exact printer documents a cooling state or waiting period, follow that model's guidance.
Compare the sequence with a known test sheet
A client stencil can make it hard to tell whether the progression is specific to that artwork.
Use the same Tattoo Stencil Printer Test Sheet for two or three consecutive prints. It gives you fixed lines, gaps, counters, dark regions, and a 50 mm scale mark.
Check the scale mark first. If physical size changes between prints, comparing line width or gap size becomes much less useful.
Then compare the same features across the sequence.
Client stencil gets heavier, test sheet stays stable
The repeated change may be more specific to the client job, its density, document structure, or the path used to print that file.
Recheck the client file and print setup before changing hardware variables.
Client stencil and test sheet both get heavier
Now the broader printer/paper/state path deserves more attention because independent geometry changes in the same direction.
Move into the Printer Troubleshooter and the exact printer's support documentation.
Test sheet changes randomly
Do not call that proof of cumulative darkening. Treat the printer output as inconsistent and troubleshoot accordingly.
Repeated thermal printing can be state-dependent, but do not guess the cause
Some thermal-printer manufacturers document that repeated or dense printing can change device state.
Brother, for example, documents on its PJ-763MFi support page that the thermal head can become too hot during many high-content prints, that unintended imaging can occur, and that printing may stop until the head cools. See Brother's PJ-763MFi indicator guidance.
Phomemo's current M08F quality guidance lists battery level, print density, print-head cleanliness, image quality, app version, and firmware/support information among its troubleshooting checks. See Phomemo M08F print-quality guidance.
Those examples support only a careful conclusion:
printer state and supported settings can matter on particular models.
They do not justify saying:
- later prints are darker, therefore the head is overheating;
- every tattoo stencil printer needs the same cooldown time;
- every printer should use the same darkness setting;
- a darker second print proves a particular component has failed.
Use the instructions for the exact device you have.
Change one supported variable at a time
Once the progression is repeatable, choose one test that can actually answer a question.
Depending on the printer's documented controls, that may be:
- one recorded pause;
- one supported darkness/density change;
- one supported power/battery condition;
- corrected paper preparation or loading;
- the known test sheet instead of the client file.
Do not change paper brand, file, darkness, app, power, and pause duration together.
If the next print improves after six changes, you still do not know what mattered.
Do not thin the client stencil to compensate for an unstable run
Suppose the same file gives you:
- Print 1: correct;
- Print 4: thicker lines and closed gaps.
If you thin the artwork until Print 4 looks acceptable, the next fresh run may produce an underweight Print 1.
Keep the passing file while you investigate the changing output.
Only adapt the stencil after the printing process is stable enough that a remaining limitation is consistent and genuinely tied to the artwork at its real size.
Use the Tattoo Stencil Print Checker if you need to confirm that the final digital geometry itself remains reasonable at the intended physical size.
Route the later-print symptom after you confirm the sequence
Print 1 already too dark: use Tattoo Stencil Too Dark.
Later lines get wider or gaps close: use Printer Filling In Gaps.
Later lines become broken: use Broken Lines.
Later details disappear: use Print Missing Detail.
Later unwanted black marks appear: use Black Lines or Streaks.
Known test geometry changes too: use the Printer Troubleshooter and the current manufacturer guidance for the exact model.
Studio recovery checklist
- Keep the exact client file unchanged.
- Label the first acceptable sheet as Print 1.
- Choose one line, one gap, and one dark area to compare.
- Print only enough repeated copies to establish whether a real progression exists.
- Record any pause, restart, warning, or power change.
- If the pattern is clear, make one pause-and-recovery comparison.
- Repeat a short sequence with the Printer Test Sheet.
- Decide whether the change is client-specific or appears on known geometry too.
- Use only supported, model-specific adjustments from there.
- Do not alter the approved client stencil merely to compensate for an unstable print sequence.
The goal is not to prove a hidden hardware theory. It is to establish whether a passing Print 1 stops matching later nominally identical output as the run continues, then hand the visible failure to the correct printer, paper, morphology, or model-specific troubleshooting step.
Related Guides
Keep reading from here
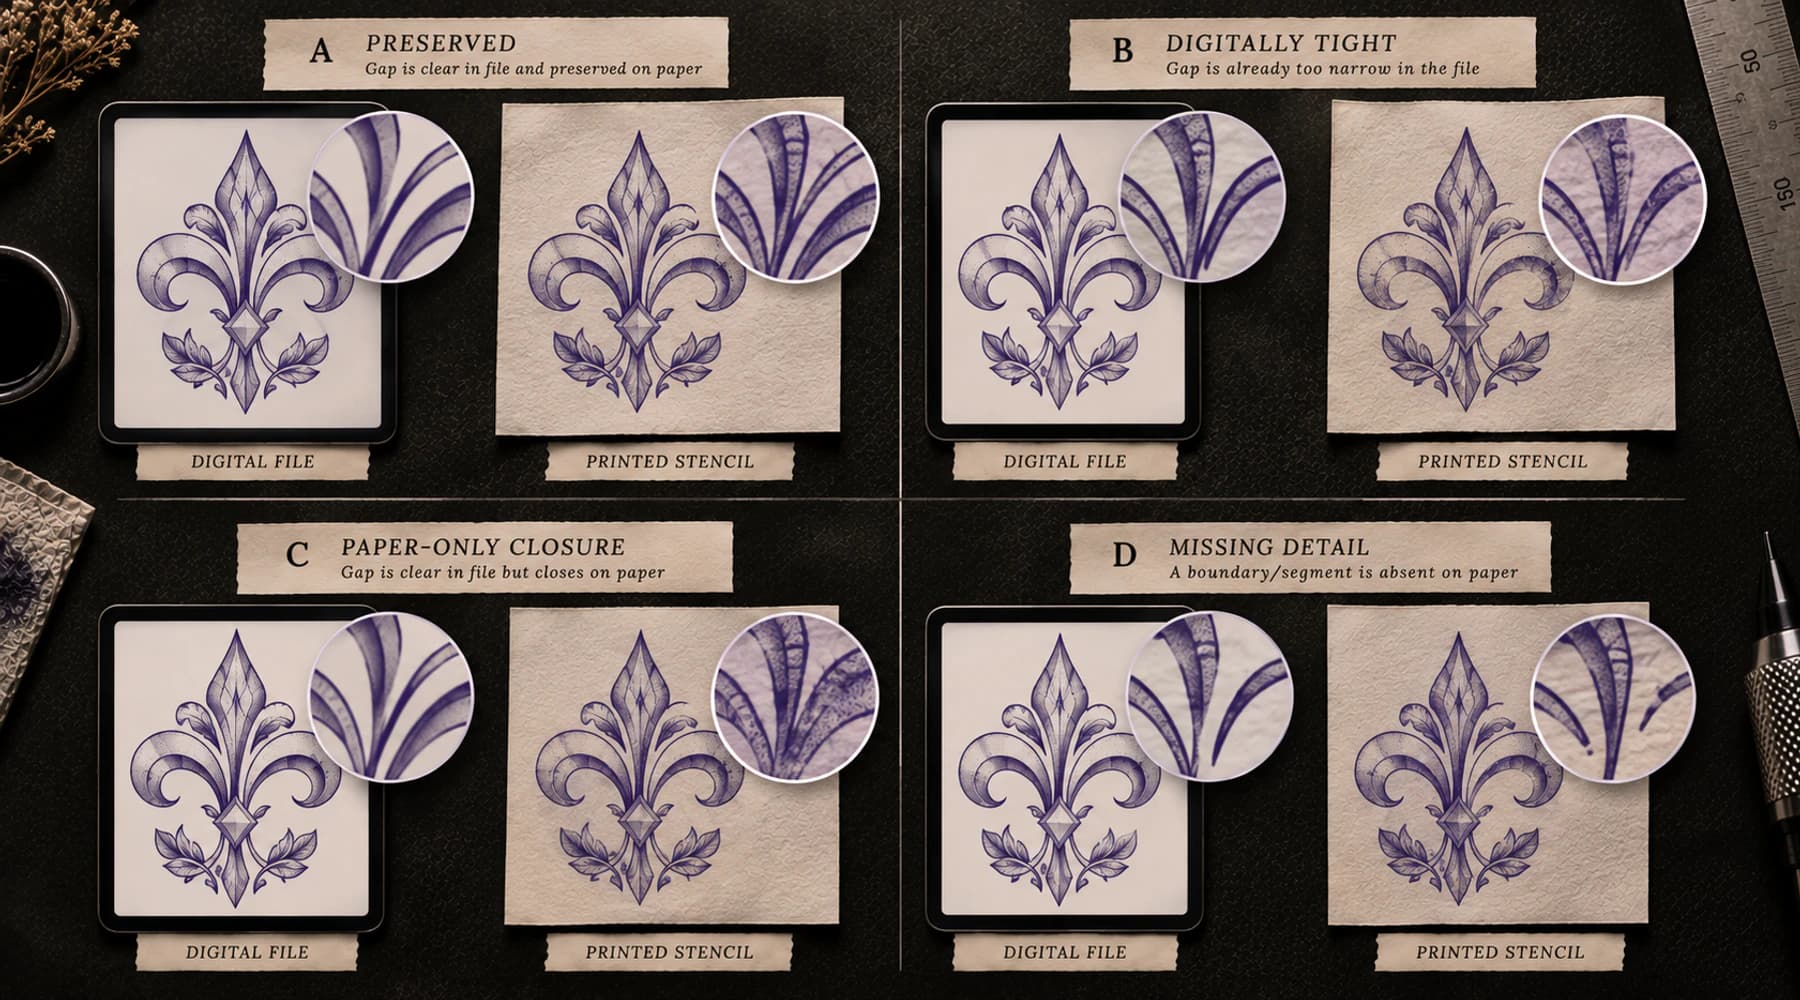
Tattoo Stencil Printer Filling In Gaps? Compare File vs Paper
If clean digital stencil gaps close on paper, compare the same final-size geometry through preview, scale, and a known control to find where extra mark mass appears.
tattoo stencil printer fills gaps · tattoo stencil printer lines too thick
Read guide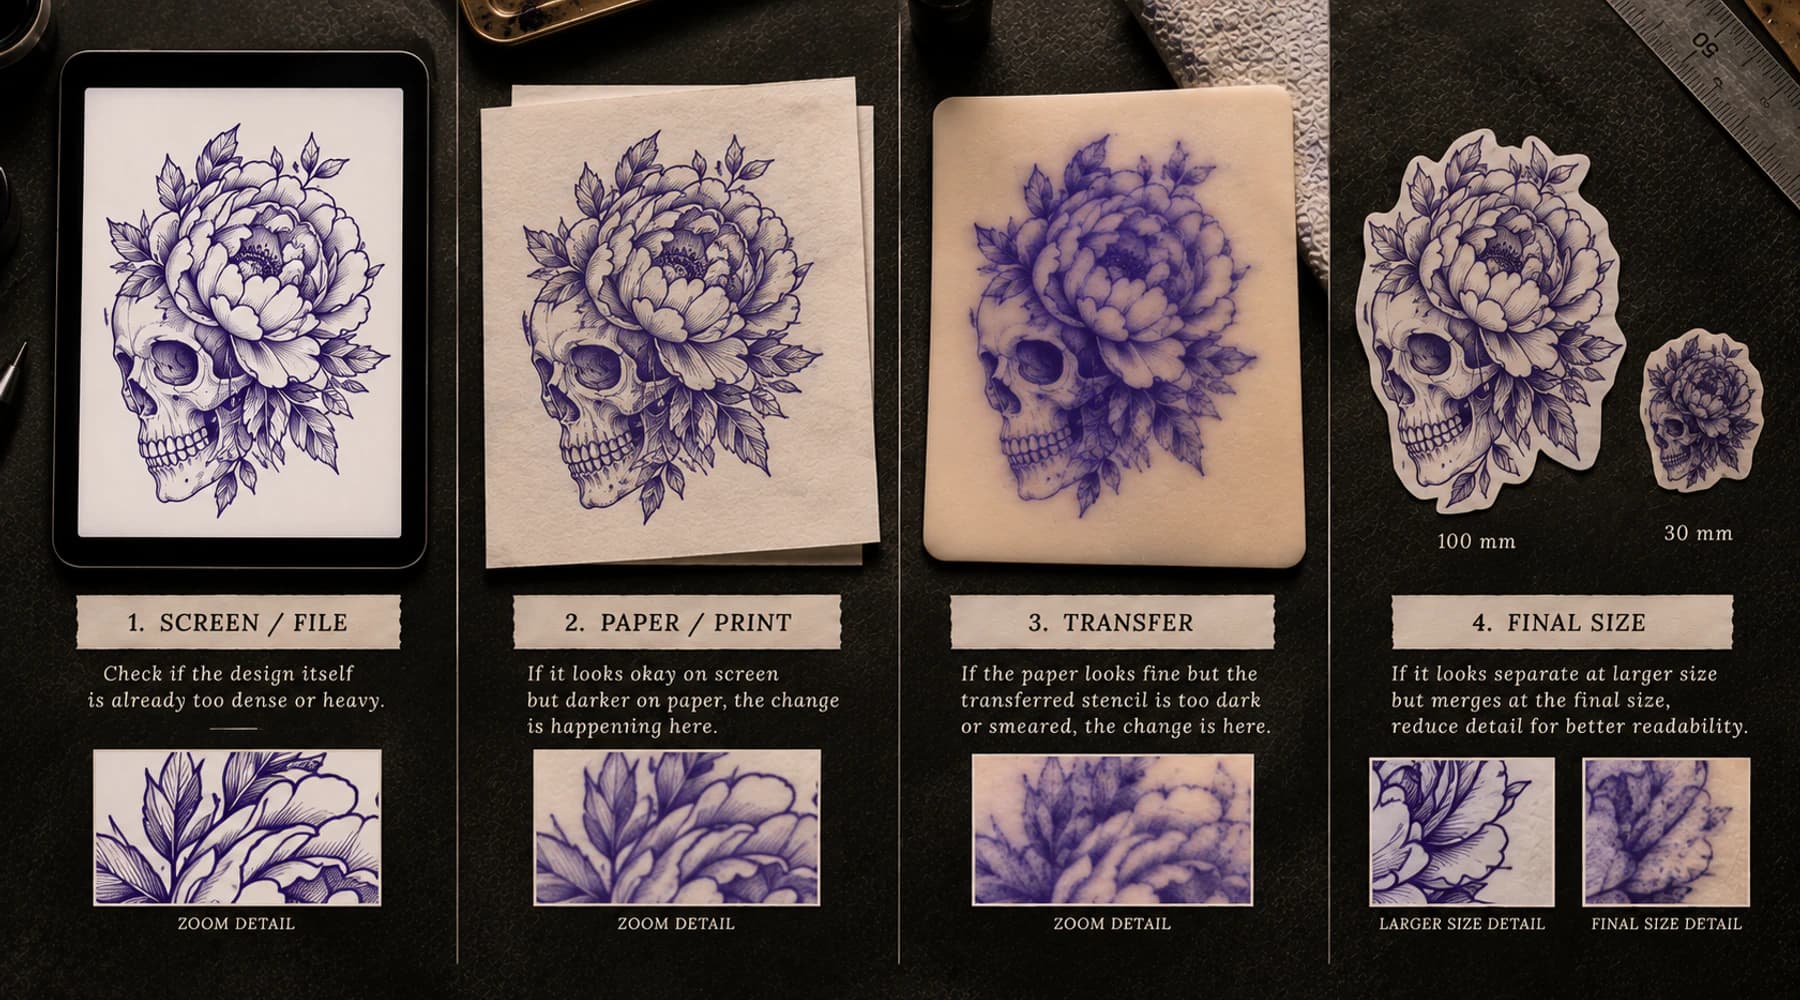
Why Is My Tattoo Stencil Too Dark?
Find where a tattoo stencil first becomes too dark: source, stencil file, print, transfer, or final size, then move to the right next check.
tattoo stencil too dark · dark tattoo stencil
Read guide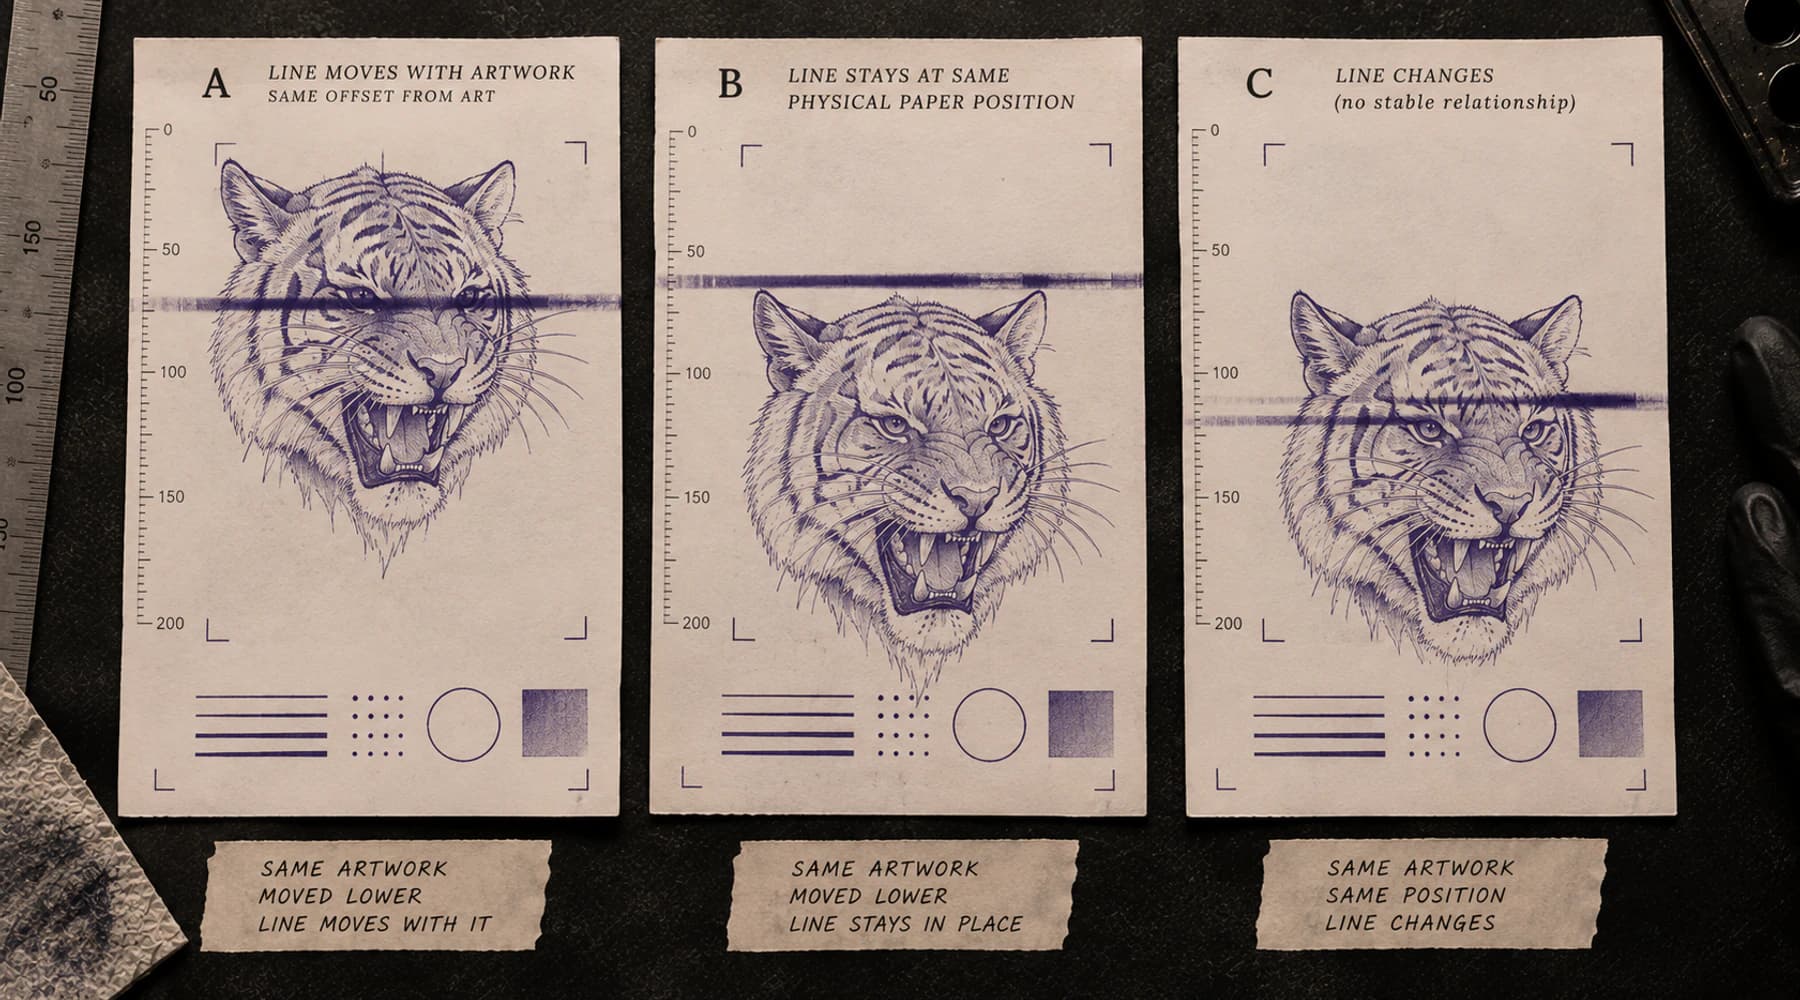
Tattoo Stencil Printer Black Lines or Streaks: Trace the Added Mark
File and print preview are clean, but physical paper adds a black line, streak, or stripe? Move the artwork once to see whether the mark follows the job, the paper position, or neither.
tattoo stencil printer black lines · tattoo stencil printer black streaks
Read guideAuthor
Andrea Mezzadra
Founder and product builder at StencilStudio
Andrea builds StencilStudio and tests how the tools fit into real stencil prep, using real references and outputs to document what works, what changes, and where artist judgment still matters.
In the App
Repeat known geometry instead of spending client stencils
Use the Printer Test Sheet to compare the same lines, gaps, counters, dark regions, and 50 mm scale across a controlled print sequence.