Approved design
NORMALFlip: No
Human-readable reference showing the intended final direction on skin.


Printing & Transfer
Trace mirror state through design, export, printer, paper and skin so lettering and asymmetric stencils reach the client in the intended orientation.
mirror tattoo stencil · tattoo stencil backwards · tattoo stencil orientation · tattoo stencil lettering backwards
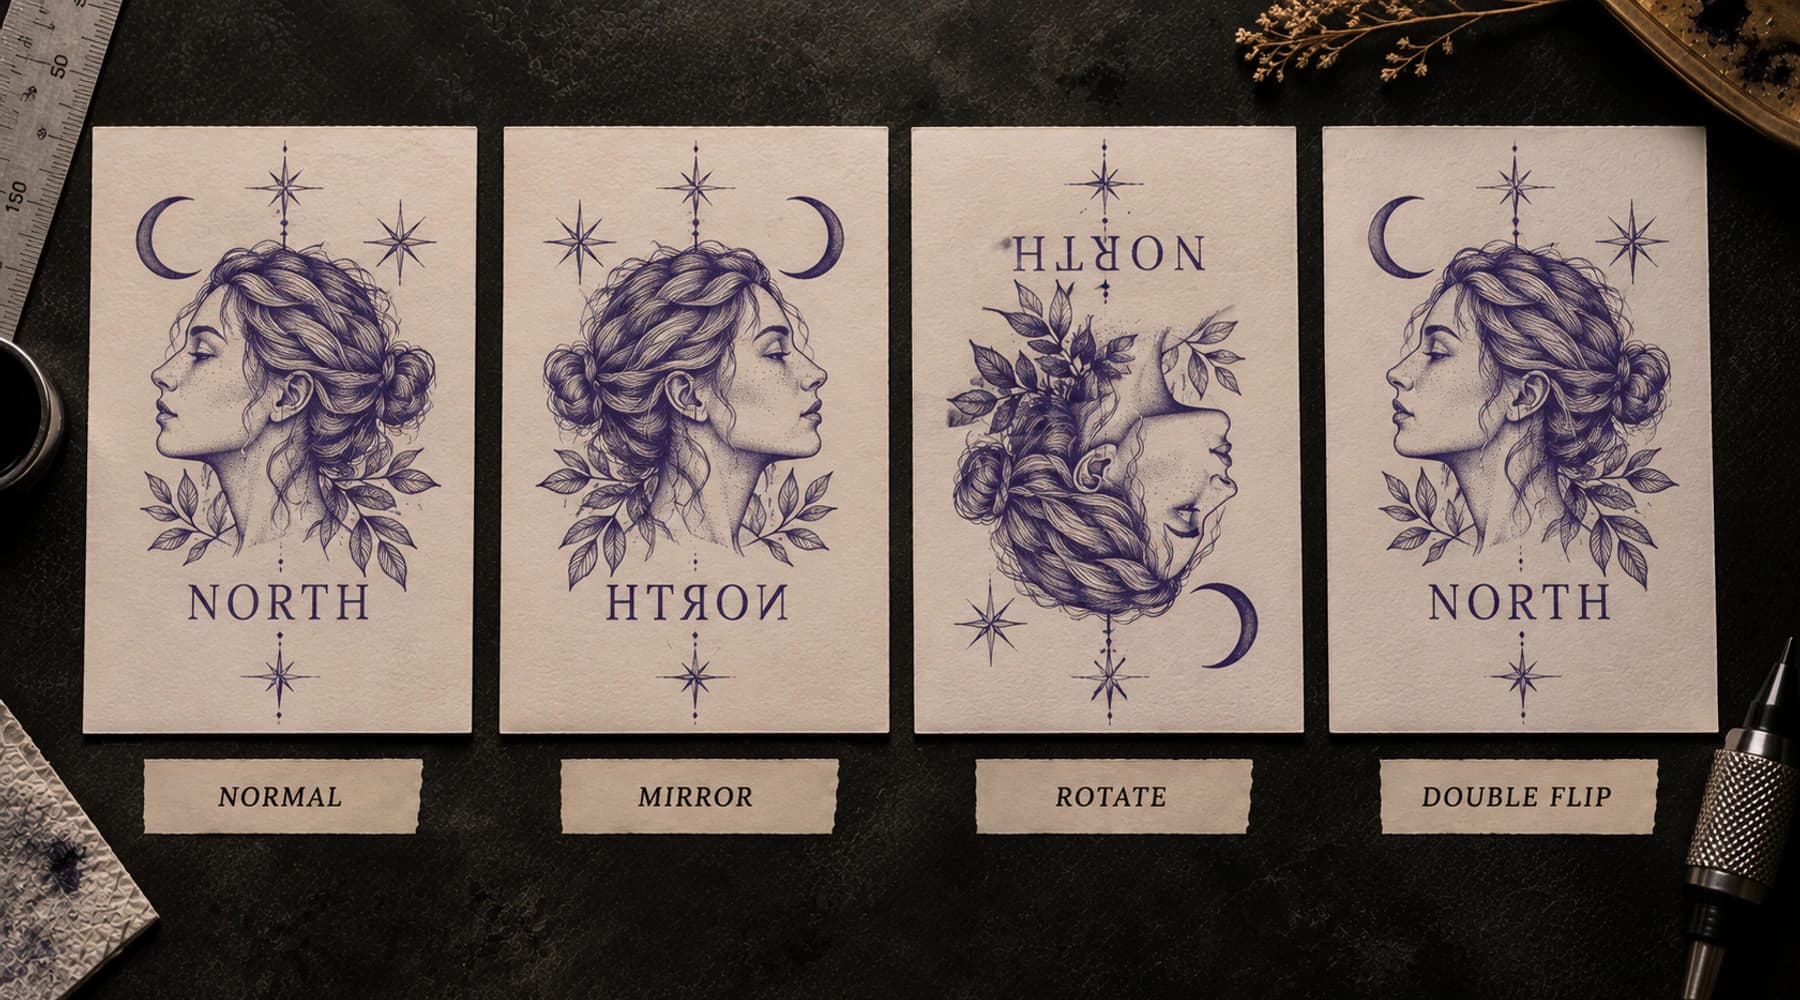
Where did the flip happen?
A file can look backwards on screen and still be correct for a verified transfer path. A file can also look normal and reach skin reversed. Record the orientation at every stage, then make the complete workflow produce the intended result.
Mirror ledger example
This sample assumes a paper-to-skin step that reverses left and right. It illustrates the bookkeeping method, not a universal printer or paper behavior.
| Stage | State | Flip here? | What to verify |
|---|---|---|---|
| Approved design | NORMAL | No | Human-readable reference showing the intended final direction on skin. |
| Stencil / export | NORMAL | No | Keep the production asset unchanged until the chosen mirror point. |
| Print app | MIRRORED | Yes | Example mirror point. Your verified setup may use a different stage. |
| Paper | MIRRORED | No extra flip | Confirm the physical image with an asymmetric marker, not a symmetric motif. |
| Skin | INTENDED | Transfer reversal | This example assumes the paper-to-skin contact reverses left and right. |
Flip: No
Human-readable reference showing the intended final direction on skin.
Flip: No
Keep the production asset unchanged until the chosen mirror point.
Flip: Yes
Example mirror point. Your verified setup may use a different stage.
Flip: No extra flip
Confirm the physical image with an asymmetric marker, not a symmetric motif.
Flip: Transfer reversal
This example assumes the paper-to-skin contact reverses left and right.
Mirror parity
0 flips
NORMAL
Same left-right state as the approved master.
1 flip
MIRRORED
Left and right have toggled once.
2 flips
NORMAL
The second flip cancelled the first.
3 flips
MIRRORED
Another flip toggled the state again.
Count software flips, but do not stop there. The physical transfer can also change left-right orientation, so the final test is the known result on skin or a safe non-client transfer test for that exact setup.
Three paths
NORMAL → MIRRORED → MIRRORED PAPER → INTENDED SKIN
One software flip is chosen deliberately, then the known transfer reversal produces the approved direction.
NORMAL → NORMAL FILE → MIRRORED PAPER → INTENDED SKIN
The file stays normal because the tested printer path performs the required horizontal reversal.
NORMAL → MIRRORED → NORMAL PAPER → WRONG SKIN
A second software flip cancels the first. In a reversing transfer setup, the normal-looking paper then transfers backwards.
Asymmetric control
Add or choose a marker whose left and right cannot be confused. Keep temporary controls outside the final artwork when they are only for production checking.
Do not substitute rotation
Production handoff
Once the mirror state is known, set the true print dimensions. A correct left-right orientation does not prove the sheet is at the correct scale, and a perfect 1:1 print can still be backwards.
A tattoo stencil can be sharp, correctly sized, fully printed, and transferred cleanly while still being unusable for one reason: left and right are wrong.
That failure is easy to describe and surprisingly easy to create. The artwork may be flipped in the drawing app, flipped again in a stencil or printer app, or left untouched because someone expected the printer to reverse it automatically. A preview can look convincing at every step while the complete chain performs zero reversals, two reversals, or a reversal at a different point than expected.
The safe question is not "Where do I always press Mirror?"
It is:
What should the client see on the finished tattoo, what does each stage do to left and right, and where does the required reversal happen in this exact setup?
That distinction matters most for names, dates, numbers, Roman numerals, signatures, handwriting, logos, profile faces, hands, directional symbols, asymmetrical ornament, and any composition whose meaning changes when left and right swap.
Define orientation before opening the print controls.
Keep one approved view that represents what the finished tattoo is meant to look like when viewed in the intended direction. Call that the skin-facing reference.
For lettering, the word should read correctly in the intended viewing direction. For a profile, the face should point the intended way. For a hand, the anatomy should match the design decision. For a logo, use the approved mark rather than memory. For a signature, compare against the original signature image.
This gives every later stage a fixed reference.
Without that reference, "normal" and "mirrored" are vague. A file can look normal simply because you have been staring at the production version long enough to get used to it.
A perfectly symmetrical mandala is a bad mirror test. It can be reversed with no visible clue.
Use one unmistakably asymmetric feature instead:
TEST;R;R →;27/08;If the client design is symmetrical, add a temporary asymmetric control to the test file. Remove it from the production artwork when it is no longer needed.
Think of the workflow in reverse:
FINAL INTENT ON SKIN
↑
PAPER-TO-SKIN TRANSFER
↑
PHYSICAL STENCIL PAPER
↑
PRINT APP / DRIVER / PRINTER
↑
PRINT MASTER
↑
PREPARED STENCIL
↑
APPROVED DESIGN
Start at the top: what orientation must appear on skin?
Then establish what the physical transfer step does in your actual setup. If the stencil-bearing face of the paper is placed against skin in a way that reverses left and right, the paper image must be in the corresponding opposite state before contact. If your workflow has a different physical or device-specific transformation, use that actual behavior instead.
Next work upward. Which stage will create the paper state you need?
Possible flip points include:
Do not assume all of those stages preserve orientation. Do not assume all of them reverse it either.
Current products demonstrate why this matters. MUNBYN documents a Picture mirroring control in its Luck Jingle app for the ITP05. OZER describes automatic horizontal mirroring in its Quick Stencil printer workflow. Other thermal-copy workflows require the artist to prepare the reversed image before the printer stage. These are examples of different implementations, not rules that can be transferred to every machine.
For a simple one-app workflow, you may know the path by memory. For a multi-app workflow, guest spot, shared studio printer, or unfamiliar manufacturer app, write it down.
A mirror ledger records two things at each stage:
Here is one example for a setup where the paper-to-skin contact reverses left and right:
| Stage | Orientation | Flip at this stage? | | --- | --- | --- | | Approved artwork | Normal skin-facing reference | No | | Prepared stencil | Normal | No | | Print master | Normal | No | | Printer app | Mirrored | Yes, intentional | | Physical paper | Mirrored | No additional flip | | Skin transfer | Intended orientation | Physical transfer reversal |
That table is an example of the bookkeeping method, not a prescription for your printer.
A different verified setup could leave the printer app untouched and mirror earlier. Another could leave the source and print master normal because the printer path performs the required reversal itself.
The important part is not which row says Yes. The important part is that you can explain the state at every row.
You do not need transformation math to diagnose double mirroring.
Use this:
NORMAL
→ horizontal flip
MIRRORED
→ horizontal flip
NORMAL
→ horizontal flip
MIRRORED
So, considering horizontal software flips alone:
That explains why a second mirror command can silently cancel the first.
But do not count software flips and stop. The paper-to-skin step can also reverse orientation. The job is to make the complete path end in the intended skin-facing state.
This is the part that causes the most confusion.
Suppose your verified transfer process requires the physical paper image to be mirrored so the skin result reads normally.
Then a production file that appears backwards on screen may be exactly what you need if no later stage changes it again.
Conversely, a file that looks perfectly readable on screen can be wrong if the downstream path preserves that state onto paper when a reversal was required before transfer.
Do not judge the production file in isolation. Judge it relative to:
Do not destructively mirror the only approved source just because one printer path needs a reversed production version.
A robust file setup keeps two conceptual states:
Approved master
Print / transfer variant
This separation is particularly useful for lettering, logos, signatures, and portraits. It also reduces confusion when the same design is reprinted through a different printer or app months later.
Client approval should normally show the intended final tattoo direction, not a backwards production state. The technical print transform belongs downstream from the design decision.
A horizontal mirror is an image transformation. It is not the same thing as retyping the characters in reverse order.
If the approved tattoo says:
MARIA
keep the approved text as MARIA.
If your production path requires a mirrored image, horizontally flip the rendered artwork at the chosen stage. Do not solve the problem by typing AIRAM and hoping the later transfer reconstructs the intended lettering.
Manual character reversal creates a second content problem. Kerning, ligatures, connected script, punctuation, accents, and custom letterforms can behave differently when the string itself is rewritten.
A correctly mirrored production image can still contain:
Likewise, perfectly correct content can still be mirrored incorrectly.
For client-critical lettering, run two checks:
If the lettering is correct but its counters, joins, or spacing fail at the intended physical size, that is a different problem. Use the tattoo lettering size and readability guide for that decision.
Numbers can be deceptive in a quick glance. A reversed or misread date may still contain familiar shapes, and a run of Roman numerals can look visually plausible because the forms repeat.
Before transfer:
Do not let "the print looks clean" substitute for that check.
A signature carries identity in geometry that a typed replacement does not preserve:
Keep the original signature image as the identity reference. Prepare a separate stencil version, then control its orientation as a production decision.
Do not retype, redraw, or "correct" a signature merely to make mirror state easier to understand. That changes the source while trying to solve an orientation problem.
An unfamiliar mirrored logo can look almost right. Use the approved source, not visual familiarity, as the reference.
Text is not the only orientation-sensitive content. Check:
Do not assume a symbol is reversible because it contains no letters. If direction matters to the design or client, treat it like lettering: compare it against an approved source.
A frontal face may still look like the same person after a horizontal reversal, especially when the obvious structure is nearly bilateral.
Asymmetrical details can expose the mistake:
For a profile, direction is usually obvious. For a frontal portrait, compare those asymmetric landmarks against the source before printing and again before transfer.
This is an orientation check, not a portrait-likeness diagnosis. If the face has the correct left-right direction but no longer resembles the source after tracing or simplification, use the portrait stencil likeness guide.
These transformations are different:
| Transformation | What changes | | --- | --- | | Horizontal flip | Left and right swap | | Vertical flip | Top and bottom swap | | 180-degree rotation | The entire image turns upside down | | Arbitrary rotation | The image changes angle around a pivot |
A 180-degree rotation does not undo a horizontal mirror.
Procreate's current Transform interface reflects this distinction: Flip Horizontal, Flip Vertical, and rotation are separate controls. If Procreate is one stage in your workflow, treat its horizontal flip as one possible mirror point, not as a mandatory place to perform the production reversal. The Procreate-to-stencil workflow covers the broader export and print handoff.
Image orientation and paper loading are separate variables.
A paper stack loaded incorrectly can cause a blank, faint, poorly fed, misplaced, or otherwise unusable stencil. That does not mean the image file itself had the wrong mirror state.
Likewise, a correctly loaded paper stack does not prove the image orientation is correct.
Follow the loading instructions for the exact printer and transfer paper in use. Do not memorize one universal "purple side faces X" rule and apply it to every system.
If the paper or printer output is the problem, use the thermal stencil printer workflow or the Tattoo Stencil Printer Troubleshooter. Keep the orientation ledger focused on left-right image state.
PNG, JPG, PDF, SVG, and other image/document formats can contain either orientation.
A PDF does not automatically make a stencil correctly oriented. It can contain artwork that was already mirrored upstream, and a print app or driver can still transform the PDF later.
File format and mirror state answer different questions:
The same separation applies to physical scale. A file can be mirrored correctly and printed at the wrong size. It can also be exactly 1:1 and still be backwards.
Use the Tattoo Stencil Size & Print Calculator when you need the physical-size and PDF side of the workflow.
A print preview can confirm the orientation that the print application currently intends to send.
It cannot, by itself, prove the final skin orientation unless you also know what happens after the preview:
If a manufacturer app exposes Mirror, Flip, Reverse, Transfer, T-shirt transfer, or Iron-on, do not assume those names mean the same transformation across products. Verify the exact function using the manufacturer's current documentation or a controlled test.
A common path is:
Do not repair this by randomly enabling mirror controls until one preview looks familiar.
Return to the approved skin-facing reference. Write down each stage. Identify the actual paper state required by the transfer. Then choose one deliberate mirror point if the path needs it.
Another common path is:
The dangerous part is step 4: the paper may look "normal" again and therefore reassuring.
If you suspect a double flip, do not reason from the latest file. Return to the approved master and rebuild the ledger from the first transformation.
"I always mirror in Procreate" can work for one stable setup and fail immediately when one downstream stage changes.
Re-verify orientation when you change:
The habit to preserve is not the location of the Mirror button. It is the ability to say which stage performs the required reversal in this setup.
Do not discover an unfamiliar printer's behavior on a full client stencil.
Use a small non-client test such as:
R → TEST 27
Record:
Once the path is known, keep those settings stable for the client stencil.
The thermal printer guide covers the rest of the guest-spot print baseline, including paper, output quality, scale, and known-control testing.
On iPhone, the print path may be AirPrint or a manufacturer's app. Those interfaces do not expose one universal set of controls across every printer.
The mirror decision still follows the same ledger:
If a manufacturer app exposes a mirror control, count that as one possible flip. If it does not, do not infer that the printer automatically will or will not reverse the image.
For AirPrint, manufacturer-app selection, exact-size PDF handling, and calibration, use How to Print a Tattoo Stencil From iPhone. This page stays focused on left-right orientation across that path.
A design created for the client's left arm is not automatically suitable for the right arm after a horizontal flip.
Print mirroring is a production transformation whose purpose is to preserve the chosen final design orientation through transfer.
Body-side adaptation can change the composition itself.
For example, a snake, face, branch, or ornamental flow designed to point toward the body center may need a compositional change when moving to the opposite side. Simply mirroring the print may also mirror deliberate anatomy, lettering, lighting, or internal relationships that were not meant to change.
Decide the composition first. Then establish its final skin-facing reference. Only after that should the print/transfer mirror ledger begin.
For curvature, taper, body lines, and placement adaptation, use Fit Tattoo Stencil to Body.
Before printing a client-critical stencil:
After printing:
Then keep content, orientation, and physical size as separate sign-offs.
| What you see | What it usually tells you to inspect | | --- | --- | | Text reads backwards in the final transfer | Mirror state is wrong somewhere in the workflow. Trace the ledger from the approved master. | | Digital production file looks backwards, but the verified skin result is correct | The backwards file may be an intentional production state. Do not "fix" it in isolation. | | The file was horizontally flipped twice | The second flip cancelled the first. Rebuild from the approved master. | | A symmetrical design gives no clue | Use an asymmetric control such as R →, text, a date, or a profile. | | Logo direction is wrong but print quality is perfect | Treat it as an orientation error, not a printer-quality error. | | Design moved to the opposite body side and now feels compositionally wrong | Revisit body-side design adaptation. Do not assume a printer mirror solves composition. | | Paper is blank, faint, skewed, creased, or badly fed | Investigate paper/printer workflow separately. Image mirroring may be unrelated. | | Stencil is the correct direction but physically too large or small | Diagnose physical scale, not orientation. Use the wrong-size print guide. | | Paper is correct but the skin transfer is patchy, doubled, or smudged | Use the Transfer Troubleshooter for the transfer-quality failure. |
A mirror mistake is unusually expensive because every other stage can succeed. The most reliable prevention is simple: preserve an approved skin-facing master, know what each stage does, use an asymmetric control, and record exactly where the left-right reversal occurs.
Picture mirroring control in one tattoo-printer app.Related Guides

Print a tattoo stencil from iPhone without silent resizing: prepare a 1:1 PDF, use AirPrint or your printer app, and verify the 50 mm scale check.
print tattoo stencil from iPhone · AirPrint tattoo stencil
Read guide
Use a tattoo thermal stencil printer with a repeatable file-to-paper workflow: control size and mirror, load transfer paper correctly, test output, and diagnose blank, faint, blurry, merged, skewed, or missing lines.
tattoo thermal stencil printer · tattoo stencil printer workflow
Read guide
Turn Procreate artwork into a tattoo stencil without losing scale or line clarity: isolate the stencil layer, export the right raster file, review detail at final size, and prepare exact-size print output.
Procreate tattoo stencil · tattoo stencil from Procreate
Read guideAuthor
Founder and product builder at StencilStudio
Andrea builds StencilStudio and tests how the tools fit into real stencil prep, using real references and outputs to document what works, what changes, and where artist judgment still matters.
In the App
Set physical size, mirror only when your verified workflow requires it, and export a 1:1 PDF with a calibration check.