

Spartan stencil evaluation

Judge any Spartan reference before it becomes a stencil

Spartan designs live or die on helmet recognition and weapon separation. Compare helmet bust, shield and spear guard, and full battle stride for your placement, vet the Corinthian slit, the aspis rim and lambda, and the dory shaft at your exact size, then prepare a clean stencil that transfers as one readable warrior.

Built for working artists preparing Spartan pieces. This page covers Spartan variant choice and stencil preparation only, not tattoo application or healing advice. Bust, guard, and battle-stride options are judged here as different constructions inside one helmet plus shield plus spear framework.

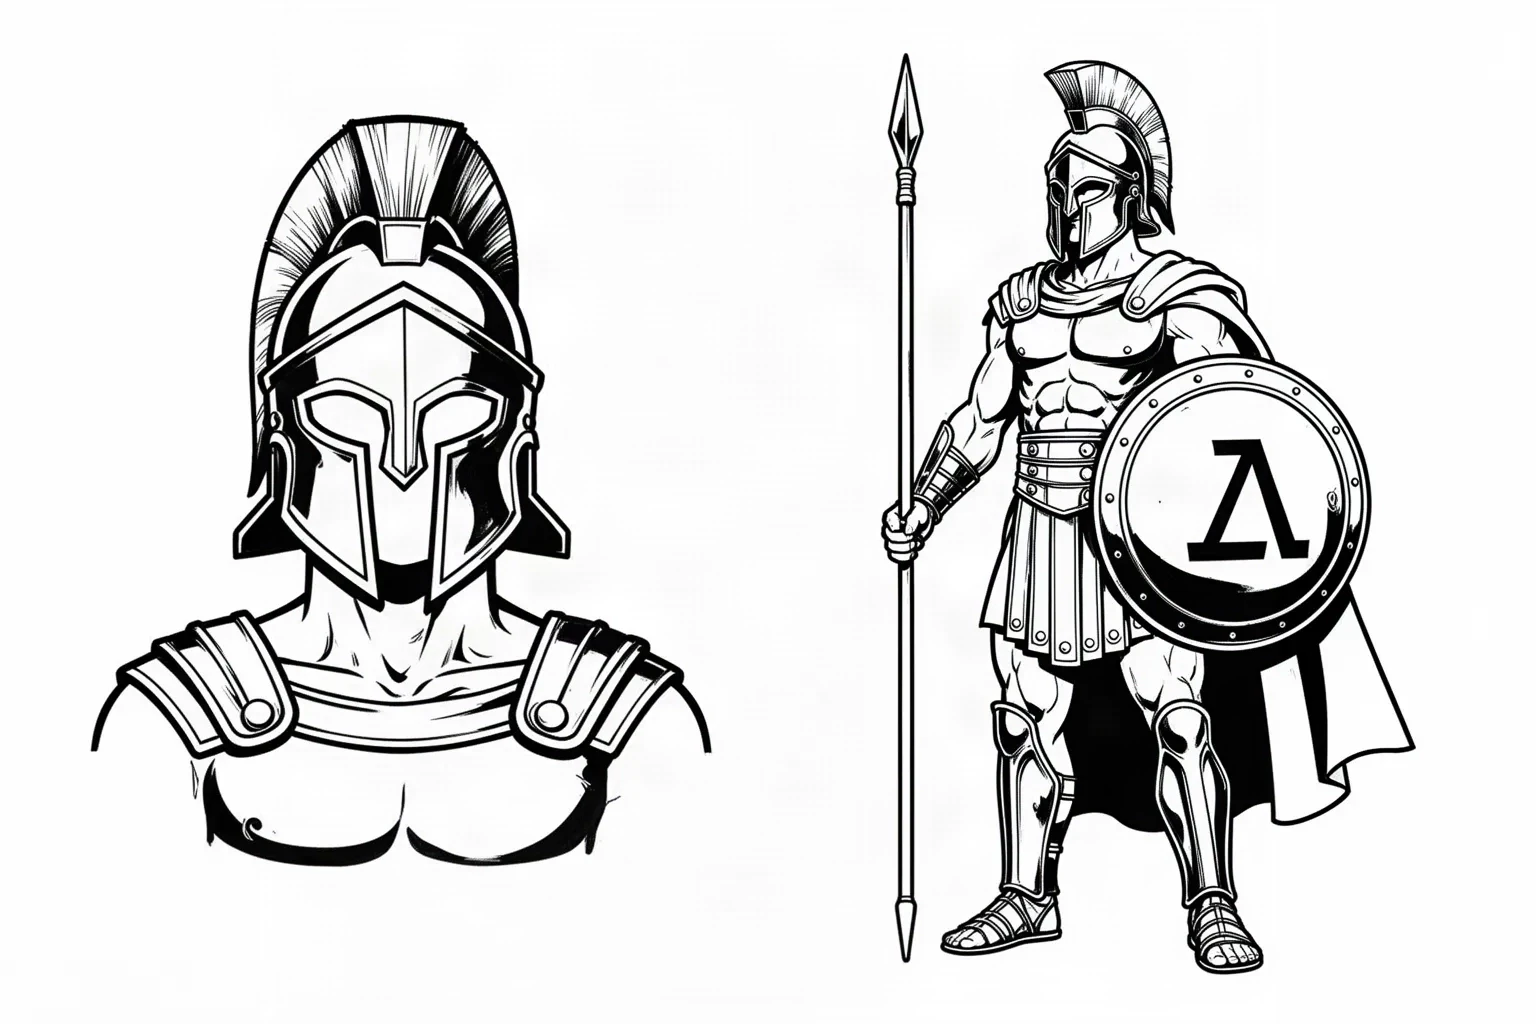
Original black linework study showing a Corinthian helmet bust with an open eye and nose opening beside a standing Spartan guard with a round lambda shield, a vertical spear kept clear of the body, and one cape shape.
Original linework study, generated illustration. Read it for structure only: the Corinthian eye and nose opening stays white through the helmet, the cheek plates stay apart from the nose guard, and the spear shaft keeps its own channel beside the figure. The guard's shield sits close to the torso in this study, which is exactly the contact to check on your own reference. Confirm open skin at the rim, along the shaft, and inside the lambda at the height you will print.

What makes a Spartan stencil-viable

Open slit, separated shield and spear, and a readable stance decide the result.

A Spartan is a Corinthian helmet plus a separated round shield and long spear on one pose axis. These three pillars predict whether that construction survives reduction, print, and transfer.

Corinthian helmet read

A Spartan reads first as a Corinthian helmet: one dome contour, a T-shaped eye and nose opening with open skin inside it, separated cheek plates, and a nose guard that never joins the cheeks. Stencil viability comes from that opening staying open, not from crest texture, scratches, or weathering marks. When the eye slit closes, every Spartan bust becomes an anonymous dark helmet.

Check: Cover all crest detail, scratches, and shading. If the dome plus the open eye and nose channel plus both cheek edges still read as a Spartan helmet at true size, the head is sound. If the slit bridges or a cheek touches the nose guard, reopen the channel before judging anything else.

Shield and spear separation

The round aspis shield and the long dory spear carry the second read. The shield needs one clean rim plus open skin between the rim and the nearest armor, arm, or torso mark, with the lambda device held as open negative space rather than fine filled strokes. The spear needs one straight shaft line with visible standoff from the body along its full length. Foreshortened or angled spears that cross the torso fail first.

Check: Trace the shield rim without lifting a finger, then trace the spear shaft end to end. If either path touches armor, cape, or background at 1:1, shift the weapon or enlarge the piece before touching line weight.

Torso, cape, and pose axis

The body reads through pectoral and abdominal mass plus a single cape shape on one pose axis: helmet bust, standing guard with shield and spear, or full battle stride. Muscle shading and cape folds are support, not structure. When cape edges cross the spear or shield rim, or abdominal lines join into one shaded block, the figure loses its stance and its transfer safety at once.

Check: Cover all muscle hatching and cape fold lines. If the torso silhouette, the cape outer edge, and the stance from helmet to grounded foot still read as three separate marks, density is removable. If any two merge, simplify before print.

Variant comparison

Pick the Spartan construction that fits the placement and the size.

Three Spartan constructions, three different risk profiles. Choose one before vetting, because each variant fails in a different place.

Helmet bust

Corinthian helmet with T-opening and cheek plates above a muscled neck and upper cuirass, optional crest. No shield, no spear, no background field. The tightest Spartan construction and the only one that fits narrow placements without a fight.

Strengths: Strongest recognition per square centimeter, easiest to vet because only one gap family matters, and the most forgiving at small heights. The helmet carries the full Spartan read on its own.

Constraints: Crest spread and cheek width punish narrow wraps when drawn oversized. Fine eye-slit detail and crest texture close first below about 8 cm, and weathering scratches add nothing at stencil mass.

Choose when: Choose it when the brief names a Spartan helmet, when the placement is a forearm, calf, bicep, or chest panel with limited height, or when the client wants the disciplined sentinel look rather than a battle scene.

Shield and spear figure

Three-quarter or full standing figure in guard stance with a round aspis shield held clear of the torso and a vertical or near-vertical dory spear alongside the body axis. Cuirass bands and cape stay subordinate to the two weapon separations.

Strengths: The most complete Spartan statement that still vets cleanly: helmet plus shield plus spear in one readable guard posture. Suits thigh, upper arm, shoulder, and back panels where shield diameter and spear length keep their own room.

Constraints: Needs the largest minimum height of the three for a full figure. Shield rims touch chest bands fast, horizontal spear angles wrap badly on limbs, and a second weapon or banner doubles the separation work.

Choose when: Choose it when the client wants the recognizable Spartan guardsman with lambda shield and long spear, and when the placement offers about 12 cm or more of height with room for a full weapon standoff.

Full battle pose

Lunging or charging figure with raised spear or short sword, flowing cape, extended shield arm, and bent lead leg. Motion comes from the stride axis plus one cape shape, with muscle tension drawn as contour rather than shading.

Strengths: Strongest narrative energy and the best fit for large back, thigh, and sleeve sections where stride length and cape sweep can spread. One committed pose axis photographs and transfers with authority.

Constraints: Foreshortened spears, overlapping limbs, and cape bands crossing the shield or spear path merge first. Needs about 18 cm or more plus one background family maximum, and realistic muscle shading must first become line hierarchy.

Choose when: Choose it when the brief centers on battle motion on a large flat panel, and when the height allows a separated stride, a separated spear path, and a cape held clear of both weapons.

Samurai armor, kabuto, menpo, and katana construction stays on the samurai owner, and Aztec fretwork and sun-stone construction stays on the Aztec owner. Cross-style warrior direction choice stays on the warrior owner. This comparison exists to choose among Spartan constructions, not to judge those neighboring traditions.

Final-size vetting framework

Score the reference in minutes, then act on the weakest check.

Four Spartan constructions at labeled heights. Each one names the protected structure, the fix, and the go or no-go verdict at that exact size. Confirm every verdict with a measured 1:1 print.

HOLDS AT STATED SIZE

Corinthian helmet bust with crest at 12 cm

Intended height 120 mm

Source
Chest-up bust with a domed Corinthian helmet, an open T-shaped eye and nose channel, separated cheek plates, one transverse crest with counted supports, and a two-band upper cuirass. No shield, no spear, no background field.
Protect
Dome contour, open eye and nose channel, both cheek edges, crest base position, and the outer cuirass band that sets torso width.
Fix
Reduce crest supports to two or three with open skin between them if any pair touches at 1:1. Keep dome height, slit width, and cheek separation unchanged.
Candidate stencil
Same Spartan with the helmet slit kept open, shield rim and lambda separated from the torso, spear shaft held clear of cape and figure, and protected helmet plus weapon contours held at transferable mass.
Final-size verdict
Holds at 12 cm after a crest-spacing check. The helmet reads as Spartan from across the room, the cheeks stay separate from the nose guard, and the bust keeps its armored weight without weapon separations to manage.

REOPEN SHIELD AND SPEAR GAPS

Standing guard with aspis shield and dory spear at 15 cm

Intended height 150 mm

Source
Full standing figure in guard stance with a vertical spear along the body axis, a round shield with lambda device held beside the torso, cuirass bands on chest and shoulder, and a short cape fall behind one shoulder. Strong presence, but the shield rim touches a chest band and the spear shaft grazes the cape edge.
Protect
Body axis from helmet to grounded feet, full spear length and standoff, shield rim and lambda clearance, and the outer shoulder contour.
Fix
Shift the shield until open skin runs between rim and chest band at true size, then move the spear or shorten the cape fall until the shaft keeps clearance along its full length. Remove muscle hatching before changing weapon or torso mass.
Candidate stencil
Same Spartan with the helmet slit kept open, shield rim and lambda separated from the torso, spear shaft held clear of cape and figure, and protected helmet plus weapon contours held at transferable mass.
Final-size verdict
Holds at 15 cm once both gaps stay open at 1:1. Guard authority comes from a separated spear plus a separated shield disc, not from cuirass texture or cape folds.

RESTRAIN CAPE AND BACKGROUND FLOW

Charging stride with sweeping cape and dust band at 20 cm

Intended height 200 mm

Source
Lunging Spartan with raised spear, extended shield arm, layered cuirass, and a long cape sweeping behind the figure plus one dust and banner drift. Narrative is rich but two cape folds cross the spear shaft and the dust band touches the crest tips.
Protect
Stride axis and raised-spear path, helmet-to-shoulder hierarchy, shield-arm extension, and the single strongest cape edge that sets motion direction.
Fix
Keep one cape shape with one outer edge plus one fold line maximum, reduced to half weight with open skin to spear and shield on all sides. Demote the dust band to a light arc clear of the crest or remove it. Do not keep layered cape folds plus dust plus banner together at this height.
Candidate stencil
Same Spartan with the helmet slit kept open, shield rim and lambda separated from the torso, spear shaft held clear of cape and figure, and protected helmet plus weapon contours held at transferable mass.
Final-size verdict
Holds at 20 cm once motion ranks below figure mass. Stride energy carries the composition while one restrained cape shape supplies movement at 1:1.

ENLARGE OR RECROP

Detailed phalanx scene with three fighters at 8 cm

Intended height 80 mm

Source
Outline-only scene with three overlapping Spartans, interlocked shields, crossed spears, fortress wall lines, cape folds, and full muscle shading on every torso. Attractive on screen but drawn with almost no line mass and six competing detail families.
Protect
Lead helmet position and spear direction that give the scene its Spartan read.
Fix
Enlarge past the point where every eye slit, shield rim, and spear channel transfers as open skin, or recrop to one helmet bust with cuirass and no weapons. Do not keep three armored figures plus architecture plus crossed spears together at 8 cm.
Candidate stencil
Same Spartan with the helmet slit kept open, shield rim and lambda separated from the torso, spear shaft held clear of cape and figure, and protected helmet plus weapon contours held at transferable mass.
Final-size verdict
At 8 cm the slits, rims, shafts, and wall lines function as one band and spears print as broken scratches. Enlarge, recrop to one bust, or choose a single shield emblem for this height.

Portrait likeness vetting stays on the portrait owner, and broad motif browsing stays on the stencils and subject hubs. This framework exists to judge Spartan variant fit, Corinthian slit and cheek construction, shield and spear separation, and cape restraint at a stated height, not to replace those owners.

Helmet, shield, and spear at final size

Judge the white space at the height you will print.

Screens forgive crowding that paper and skin do not. Set the height first, then inspect each feature below at true physical size with scaling off.

About 8 cm and below

Wrist and ankle accents, behind-ear marks, finger panels, and small gap fillers.

Carry a recrop only: a Corinthian helmet with open slit, or a single shield disc with a simplified lambda. Keep one contour family and two separations maximum. If the eye slit or the lambda counter closes at 1:1, enlarge or reselect rather than forcing a figure small.

About 10 to 16 cm

Common forearm, calf, shoulder, and thigh Spartan pieces.

The most flexible band. A helmet bust or a single standing guard with shield and vertical spear can work when every helmet, shield, and spear gap is verified at true size. Check slit width, cheek separation, rim standoff, and shaft clearance before approving crest or muscle detail.

About 18 cm and above

Large thigh panels, back pieces, chest, and full sleeve sections.

Room for a full battle stride with spear, shield, and one cape shape plus at most one background drift, but only when open skin separates the helmet slit, cheek plates, shield rim, spear shaft, and cape edge. Larger height does not rescue a merged slit, a shield fused to the torso, or a spear crossing the cape.

Spartan feature checks by height band
FeatureAbout 8 cm and belowAbout 18 cm and above
Helmet slit, cheeks, and crestKeep the heaviest lines on the dome contour and cheek outer edges, and cut the slit wider than the screen file suggests. Crest texture, scratches, and weathering merge first at small heights.Crest supports and cheek modeling can carry more shape when each keeps its own spacing at 1:1. Check the full head with a squint test at true size.
Shield rim and lambda deviceCarry the rim plus a simplified lambda with open counters only. Fine concentric rings, rivets, and battle damage merge first and should be removed before the rim is thinned.Full rim with rivet hints and a bolder lambda can work when rim-to-torso clearance and lambda counters each stay open at true size. The shield should never join the cuirass or the cape.
Spear shaft, tip, and standoffCarry at most a short spear section or omit the spear entirely in favor of the helmet. A full-length shaft with tip detail closes against the figure at small heights.A full dory with tip and butt spike can work when the shaft keeps visible standoff along its full length and foreshortening is avoided. Steel should never cross the cape or close a helmet gap.
Musculature, cape, and backgroundKeep no cape sweep and no background field. Muscle hatching and fold lines compete with the slit and lambda gaps for the same room and should be recropped away.One cape shape plus one background drift maximum can add narrative when the lead figure clearly dominates. Equal-weight double fields need hierarchy work before print.

Reference to clean stencil

Build from the helmet and weapons outward, then rank the rest.

Work in this order so one change at a time can be judged at the same height. Stop when slit, shield, spear, cape, and stance each read correctly.

  1. 01

    Lock variant, height, and placement first

    Name one of the three variants on this page, set the intended physical height in millimeters, and name the body area before judging the reference. A battle stride that holds at 20 cm on a back panel can fail at 8 cm on a wrist with no line being wrong on its own. Use the size calculator when target dimensions are still open.

  2. 02

    Verify helmet, shield, and spear hierarchy

    Confirm the Corinthian slit plus cheek construction fits the variant, then rank the composition: helmet read first, shield and spear separation second, torso and cape flow third, background last. Resolve slit bridges, rim contacts, and shaft touches before touching line weight. A head with an open slit plus a separated shield and spear is already halfway to stencil-ready.

  3. 03

    Set figure versus ornament roles

    Assign every mark a role: lead structure that carries the first read, support that shapes it, and ornament that can be removed. Strengthen dome, cheek, rim, and shaft contours first, keep muscle hatching and cape folds lighter, and mark one removable texture row or background drift that can go if gaps close.

  4. 04

    Simplify density and reopen gaps at 1:1

    Reduce crest supports, muscle hatching, cape folds, and background marks before thinning contours. Keep open skin inside the helmet slit, around cheek plates, between shield rim and torso, along the full spear path, and between cape edges, and run a squint check: step back until fine texture disappears and confirm the Spartan still reads. The line-weight guide covers fine, normal, and bold behavior on the same stencil.

  5. 05

    Verify print and transfer path

    Export a true-size PDF with no fit-to-page scaling, inspect the narrowest slit section, the shield rim clearance, and the spear-to-figure channel on plain paper, then measure the physical print with a ruler. If the digital file passes and only paper fails, move to print-stage evidence instead of simplifying again.

Placement and size decisions

Flat skin preserves shields and strides, curves demand simpler builds

A Spartan is a vertical helmeted figure with a long spear path and a wide shield disc. Placements with a clear flat span preserve slit width, shield diameter, and spear length, while narrow limbs demand a bust or a guard run.

Back and thigh

Broad flat fields where a helmet bust with wide crest or a full battle stride with shield and spear can spread without wrapping. The width is the asset, so crest spread, shield diameter, and spear length need spacing checks rather than compression.

Check: Center the helmet slit on the flattest span, keep shield-rim and spear-tip clearance inside the panel edges, and verify crest and cape spacing at 1:1 before print.

Outer forearm and calf

Long narrow fields where the figure should follow the limb axis. Wide shield discs and horizontal spear angles wrap fast and crowd the helmet.

Check: Choose a helmet bust or a standing guard with the spear running along the limb for these fields, align the body axis with the limb, and shorten cross-limb shield spans while edits are still cheap.

Chest and shoulder

Large curved panels with room for a bust with crest or a half-figure with raised spear. The curve compresses one side of wide shield compositions in photos and transfers.

Check: Center the slit on the flattest span, let cape and support ornament fall toward the slope, and keep background to one drift family maximum.

Wrist, ankle, hand, and behind ear

Small wrapped fields where only a recrop survives. Full guards with shield and spear plus crest forced into these bands merge first.

Check: Recrop to a Corinthian helmet or a simplified shield disc with open lambda counters, then run the small-size checks at the exact height.

Stencil-ready checklist

Approve the Spartan only when every line passes

Run this short sequence with scaling off and a ruler in hand. One failed line means fix, enlarge, or reselect before transfer.

  • Confirm intended height in millimeters, the named placement, and the bust, guard, or battle-stride choice.
  • Confirm the helmet eye and nose channel stays open with both cheek plates separable at 1:1.
  • Confirm the shield rim keeps open skin to the torso with lambda counters open at true size.
  • Confirm the full spear path keeps open skin to the figure and cape with tip separable.
  • Confirm cape and background total one shape family or zero at small heights, with no mark touching helmet, rim, or shaft.
  • Export a true-size PDF with scaling off and measure the physical print.

Spartan transfer prep

Transfer without closing the slit or welding the shield

Spartan transfers fail at four predictable points. Each one below names the early sign and the prevention that keeps the helmet, shield, and spear honest.

Eye slit bridges on skin

Early sign: The helmet eye and nose opening prints as a solid dark wedge on paper or skin although the screen file looked open.

Prevention: Cut the slit wider than feels necessary on screen and judge it on the measured 1:1 paper print, not the monitor. Widen the channel or remove neighboring crest texture when the tightest slit section closes, and re-check after any line-weight increase.

Shield rim welds to the torso

Early sign: The aspis rim transfers joined to a chest band, arm, or cape edge with no visible separation between disc and figure.

Prevention: Hold one clear rim channel at true size with the shield drawn fully clear of the body before transfer. Anchor the helmet end first and smooth toward the shield side in short passes so the disc cannot drag into the torso.

Spear shaft touches the cape

Early sign: The dory shaft prints fused to a cape fold or background drift along part of its length, breaking the long clean weapon read.

Prevention: Keep the spear on a straight near-vertical path with open skin on both sides at 1:1, and hold the cape as one shape clear of the shaft. If the reference crosses them, move the cape or shorten its fall before committing transfer paper.

Cape drags the axis off

Early sign: One cape side sits high or the stride leans after first contact on curved skin, pulling the helmet and shield with it.

Prevention: Align the helmet slit to the body midline or limb axis on a live photo before print, anchor the head end first, and lift to confirm the axis before the cape and shield areas touch skin.

Prerequisites before the transfer touches skin

Confirm the measured 1:1 paper print with a ruler, a clean dry placement area, and the planned anchor point (helmet end for busts and guards, head end for strides). Transfer in sections from the anchor so the shield side cannot drag the slit or shaft off position. If the first contact looks faint or patchy, diagnose the layer with the transfer troubleshooter instead of pressing harder.

Open the transfer troubleshooter
Open slit plus separated shield first Verify gaps at 1:1 One cape family maximum

FAQ

Spartan stencil decisions, answered

Short answers for the variant, recognition, size, cape, and transfer checks that recur when a Spartan reference moves toward transfer-ready output.

Match the variant to the brief and the available height. A helmet bust suits helmet-first requests and forearm, calf, bicep, or chest panels with limited room. A shield and spear figure suits guardsman requests with a lambda shield and long dory on thigh, upper arm, shoulder, or back panels of about 12 cm or more. A full battle pose suits motion-led requests on large back, thigh, or sleeve sections of about 18 cm or more. The comparison on this page names the structure, strengths, and constraints of each variant so the choice happens before stencil prep.

Next steps

Use the neighboring owners for adjacent jobs.

This guide covers Spartan variant choice, Corinthian helmet plus shield plus spear vetting, height-tied density and cape restraint, and reference-to-stencil preparation. Use the links below for related jobs such as sizing, print checks, paper, and placement.

Warrior direction depth, samurai armor depth, Aztec fretwork and sun-stone depth, portrait likeness depth, generic conversion, broad gallery browsing, paper manufacturing detail, and placement mechanics stay in their specialist owners. The links above hand off instead of repeating that detail.

From evaluated reference to working stencil

Turn the approved Spartan into a stencil draft.

Start from the variant that passed the slit, shield, and spear checks, then continue on iPhone for body fit, exact-size print, mirror and professional export.