

Combined-motif stencil vetting

Vet the snake and flower before they share one stencil

A coiled body and soft blooms compete for the same skin. Pick one dominant motif, prove the scale-to-petal gaps and head-vs-bloom contrast at your exact size, then set coil-wrap flow so the pairing transfers as two readable marks.

Built for working artists preparing combined snake-plus-flower pieces. This page covers dominance choice, scale-to-petal retention, head-vs-bloom readability, coil-wrap flow, and combined print prep only. Single-snake silhouette depth stays with the snake owner and petal vetting stays with the small-flower owner.

Dominance first

One motif leads, the other supports.

Combined pieces fail when scale texture and petal texture share equal mass and stems fill whatever is left. These three dominance options decide the hierarchy before a single gap is measured.

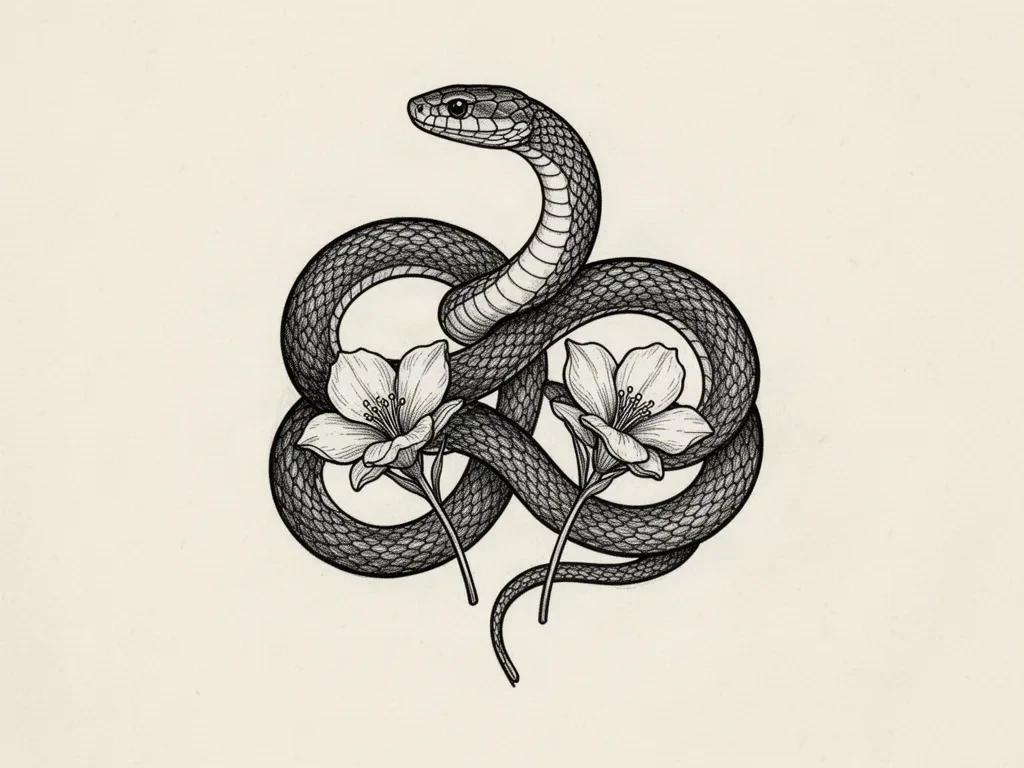
Synthetic black line-art study of a snake-led snake and flower composition, with a raised snake head clear above two open coil loops and two small blooms seated in the coil openings
Snake-led study. Synthetic illustration of mass distribution only, not to scale and not a stencil file. The stem run crossing the lower coil is the kind of contact the gap check resolves before print.
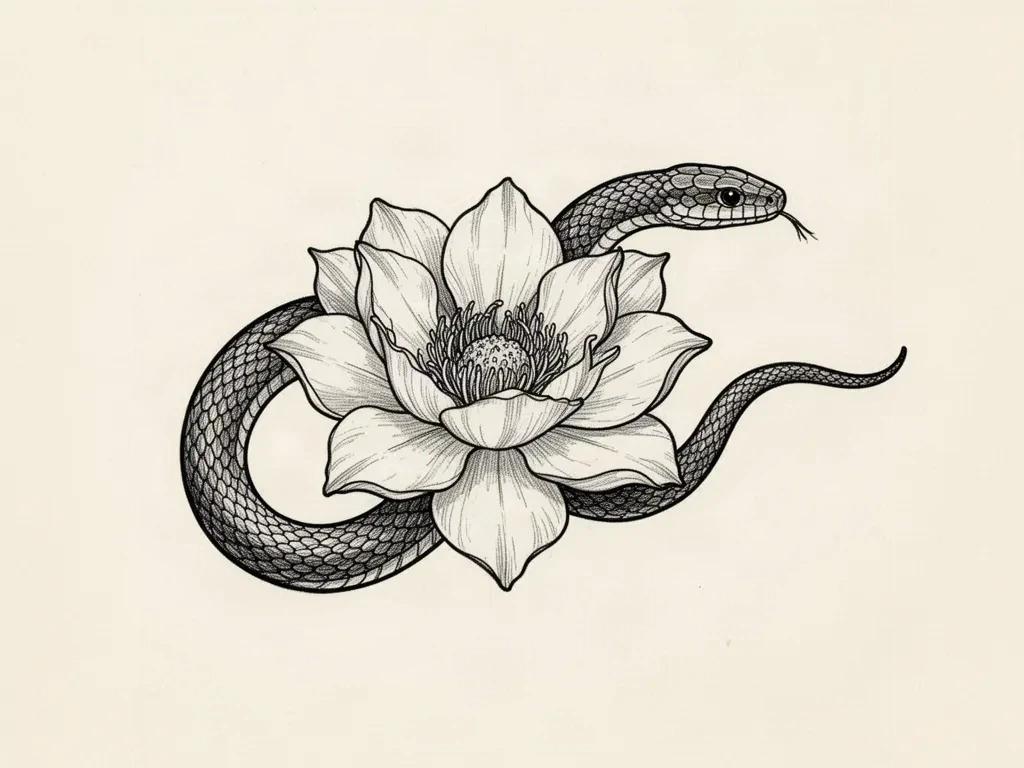
Synthetic black line-art study of a flower-led composition, with one large open bloom dominating and a slender snake body passing behind it toward open paper
Flower-led study. Synthetic illustration of mass distribution only, not to scale and not a stencil file. The body pass sitting behind the bloom marks the petal-edge contact that must be pulled fully clear at final size.
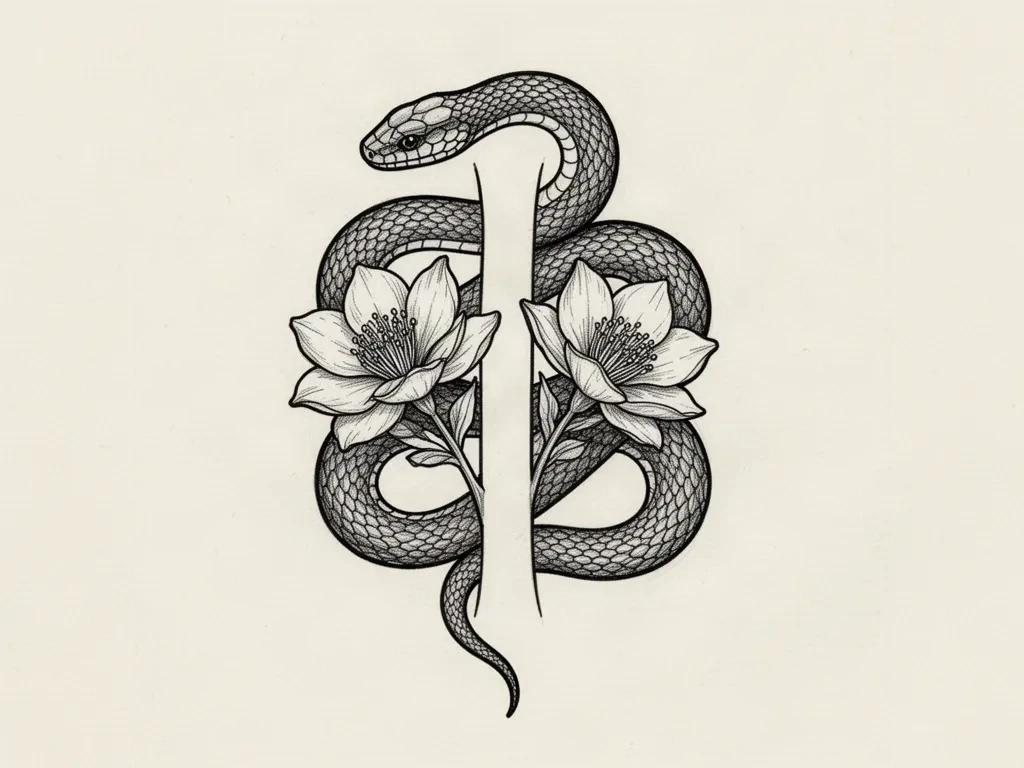
Synthetic black line-art study of a balanced snake and flower interweave, with two open blooms seated inside the coil openings and an open channel kept between the body edges and every petal edge
Balanced interweave study. Synthetic illustration of mass distribution only, not to scale and not a stencil file. Comparable coil and bloom mass means the unbroken channel between scale edges and petal edges is the structure the gap check protects.

Snake-led coil

The snake body carries the first read at roughly sixty percent of the visual mass, with one or two compact blooms parked in coil openings or trailing beside the tail. This build suits clients who want movement and head presence first with botanical softness second, and it survives reduction best when the outer body contour stays the heaviest mark and blooms never cross the body axis.

Check: Cover the flowers. If the coil still reads as one flowing ribbon with a clear head and tail at 1:1, the dominance is sound. If the eye goes to petal texture first even with blooms covered mentally, the blooms are too large or parked too close to the head.

Flower-led spray

One focal bloom carries the first read, with the snake body used as a stem-like sweep that enters behind petals and exits toward open skin. This build suits clients who want botanical softness first with serpent motion second, but it fails fastest when a body pass touches a petal edge, when the head lands inside the bloom cup, or when scale rows compete with petal separations at equal weight.

Check: Trace the focal bloom cup and outer petal tier as one closed flower. If the bloom stays complete and the snake keeps visible skin on all sides of every body pass at true size, the wrap works. If any body edge bridges onto a petal edge, move the body fully clear or shrink the bloom before print.

Balanced interweave

Snake and florals share comparable mass along one limb axis, usually a loose coil with blooms and buds seated in the openings between passes. This build suits mid-size flat fields such as outer forearms and calves, but it needs a continuous skin channel between every scale edge and every petal edge because long body texture and soft petal volume merge into one dark band on curves when they touch.

Check: Draw one imaginary channel between every body pass and every petal edge. If the channel runs unbroken from head to tail at true size with no scale-to-petal contact, the balance holds. If one bloom crowds a loop or the head sits against a petal tip, reopen before judging line weight.

When the combination fits but neither motif should dominate, keep this page as the working surface. When the job is really a single snake or a single small flower, hand off to the snake stencil owner or the small-flower stencil owner instead of forcing a pairing.

Combined evaluation framework

Score the reference in minutes, then act on the weakest check.

Four combined constructions at labeled lengths. Each one names the protected structure, the fix, and the go or no-go verdict at that exact size. Confirm every verdict with a measured 1:1 print.

HOLDS AT STATED SIZE

Snake-led coil with two blooms in the openings at 13 cm

Intended length 130 mm

Source
Loose two-loop coil with the head raised clear above the top pass, one compact bloom seated in each coil opening, short stems falling toward open skin, and one continuous skin channel between every body edge and every petal tip.
Protect
The full body contour with countable loops, the raised head with eye clearance, the tail taper direction, and both bloom cups with one outer petal tier each.
Fix
Shorten only the stem tip nearest the lower pass if the channel narrows at 1:1. Keep loop count, head mass, and bloom cups unchanged.
Candidate stencil
Same pairing with dominant motif set, coil axis aligned, texture thinned to surviving bridges, and outer contours kept at transferable mass.
Final-size verdict
Holds at 13 cm after a coil-opening check. Separated body mass and petal mass mean the eye reads snake first, flower second, with no shared pocket.

SEPARATE FIRST

Flower-led spray with body pass touching petals at 10 cm

Intended length 100 mm

Source
One strong focal bloom with a snake body sweeping behind it, but the mid-body pass touches two outer petal edges and the head sits close enough to a bud that the head outline and bud outline share one channel.
Protect
The focal bloom cup with its outer petal tier and the head oval with eye placement as the motion anchor.
Fix
Pull the body pass outward until visible skin rings every petal edge, move the bud fully clear of the head or remove it, and recheck at 1:1 before any shading work.
Candidate stencil
Same pairing with dominant motif set, coil axis aligned, texture thinned to surviving bridges, and outer contours kept at transferable mass.
Final-size verdict
Not stencil-ready at 10 cm. A body edge that touches a petal turns two textures into one dark mass, so separate first, then recheck before ornament.

THIN TEXTURE FIRST

Balanced interweave with full scale rows plus layered petals at 9 cm

Intended length 90 mm

Source
Even coil-to-bloom balance with repeated dorsal scale outlines on every pass plus double-tier petals and stamen clusters on three blooms. Several scale-to-petal and petal-to-petal separations sit near one millimeter on screen.
Protect
The body outer contours with head position, one focal bloom cup with one petal tier, and one coil opening as the bridging anchor.
Fix
Reduce scale hints to spaced ticks on the outer curve only, cut blooms to one focal plus one bud, and recheck each surviving gap for open skin at 1:1. Reduce texture count before thinning any contour.
Candidate stencil
Same pairing with dominant motif set, coil axis aligned, texture thinned to surviving bridges, and outer contours kept at transferable mass.
Final-size verdict
Simplify first. If the interweave zone still reads as one grey band at true size, the pairing needs fewer scales and petals, not finer lines.

ENLARGE OR RECROP

Tight coil with head nested in bloom cup at 6 cm

Intended length 60 mm

Source
Compact coil with the head tucked into a layered bloom cup plus small buds along the tail. Head outline, petal tiers, and scale ticks share the same fine line weight at a width where none of the gaps survive paper.
Protect
The nested head-plus-bloom silhouette and one body sweep, either the coil or the tail run, not both at full density.
Fix
Lift the head fully clear of the bloom cup, merge layered petals into one open tier, drop scale ticks at this size, and recheck with a squint test. Below about 8 cm, nested head detail plus equal-weight petal detail merge into one pocket.
Candidate stencil
Same pairing with dominant motif set, coil axis aligned, texture thinned to surviving bridges, and outer contours kept at transferable mass.
Final-size verdict
At 6 cm the shared fine weight flattens the contrast hierarchy. Enlarge past 10 cm, recrop to the coil plus one separated bloom, or cut the bud tail for this size.

Coiled, striking, and extended silhouette comparison stays with the snake stencil owner, and petal separation plus bud-density rules stay with the small-flower stencil owner. This framework exists to judge combined dominance, scale-to-petal separations, head-vs-bloom contrast, and stem bridging at a stated size, not to replace those owners.

Scale-to-petal gaps and head-vs-bloom contrast at final size

Judge the bridge channel at the size you will print.

Screens forgive combinations that paper and skin do not. Set the pairing length first, then inspect each feature below at true physical size with scaling off.

About 6 to 8 cm

Wrist accents, ankle, behind-ear-adjacent spots.

Carry one texture only at this width: a simplified coil with one plain bloom, or one focal bloom with a short body sweep and no scale rows. Keep a single contour family and treat scale ticks, stamen dots, and buds as removable. If any scale-to-petal gap closes at 1:1, remove that texture rather than shrinking it further.

About 9 to 13 cm

Common forearm, shoulder blade, collarbone, and calf combined pieces.

The most flexible band for a true combined read. One clear dominant texture, spaced scale hints, open head and bloom shapes, and a restrained stem bridge can work when every gap is verified at true size. Check loop spacing, head clearance, petal separations, and bridge clearance before approving scale rows or bud runs.

About 14 cm and above

Thigh, upper back, rib, and spine panels with room for loops, blooms, and stems.

Room for fuller loops, two blooms plus a bud, and a one-pass stem bridge, but only when open skin separates every scale edge from every petal edge. Larger size does not rescue a head nested in a bloom cup, a body pass fused to petals, or equal-weight micro detail that competes with outer contours.

Combined feature checks by size band
FeatureAbout 6 to 8 cmAbout 14 cm and above
Scale rows vs petal edgesKeep scale hints off the stencil or as a few spaced outer-curve ticks. Keep one petal tier with open separations. Any scale-to-petal contact is a removal call, not a thinning call.Spaced scale ticks along the outer curve can work when each keeps open skin from every petal edge. Judge channel continuity, not count: one pinched pass fails the coil even when the rest looks airy.
Head vs bloom contrastKeep the head fully clear of every bloom cup with a visible skin ring around the head oval and eye. Drop buds near the head and keep the jaw as one clean edge.A head parked near a bloom can work when the head outline, eye, and jaw each keep open skin. Check head clearance with a squint test at true size before adding tongue or jaw detail.
Stems, buds, and dot chainsKeep at most one bridge element, and keep it fully clear of both body passes and petal edges. Dots below about 1.5 mm on the print are removal candidates.A single stem sweep plus one spaced bud can work when each keeps open skin on all sides. Judge bridge density, not count: clustered buds merge even when the count looks modest.
Coil loop separationsEvery neighboring body pass must read as open skin at 1:1. Merge means fewer loops or a longer layout, not thinner body contours.Loops can sit closer relative to length, but each pass must still survive print and transfer as a separate ribbon. Blooms seated in openings need the widest bridge check.

Reference to clean stencil

Set the dominant motif first, then thin the bridge.

Work in this order so one change at a time can be judged at the same size. Stop when dominance, axis, gaps, and hierarchy each read correctly.

  1. 01

    Name the dominant motif, size, and placement

    State the build in one sentence, snake-led, flower-led, or balanced, then set the intended physical length in millimeters and the named body area. A balanced interweave that holds at 13 cm on a flat forearm can fail at 7 cm on a wrist with no line being wrong on its own. Use the size calculator when target dimensions are still open.

  2. 02

    Set the coil axis and open every scale-to-petal gap

    Seat blooms in coil openings with stems falling toward open skin, keep the head raised clear of every bloom cup, and confirm a continuous skin channel separates every body edge from every petal edge at true size. Resolve body-to-petal contacts, nested heads, and stem bridges before touching line weight.

  3. 03

    Rank three line levels

    Assign heaviest mass to the snake outer contour and the bloom cups, middle mass to one scale family or one petal tier, and lightest removable mass to scale ticks, stamen dots, buds, and leaves. Mark at least two small textures that can be removed without changing identity. Strengthen the dominant contour first and never promote buds to contour weight to fill empty skin.

  4. 04

    Simplify texture and recheck at 1:1

    Reduce scale, petal, and bud count before thinning contours. Keep open skin between coil passes, around the head and eye, between every petal, and along the full stem bridge, then run a squint check: step back until texture disappears and confirm the pairing still reads as snake plus flower. The line-weight guide covers fine, normal, and bold behavior on the same stencil.

  5. 05

    Verify print and transfer path

    Export a true-size PDF with no fit-to-page scaling, inspect the narrowest loop gap, the tightest head-to-bloom clearance, and the stem bridge on plain paper, then measure the physical print with a ruler. If the digital file passes and only paper fails, move to print-stage evidence instead of simplifying again.

Coil-wrap and floral framing flow

Combined pairs want flat skin that preserves their separations

A snake-plus-flower pairing is a two-texture gap composition wrapped around one axis. Flat placements preserve loop, petal, and stem separations with little compensation, while tight curves and centered fields demand strict axis control.

Wrist, ankle, and behind ear

Small curved fields where only a simplified pair survives: an open coil with one plain bloom, or one bloom with a short body sweep. Full scale rows, layered petals, and bud tails forced into these spots merge first.

Check: Recrop to the dominant motif with at most one bridge element, then run every scale-to-petal check at the exact length.

Outer forearm and calf

Long flat fields where balanced interweaves read best. Keep the long axis along the limb line so coil loops and blooms do not drift across the curve.

Check: Align head, coil center, bloom cups, and stem bridge to the flattest span and confirm separations at 1:1 before print.

Shoulder, thigh, and upper back

Broad panels with room for looser coils, two blooms plus a bud, and a restrained stem sweep. The most forgiving area for blooms seated inside coil openings.

Check: Spend the extra room on scale-to-petal separation first, raise the head onto the flattest span, and let stems fall toward open skin.

Spine, ribs, and sternum

Centered or breathing fields where axis drift and stem crowding show fastest. Curved rib placements foreshorten lower loops first and pinch loop gaps the screen hides.

Check: Lay out center alignment on skin before locking the file, keep bud counts low near the midline, and preview the full pairing on a body photo.

Stencil-ready checklist

Approve the pairing only when every line passes

Run this short sequence with scaling off and a ruler in hand. One failed line means keep, simplify, rescale, or relocate before transfer.

  • Confirm dominant build, intended length in millimeters, and named placement in one sentence.
  • Confirm coil loops stay countable with open skin between neighboring passes at 1:1.
  • Confirm the head sits clear of every bloom with open skin around the head oval and eye.
  • Confirm every scale-to-petal and petal-to-petal gap stays open at 1:1.
  • Confirm each surviving bud, stem, and dot keeps open skin on all sides with no contact to body or petals.
  • Confirm line hierarchy with heaviest body and bloom-cup contours, middle scale or petal tier, and lightest removable texture.
  • Export a true-size PDF with scaling off and measure the physical print.
One motif leads Verify scale-to-petal gaps at 1:1 Keep, simplify, rescale, or relocate

FAQ

Combined stencil decisions, answered

Short answers for the dominance, gap retention, hierarchy, and placement checks that recur when a snake-plus-flower reference moves toward transfer-ready output.

Judge by placement shape and length. Small curved spots suit a snake-led coil with one plain bloom or a flower-led bloom with a short body sweep and no scale rows. Flat mid-size fields suit a balanced interweave with blooms seated in coil openings. Broad panels suit looser coils with two blooms plus one bud. Do not force full scale rows plus layered petals plus a bud tail into a wrist-length piece, and do not nest the head inside a bloom cup across a sharp curve.

Next steps

Use the neighboring owners for adjacent jobs.

This guide covers combined dominance choice, size-tied scale and gap rules, three-level hierarchy, and reference-to-stencil preparation. Use the links below for related jobs such as sizing, print checks, paper, and placement.

Single-snake catalogs, single-flower catalogs, skull and rose dominance, dagger construction, tiger portrait framing, broad subject browsing, grid overlays, photo-quality scoring, paper manufacturing detail, and placement mechanics stay in their specialist owners. The links above hand off instead of repeating that detail.

From evaluated reference to working stencil

Turn the approved pairing into a stencil draft.

Start from the pairing that passed the dominance and gap checks, then continue on iPhone for body fit, exact-size print, mirror and professional export.