

Four-leaf clover stencil evaluation

Judge any lucky clover before it becomes a stencil

Clovers live or die on notch discipline. Choose the four-leaflet construction that fits your width, protect the open gaps between leaflets and the stem path, and confirm every separation at your exact size for a clean transfer-ready stencil.

Built for working artists preparing lucky-clover pieces. This page covers four-leaflet symmetry, gap retention, stem transferability, and transfer prep only, not tattoo application or healing advice. Flower-head and vine-run vetting stays with the floral and vine owners linked below.

Reading a clover plate

  • Leaflets: Count four separable shapes with open notches between every pair. Touching neighbors fail before thin lines do.
  • Junction: Find the center where four separations meet and confirm it reads as open skin, not an inked dot.
  • Stem: Follow one confident path from junction to tip. Fading hairline stems break first on transfer.

Use this checklist to read any clover reference, then verify your own reference at the width you will print.

Clover variant chooser

Four leaflets, one junction, and a stem decide the read.

A clover piece is four compact shapes around one center plus their stem. Pick the construction that fits the placement width, then protect the gaps that keep it separable.

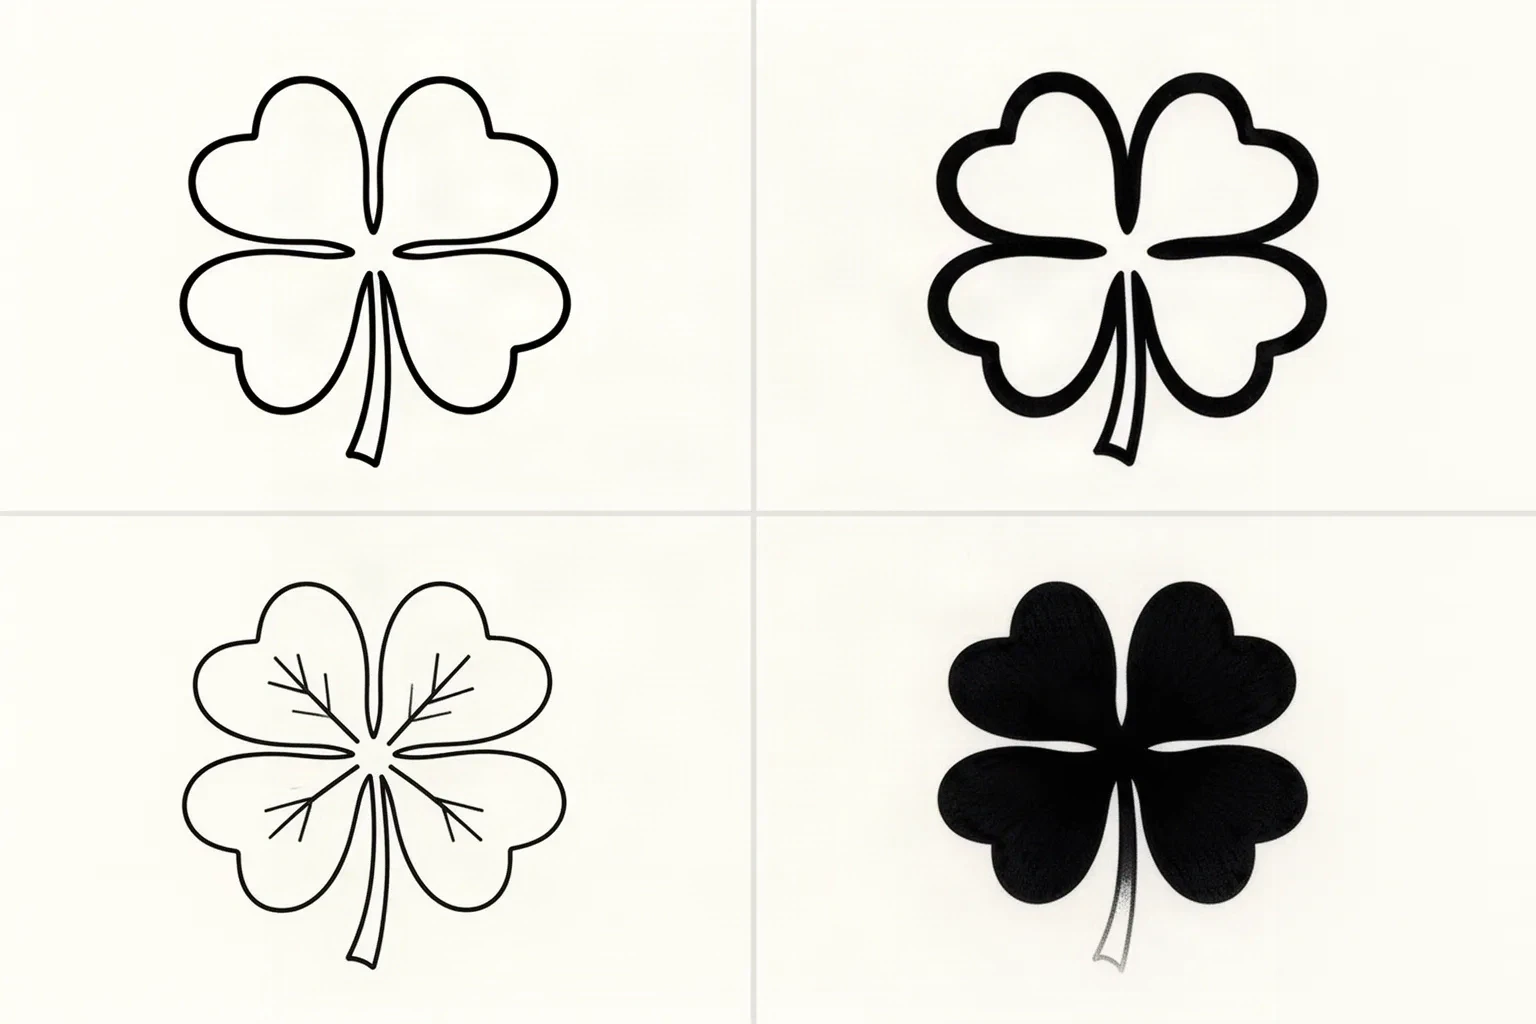
Four-panel black ink study of four-leaf clovers: a medium outline with open notches and an open center, a heavier rounded outline, a very thin line version with vein marks, and a solid black merged mass showing how leaflets and the center junction collapse together
Illustrative construction study, not app output. Three line treatments plus the failure case: a medium outline with open notches and an open center junction, a heavier rounded outline for small widths, a thin line treatment with vein marks, and the solid merged mass that appears once leaflets touch and the junction fills in. Read the plate for the logic, then verify your own reference at the width you will print.

Classic four-heart outline

Use when: The default for most placements from 4 cm up. Four heart-shaped leaflets with clear notches between them read instantly as a lucky clover.

Construction: Keep four even leaflets around one small center junction with open skin in every notch. One curved stem below, plus at most one short center vein mark per leaflet at larger widths.

Failure mode: Fails when the notches close and neighboring leaflets share one merged edge. Four touching hearts read as one rounded blob after transfer.
Rounded-lobe simplified

Use when: Small placements (finger, behind ear, ankle, wrist) where heart notches are too fine to survive. Trades the pointed heart tips for forgiving rounded lobes.

Construction: Widen every notch, drop inner vein marks entirely, and keep the center junction as open skin rather than an inked dot. Let the four-lobe silhouette carry the read.

Failure mode: Fails when simplification goes too far and the notches flatten into a plain quatrefoil with no clover character. Keep a visible inward dip at each of the four separations.

Fine-line minimal

Use when: Minimalist and single-needle style work where the clover floats on thin contours and open skin, often paired with a date, initial, or tiny sparkle accent.

Construction: Use one light continuous contour per leaflet with slightly stronger outer edges than feels right on screen. Keep the stem thinner than the leaflet contours but unbroken from junction to tip.

Failure mode: Fails when every line carries the same hairline weight and the stem vanishes on transfer. Thin stems break first, so the stem needs its own deliberate weight decision.

Emblem with lucky pairing

Use when: Larger placements (forearm, calf, shoulder) where the clover anchors a small lucky composition with a horseshoe, banner, numerals, or dice accent.

Construction: Keep the clover dominant and the accent subordinate with a clear skin channel between the two constructions. Resolve the stem into the composition direction instead of letting it collide with lettering.

Failure mode: Fails when the accent touches a leaflet edge or the stem runs into script with no planned gap. A touching accent turns two readable marks into one merged mass.

Clover evaluation framework

Score the reference in minutes, then act on the weakest check.

Four clover constructions at labeled widths. Each one names the protected structure, the fix, and the go or no-go verdict at that exact size. Confirm every verdict with a measured 1:1 print.

HOLDS AT STATED SIZE

Classic four-heart clover with open notches at 5 cm

Intended width 50 mm

Source
Four even heart-shaped leaflets with visible skin in every notch, a small open center junction, one curved stem with clear weight, and no inner shading.
Protect
Each inter-leaflet notch from edge to center, the open center junction, and the unbroken stem path.
Fix
No structural fix needed. Confirm every notch stays open at 1:1 and print true size with scaling off.
Candidate stencil
Same clover with the variant set, leaflets separated, the center junction kept as open skin, and the stem at transferable weight.
Final-size verdict
Holds at 5 cm. Four leaflets stay separable and the clover reads from symmetry plus open notches, not shading.

REOPEN NOTCHES FIRST

Pretty reference with touching leaflets at 4 cm

Intended width 40 mm

Source
An attractive photo-style clover where neighboring leaflets touch along short shared edges and the center is one inked mass with fine vein texture inside each leaflet.
Protect
The four-leaflet rhythm and the stem direction the reference is reaching for.
Fix
Re-space the leaflets so open skin runs from every notch into the center, reduce the center to a small open junction, and remove inner vein texture before anything else changes.
Candidate stencil
Same clover with the variant set, leaflets separated, the center junction kept as open skin, and the stem at transferable weight.
Final-size verdict
Not stencil-ready until every notch is open at true size. Touching leaflets function as one mass at small widths.

STRENGTHEN STEM FIRST

Fine-line clover with hairline stem at 4 cm

Intended width 40 mm

Source
A delicate clover with thin uniform contours and a long hairline stem that fades toward its tip, plus one tiny sparkle accent near the upper leaflets.
Protect
The four even leaflets with their notch separations and the sparkle position.
Fix
Give the stem its own confident weight from junction to tip, shorten it if it still fades at 1:1, and keep the sparkle clear of every leaflet edge with its own skin gap.
Candidate stencil
Same clover with the variant set, leaflets separated, the center junction kept as open skin, and the stem at transferable weight.
Final-size verdict
At 4 cm a fading hairline stem breaks on transfer. Strengthen the stem path first, because leaflets without a readable stem lose the clover read.

SEPARATE OR ENLARGE FIRST

Clover-and-banner pairing with contact at 7 cm

Intended width 70 mm

Source
A lucky composition where a small banner with lettering sits directly against the lower leaflets and the stem runs into the banner edge with no separation.
Protect
The clover construction with its notch gaps and the banner wording intent.
Fix
Move the banner one clear skin channel below the leaflets, resolve the stem to end above the banner or pass clearly behind it with overlap order, and verify lettering counters separately at 1:1.
Candidate stencil
Same clover with the variant set, leaflets separated, the center junction kept as open skin, and the stem at transferable weight.
Final-size verdict
Not stencil-ready while clover and banner share contact. Separate the constructions or enlarge past the point where every channel stays open.

Floral bloom and vine-run vetting stays out of this framework. Petal layering and ray tiers are judged on the aster and gladiolus pages, round-fruit pairing on the cherry page, and stem paths on the vine page, while this framework judges four-leaflet symmetry, notch and junction gaps, and stem transferability on the compact clover head. Broad visual browsing stays on the stencils and subject hubs.

Notches, junction, and stem at final size

Judge the white space at the width you will print.

Screens forgive crowding that paper and skin do not. Set the width first, then inspect each feature below at true physical size with scaling off.

About 3 cm and below

Finger, behind ear, wrist dots, and tiny ankle accents.

Carry the rounded-lobe simplified construction with no vein marks and no accent. If any notch closes at 1:1, enlarge or reselect rather than forcing the classic heart points into this band.

About 4 to 7 cm

The most common clover band: inner wrist, ankle, collarbone, shoulder accents, and small forearm pieces.

The flexible band for the classic four-heart construction with one stem and at most one short vein mark per leaflet. Verify notch gaps, center junction, and stem continuity at true size with scaling off.

About 8 cm and above

Forearm, calf, thigh, shoulder, and emblem compositions with lucky pairings.

Room for heart points, one vein mark per leaflet, and one subordinate accent, but only when open skin separates every element. Larger width does not rescue touching leaflets or a stem that collides with lettering.

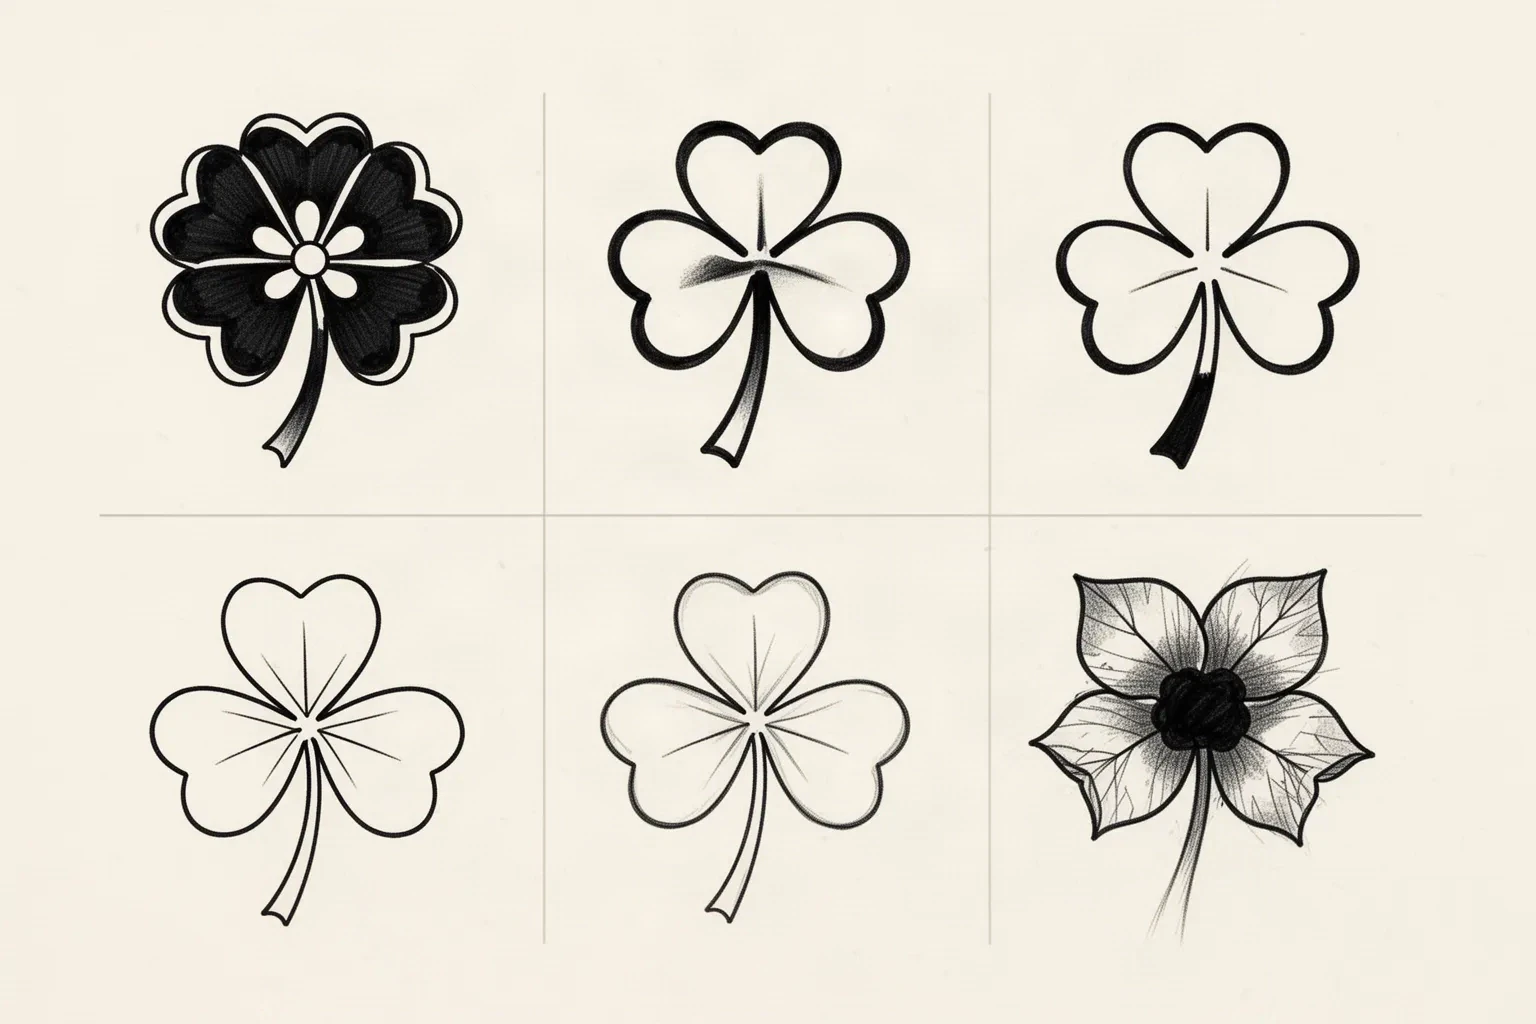
Six-panel black ink construction plate of four-leaf clovers: a solid filled clover with a small light flower at the center, three progressively thinner outline versions that keep the notches and center junction open, two fine-line versions with radiating vein marks, and a shaded photographic-texture clover with a dark filled center
Illustrative variant construction plate, not app output. Top row to bottom row: the filled treatment with an inked mass, then three outline weights that hold four separate notches around an open center junction on one stem, a fine-line version carrying radiating vein marks, and a photographic texture that packs the center into a dark mass. Compare the constructions here, then judge your own reference at the width you will print.
Clover feature checks by width band
FeatureAbout 3 cm and belowAbout 8 cm and above
Inter-leaflet notchesKeep every notch as open skin from outer edge to center. Merge means widening a notch, not thinning the lines around it.Heart points can sharpen when each notch keeps its own channel at 1:1. If two leaflets share an edge, respace before touching line weight.
Center junctionKeep the center as a small open junction where four separations meet, never an inked dot. An inked center fills first at small widths.A slightly stronger junction outline can anchor the symmetry when all four channels stay open at true size.
Stem line massGive the stem one confident weight from junction to tip with open skin on both sides. If the stem disappears, the clover loses its plant read and becomes a floating quatrefoil.Same priority. Larger widths allow a slightly finer secondary curve, but the lead stem must still dominate and stay unbroken.
Veins and accentsCarry none, or at most one tiny sparkle with its own skin gap. Small widths suit leaflets plus stem; inner detail forced into these bands merges first.One short vein mark per leaflet or one subordinate lucky accent can work when each keeps open skin. Check the full piece with a squint test at true size.

Fine-detail fallout risk checklist: notches, junction, and stem

  • Closed notches: neighboring leaflets touching with no preserved gap erase the four-leaf read at small widths.
  • Inked center blob: a filled center junction prints as one dark mass once transfer solution spreads.
  • Fading hairline stems: thin uniform stems break first on transfer while leaflets survive.
  • Vein texture crowding: inner vein runs packed edge to edge merge into one scalloped fill below 5 cm.
  • Accent contact: a horseshoe, banner, numeral, or sparkle touching a leaflet bridges first.
  • Stem-to-lettering collision: a stem running into script with no planned gap turns two marks into one mass.

Reference to clean stencil

Lock the head, then build outward along the stem.

Work in this order so one change at a time can be judged at the same width. Stop when leaflets, junction, stem, placement, and print each read correctly.

  1. 01

    Lock width, variant, and placement first

    Set the intended physical width in millimeters, choose one construction (classic four-heart, rounded-lobe simplified, fine-line minimal, or emblem pairing), and name the body area before judging the reference. A clover that holds at 8 cm on a flat forearm can fail at 3 cm on a curved finger with no line being wrong on its own. Use the size calculator when target dimensions are still open.

  2. 02

    Rank leaflets, junction, and stem

    Name the four leaflets, the center junction, and the stem, then assign every mark a role: outer leaflet contours that carry the first read, the open junction that keeps them separable, and the stem that carries the plant direction. Strengthen outer contours and the stem first, and mark one removable detail that can go if gaps close.

  3. 03

    Simplify notches and reopen gaps for final size

    Re-space touching leaflets and reopen every notch before thinning any contour. Reduce vein marks to one short mark per leaflet or remove them entirely, resolve the center to open skin, then run a squint check: step back until inner detail disappears and confirm four separate leaflets plus stem still read. The line-weight guide covers fine, normal and bold behavior on the same stencil.

  4. 04

    Fit the stem and accent to the body

    Angle the stem with the body line, keep accents subordinate with a clear skin channel, and shorten cross-axis stems while edits are still cheap. Preview the placement on a body photo when the curve, wrap, or viewing angle could change the symmetry read.

  5. 05

    Verify print and transfer path

    Export a true-size PDF with no fit-to-page scaling, inspect the narrowest notch and the center junction on plain paper, then measure the physical print with a ruler. If the digital file passes and only paper fails, move to print-stage evidence instead of simplifying again.

Placement and size decisions

Compact heads want flat skin that keeps symmetry honest

A clover is a small symmetric emblem. Placements with a flat readable span preserve the four-leaflet symmetry with little compensation, while small wrapped placements demand a simplified recrop.

Inner wrist and ankle

Small curved fields where only the simplified or a clean classic clover survives. Veins and accents forced into these bands merge first.

Check: Recrop to leaflets plus one confident stem, verify every notch at the exact width, then run the small-size checks before print.

Finger and behind ear

Very small wrapped fields with movement and friction. Only rounded-lobe constructions with open notches and a short sturdy stem hold here.

Check: Drop all inner detail, confirm the center junction reads as open skin at 1:1, and check fading risk for the placement with the artist.

Forearm, calf, and shoulder

Medium panels with room for heart points, one vein mark per leaflet, and a graceful stem curve along the limb or bone line.

Check: Run the stem with the longest span, seat the clover head on the flattest area, and confirm notch and junction gaps stay open at true size.

Thigh, chest, and back accents

Large panels with room for emblem pairings, banners, and numerals alongside the clover, but wide compositions compress on curves in photos and transfers.

Check: Spend the extra room on clover-to-accent separation first, center the clover on the flattest span, and verify lettering counters separately at 1:1.

Clover versus neighboring motifs

Route the motif to the right vetting logic

Clovers share botanical vocabulary with flowers and vines, but stencil decisions differ by job: compact symmetry here, bloom construction or stem paths there. Use this table to confirm the brief before judging it as a clover.

Clover versus neighboring motifs for stencil vetting
MotifConstructionStencil call
Four-leaf clover (this page)Four heart-shaped or rounded leaflets with open notches meeting at a small center junction, on one curved stem.Vet four-leaflet symmetry, notch and junction gaps, and stem transferability using the framework on this page.
Three-leaf shamrockThree leaflets with wider spacing and a more open triangular rhythm, often with a longer stem emphasis.Do not judge a shamrock by four-leaflet symmetry. Three leaflets need their own spacing logic, and a four-leaf fix list will mislead the construction.
Floral bloom (aster, gladiolus, cherry)Layered petals, ray tiers, or round fruit forms judged on bloom density, branch hierarchy, or fruit separation.Judge petal layering, ray count, or fruit pairing on the aster, gladiolus, or cherry stencil pages. Link there when the brief is a flower head or fruit, not a luck emblem.
Trailing vine fillerA continuous stem system judged on path continuity, overlap bridges, and leaf rhythm along a run.Judge stem paths and wrap bridges on the vine stencil page when the brief is a traveling vine, not one compact clover head.

Stencil-ready checklist

Approve the clover only when every line passes

Run this short sequence with scaling off and a ruler in hand. One failed line means fix, enlarge, or reselect before transfer.

  • Confirm intended width in millimeters, the chosen clover variant, and the named placement.
  • Confirm four leaflets read as separate shapes with open skin in every notch at 1:1.
  • Confirm the center junction reads as open skin where four separations meet, not an inked dot.
  • Confirm the stem runs unbroken from junction to tip with its own deliberate weight.
  • Confirm veins and accents stay clear of every leaflet edge with a preserved skin gap.
  • Export a true-size PDF with scaling off and measure the physical print.
Four leaflets, open notches Verify gaps at 1:1 Stem survives transfer

FAQ

Clover stencil decisions, answered

Short answers for the notch, stem, size, and handoff checks that recur when a four-leaf clover reference moves toward transfer-ready output.

It is usable when three checks pass at the exact physical width: open skin runs through every inter-leaflet notch into the center at 1:1, the center junction reads as open skin rather than an inked mass, and the stem runs unbroken from junction to tip with its own weight. If any check fails, the fix list on this page names what to respace, simplify, or enlarge before print.

Next steps

Use the neighboring owners for adjacent jobs.

This guide covers four-leaflet symmetry, notch and junction gap retention, stem transferability, and clover transfer preparation. Use the links below for adjacent jobs such as bloom vetting, sizing, print checks, paper, and placement.

Petal layering, ray-tier depth, fruit pairing, vine path mechanics, generic outline theory, broad gallery browsing, paper manufacturing detail, and placement mechanics stay in their specialist owners. The links above hand off instead of repeating that detail.

From evaluated reference to working stencil

Turn the approved clover into a stencil draft.

Start from the clover construction that passed the notch and stem checks, then continue on iPhone for body fit, exact-size print, mirror and professional export.