

Cherry-fruit stencil evaluation

Judge any cherry-fruit reference before it becomes a stencil

Cherry fruit lives or dies on round-form separation. Choose single vs paired form, set stem length and leaf pairing, protect the shine gaps, and confirm every gap stays open at your exact width before transfer.

Built for working artists preparing cherry-fruit pieces. This page covers round-fruit evaluation and stencil preparation only, not tattoo application or healing advice. Looking for pink blossom sprays with petals and branches instead? That construction is vetted on the cherry-blossom stencil page.

Fruit variant chooser

Single, pair, stems, and leaves decide the read.

A cherry-fruit piece is two round forms plus their hanging structure. Pick the configuration that fits the placement width, then protect the gaps that keep it separable.

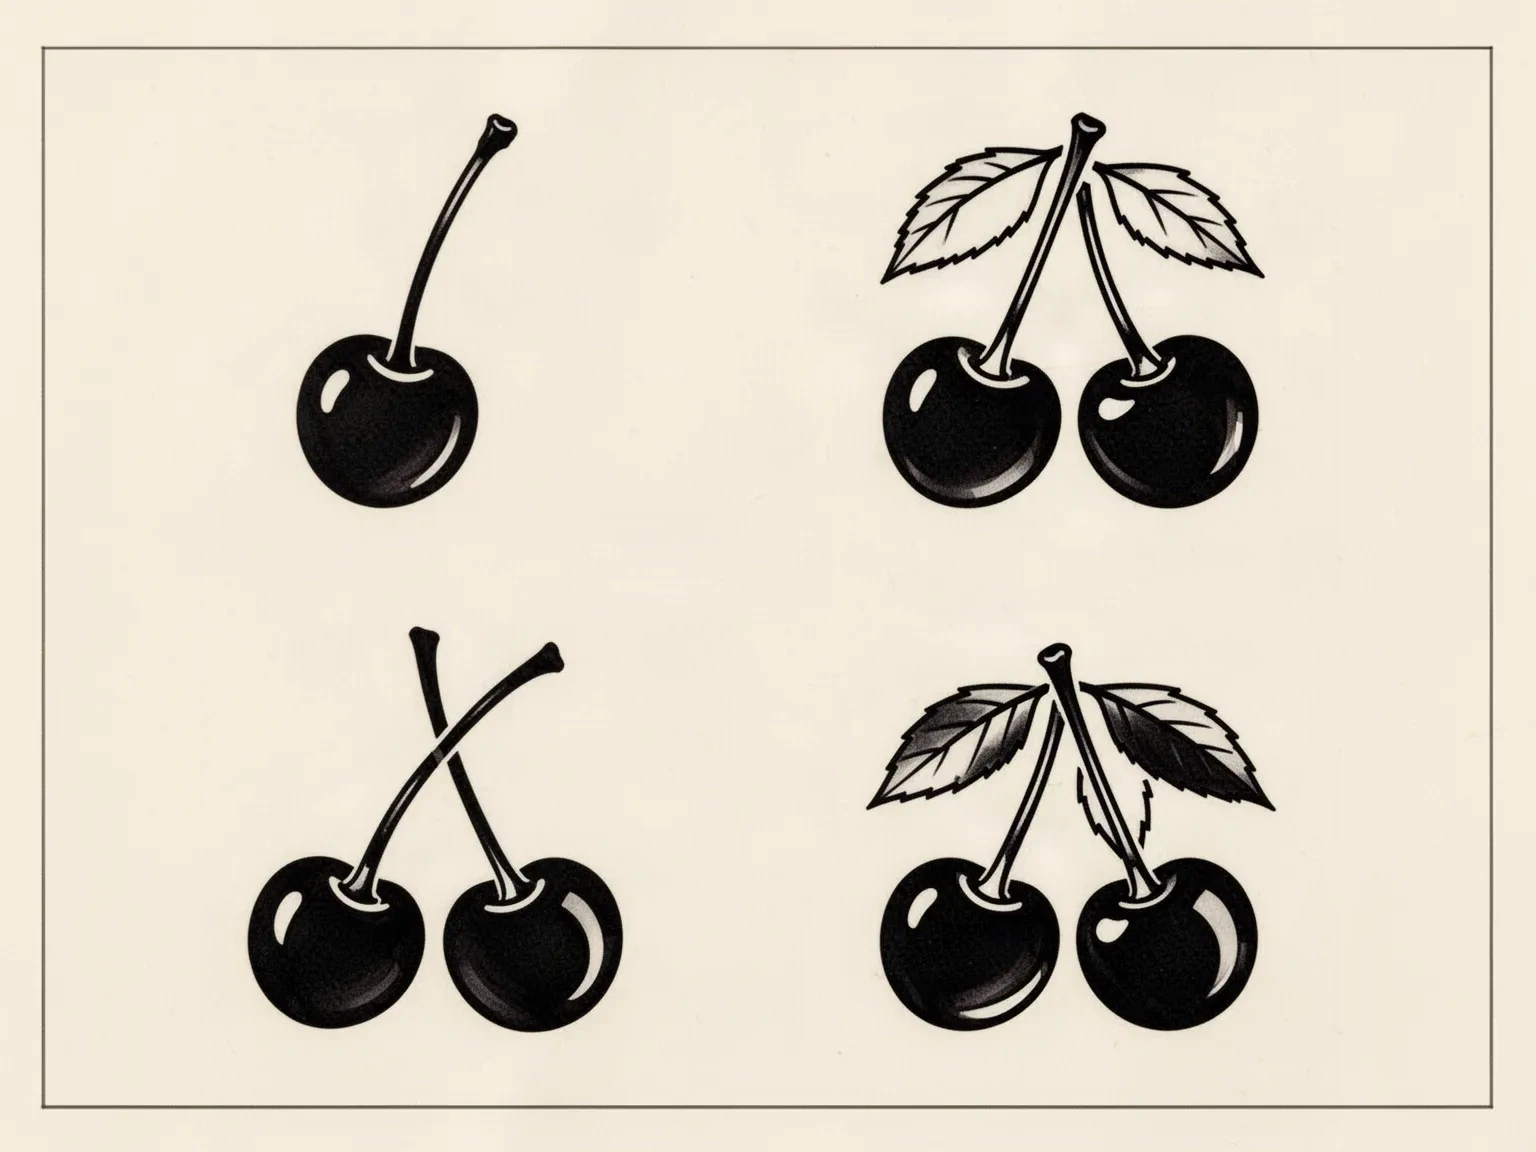
Line-art plate comparing four cherry-fruit stencil directions: a single cherry with one short stem, a pair joined at a narrow V junction with open skin between the fruit, a pair with long stems crossing once, and a pair with two pointed leaves at the stem junction.
Original synthetic illustration for configuration comparison, not a production stencil, not app output, and not a scale reference. Shine marks appear as open paper because that is how they have to survive transfer. Confirm every gap at your measured 1:1 print.

Single cherry

Use when: Small placements (behind ear, finger, ankle) or minimalist fine-line work where one readable sphere is the whole read.

Stem and leaf: One short stem, no crossing. Leaf is optional; if kept, use one small leaf with open skin between leaf and fruit.

Failure mode: Fails when a lone cherry is drawn with heavy shading texture around it to fill space. At small widths the texture merges into the contour and the sphere loses its edge.

Classic pair

Use when: The default for most placements. Two spheres hanging from stems that meet in a tight V read instantly as cherries even at small sizes.

Stem and leaf: Keep stems joined at one junction with a narrow V. Add at most one leaf at the junction. Confirm each stem stays a separate mark where they meet.

Failure mode: Fails when the two spheres touch or overlap with no skin between them. Two touching discs read as one lumpy mass after transfer.

Long or crossed stems

Use when: Larger placements (thigh, shoulder, ribs) where stem movement adds elegance, including Y2K and ornamental directions with looping stems.

Stem and leaf: Cross stems at most once and keep a clear over-under order. Long stems need bolder mass than the fruit contour because thin stems break first on transfer.

Failure mode: Fails when two or more crossings create a woven knot above small fruit. The knot fills in and drags the eye away from the cherries.

Leaf-accented pair

Use when: Traditional and neo-traditional work where one or two pointed leaves balance the round fruit.

Stem and leaf: Pair leaves with the stem junction, not with the fruit bodies. Keep a visible gap between every leaf edge and the nearest cherry contour.

Failure mode: Fails when leaves touch the fruit. Leaf-to-fruit contact closes the gap that separates the two constructions and both lose their read.

Fruit evaluation framework

Score the reference in minutes, then act on the weakest check.

Four cherry-fruit constructions at labeled widths. Each one names the protected structure, the fix, and the go or no-go verdict at that exact size. Confirm with a measured 1:1 print.

HOLDS AT STATED SIZE

Classic pair with tight V stems at 6 cm

Intended width 60 mm

Source
Two separated spheres, stems meeting in one narrow junction, one small leaf with open skin around it.
Protect
The skin gap between the two spheres, the stem separation at the junction, and the leaf-to-fruit gap.
Fix
No structural fix needed. Confirm the shine gaps stay open at 1:1 and print true size.
Candidate stencil
Same fruit with the configuration set, touching forms separated, shine gaps kept as open skin, and stems at transferable mass.
Final-size verdict
Holds at 6 cm. Paired round forms stay separable and the junction reads as one meeting point.

SEPARATE THE FRUIT FIRST

Touching pair that merges at 5 cm

Intended width 50 mm

Source
Attractive reference with two glossy cherries pressed together, sharing one merged contour where they touch.
Protect
The two sphere identities and the stem junction above them.
Fix
Re-space the spheres so open skin separates them, or recrop to the stronger single cherry. Do not thicken the shared contour to hide the contact.
Candidate stencil
Same fruit with the configuration set, touching forms separated, shine gaps kept as open skin, and stems at transferable mass.
Final-size verdict
Not stencil-ready until the fruit separates. Touching round forms function as one mass at small widths.

SIMPLIFY STEMS FIRST

Double-crossed stems over small fruit at 6 cm

Intended width 60 mm

Source
Small cherries under tall looping stems that cross twice near the junction with thin uniform line mass.
Protect
The fruit contours and one leading stem path from junction to top.
Fix
Reduce to a single crossing with clear overlap order, shorten the weaker loop, and give stems slightly bolder mass than the fruit contour.
Candidate stencil
Same fruit with the configuration set, touching forms separated, shine gaps kept as open skin, and stems at transferable mass.
Final-size verdict
Not stencil-ready until one stem leads. Woven stems above small fruit fill in first on transfer.

REOPEN SHINE GAPS FIRST

Glossy pair with closed highlights at 4 cm

Intended width 40 mm

Source
One small pair with detailed shine marks, stipple shading, and thin highlight outlines inside each sphere.
Protect
The outer sphere contours and one shine gap per cherry, kept as open skin.
Fix
Keep a single comma or oval shine gap per cherry and remove stipple inside the spheres. Shine reads through absence of ink, not through extra marks.
Candidate stencil
Same fruit with the configuration set, touching forms separated, shine gaps kept as open skin, and stems at transferable mass.
Final-size verdict
At 4 cm only one shine gap per cherry survives. Enlarge past 5 cm or simplify before print.

Blossom construction stays out of this framework. Petal layering, branch movement, and bud density are vetted on the cherry-blossom stencil page, while this framework judges sphere separation, shine gaps, and stem junctions. Broad visual browsing stays on the stencils and subject hubs.

Round forms, shine gaps, and overlap at final size

Judge the white space at the width you will print.

Screens forgive crowding that paper and skin do not. Set the width first, then inspect each feature below at true physical size with scaling off.

About 4 cm and below

Behind ear, finger, wrist dots, and tiny ankle accents.

Carry a single cherry or a small tight pair with one shine gap each and no leaf, or one leaf only with a clear gap. Remove stipple and secondary shine marks before anything else.

About 5 to 8 cm

The most common cherry band: collarbone, hip, inner ankle, forearm accents.

The flexible band for the classic pair with a tight V junction and one leaf. Verify sphere separation, junction separation, and shine gaps at true size with scaling off.

About 8 cm and above

Thigh, shoulder, ribs, and ornamental compositions with stem movement.

Room for longer stems, one crossing, and fuller leaf pairing, but only when every gap is verified open at 1:1. Larger width does not rescue touching fruit or woven stems.

Cherry-fruit feature checks by width band
FeatureAbout 4 cm and belowAbout 5 cm and above
Sphere contoursKeep the heaviest contour mass here. If a sphere edge disappears, the cherry loses its fruit read and becomes a soft blotch.Same priority. Larger widths allow slightly finer inner shading, but outer contour separability still decides the read.
Shine and highlight gapsKeep exactly one open shine gap per cherry. Merge means removing a shine mark, not thinning it.A second small sparkle or stipple accent can work when each mark keeps its own open skin at 1:1.
Stem junctions and crossingsKeep one junction with stems that stay separate marks. Recrop long stems rather than forcing loops into a small width.One crossing can add movement when the overlap order is explicit. Equal-weight double crossings need restructuring before print.
LeavesCarry at most one small leaf with a visible gap to the fruit. Leaves touching cherries merge first.Two leaves can work when each keeps its own stem length and open skin. Check the leaf-to-fruit gap with a squint test at true size.

Reference to clean stencil

Build from the fruit outward to the stems.

Work in this order so one change at a time can be judged at the same width. Stop when configuration, gaps, mass, and stems each read correctly.

  1. 01

    Lock width and placement first

    Set the intended physical width in millimeters and name the body area before judging the reference. A pair that holds at 8 cm on a thigh can fail at 4 cm behind an ear with no line being wrong on its own. Use the size calculator when target dimensions are still open.

  2. 02

    Choose the fruit configuration

    Decide single vs paired, stem length and crossing count, and leaf pairing from the chooser above. Name the protected gaps: sphere separation, junction separation, leaf-to-fruit gap, and one shine gap per cherry.

  3. 03

    Simplify round forms at 1:1

    Separate touching spheres, reduce stems to one junction with at most one crossing, and keep one shine gap per cherry as open skin. Run a squint check: step back until shine marks disappear and confirm the fruit still reads as cherries.

  4. 04

    Set bold vs fine-line mass

    Bold traditional pairs need heavier sphere contours and stems with re-checked gaps, because bold mass expands toward nearby separations. Fine-line singles need slightly stronger outer contours than feels right on screen, because thin round contours break first on transfer. Confirm the narrowest gap after any weight change.

  5. 05

    Verify print and transfer path

    Export a true-size PDF with no fit-to-page scaling, inspect the smallest shine gap and the stem junction on plain paper, then measure the physical print with a ruler. If the digital file passes and only paper fails, move to print-stage evidence instead of simplifying again.

Placement and size decisions

Cherries hang, so give them skin that lets them dangle

A cherry pair is a hanging composition. Placements with a natural downward direction preserve it with little compensation, while small wrapped placements demand a recrop to one fruit.

Collarbone and hip

Hanging fields where stems point upward so the fruit dangles naturally. The classic pair reads best here with little compensation.

Check: Orient the junction upward, align stems with the body line, then confirm sphere separation at 1:1 before print.

Behind ear and ankle

Small wrapped fields where only a single cherry or a tight small pair survives. Leaves and loops forced into these bands merge first.

Check: Recrop to the strongest fruit with at most one leaf, then run the small-size checks at the exact width.

Thigh and shoulder

Broad fields with room for longer stems, one crossing, and fuller leaf pairing.

Check: Give stems a clear direction along the longest span and confirm the crossing order stays readable at true size.

Forearm and ribs

Narrow vertical fields where the stem run should follow the limb or torso axis. Wide side leaves crowd fast on curves.

Check: Keep the composition slim, shorten cross-axis leaves early, and preview the stencil on a body photo before locking width.

Stencil-ready checklist

Approve the fruit only when every line passes

Run this short sequence with scaling off and a ruler in hand. One failed line means fix, enlarge, or reselect before transfer.

  • Confirm intended width in millimeters and the named placement.
  • Confirm single vs paired configuration with stem and leaf roles decided.
  • Confirm open skin between the spheres and at the stem junction at 1:1.
  • Confirm one open shine gap per cherry and no stipple inside small fruit.
  • Confirm at most one stem crossing with explicit overlap order.
  • Export a true-size PDF with scaling off and measure the physical print.
Fruit separates at 1:1 One shine gap per cherry Stems cross at most once

FAQ

Cherry-fruit stencil decisions, answered

Short answers for the pairing, shine, stem, and placement checks that recur when a cherry-fruit reference moves toward transfer-ready output.

It is usable when four checks pass at the exact physical width: the fruit configuration suits the placement, open skin separates the spheres and the stem junction, one shine gap per cherry stays open at 1:1, and stems cross at most once with clear overlap order. If any check fails, the fix list on this page names what to separate, simplify, or enlarge before print.

From evaluated reference to working stencil

Turn the approved fruit into a stencil draft.

Start from the cherry-fruit configuration that passed the separation check, then continue on iPhone for body fit, exact-size print, mirror and professional export.