

Aster stencil evaluation

Judge any aster reference before it becomes a stencil

Asters live or die on ray discipline. Check the star-burst petal count and layering, the separation between rays and the disk button, and the stem and leaf flow at your exact width for a clean transfer-ready stencil.

Built for working artists preparing aster pieces. This page covers aster ray and disk vetting, stem and leaf flow, size-tied gap checks, and transfer prep only, not tattoo application or healing advice. Branch sprays with layered blossoms and buds need different vetting logic.

What makes an aster stencil-viable

Ray count, disk contrast, and stem flow decide the result.

An aster piece is a star-burst head of many narrow rays around a compact disk on a slender stem. These three pillars predict whether that construction survives reduction, print, and transfer.

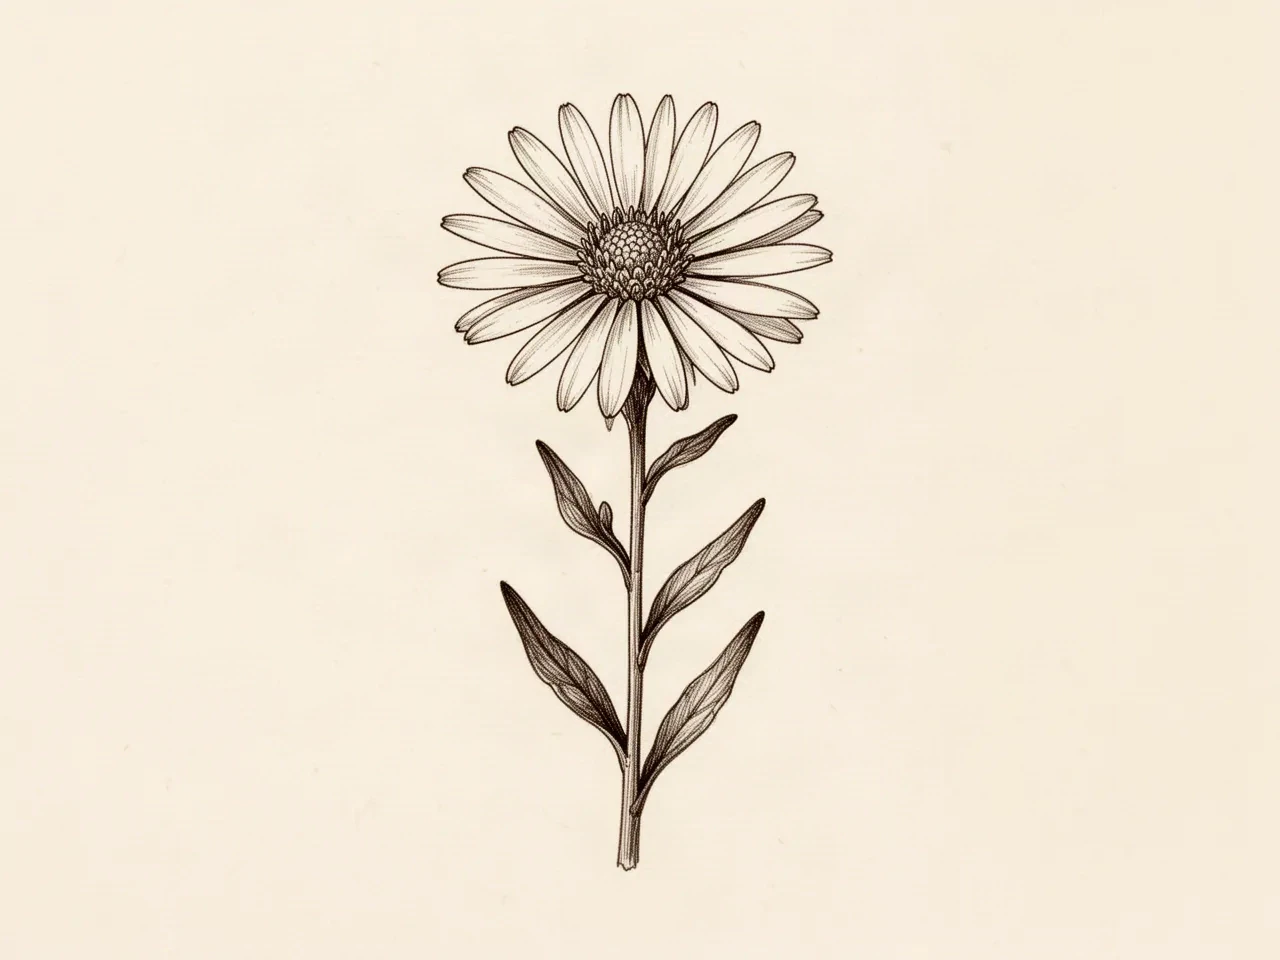
Original ink line study of an aster with narrow ray petals in a single tier around a compact rimmed disk, a slender upright stem, and narrow lance-shaped leaves spaced alternately along it
Original editorial illustration, not app output. Read the plate in three passes: ray separations from disk edge to tip, the disk as one rimmed button, and one stem direction with leaves that keep clear of the rays.

Reading the plate

  • Rays: Count only the separations that stay open at your width. Merged neighboring rays fail before thin lines do.
  • Disk: Treat the center as a compact button with a clean rim. Countable floret texture is the first thing to remove.
  • Stem and leaves: Follow one direction from base to bloom, then confirm leaf tips never touch the lowest rays at 1:1.

Star-burst petal count and layering

A garden aster carries many narrow ray petals in one or two radiating tiers around a compact disk, giving the star-burst read clients ask for. Stencil viability comes from keeping each ray separable with open skin between neighbors, not from drawing every petal a photo shows.

Check: Count the readable rays at the target width, then trace one ray from the disk to open air. If two neighboring rays share one merged edge at 1:1, that bloom needs fewer rays or one tier before anything else changes.

Center-disk separation

The aster disk is a small dense button of tiny florets, usually shown darker or warmer than the rays. A stencil-ready aster keeps the disk as one compact anchor with a clean tonal break between disk and rays, so the center reads as a button, not as shading that bleeds into the petals.

Check: Squint until ray detail disappears. If the disk still reads as one contained button with a clear edge, it is close. If the center reads as one flat pocket with no edge, simplify the disk before touching petal line mass.

Stem and leaf flow

Aster stems are slender and upright with narrow lance-shaped leaves set alternately along the stem. One clear stem direction with a few well-spaced leaves transfers cleanly, while crossed stems or leaves of equal weight touching the bloom read as a tangle once reduced.

Check: Follow the stem from base to bloom with a finger. If the path crosses a ray, a second stem of equal weight, or a leaf that touches the bloom edge at 1:1, restructure that hierarchy before judging petal detail.

Aster evaluation framework

Score the reference in minutes, then act on the weakest check.

Four aster constructions at labeled widths: single open bloom, layered bloom, filled disk, and leaf-crowded spray. Each one names the protected structure, the fix, and the go or no-go verdict at that exact size. Confirm every verdict with a measured 1:1 print.

HOLDS AT STATED SIZE

Single open aster with spaced rays at 9 cm

Intended width 90 mm

Source
One open bloom with a single readable ray tier, a compact disk with a clean edge, and one slender stem with a single spaced lance leaf.
Protect
Each ray separation from disk to tip, the compact disk button with its edge, and the uninterrupted stem path from base to bloom.
Fix
Shorten only the longest ray if it crowds a neighbor at 1:1. Keep ray count, disk density, and stem direction unchanged.
Candidate stencil
Same aster with the ray tier set, disk rim reopened, and protected contours kept at transferable mass.
Final-size verdict
Holds at 9 cm. Ray separations stay open at 1:1 and the bloom reads as aster from structure alone, not shading.

SIMPLIFY RAYS FIRST

Double-tier aster with crowded inner ring at 8 cm

Intended width 80 mm

Source
An attractive full bloom with two stacked ray tiers and a dense inner ring where short upper rays sit directly over lower rays, leaving small enclosed separations near the disk.
Protect
The outer ray rhythm, the disk button, and the stem direction that carries the upright habit.
Fix
Reduce to one readable ray tier for this width, or keep the layered construction only after enlarging past the point where inner separations stay open. Re-check with a squint test at 1:1.
Candidate stencil
Same aster with the ray tier set, disk rim reopened, and protected contours kept at transferable mass.
Final-size verdict
Simplify first. If the inner ring still reads as one serrated band at true size, enlarge the width or reselect a single-tier bloom.

REOPEN THE DISK FIRST

Aster with filled-in disk center at 7 cm

Intended width 70 mm

Source
A sweet small bloom where the disk is drawn as packed dots or crosshatch edge to edge with no clean rim, so disk tone touches the ray bases.
Protect
The outer ray rhythm and the stem with its leaf spacing.
Fix
Redraw the disk as one compact button with a clear rim and open skin between disk edge and ray bases. Fewer disk marks with a rim beats thinner dense texture. Do not invent spacing from a merged disk.
Candidate stencil
Same aster with the ray tier set, disk rim reopened, and protected contours kept at transferable mass.
Final-size verdict
At 7 cm a packed disk functions as one mass. Reopen the disk rim first; larger width is the only rescue for a fully filled center.

RESTRUCTURE OR RECROP

Aster spray with leaf crowding the bloom at 10 cm

Intended width 100 mm

Source
One good bloom on an upright stem, but two lance leaves rise beside it and one leaf tip touches the lowest rays, leaving a small enclosed separation.
Protect
The bloom with its disk button, and the stem direction that gives the upright habit.
Fix
Keep one leaf with a clear stem gap and remove or recrop the touching leaf, or recrop to the bloom with a short stem stub. Do not invent spacing from a merged leaf-to-ray contact.
Candidate stencil
Same aster with the ray tier set, disk rim reopened, and protected contours kept at transferable mass.
Final-size verdict
At 10 cm the leaf-to-ray contact functions as one mass. Separate, recrop to the bloom, or enlarge before print.

Branch-spray construction stays out of this framework. A cherry-blossom stencil judges branch hierarchy and bud spacing along a woody spray, while this framework judges ray tiering, disk contrast, and slender stem flow on single aster heads. Broad visual browsing stays on the stencils and subject hubs.

Rays, disk, and gaps at final size

Judge the white space at the width you will print.

Screens forgive crowding that paper and skin do not. Set the width first, then inspect each feature below at true physical size with scaling off.

About 7 cm and below

Wrist, ankle, behind-ear accents, and small gap fillers.

Carry one bloom with a stem stub and at most one small leaf. Keep a single ray tier, a compact disk with a clean rim, and no countable floret texture. If a ray separation or the disk rim closes at 1:1, enlarge or reselect rather than forcing reduction.

About 8 to 12 cm

Common forearm, shoulder, calf, and collarbone aster pieces.

The most flexible band. One bloom with a real stem run plus one or two spaced lance leaves can work when every ray gap, disk edge, and leaf separation is verified at true size. Check stem hierarchy before approving a second bloom.

About 12 cm and above

Thigh, upper back, shoulder cap, and side-torso compositions.

Room for a bloom with a full stem run plus one bud or companion bloom, but only when open skin separates every element. Larger width does not rescue merged ray tiers, packed disks, or touching leaf-to-bloom contacts.

Aster feature checks by width band
FeatureAbout 7 cm and belowAbout 12 cm and above
Ray separations and inner tierKeep the heaviest ray lines here. If a ray edge disappears, the bloom loses its star-burst read and becomes a plain disc.Same priority. Larger width allows slightly finer inner-tier rays, but separability still beats uniform thinness.
Disk button and tonal breakCarry a compact disk with a clean rim and no countable floret marks. Merge means fewer disk marks plus a rim, not thinner texture.Light floret texture can work when each mark keeps open skin at 1:1. If the center reads as one dark pocket, reopen the rim.
Stem line and leaf contactKeep one unbroken stem segment with open skin on both sides. A second leaf competes with rays for the same room and should be recropped away.One or two leaves can add movement when the stem clearly dominates. Equal-weight stems or leaves need hierarchy work before print.
Buds and companion bloomsCarry none. Small widths suit one bloom; a companion bloom or bud forced into these bands merges first.A bud or second bloom can work when each keeps its own stem length and open skin. Check the full group with a squint test at true size.

Fine-detail fallout risk checklist: rays and disk

  • Inner-tier stacking: short upper rays drawn directly over lower rays with no skin between tiers merge into one serrated band on transfer.
  • Packed disk texture: countable floret dots or crosshatch edge to edge with no rim print as one dark pocket.
  • Ray-to-disk bridging: rays whose bases touch the disk with no tonal break erase the button read at small widths.
  • Leaf-to-bloom contact: a lance leaf tip touching the lowest rays bridges first at small widths.
  • Crossed stems: two stems of equal weight, or a stem crossing a ray, tangle once reduced.
  • Hidden second bloom: a half-hidden companion bloom drawn as stacked contours behind the focal bloom closes into one band below 8 cm.

Reference to clean stencil

Lock the construction, then build outward from the bloom.

Work in this order so one change at a time can be judged at the same width. Stop when construction, hierarchy, gaps, and stem flow each read correctly.

  1. 01

    Lock width, variant, and placement first

    Set the intended physical width in millimeters, choose one construction (single-tier bloom, layered bloom, or bloom with stem and leaves), and name the body area before judging the reference. A bloom that holds at 12 cm on a flat thigh can fail at 7 cm on a curved wrist with no line being wrong on its own. Use the size calculator when target dimensions are still open.

  2. 02

    Rank rays, disk, and stem

    Name the focal bloom, count its readable rays, and assign every mark a role: rays that carry the first read, the disk that anchors it, and the stem that directs it. Strengthen outer ray contours and the disk rim first, keep secondary elements compact, and mark one removable ray tier or leaf that can go if gaps close.

  3. 03

    Simplify rays and disk for final size

    Reduce ray tiers and disk texture before thinning ray lines. Keep open skin between rays, between disk edge and ray bases, and between the bloom and every leaf, then run a squint check: step back until disk detail disappears and confirm the bloom and stem still read. The line-weight guide covers fine, normal and bold behavior on the same stencil.

  4. 04

    Verify print and transfer path

    Export a true-size PDF with no fit-to-page scaling, inspect the narrowest ray gap, the disk rim, and the smallest leaf separation on plain paper, then measure the physical print with a ruler. If the digital file passes and only paper fails, move to print-stage evidence instead of simplifying again.

Placement and size decisions

Star-burst heads want flat skin that keeps rays separated

An aster is a compact radial head on a slender stem. Placements with a clear span preserve the rays with little compensation, while small wrapped placements demand a recrop to one bloom.

Shoulder and upper back

Broad, gently curved fields with room for a bloom plus a real stem run and one or two spaced leaves.

Check: Seat the bloom on the flattest span, run the stem along the longest available line, then confirm every ray gap stays open at 1:1 before print.

Outer forearm

Narrow field where the stem should follow the limb line. Wide star-burst heads set across the limb wrap fast and crowd ray edges.

Check: Align the stem with the limb axis, tilt the bloom to the flattest spot, and shorten cross-limb leaves while edits are still cheap.

Thigh and calf

Large panels with room for a bloom paired with a bud or companion bloom, but the curve compresses one side of wide heads in photos and transfers.

Check: Spend the extra room on bloom-to-accent separation first, center the bloom on the flattest span, and let the stem fall toward the slope.

Wrist, ankle, and behind ear

Small wrapped fields where only one bloom survives. Full stems with paired leaves or companion blooms forced into these bands merge first.

Check: Recrop to the single strongest bloom with at most a short stem stub, then run the small-size checks at the exact width.

Aster versus similar flowers

Route the bloom to the right vetting logic

Asters share a daisy-like look with several flowers, but stencil decisions differ by ray breadth, tiering, and disk construction. Use this table to confirm the bloom before judging it as an aster.

Aster versus similar flowers for stencil vetting
FlowerConstructionStencil call
Aster (this page)Many narrow rays in one or two tiers around a small compact disk, on a slender upright stem with narrow alternate leaves.Vet ray count and tiering, disk rim, and leaf spacing at final size using the framework on this page.
Common daisyFewer, broader rays in a single open ring around a larger domed center, often with a simpler stem.Judge broad-ray rhythm and the domed center as a different construction. This page does not vet daisy ray breadth or center depth.
ChrysanthemumDense layered petals in many overlapping tiers forming a full rounded head, often much larger than an aster bloom.Judge tier reduction and head density on its own terms. Do not carry aster single-tier logic into a layered chrysanthemum head.
SunflowerOne large bold head with broad rays around a wide textured seed disk.Judge seed-disk density and head scale on the sunflower stencil page. Link there when the brief centers one bold bloom.

Stencil-ready checklist

Approve the aster only when every line passes

Run this short sequence with scaling off and a ruler in hand. One failed line means fix, enlarge, or reselect before transfer.

  • Confirm intended width in millimeters, the chosen construction, and the named placement.
  • Confirm every ray separation stays open from disk edge to tip at 1:1.
  • Confirm the disk reads as a compact button with a clean rim, not one flat pocket.
  • Confirm bloom-to-leaf and bloom-to-accent gaps stay open at true size.
  • Confirm no crossed stem or equal-weight second element competes with the lead stem.
  • Export a true-size PDF with scaling off and measure the physical print.
Narrow rays, open skin Verify gaps at 1:1 Disk reads as button

FAQ

Aster stencil decisions, answered

Short answers for the ray, disk, size, and handoff checks that recur when an aster reference moves toward transfer-ready output.

It is usable when three checks pass at the exact physical width: every ray separation stays open from disk edge to tip at 1:1, the disk reads as a compact button with a clean rim rather than one flat pocket, and the stem and leaves keep open skin with no leaf touching the bloom. If any check fails, the fix list on this page names what to simplify, respace, or enlarge before print.

Next steps

Use the neighboring owners for adjacent jobs.

This guide covers aster ray and disk vetting, stem and leaf flow, width-tied gap rules, and transfer prep. Use the links below for related jobs such as sizing, print checks, conversion, and neighboring flower constructions.

Board organization, grid overlays, photo-quality scoring, generic conversion, broad gallery browsing, paper manufacturing detail, and placement mechanics stay in their specialist owners. The links above hand off instead of repeating that detail.

From evaluated reference to working stencil

Turn the approved aster into a stencil draft.

Start from the aster that passed the ray and disk checks, then continue on iPhone for body fit, exact-size print, mirror and professional export.