

Coraline stencil evaluation

Keep the buttons, prove it transfers

Coraline pieces live or die on button recognition and open gaps. Check the button eyes and bob silhouette first, simplify strands and motifs to ranked support, then prepare a stencil that transfers as one readable likeness at final size.

Built for working artists handling client-requested Coraline pieces. This page covers likeness vetting and stencil preparation only, not tattoo application or healing advice. Work from an original interpretation or a properly licensed reference. No franchise artwork is reproduced on this page. Face, bust, and motif constructions are judged as different options inside one button-first framework.

What makes a Coraline stencil-viable

Buttons, silhouette, and expression decide the result.

A Coraline is a button-eyed face inside a bob silhouette with a guarded expression. These three pillars predict whether that combination survives reduction, print, and transfer.

Button-eye recognition

A Coraline reads first as a young face with two round button eyes: a closed outer rim, two or four thread holes, and short thread tails that seat each button to the face. At stencil size the holes and tails are the failure point, not the rims. When holes fill or tails touch the rim, the face drops from doll-like Coraline to a generic cartoon girl, and no amount of hair detail restores the read.

Check: Cover all hair, raincoat, key, and cat detail. If the two button eyes plus their hole pattern still read as Coraline from two meters, the anchors are sound. If the face becomes generic, repair button spacing and hole clearance before touching anything else.
Blue-bob silhouette

The second carrier is the chin-length bob: a rounded outer mass with a side part and blunt ends that frame the face on both sides. Stencil references often dissolve the bob into strand hatching, star fields, or tunnel swirls that share edges with the face contour. The silhouette survives when one outer contour per side holds continuous and interior strands rank strictly as removable support.

Check: Trace the outer bob contour from crown to chin on both sides without lifting focus. If each side runs as one unbroken shape with open skin between hair and cheek, the silhouette holds. If strands bridge to the face or the ears at target size, restack the strands before print.

Expression controls

Coraline recognition also depends on a small, controlled mouth: a neutral line, a slight frown, or a wary half-smile, plus simple brow placement. Exaggerated grins, full lip rendering, and heavy nose detail push the face toward generic cartoon or horror-doll territory. The stencil stays on character when the mouth is one short mark with open pockets at both ends and the brows sit as two light ticks that never touch the hair.

Check: Name the mouth shape and both brow positions, then cover everything except eyes, brows, and mouth. If the guarded, watchful mood still reads, the controls are correct and every extra facial tick can thin first.

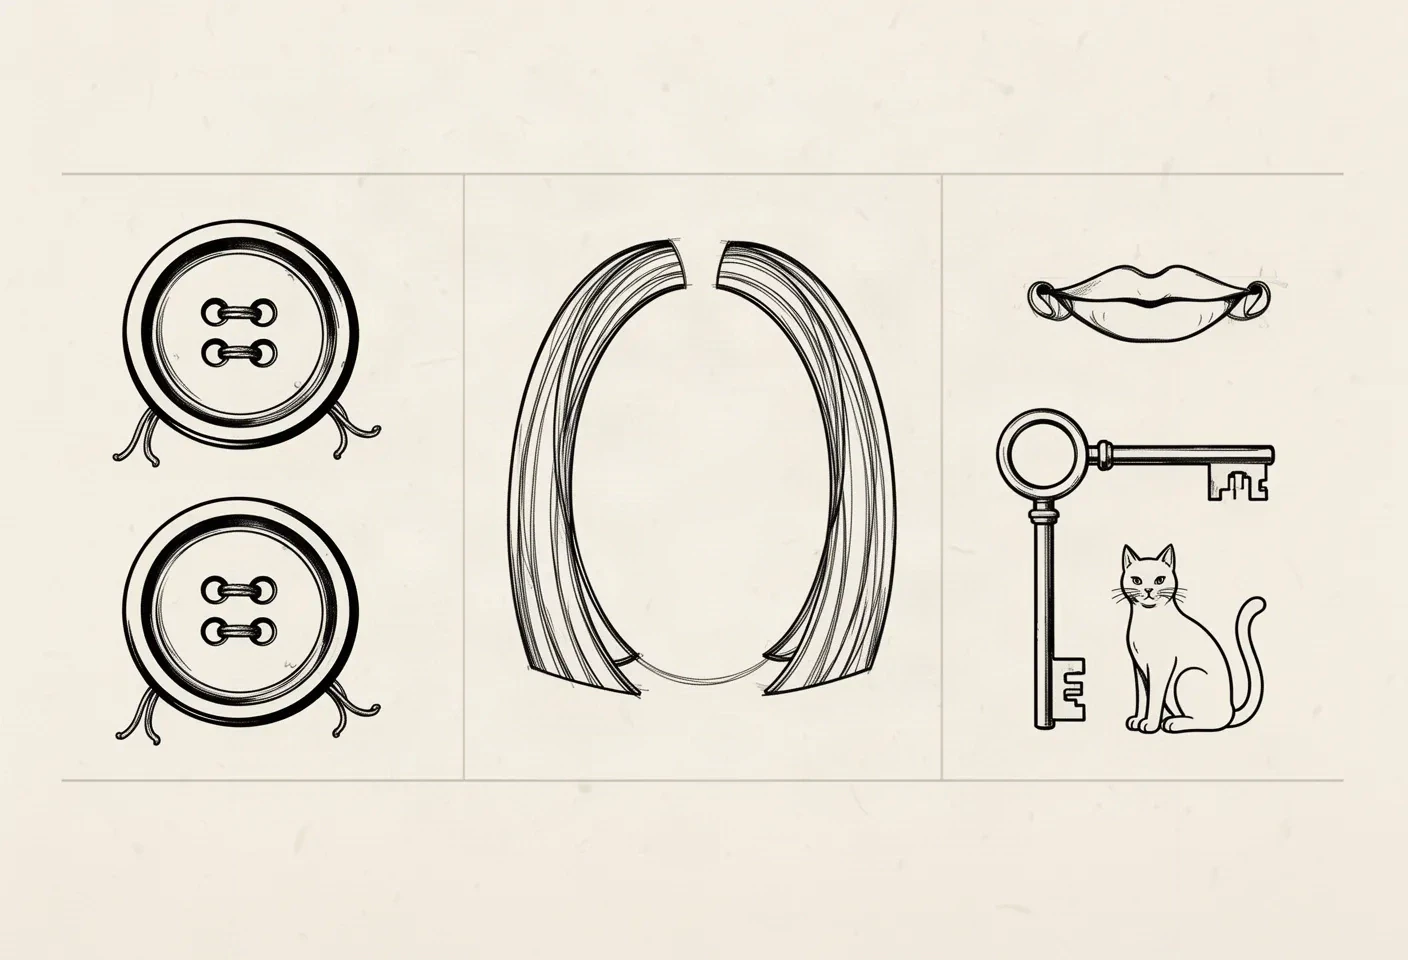
Original schematic stencil construction plate: two button diagrams with paired thread holes and short tails, a mirrored chin-length bob contour framing an empty face oval, and a mouth line with open end loops beside a toothed key and a whisker-drawn seated cat.
Original schematic plate, synthetic illustration, not app output and not character artwork. Read it left to right as a check order. The two button diagrams test hole spacing and tail clearance against the rim. The mirrored contour tests whether a bob frame keeps an open channel to the face oval instead of bridging into it. The right panel shows a mouth with open end pockets beside a key and cat still carrying teeth, whiskers, and facial detail, which is exactly the motif weight this page says to drop or reduce before print. Reproduce none of it exactly; judge your own reference against the same separations at 1:1.

Coraline evaluation framework

Score the reference in minutes, then act on the weakest check.

Four Coraline constructions at labeled sizes. Each one names the protected structure, the fix, and the go or no-go verdict at that exact size. Confirm with a measured 1:1 print.

HOLDS AT STATED SIZE

Button-eye face close-up at 8 cm

Intended width 80 mm

Source pattern: Tight original face study: two round button rims with four thread holes each, short thread tails seating each button, small nose hint, neutral mouth line, and simple brow ticks. Bob edges frame the face without strand hatching. Illustrative construction with clear contours and open skin between features.

Protect
Both button rims as separate closed shapes, every thread hole kept open at true size, thread tails with clearance to each rim, and the mouth line with open pockets at both ends.
Fix
Reduce to two holes per button if four holes close at 1:1, shorten thread tails so no tail touches a rim, and remove any cheek shading that sits closer than one outline-width to an eye.
Candidate stencil
Same Coraline with both button rims held continuous, holes bounded with open rims, bob gaps reopened, motifs ranked to support, and protected button and silhouette contours held at transferable mass.
Final-size verdict
Holds at 8 cm once every hole and both mouth pockets verify open on a measured print. The strongest choice for small placements where likeness must survive with no costume support.

REOPEN EYE AND HAIR GAPS

Bob-framed bust with raincoat collar at 12 cm

Intended height 120 mm

Source pattern: Chest-up construction: bob mass on both sides, button eyes, raincoat collar and one shoulder seam, calm wary expression. Strong on screen, but two hair strands touch the left button rim and the collar edge shares a merged line with the chin on one side.

Protect
Outer bob contour on both sides, both button rims with their hole patterns, mouth and brow placement, and the collar as the single readable costume accent.
Fix
Restack the touching strands clear of the button rims, reopen the collar-to-chin gap until open skin runs edge to edge at true size, and keep one shoulder seam maximum. Do not thin the rims to save the strands.
Candidate stencil
Same Coraline with both button rims held continuous, holes bounded with open rims, bob gaps reopened, motifs ranked to support, and protected button and silhouette contours held at transferable mass.
Final-size verdict
Holds at 12 cm once hair-to-eye and collar-to-chin gaps each keep daylight at 1:1. Strand-to-rim contact is the most common transfer failure for this bust.

SIMPLIFY MOTIFS FIRST

Key, cat, and face composition at 14 cm

Intended height 140 mm

Source pattern: Face plus supporting motifs: a long key with bow detail beside the cheek, a small black cat silhouette near the shoulder, and scattered star or tunnel swirls. Convincing as illustration, but key teeth, cat whiskers, and swirl bands carry almost no stencil separation at this height.

Protect
Face oval and button placement, bob direction on both sides, key shaft and bow outline, and the cat body silhouette as the single accent shape.
Fix
Convert the key to one shaft outline plus one simplified bow ring with no inner teeth, reduce the cat to body, head, tail, and ear triangles with no whiskers, and remove swirl bands or keep one fully separated mark. Verify every remaining face gap at 1:1 before print.
Candidate stencil
Same Coraline with both button rims held continuous, holes bounded with open rims, bob gaps reopened, motifs ranked to support, and protected button and silhouette contours held at transferable mass.
Final-size verdict
Not stencil-ready until motifs become ranked support. Key teeth and whisker tone merge into one pocket at transfer while the buttons and silhouette can stay.

ENLARGE OR RECROP

Fine-line small Coraline face at 5 cm

Intended width 50 mm

Source pattern: Delicate outline-only face with thin button rims, four tiny holes per button, hairline strands, freckle dots, and a narrow mouth, drawn with almost no line mass. Attractive on screen but built from hairline contours with narrow separations throughout.

Protect
Button positions and the mouth placement that give the face its direction.
Fix
Enlarge past the point where both rims, at least two holes per button, and one outer bob contour each transfer as open shapes, or recrop to buttons plus mouth without freckles, strands, or costume. Do not keep four-hole buttons and freckles together at 5 cm.
Candidate stencil
Same Coraline with both button rims held continuous, holes bounded with open rims, bob gaps reopened, motifs ranked to support, and protected button and silhouette contours held at transferable mass.
Final-size verdict
At 5 cm the holes and freckles function as one band and the rims print as broken scratches. Enlarge, recrop to buttons plus mouth, or choose a bolder emblem-style construction for this width.
Face close-up vs bust vs motif composition decision
ChoiceChoose whenStrengthsCosts
Button-eye face close-upSmall to medium placements, first Coraline pieces, or symmetric panels where instant recognition matters.Simplest construction, gaps are geometric and easy to verify, holds smallest, heals most predictably.Less story than a bust with motifs, needs clean hole spacing, weak rims read as generic doll eyes.
Bob-framed bust with collarMedium placements where the client wants hair and raincoat character without a full scene.Bob plus collar carry context, supports wary expression, scales into medium compositions.Needs more height, fails first at strand-to-rim and collar-to-chin contacts, texture must convert to ranked strands.
Face with key and cat accentsLarge placements where the story around Coraline is the point and motifs can spread.Strong panel anchor, room for one key and one cat, works as a thigh or back centerpiece.Needs the largest width, key teeth and whiskers fail first, every motif gap must be verified at 1:1.

Generic cartoon outline and flat-color conversion depth stays on the cartoon owner. Broad portrait likeness comparison stays on the portrait maker. This framework exists to judge Coraline button placement, bob silhouette separation, and expression control at a stated size, not to replace those owners.

Buttons, hair, and motifs at final size

Judge the white space at the size you will print.

Screens forgive crowding that paper and skin do not. Set the size first, then inspect each feature below at true physical size with scaling off.

About 6 cm and below

Wrist and ankle accents, behind-ear marks, finger panels, and small gap fillers.

Carry a button-eyes-plus-mouth recrop or a minimal bob-framed emblem only. Keep one contour family and two holes per button maximum. If a hole or a mouth pocket closes at 1:1, enlarge or reselect rather than forcing strands, freckles, or costume.

About 8 to 12 cm

Common forearm, calf, shoulder, and collarbone Coraline pieces.

The most flexible band. A face close-up or a bob bust with one collar accent can work when every gap is verified at true size. Check hole clearance, thread-tail standoff, strand-to-rim gaps, and mouth pockets before approving keys, cats, or swirls.

About 14 cm and above

Large thigh panels, back pieces, chest, and full sleeve sections.

Room for a bust with a key and a small cat accent, but only when open skin separates the buttons, each motif outline, and every costume panel at 1:1. Larger height never rescues merged holes, joined mouth corners, or a strand-covered face field.

Coraline feature checks by size band
FeatureAbout 6 cm and belowAbout 8 cm and above
Button rims, holes, and thread tailsKeep two closed rims with open skin between and around each, two holes per button maximum, and tails that end clear of every rim. If a hole closes, widen it or enlarge the piece, never thin the rim into a scratch.Same priority. Larger widths allow four holes per button or one short tail pair when each keeps its own spacing at 1:1. Run a squint test at true size and confirm the buttons still read before any hair detail does.
Bob mass and strandsCarry one outer contour per side with no interior strands. Remove hatching, star rows, and swirl bands at small widths.Up to three ranked strands per side can work when each keeps open skin to the face and to its neighbor at 1:1. Hair detail should never join a button rim or a mouth corner.
Mouth, brows, and noseOne short mouth mark with open pockets at both ends, two light brow ticks, and no nose or a single dot maximum. Merge means a bolder mouth or a larger height, not thinner brows.Guarded-expression modeling can carry one extra mouth-end mark or one brow extension when each keeps clearance at 1:1. Check the full face at arm's length on the physical print.
Key, cat, and background motifsKeep no background field and no second motif. One small key or one cat needs its own clearance at this width, otherwise recrop it away.One key plus one small cat silhouette can add story when the buttons and bob dominate clearly. Equal-weight motif bands or swirl fields need hierarchy work before print.

Reference to clean stencil

Build from the buttons outward, then rank the motifs.

Work in this order so one change at a time can be judged at the same size. Stop when buttons, bob, expression, and motifs each read correctly.

  1. 01

    Lock size, placement, and construction first

    Set the intended physical width or height in millimeters, name the body area, and choose face close-up, bob bust, or face-with-motifs before judging the reference. A face that holds at 8 cm on a forearm and a motif composition that needs 14 cm on a thigh are different decisions. Use the size calculator when target dimensions are still open.

  2. 02

    Assign the recognition carrier

    Decide which shape carries the read, then rank everything else as support. Protect the carrier geometry first: button rims and hole patterns for face-led work, or bob contour plus collar for bust work. Resolve rim-to-strand contacts, tail-to-rim contacts, and collar-to-chin contacts before touching line weight.

  3. 03

    Set lead versus motif roles

    Give every mark one role: lead structure that carries the first read, support that shapes the silhouette, or motif that can be removed. Strengthen the button rims and outer bob contour first, keep mouth and brows light, and mark one removable motif row, swirl band, or strand set that can go if gaps close.

  4. 04

    Simplify at 1:1 and run the gap checks

    Reduce strands, swirls, key teeth, and whiskers before thinning contours. Keep open skin inside each button rim and around each hole, tail, and mouth end, then run a squint check: step back until fine detail disappears and confirm the buttons plus bob still read. The line-weight and density guides cover fine versus bold behavior and final-size readability on the same stencil.

  5. 05

    Verify print and transfer path

    Export a true-size PDF with no fit-to-page scaling, inspect the narrowest hole, both mouth pockets, and the smallest key or cat gap on plain paper, then measure the physical print with a ruler. If the digital file passes and only paper fails, move to print-stage evidence instead of simplifying again.

Placement and construction decisions

Faces want axis, busts and motifs want width

Button-eye faces want a clear vertical axis that survives curvature, while bob busts and key-and-cat compositions want centered panels that preserve symmetry. Narrow limbs demand a vertical crop.

Thigh and back

Broad flat fields where a bust with a key and a small cat can spread symmetrically. Width is the asset, so bob tips and motif edges need spacing checks rather than compression.

Check: Center the face on the flattest span, mirror the two bob masses, and verify motif-to-face spacing at 1:1 before print.

Outer forearm and calf

Long narrow fields where the composition should follow the limb axis. Wide busts and side motifs wrap fast and crowd button and strand gaps.

Check: Choose a vertical face close-up or a slim bob bust for these fields, align the face axis with the limb, and shorten cross-limb hair or motif width while edits are still cheap.

Chest and shoulder

Large curved panels with room for a bust with a collar or one motif accent. The curve compresses one side of wide compositions in photos and transfers.

Check: Center the button pair on the flattest span, let support hair fall toward the slope, and keep motifs to one key or one cat maximum.

Wrist, ankle, hand, and behind ear

Small wrapped fields where only a recrop survives. Busts with collars, keys, cats, and swirls forced into these bands merge first.

Check: Recrop to buttons plus mouth or a minimal bob emblem without motifs, then run the small-size checks at the exact width.

Stencil-ready checklist

Approve the Coraline only when every line passes

Run this short sequence with scaling off and a ruler in hand. One failed line means fix, enlarge, or reselect before transfer.

  • Confirm intended size in millimeters, the named placement, and the face, bust, or motif construction choice.
  • Confirm both button rims stay continuous with open skin inside each rim at 1:1.
  • Confirm every thread hole reads separately with open skin around it.
  • Confirm bob, key, and cat shapes stay countable with no merged bands.
  • Confirm motifs total support only, with no contact on rims, holes, or mouth.
  • Export a true-size PDF with scaling off and measure the physical print.
Buttons first Verify gaps at 1:1 One construction leads

FAQ

Coraline stencil decisions, answered

Short answers for the likeness, size, simplification, original-art, and placement checks that recur when a Coraline reference moves toward transfer-ready output.

Protect three anchors at the exact physical size: two round button eyes with open thread holes, the chin-length bob silhouette framing the face on both sides, and the small controlled mouth with brow placement that sets the wary mood. Cover the hair, collar, key, and cat on your reference; if the buttons plus bob and mouth still read from two meters, the likeness is anchored. If the face becomes generic, repair hole clearance and bob continuity before adding any motif back.

Next steps

Use the neighboring owners for adjacent jobs.

This guide covers Coraline likeness checks, size-tied button and strand density rules, face versus bust versus motif decisions, and reference-to-stencil preparation. Use the links below for related jobs such as conversion, sizing, print checks, paper, and placement.

Generic cartoon conversion mechanics, broad portrait landmark detail, paper manufacturing detail, and placement mechanics stay in their specialist owners. The links above hand off instead of repeating that detail.

From evaluated reference to working stencil

Turn the approved Coraline into a stencil draft.

Start from the Coraline that passed the button, bob, and gap checks, then continue on iPhone for body fit, exact-size print, mirror and professional export.