

Chainmail stencil evaluation

Vet any chainmail ring field before it becomes a stencil

Mail lives or dies on interlink gaps and row offset. Check the ring construction, the half-step rhythm, the overlap separation, and the curvature fit at your exact field size, then prepare a clean sheet that still reads as mail on skin.

Built for working artists preparing interlinked ring-mail fields. This page covers ring interlink, row offset, overlap gaps, curvature fit, and transfer-ready prep only, not tattoo application or healing advice. This is not a chain-link band guide, an armor history article, or a gallery of chainmail ideas.

What makes mail stencil-viable

Interlink, offset, and gaps decide the result.

A mail field is a sheet of woven rings worn on curved skin. These three pillars predict whether that sheet survives reduction, print, dry fit, and transfer.

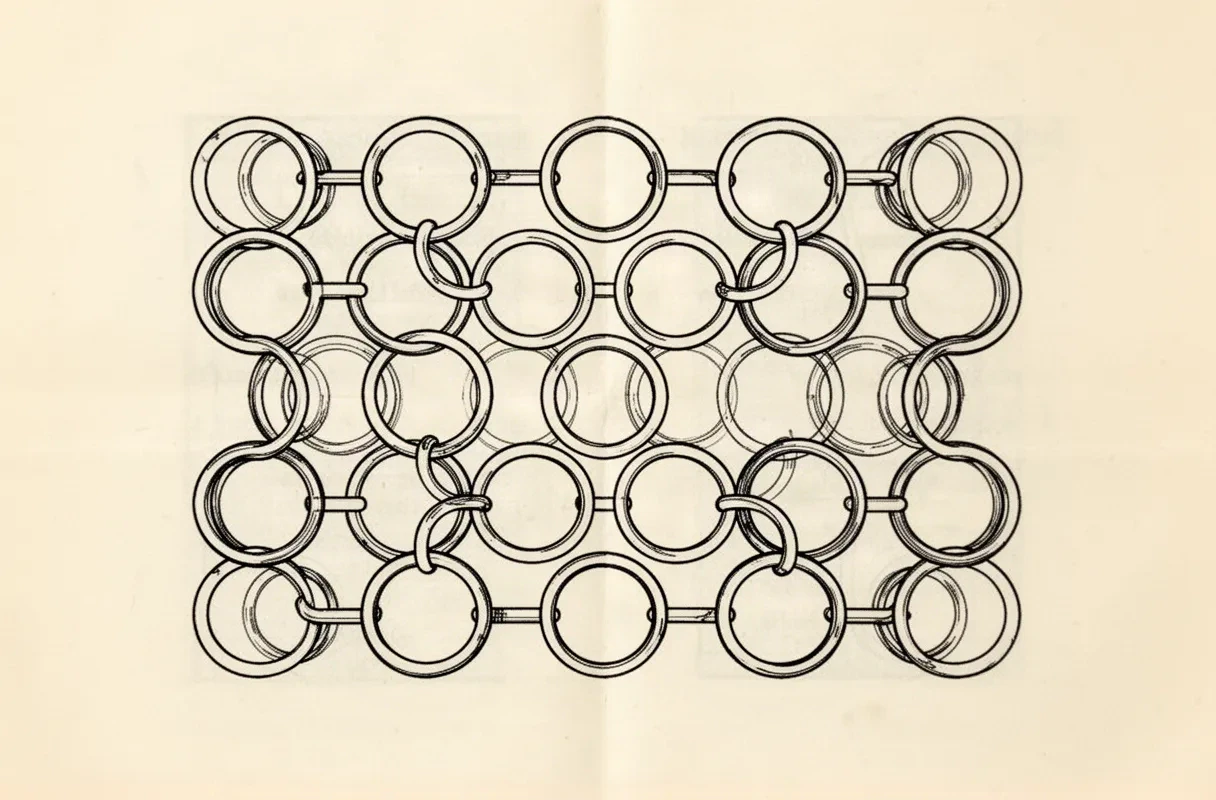
Construction plate of interlinked chainmail rings seated in offset rows, with open ring centers and narrow overlap passes between neighboring rings
Construction plate Interlinked passes, half-step rows, and open ring centers are the reads to confirm. The engraving adds rivet dots and doubled contours: treat those as plate decoration, not stencil detail, and settle the real gaps on a measured 1:1 print. Synthetic editorial illustration, not StencilStudio app output or a stencil file.

Ring interlink and open centers

A mail field reads first as separate rings passing through each other with open skin inside every ring. Stencil viability starts with two facts per ring: a closed outer contour and an open center that is never shared with a neighbor. Armor photos show rivets, shading, and shadow inside each center that fill those openings, so photographed mail always looks denser than transferable mail.

Check: Trace one full ring, then confirm the overlap point where it passes through its neighbors stays open at true size. If two ring walls merge into one filled mark, the interlink needs reopening before row offset is judged.

Row offset and overlap rhythm

Rings are the second read: identical rings seated in offset rows so each ring nests into the pocket of the row above. Transfer needs every row (one ring height plus its share of the overlap zone) matched in spacing, tilt, and link direction. Aligned grid rows read as fence mesh, while drifting rows read as scattered circles.

Check: Cover every second row and confirm the visible rows still form one even lattice. If spacing drifts or one overlap sits deeper than the rest, even out the offset before changing line mass.

Mail density and gap retention

A mail field is a continuous sheet that must bend over curved skin without its gaps closing. The open skin between ring walls is the structural material, and screens forgive crowding that paper and skin do not. Small fields fail as one gray patch, not as fine lines.

Check: Print at true size with scaling off and confirm each must-keep gap stays visibly open at arm's length. If a gap closes, remove a row or enlarge the field rather than thinning ring walls.

Mail or not mail

Confirm the motif before building the field.

Chainmail shares a name with chain-link and a texture with several lattice systems. This comparison routes each nearby intent to its owner so this page can stay on ring-mail construction.

Chainmail (this page)

Interlinked ring field in offset rows, built for mail effect across an area. Judged on ring interlink, row offset, overlap gaps, and curvature fit.

Choose when: Choose this page when the brief names chainmail, ring mail, or a pauldron-style ring sheet that must stay readable as mail after transfer.

Chain-link

Single-file band of interlocked jewelry links (cable, curb, paperclip) that wraps a limb and closes with a planned overlap seam.

Choose when: Use the chain-link owner when the piece is one bracelet-style band with a seam, not a two-dimensional ring field.

Flower of life

19-circle overlapping lattice on one fixed radius with a shared-center build sequence and symmetry proof.

Choose when: Use the flower-of-life owner when the brief names overlapping equal circles on a fixed center system rather than woven mail.

Ornament and geometric

Symmetric centerpiece or frame work (ornament) and direction-led pattern systems with repeat units and closing joints (geometric).

Choose when: Use those owners when the piece is a decorative centerpiece, medallion, or tessellated band rather than interlinked rings.

Polynesian

Band and focal tribal systems with fretwork, spearhead, and emblem construction rules.

Choose when: Use the polynesian owner when the brief names tribal band structure rather than mail construction.

Chain-link wrap bands, flower-of-life lattice builds, generic ornament centerpieces, geometric direction choice, and polynesian band systems stay on their own owners. This page judges interlinked ring rows, overlap separation, and curvature fit for mail fields only.

Ring-field evaluation framework

Score the reference in minutes, then act on the weakest check.

Four mail fields at labeled sizes. Each one names the protected structure, the fix, and the go or no-go verdict at that exact size. Confirm with a measured 1:1 print plus a paper dry fit on the placement.

HOLDS AT STATED SIZE

Open European 4-in-1 mail panel at 12 cm

Field 120 mm wide, ring outer diameter 12 mm, 5 rows

Reference read

Even ring lattice with matched ring size, consistent row offset, and open centers in every ring. Quiet on screen, which is why it transfers well.

Protect
The ring diameter, the half-step row offset, and every open center with its overlap gap.
Fix
Adjust nothing structural. Confirm overlap gaps at 1:1 and keep ring-wall mass unchanged.
Candidate stencil
Same ring placement with interlink rebuilt, rows offset, shading converted to open skin, and gaps verified at transferable mass for the stated field size.
Final-size verdict
Holds at 12 cm. Every ring reads as mail at true size and each row nests evenly into the row above.

REOPEN OVERLAP GAPS

Dense shaded mail render forced onto 8 cm

Field 80 mm wide, ring outer diameter 8 mm, 6 rows

Reference read

Attractive armor-style render with rivet dots, inner shading rings, and contact shadow at every overlap. Rich on screen, but each shaded overlap nearly bridges neighboring ring walls and the rivet marks crowd every center.

Protect
The even row offset and the ring placement rhythm, which are sound and worth keeping as the rebuild base.
Fix
Delete rivet dots and inner shading rings, convert each overlap shadow to bounded open skin, and re-verify every overlap gap at 1:1. Do not thin the ring walls to compensate for shaded interiors.
Candidate stencil
Same ring placement with interlink rebuilt, rows offset, shading converted to open skin, and gaps verified at transferable mass for the stated field size.
Final-size verdict
Not stencil-ready until overlaps become open skin. Shaded mail merges first even when ring placement is correct.

REPLAN THE OFFSET

Aligned grid rings sold as mail at 14 cm

Field 140 mm wide, ring outer diameter 14 mm, 5 rows

Reference read

Clean uniform rings with open centers and even spacing, but rows sit directly stacked with no half-step offset. The field reads as fence mesh or bubble rows rather than woven mail.

Protect
The ring diameter, wall mass, and open centers, which survive once the rows are reseated.
Fix
Shift every second row by half a ring so each ring nests into the pocket above, then re-check row spacing and edge trimming. Do not add shading or rivets to force a mail read.
Candidate stencil
Same ring placement with interlink rebuilt, rows offset, shading converted to open skin, and gaps verified at transferable mass for the stated field size.
Final-size verdict
Not stencil-ready until rows offset. Aligned rings cannot be fixed with cleaner ring drawing.

ENLARGE OR RECROP

Fine micro-mail forced onto a wrist panel at 6 cm

Field 60 mm wide, ring outer diameter 6 mm, 7 rows

Reference read

Delicate small rings with hairline walls, elegant on screen with tight gaps between every ring. Every overlap gap and center sits near the transfer floor at this width.

Protect
The offset-row idea and the panel boundary, which can survive at transferable mass.
Fix
Rebuild rings at transferable wall mass with reopened centers, reduce the row count so each unit grows, or enlarge the panel past the point where gaps stay open. Do not keep hairline mass across all 7 rows at 6 mm rings.
Candidate stencil
Same ring placement with interlink rebuilt, rows offset, shading converted to open skin, and gaps verified at transferable mass for the stated field size.
Final-size verdict
At this width the field reads as one textured patch and rings fill in. Enlarge, recrop to fewer rows, or choose a bolder ring construction.

Rows, overlap, and wall mass at final size

Judge the open skin at the size you will print.

Screens forgive crowding that paper and skin do not. Set the field dimensions first, then inspect each feature below at true physical size with scaling off.

About 6 to 8 cm field width

Wrist panels, behind-shoulder accents, and small gap fillers with few rows.

Carry one simple ring construction with few rows and wide overlap gaps. If any center or overlap closes at 1:1, enlarge the field or remove a row rather than forcing reduction.

About 9 to 14 cm field width

Common pauldron caps, forearm panels, and calf mail sheets.

The most flexible band. Full offset rows with interior overlap control work when every center and overlap gap is verified at true size. Check row offset and edge trimming before approving wall mass.

About 15 cm field width and above

Chest mail panels, full shoulder caps, and large thigh sheets.

Room for smaller rings relative to the field and real row counts, but only when open skin separates every ring wall from its neighbors. Greater width does not rescue aligned rows or shaded overlaps.

Worked row seating: rings per row, offset pitch, edge trim

Field width divided by ring diameter sets rings per row, offset rows nest at roughly three-quarter ring pitch, and edges trim to half-rings so no ring center is cut through. Three starting points below use that method.

Shoulder cap panel

Field 120 mm wide with 12 mm rings seats about 10 rings per row; offset rows nest at roughly three-quarter ring pitch, so 5 rows fill about 45 mm of drop. Trim the edge to half-rings, never through a ring center.

Forearm mail panel

Field 100 mm wide with 10 mm rings seats about 10 rings per row; 6 offset rows fill about 45 mm of panel height. Confirm every overlap gap on the curve-facing edge before transfer.

Chest mail sheet

Field 160 mm wide with 12 mm rings seats about 13 rings per row; 8 offset rows fill about 72 mm of drop. Keep the sternum center column aligned to the body midline and re-check row rhythm after any placement shift.

Reference to clean stencil

Build along the rows, then fit the curve.

Work in this order so one change at a time can be judged at the same size. Stop when interlink, offset, gaps, and the dry fit each read correctly.

  1. 01

    Disambiguate the motif, then lock field size and placement

    Confirm the reference shows interlinked rings in offset rows, not a single-file chain-link band, ornament scrollwork, flower-of-life circles, or polynesian fretwork, which have their own owners linked below. Then set the field width and height in millimeters and name the body area before judging any ring.

  2. 02

    Verify ring interlink and row offset

    Confirm closed ring contours with an open center in every ring, then confirm the half-step offset between rows. Resolve merged ring walls, filled centers, and aligned grid rows before touching line weight. A field with settled interlink and one even offset is already halfway to stencil-ready.

  3. 03

    Set wall mass and reopen overlap gaps

    Assign every mark a role: ring walls that carry the mail read, overlap edges that carry depth, and photo shading (rivets, inner rings, contact shadow) that must convert or go. Strengthen ring walls first, delete interior shading, and mark one row that can drop out if gaps close.

  4. 04

    Fit the field to curvature at 1:1

    Print at true size with scaling off, cut the paper field to the planned boundary, and tape it to the placement to confirm bend behavior. Mark the anchor edge, smooth toward the free edge, and watch overlap gaps on the curve. If gaps pinch, reopen them in the file or add ring diameter rather than pressing harder at transfer.

  5. 05

    Verify print and transfer path

    Export a true-size sheet with no fit-to-page scaling, inspect the narrowest overlap gap and the smallest ring center on plain paper, then measure the physical print with a ruler. If the digital file passes and only paper fails, move to print-stage evidence instead of simplifying again.

Placement and curvature decisions

Mail fields want placements measured on the curve

A mail field is a sheet worn bent. Flat placements do not exist here, so every placement is a curvature decision with its own anchor edge and gap watch points.

Shoulder cap and pauldron

A compound curve where a flat-drawn field compresses toward the deltoid peak and stretches toward the edges. Row rhythm errors show across the full front view.

Check: Anchor at the cap center, smooth outward toward the edges, and confirm overlap gaps stay open on the peak before committing transfer paper.

Forearm and bicep panels

A tapered cylinder where a field drawn for one circumference sits differently a centimeter higher or lower. Taper pinches overlap gaps on the narrow end.

Check: Measure at the exact placement height, keep the travel direction aligned with the limb axis, and re-check the dry paper fit after any placement shift.

Chest and sternum sheets

A broad, gently curved field where the body midline becomes part of the design. One offset half-step error near the midline is immediately visible.

Check: Align the center ring column to the body midline on the live placement, then verify left and right halves match before print.

Thigh and calf sheets

Large fields with strong curvature at the edges and movement through walking. Edge rings lift first and tight gaps close under flex.

Check: Trim edges to half-rings, widen edge gaps slightly relative to the field center, and confirm the dry fit through a small range of motion.

Stencil-ready checklist

Approve the field only when every line passes

Run this short sequence with scaling off, a ruler in hand, and a paper field fitted on the placement. One failed line means fix, enlarge, or reselect before transfer.

  • Confirm the motif is interlinked ring mail in offset rows, not chain-link, ornament, flower of life, or polynesian construction.
  • Confirm field width, height, ring diameter, and row count at the named placement.
  • Confirm open centers in every ring at 1:1.
  • Confirm half-step row offset with open overlap gaps at every interlink.
  • Confirm edges trimmed to half-rings with no ring center cut through.
  • Export a true-size sheet with scaling off, dry-fit the paper field on the placement, and measure the physical print.

Mail-field transfer prep

Transfer without closing the mail

Mail-field transfers fail at four predictable points. Each one below names the early sign and the prevention that keeps rings readable.

Overlap fill-in

Early sign: Rings print as separate marks but transfer as one continuous mesh where overlaps touch.

Prevention: Judge gaps on the measured 1:1 paper print, not the screen. Widen the tightest overlap in the file or remove one row so remaining rings grow, then re-check after any wall-mass increase.

Center closure

Early sign: Ring centers that looked open on screen arrive filled, so the mail read collapses into dots.

Prevention: Keep every center as bounded open skin with stencil walls on all sides. If a center touches a wall or a rivet mark bridges it, clear the interior toward the ring center before reprinting.

Curve pinch

Early sign: Gaps read open on the flat print but close where the field bends over the shoulder, limb, or chest curve.

Prevention: Run the dry paper fit on the real placement before transfer paper. If a gap pinches on curve, reopen it in the file or add ring diameter rather than pressing harder.

Edge lift and drift

Early sign: Edge rings smudge or one row steps sideways after first contact on a curved placement.

Prevention: Mark an anchor edge on the stencil margin, transfer from the anchor toward the free edge in short passes, and lift to confirm the offset rhythm before the second half touches skin.

Prerequisites before the transfer touches skin

Confirm the measured 1:1 paper print with a ruler, complete the dry paper fit on the placement, and mark the agreed anchor edge on the stencil margin. Transfer from the anchor toward the free edge so loose rings cannot drag rows off offset. If the first contact looks faint or patchy, diagnose the layer with the transfer troubleshooter instead of pressing harder.

Open the transfer troubleshooter
Centers stay open Rows offset, not stacked Overlaps stay skin

FAQ

Chainmail stencil decisions, answered

Short answers for the interlink, offset, gap, curvature, and transfer checks that recur when a mail reference moves toward transfer-ready output.

A correct field shows separate rings passing through each other with open skin inside every ring, seated in offset rows so each ring nests into the pocket of the row above. If rows stack in a straight grid, centers are filled with rivets or shading, or ring walls merge at overlaps, the reference needs reconstruction before sizing. Confirm the verdict on a measured 1:1 print, not on screen.

Next steps

Use the neighboring owners for adjacent jobs.

This guide covers mail-field interlink, row offset, overlap gaps, curvature fit, and transfer prep. Use the links below for related jobs such as sizing, print checks, paper, and placement.

Chain-link wrap construction, flower-of-life shared-center method, ornament centerpiece framing, geometric direction comparison, polynesian band structure, generic conversion, broad gallery browsing, paper manufacturing detail, and placement mechanics stay in their specialist owners. The links above hand off instead of repeating that detail.

From evaluated reference to working stencil

Turn the approved mail field into a stencil draft.

Start from the ring field that passed the interlink, offset, gap, and dry-fit checks, then continue on iPhone for body fit, exact-size print, mirror and professional export.