

Chain-link stencil evaluation

Vet any chain-link reference before it becomes a band

Chain bands live or die on interlock gaps and seam planning. Check the link construction, the repeat rhythm, the highlight reduction, and the overlap at your exact placement circumference, then prepare a clean loop that closes without a visible joint.

Built for working artists preparing interlocked chain-link bands. This page covers link construction, gap vetting, highlight-to-skin conversion, repeat sizing, and overlap closure only, not tattoo application or healing advice. This is not a jewelry catalog, a meaning list, or a gallery of chain ideas.

What makes a chain stencil-viable

Construction, rhythm, and closure decide the result.

A chain band is a strip of interlocked links that must close into a loop on a curved placement. These three pillars predict whether that strip survives reduction, print, dry wrap, and transfer.

Link construction and interlock separation

A chain band reads first as separate links passing over and under each other with open skin inside every interlock. Stencil viability comes from two things: a closed outer contour per link and an open gap where one link disappears behind the next. Photo reference shows rounded steel shading and soft contact shadows that fill those gaps, so construction (round cable, flattened curb, elongated paperclip, bead) decides the result more than link count.

Check: Trace one full link around its contour, then confirm the overlap point where it passes behind its neighbor stays open at true size. If two neighboring contours share one filled mark, the construction needs reopening before rhythm is judged.
Repeat rhythm and link count

Links are the second read: identical units spaced evenly along the strip so the eye trusts the loop. Transfer needs every repeat unit (one link plus its share of the interlock gap) matched in length, tilt, and overlap depth. Perspective photos, wrist taper, and hand-drawn drift make evenly drawn links look even on screen while the physical wrap shows one crowded joint.

Check: Mark one repeat unit and compare it against every other unit along the strip. If spacing drifts or one overlap sits deeper than the rest, even out the rhythm before changing line mass.

Highlight reduction and overlap closure

A wrap stencil is a strip that must close into a loop on a curved limb, neck, or ankle. Highlights must convert to open skin (a reserved gap inside the link face, not a printed white line), and the strip must be cut longer than the measured circumference so the ends overlap with one link rhythm continuing through the seam. A strip with shaded links and no overlap plan transfers as a textured strap with a visible joint.

Check: Confirm every interior highlight is open skin bounded by stencil lines, then lay the printed strip around the limb before committing transfer paper. If a highlight bridges two links or a link lands exactly on the seam, adjust the file while edits are still cheap.

Link evaluation framework

Score the reference in minutes, then act on the weakest check.

Four chain-link constructions at labeled lengths. Each one names the protected structure, the fix, and the go or no-go verdict at that exact size. Confirm with a measured 1:1 print plus a dry wrap on the placement.

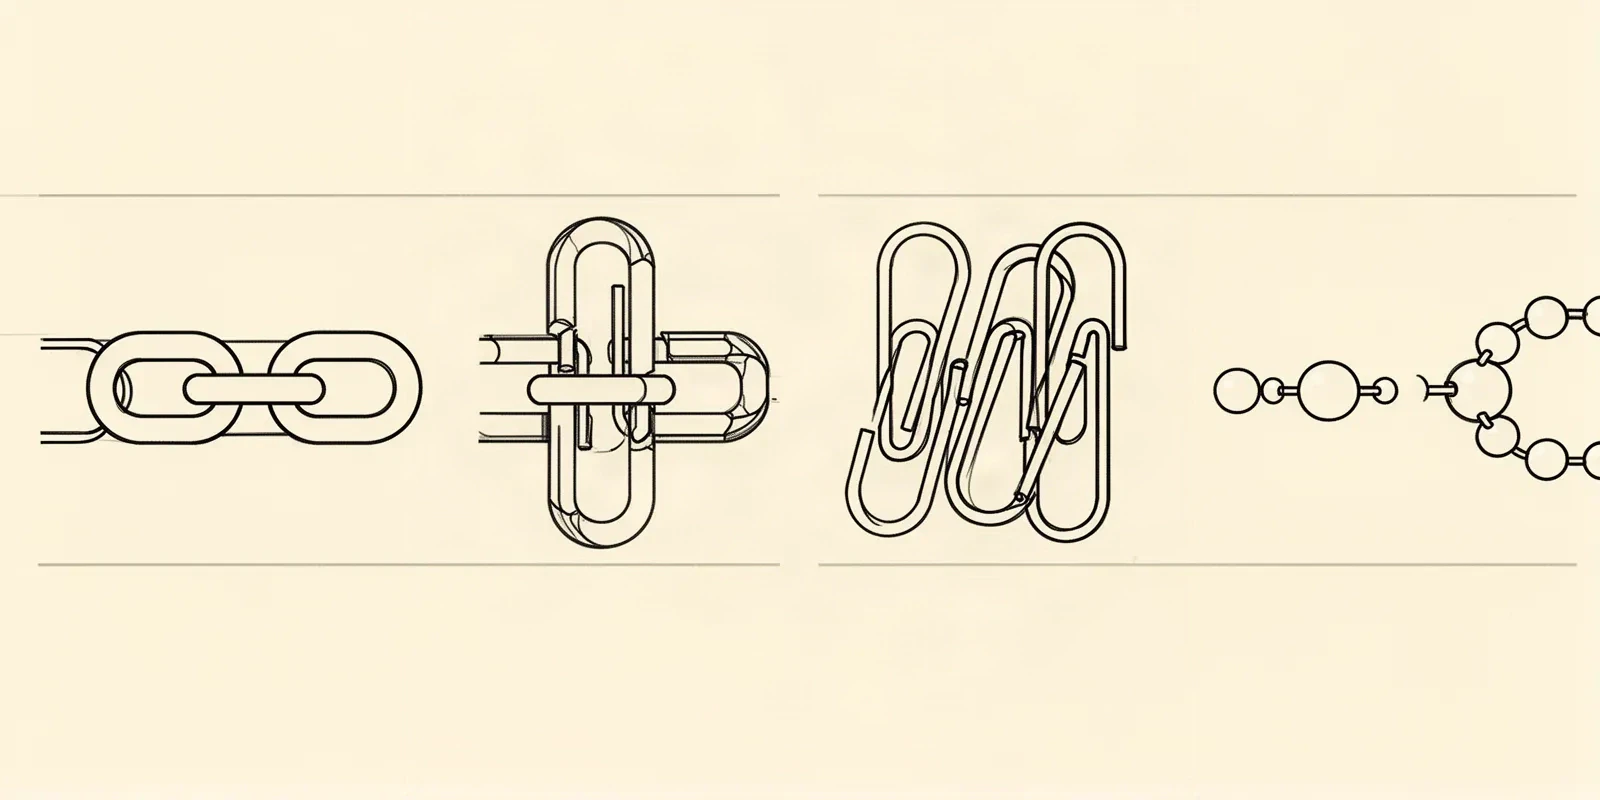
Line sketch of four chain-link constructions in order: round cable links, flattened curb links, elongated paperclip links, and small beads joined by thin connectors, drawn with open separations where one link passes behind its neighbor.
Four construction families, left to right: round cable, flattened curb, elongated paperclip, and beaded connector runs. Synthetic illustrative sketch, not a stencil file, printable output, or customer work. Sketch line density is not a size guide; judge real interlock gaps and highlight reserves on a measured 1:1 print and a dry wrap.

HOLDS AT STATED LENGTH

Round cable-link bracelet at 17 cm

Strip length 170 mm, link height 10 mm, 12 links

Reference read

One straight strip of round cable links with matched tilt, even overlaps, and one reserved highlight gap per link face. Quiet on screen, which is why it transfers well.

Protect
Every interlock gap where a link passes behind its neighbor, the even 12-link rhythm, and the marked 15 mm overlap zone with continued link direction.
Fix
Trim only inside the marked overlap zone after the dry wrap check. If a link lands on the seam, shift the trim line by one repeat unit rather than cutting through a link face.
Candidate stencil
Same construction with settled rhythm, converted highlight reserves, and a planned overlap at transferable mass for the stated strip length.
Final-size verdict
Holds at 17 cm after a dry wrap check. Every interlock stays open at 1:1 and the seam reads as a continued link, not a joint.

SIMPLIFY HIGHLIGHTS FIRST

Cuban curb-link armband at 30 cm

Strip length 300 mm, link height 16 mm, 14 links

Reference read

Bold flattened curb links with strong jewelry shading: double edge lines, bright center bars, and soft contact shadows at every overlap. Rich on screen, but each center bar nearly bridges the link face and the shadows narrow every interlock gap.

Protect
The flattened link construction with its matched tilt and the even 14-link rhythm, which are sound and worth keeping as the rebuild base.
Fix
Convert each center highlight bar to one smaller reserved skin gap, delete contact-shadow stipple at the overlaps, and re-verify every interlock gap at 1:1. Do not thin the outer contours to compensate for shaded interiors.
Candidate stencil
Same construction with settled rhythm, converted highlight reserves, and a planned overlap at transferable mass for the stated strip length.
Final-size verdict
Not stencil-ready until interior shading becomes bounded open skin. Shaded link faces merge first on curve even when outer contours are correct.

REPLAN THE SEAM FIRST

Paperclip-link necklace at 38 cm

Strip length 380 mm, link height 12 mm, 16 links

Reference read

Elongated paperclip links with clean contours and even spacing, but the strip is cut exactly to neck circumference with ends meant to meet edge to edge. On the curved neck the ends gape on the outer edge and ride over each other on the inner edge, and one link visibly breaks rhythm at the joint.

Protect
The elongated link construction and the even 16-link rhythm, which survive once the closure is replanned.
Fix
Extend the strip past circumference to create a real 15 to 20 mm overlap zone, keep one overlap direction running through the seam, and move one link so no link face sits on the joint. Do not stretch the whole strip to force the ends together.
Candidate stencil
Same construction with settled rhythm, converted highlight reserves, and a planned overlap at transferable mass for the stated strip length.
Final-size verdict
Not stencil-ready until the seam is an overlap, not an abut. End-to-end joints on curved placements cannot be fixed with cleaner link drawing.

ENLARGE OR RESELECT

Fine beaded chain forced onto a wrist at 15 cm

Strip length 150 mm, link height 5 mm, 22 beads

Reference read

Delicate small beads with hairline connectors, elegant on screen with tiny gaps between every bead. Every interlock gap and connector sits near the transfer floor at this height.

Protect
The even bead rhythm, which can survive if rebuilt at transferable mass.
Fix
Rebuild beads and connectors at transferable mass with reopened gaps, reduce the count so each unit grows, or enlarge the band height past the point where gaps stay open. Do not keep hairline mass across all 22 units at 5 mm height.
Candidate stencil
Same construction with settled rhythm, converted highlight reserves, and a planned overlap at transferable mass for the stated strip length.
Final-size verdict
At this height the run reads as one textured cord and beads fill in. Enlarge, rebuild line mass, or choose a bolder round-link construction for the wrist.

Polynesian fretwork, barb-wire twist, filigree scrollwork, and generic gallery browsing stay on their own owners. This framework exists to judge interlocked-link construction, gap survival, highlight reduction, and wrap closure at a stated strip length, not to replace those pages.

Gaps, highlights, and rhythm at final size

Judge the white space at the length you will print.

Screens forgive crowding that paper and skin do not. Set the strip length first, then inspect each feature below at true physical size with scaling off.

About 1 cm link height and below

Slim wrist and ankle bracelets, finger-side accents, and fine necklace runs.

Carry one simple round-link construction with few links and wide interlock gaps. If any gap or highlight reserve closes at 1:1, enlarge the link height or reselect rather than forcing reduction.

About 1 to 1.8 cm link height

Common wrist bracelets, standard armbands, and necklace runs.

The most flexible band. Round, curb, or paperclip links work when every interlock gap and every highlight reserve is verified at true length. Check seam placement and link rhythm before approving shading detail.

About 1.8 cm link height and above

Statement armbands, thigh bands, and bold necklace pieces.

Room for flattened curb faces or elongated links with interior highlight reserves, but only when open skin separates every interlock, face, and highlight. Greater height does not rescue a planned abut seam or highlights that bridge link faces.

Worked repeat sizing: strip length, link count, seam placement

Strip length equals measured circumference plus overlap allowance. Divide by the repeat unit to get link count, round to a whole link, then adjust the unit so the seam falls between links. Three starting points below use the 15 to 20 mm allowance recommended on this page.

Wrist bracelet

Measured 170 mm plus 15 mm overlap gives a 185 mm strip. At a 15.4 mm repeat unit, 12 links fill the strip exactly, so the seam falls between links.

Armband

Measured 300 mm plus 20 mm overlap gives a 320 mm strip. At a 16 mm repeat unit, 20 links fill the strip exactly. Place the seam on the inner arm where it draws less attention.

Necklace

Measured 380 mm plus 20 mm overlap gives a 400 mm strip. At a 25 mm repeat unit, 16 elongated links fill the strip exactly. Confirm the seam sits at the back of the neck before transfer.

Reference to clean stencil

Build along the link, then close the loop.

Work in this order so one change at a time can be judged at the same length. Stop when construction, rhythm, highlights, and the seam each read correctly.

  1. 01

    Disambiguate the motif, then lock circumference and length

    Confirm the reference shows interlocked jewelry-style links (cable, curb, paperclip, bead), not polynesian fretwork, barb-wire twist, or filigree scrollwork, which have their own owners linked below. Then measure the placement circumference with a tape at the exact height and set strip length to circumference plus an overlap allowance (this page recommends starting at 15 to 20 mm and confirming on the dry wrap).

  2. 02

    Verify link construction and rhythm

    Confirm closed outer contours per link with an open gap at every overlap, then rank the composition: construction first, rhythm second, closure third. Resolve merged interlocks, drifting spacing, and mismatched tilt before touching line weight. A strip with settled construction and one clear rhythm is already halfway to stencil-ready.

  3. 03

    Convert highlights to reserved skin

    Assign every mark a role: outer contours that carry the link read, overlap edges that carry depth, and photo shading (center bars, glints, contact shadows) that must convert or go. Replace each printed highlight with a smaller bounded skin gap inside the link face, and mark one removable link that can drop out if gaps close.

  4. 04

    Size the repeat and plan the seam at 1:1

    Divide the strip length by the repeat unit to set the link count, round to a whole link, then adjust the unit so the seam falls between links. Print at true length with scaling off, run a squint check for rhythm, and confirm the narrowest interlock gap stays open with a ruler in hand.

  5. 05

    Verify print, dry wrap, and transfer path

    Export a true-length strip (tile across sheets with scaling off when it exceeds one page), inspect the narrowest interlock and the smallest highlight reserve on plain paper, measure the physical print, then wrap the paper strip on the placement to confirm overlap before committing transfer paper. If the digital file passes and only paper fails, move to print-stage evidence instead of simplifying again.

Placement and wrap decisions

Chain bands want placements measured at the exact height

A chain band is a loop around a curved placement. Flat placements do not exist here, so every placement is a wrap decision with its own circumference and seam position.

Wrist bracelet

A small, constantly moving loop where only a slim single-link run survives. Fine beads and dense curb faces merge first here.

Check: Recrop to one round-link run with wide gaps, keep the seam near the inner wrist where it draws less attention, and run the small-height checks at the exact millimeter length.

Neck and necklace line

A long, gently curved run where rhythm errors show across the full front view. One drifting link breaks the whole necklace read.

Check: Keep one overlap direction through the entire strip, place the seam at the back of the neck, and confirm rhythm with the strip held in a loop before transfer.

Arm and armband

A tapered cylinder where a strip cut to one circumference sits differently a centimeter higher or lower. Taper is the main enemy of the seam.

Check: Measure at the exact placement height, keep the overlap on the inner arm, and re-check the dry wrap after any placement shift.

Ankle

A small loop with footwear friction and a tight curve that punish long rigid strips and tiny gaps.

Check: Use the slim-link rules from the wrist, confirm transfer holds against planned footwear contact, and widen gaps before adding link count.

Stencil-ready checklist

Approve the band only when every line passes

Run this short sequence with scaling off, a ruler in hand, and a paper strip wrapped on the placement. One failed line means fix, enlarge, or reselect before transfer.

  • Confirm the motif is interlocked links, not polynesian, barb-wire, or filigree construction.
  • Confirm placement circumference, strip length with overlap allowance, and whole-link count.
  • Confirm open interlock gaps at every overlap at 1:1.
  • Confirm highlights converted to bounded open skin with no bridging.
  • Confirm even link rhythm with the seam falling between links.
  • Export a true-length print with scaling off, dry-wrap the strip, and measure the physical print.

Wrap transfer prep

Transfer without breaking the loop

Chain-band transfers fail at four predictable points. Each one below names the early sign and the prevention that keeps the loop continuous.

Interlock fill-in

Early sign: Links print as separate marks but transfer as one continuous strap where overlaps touch.

Prevention: Judge gaps on the measured 1:1 paper print, not the screen. Widen the tightest interlock in the file or drop one link so remaining units grow, then re-check after any line-weight increase.

Highlight bridging

Early sign: Interior highlight marks bleed into link contours or connect two neighboring links across the gap.

Prevention: Keep every highlight as bounded open skin with stencil lines on all sides. If a reserve touches a contour, shrink it toward the link center before reprinting.

Seam link mismatch

Early sign: The band looks continuous on paper but one link visibly breaks rhythm where the ends meet on the body.

Prevention: Mark overlap direction with an arrow on the stencil margin, decide the seam position with the client before print, anchor the outer face first, and smooth toward the seam from both sides. Confirm one full link rhythm continues through the overlap before the seam touches skin.

Curve pinch

Early sign: Gaps read open on the flat print but close where the strip wraps the limb or neck curve.

Prevention: Run the dry wrap with the paper strip on the real placement before transfer paper. If a gap pinches on curve, reopen it in the file or add link height rather than pressing harder at transfer.

Prerequisites before the transfer touches skin

Confirm the measured 1:1 paper print with a ruler, complete the dry wrap on the placement, and mark the agreed seam position on the stencil margin. Transfer from the outer face toward the seam so the free edge cannot drag links off rhythm. If the first contact looks faint or patchy, diagnose the layer with the transfer troubleshooter instead of pressing harder.

Open the transfer troubleshooter
Interlocks stay open Overlap planned, not abutted Highlights stay skin

FAQ

Chain-link stencil decisions, answered

Short answers for the construction, gap, highlight, repeat, and placement checks that recur when a chain reference moves toward transfer-ready output.

It is usable when three checks pass at the exact strip length: every link keeps a closed contour with an open interlock gap at 1:1, link rhythm stays even with matched tilt and overlap depth, and highlights are bounded open skin rather than printed shading. If any check fails, the fix list on this page names what to simplify, reselect, or enlarge before print.

Next steps

Use the neighboring owners for adjacent jobs.

This guide covers interlocked-link construction, gap vetting, highlight-to-skin conversion, whole-link repeat sizing with overlap closure, and reference-to-stencil preparation. Use the links below for related jobs such as sizing, print checks, paper, and placement.

Twist and barb construction, fretwork patterns, scrollwork symmetry, generic conversion, broad gallery browsing, paper manufacturing detail, and placement mechanics stay in their specialist owners. The links above hand off instead of repeating that detail.

From evaluated reference to working stencil

Turn the approved band into a stencil draft.

Start from the chain strip that passed the gap, rhythm, highlight, and seam checks, then continue on iPhone for body fit, exact-length print, mirror and professional export.