

Navel zone-fit vetting

Center a butterfly on the belly button without losing the wings

The navel is a hollow on moving skin, not flat paper. Choose parked-above, centered, or cupping-below placement, set millimeter width with breathing room, prove symmetry and rim spacing at true size, then transfer with contour prep.

Built for working artists preparing belly-button butterfly pieces. This page covers navel centering, curvature and breathing-aware sizing, rim distortion checks, and transfer prep only, not tattoo application or healing advice. Generic butterfly symmetry and small-size rules stay with the owners linked below.

Navel zone choice and millimeter sizing

Name the zone first, then set the width.

Reduction plus a hollow changes every gap at once. Pick one of the three navel zones below, lock a millimeter width inside its band, and judge all later checks at that exact size.

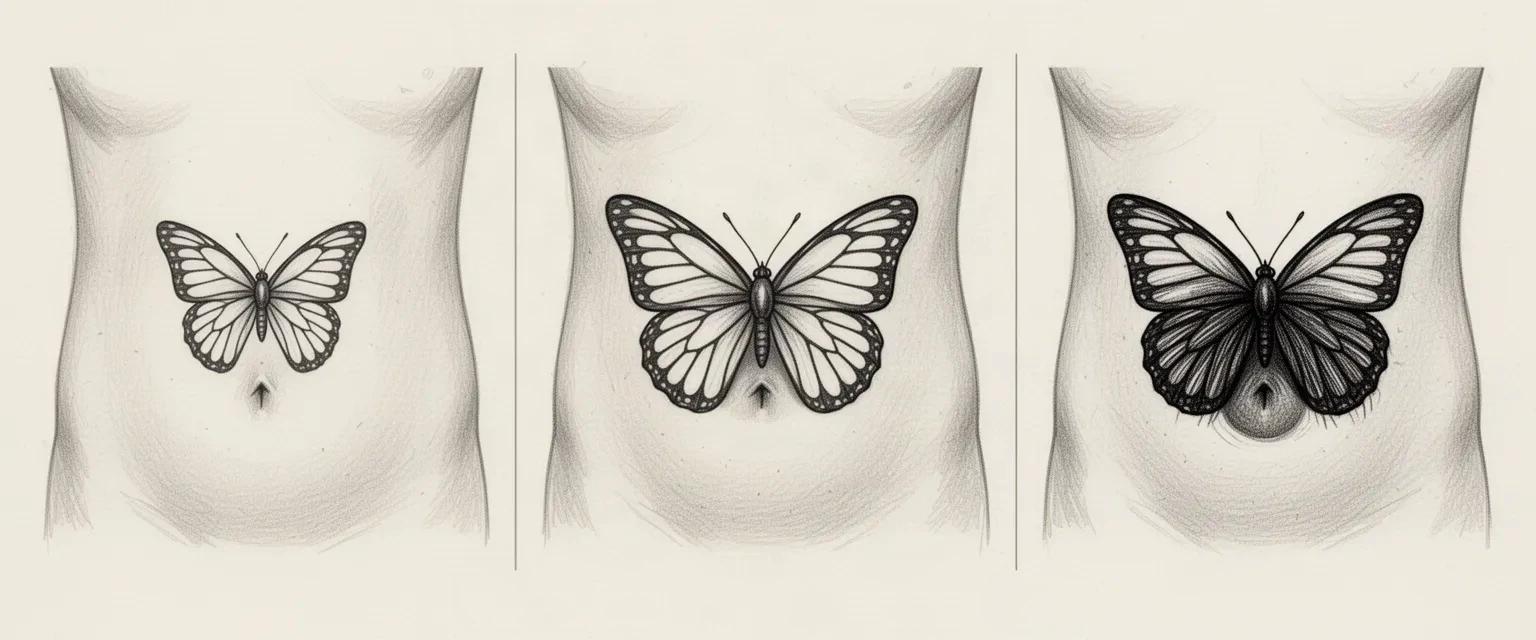
Synthetic ink placement study in three panels: a butterfly parked above the navel with clean skin below the lowest lobes, a butterfly centered on the navel with a continuous ring of clear skin around every lower lobe, and a crowded centered butterfly whose lower lobes touch the navel rim while the vein channels close into a dark mass.
Synthetic placement study, not a client photo or app output. Left: parked above the rim with an open lane of skin. Center: centered build holding a continuous rim ring. Right: crowded build whose lower lobes contact the rim, which is the state to fix before transfer.

Butterfly parked above the navel

Wings read flat, navel acts as the lower anchor

The most forgiving navel butterfly. The body sits on the standing vertical line just above the navel rim, wings spread across the flatter skin above the hollow, and the navel stays open skin below the composition. Curvature affects mainly the lowest lobe tips, breathing lift is small, and symmetry can be judged almost like flat skin.

Check: Seat the body axis on the standing midline above the rim, keep the lowest lobe edge at least a few millimeters clear of the rim at 1:1, and confirm both lower lobes clear the hollow equally in a straight-on photo.

Butterfly centered on the navel

Navel becomes the visual center of the insect

The classic belly-button butterfly: the navel sits where the lower wings meet or where the body crosses. It photographs well but carries the most distortion risk, because the rim dips, shadows, and soft tissue shifts with posture and breath. Lower lobes taper fast around the hollow and small gaps close first here.

Check: Dry-fit standing at breathing rest, confirm a continuous spacing ring between every lower lobe edge and the rim, and reject any lower vein or lobe detail that touches the rim at true size.

Butterfly framing below the navel

Wings cup upward around the lower rim

Wings arc below the navel like a small crest, with upper wing tips reaching up either side of the hollow. It suits clients who want the navel open and readable, but the composition lives on the softest lower-belly skin, so sitting and standing change the spread and breathing moves the lower field more than the upper field.

Check: Place and judge standing with weight even, keep upper wingtips symmetric around the rim at 1:1, and confirm the spread after two slow breaths rather than at a held inhale.

About 30 to 45 mm wide

Compact navel accent, usually parked above the rim.

One open-lobe butterfly with plain lower wings and no inner veins. Keep the body as a simple bar with visible skin on both sides. At this width the navel rim curvature can swallow lower detail, so spend room on lobe-to-rim clearance first, not on vein forks or antennae clubs.

About 45 to 65 mm wide

Standard navel butterfly, centered or cupping the rim.

The most common belly-button band. Carry at most three short vein forks per upper wing with plain lower lobes, and hold an open spacing ring around the full navel rim. Judge wing-to-rim distance at true size: if the lower lobes crowd the rim, shorten the lower wings before touching the upper fan.

About 65 to 90 mm wide

Wide lower-belly butterfly with wings reaching past the hollow.

Only for flatter lower bellies with room on both sides of the navel. Outer wingtips travel across the side curve, so confirm wrap taper on a body photo before print. Extra width buys vein room but not rim immunity: lower lobe spacing around the hollow still decides transfer readiness.

Generic 2 to 5 cm hold rules without navel curvature belong to the small-butterfly owner. Sternum vertical midline method belongs to the sternum owner. This framework judges only butterfly fit around the navel hollow with breathing and posture travel included.

Navel distortion and gap proof at final size

Judge the rim ring at the size you will print.

Screens forgive crowding that the hollow and breathing do not. Set the navel width first, then inspect each feature below at true physical size with scaling off, standing at rest.

Navel distortion checks by width band
FeatureAbout 30 to 55 mmAbout 55 to 90 mm
Lower lobe wrap around the rimHold an open spacing ring between every lower lobe edge and the navel rim. Any lobe that touches the rim at 1:1 merges into the hollow on transfer.Wider spans add side wrap on top of rim wrap. Confirm both the rim ring and the outer tip channels on a curved body preview, not on flat paper alone.
Vein taper into the hollowCarry no lower veins that run toward the rim. Keep at most three short upper forks, each with open skin along its full length.A fuller fan can work when every fork stays fully clear of the hollow. Judge channel continuity, not count: one fork that dives into the rim fails the wing.
Breathing and posture travelJudge standing at breathing rest after a normal exhale. The lower belly rises and spreads with breath and shifts between sitting and standing.Wide cups move most. Confirm the spread after slow breaths and re-seat standing before print, never at a held full inhale.
Spacing and symmetry across contourFold through the body axis and compare upper tips, lower lobes, and rim clearance side to side. Correct outline drift before judging veins.Camera check matters more at width: confirm with a straight-on photo plus slight left and right angles, since the hollow hides drift in person.

Navel failure checklist: small butterfly around a hollow

  • Rim contact bridging: lower lobes or veins touching the navel rim close into one dark pocket on transfer.
  • Hollow shadow swallowing: fine lower veins parked inside the hollow disappear into rim shadow at standing distance.
  • Seated-only centering: a cup centered while seated skews once the client stands and soft tissue resettles.
  • Inhale sizing: width locked at full inhale crowds the rim once the belly returns to rest.
  • Side wrap closing: wide outer tips judged flat wrap down the belly curve and their channels close.
  • Body bridging: a body bar touching either wing turns wings plus body into one solid insect mass around the navel.

General flat-to-curved wrap preview without navel decisions belongs to the body-fit preview. This table applies that preview only to the navel case: rim wrap, hollow taper, breathing travel, and contour symmetry.

Reference to clean stencil

Seat the axis, clear the rim, then prove the print.

Work in this order so one change at a time can be judged at the same navel width. Stop when zone, axis, distortion, symmetry, and transfer prep each read correctly.

  1. 01

    Name the navel zone and lock millimeter width

    State the build in one sentence, parked above, centered on, or cupping below the navel, then set the intended physical width in millimeters. A butterfly that holds at 60 mm above the rim can fail centered on the rim with no line being wrong on its own. Use the size calculator when target dimensions are still open.

  2. 02

    Seat the axis standing at breathing rest

    Stand the client with weight even and arms relaxed, find the vertical line through the navel at rest after a normal exhale, and seat the butterfly body on that line for the chosen zone. Mark nothing seated or at full inhale, and photograph straight-on before judging symmetry.

  3. 03

    Run the navel distortion pass

    Check lower lobe wrap around the rim, vein taper into the hollow, side tip wrap on wider spans, and breathing travel. Separate lower detail from the rim, merge lower veins into open lobes, and pull outer tips inward until every channel stays open at 1:1 on the curved preview.

  4. 04

    Prove symmetry and gaps at true size

    Fold the reference through the body bar and compare upper tips, lower lobes, and rim clearance side to side. Export a true-size PDF with no fit-to-page scaling, inspect the narrowest vein channel, every lobe separation, and the full rim ring on plain paper, then measure the physical print with a ruler.

  5. 05

    Prep transfer for the contour

    Dry-fit uncut on the standing client, cut short relief slits only where the rim turn resists, press from the center outward so excess length moves toward flat skin rather than into the hollow, and confirm the rim ring still reads open after slow breaths before committing.

Stencil-ready checklist

Approve the navel butterfly only when every line passes

Run this short sequence standing with scaling off and a ruler in hand. One failed line means fix, enlarge, reselect, or relocate before transfer.

  • Confirm navel zone, intended width in millimeters, and named rim clearance in one sentence.
  • Confirm wings mirror through the body axis with equal rim clearance on both sides at 1:1.
  • Confirm every surviving vein channel stays open along its full length and clear of the hollow.
  • Confirm every lobe separation, both body side gaps, and the full rim ring read as open skin at true size.
  • Dry-fit standing at breathing rest and confirm the rim ring after slow breaths.
  • Export a true-size PDF with scaling off and measure the physical print with a ruler.
Zone first, veins second Verify the rim ring at 1:1 Judge standing at rest

FAQ

Navel butterfly decisions, answered

Short answers for the centering, sizing, distortion, symmetry, and transfer checks that recur when a butterfly moves toward a belly-button transfer.

Next steps

Use the neighboring owners for adjacent jobs.

This guide covers navel zone choice, breathing-aware millimeter sizing, rim distortion checks, navel symmetry proof, and contour transfer prep. Use the links below for related jobs such as generic hold checks, pairing depth, sternum work, and print tooling.

Generic small-size simplification, paired floral and skull depth, sternum midline mechanics, and general flat-to-curved preview stay in their specialist owners. The links above hand off instead of repeating that detail.

From navel plan to working stencil

Turn the approved navel butterfly into a stencil draft.

Start from the butterfly that passed the navel zone, size, distortion, and symmetry checks, then continue on iPhone for body fit, exact-size print, mirror and professional export.