

Bullet stencil evaluation

Judge any bullet reference before it becomes a stencil

Bullet designs live or die on casing proportion, tip geometry, and band gap retention at final size. Check the variant fit, the nose and groove separations, the straight-axis symmetry, and the small-size line decisions at your exact length, then prepare a clean stencil that transfers as one readable round.

Built for working artists preparing client-requested bullet motifs. This page treats the bullet strictly as a studio object reference for stencil execution, covering variant evaluation, tip and band checks, symmetry and small-size decisions, and transfer preparation only, not tattoo application or healing advice. Pistol, rifle, hollow-point, wadcutter, and shell builds are judged here as different constructions inside one straight-axis framework.

What makes a bullet stencil-viable

Variant, tip gaps, and symmetry decide the result.

A bullet is a straight-axis object built around one centerline. These three pillars predict whether that object survives reduction, print, and transfer.

Variant choice and casing silhouette

A bullet reads first as one outer contour: compact round-nose pistol round, pointed rifle spitzer, flat wadcutter, hollow-point with open tip cavity, or shotgun shell with rim and hull. Stencil viability comes from picking the construction whose casing proportion fits the placement length, with the case, rim or base, and projectile each keeping its own contour. A pretty reference with a merged case-to-projectile junction has no construction to transfer.

Check: Cover all inner detail on the reference. If the round still reads as the intended pistol, rifle, hollow-point, wadcutter, or shell from outer contour alone, the variant choice is sound. If the casing merges into the projectile nose or the rim reads as a bump on one side, the silhouette needs repair before line weight changes.
Tip geometry and band or groove gaps

Round noses, pointed spitzer tips, hollow-point cavities, cannelure bands, and extractor grooves close first at transfer size. The stencil holds when the tip carries one clean nose mass, each band keeps open skin on both sides, and the hollow-point mouth keeps a countable opening instead of a filled dot. Two adjacent bands or a tip line that shares an edge with a groove becomes one merged bar on skin.

Check: Inspect the tip zone and every band at the exact physical length. If the nose, each cannelure line, the primer circle, and the rim each read as a separate mark with visible skin between them, gap retention passes. If two marks share one edge at 1:1, that contact needs reopening or removal before print.

Straight-axis symmetry and final-size read

Bullets are straight-axis objects with almost no width to spare, so asymmetry shows immediately. The stencil holds when the case walls run parallel and mirrored, the nose lands on the centerline, the rim or base sits square to the axis, and shell hulls keep matched sides. A tilted rim, a drifting nose, or one bowed case wall breaks the read faster than any missing groove line.

Check: Fold the reference along its long axis at the target length. If both case walls, both rim shoulders, and both nose flanks mirror within a hairline, symmetry passes. If one side carries a curve, flare, or notch the other side lacks, correct or remove it before judging detail.

Bullet evaluation framework

Score the reference in minutes, then act on the weakest check.

Four bullet constructions at labeled lengths. Each one names the protected structure, the fix, and the go or no-go verdict at that exact size. Confirm with a measured 1:1 print.

HOLDS AT STATED SIZE

Round-nose pistol round at 9 cm

Intended length 90 mm

Source
Front-view full metal jacket round with a smooth round nose, a straight parallel brass case, one cannelure band, a square rim, and a centered primer circle. Clean construction with one band family and no headstamp lettering or shading field.
Protect
Both straight case walls and the centered round nose, the square rim position, and the primer circle with open skin around it.
Fix
Shorten only the cannelure band if it crowds the case at 1:1, keeping both case walls and the nose position unchanged. Remove headstamp letters if they were planned; keep the primer circle only.
Candidate stencil
Same round with straight case walls kept, nose centered, rim square, band and primer gaps cleared, and protected contours held at transferable mass.
Final-size verdict
Holds at 9 cm after a band check. The case reads as one straight mass, the nose lands on the axis, and the rim plus primer stay separate from a normal viewing distance.

REOPEN TIP AND GROOVE GAPS

Hollow-point with cavity at 10 cm

Intended length 100 mm

Source
Hollow-point round with a visible nose cavity, two jacket petals, a straight case with one cannelure groove, and a rim with primer. Strong presence, but the cavity mouth nearly fills shut and one petal line touches the groove band on the left side.
Protect
The nose centerline and cavity position, the case walls on both sides, and the rim plus primer that anchor the base read.
Fix
Reopen the cavity mouth until it reads as a countable opening at true size, then reopen the petal-to-groove channel on the left side with open skin. Keep rim and primer unchanged.
Candidate stencil
Same round with straight case walls kept, nose centered, rim square, band and primer gaps cleared, and protected contours held at transferable mass.
Final-size verdict
Holds at 10 cm once the cavity and the petal channel stay open at true size. Hollow-point authority comes from a separated mouth plus a clean case, not from petal count or jacket shading.

RANK BANDS OR RECROP

Pointed rifle round with bands at 14 cm

Intended length 140 mm

Source
Long pointed spitzer rifle cartridge with a sharp nose, a tapered case, two cannelure bands, a shoulder step, a rim, and a primer with headstamp ring. Complete construction, but the two bands plus the shoulder step plus the headstamp ring create three competing groove families across the same case span.
Protect
The nose centerline and pointed tip position, the case taper on both sides, and the rim position that anchors the base.
Fix
Keep one cannelure band with open skin on both sides, simplify the shoulder to one clean step, and drop the headstamp ring to a plain primer circle. Do not keep two bands plus a stepped shoulder plus lettering together on one case span.
Candidate stencil
Same round with straight case walls kept, nose centered, rim square, band and primer gaps cleared, and protected contours held at transferable mass.
Final-size verdict
Holds at 14 cm once the case is ranked to one band family. On a curved limb the same length needs an axial run or a recrop to projectile plus shoulder section, verified with a dry wrap before print.

ENLARGE OR RECROP

Fine-line dense bullet emblem at 4 cm

Intended length 40 mm

Source
Delicate outline-only bullet with hairline nose doubling, thin double cannelure lines, tiny primer letters, extractor groove hatching, and a small paired banner, attractive on screen but drawn with almost no line mass and six competing micro gaps.
Protect
The nose direction and the case position that give the object its bullet read.
Fix
Enlarge past the point where the nose, the single band, and the primer circle each transfer as open skin, or recrop to nose plus case with one band and no letters. Do not keep nose doubling plus double bands plus lettering together at 4 cm.
Candidate stencil
Same round with straight case walls kept, nose centered, rim square, band and primer gaps cleared, and protected contours held at transferable mass.
Final-size verdict
At 4 cm the nose lines, bands, and primer letters function as one band and the rim prints closed. Enlarge, recrop to nose plus case, or choose a bolder construction for this length.

Cross-subject silhouette comparison stays on the stencils and subject hubs. Broad visual browsing stays on the stencils collections. Print mechanics, paper manufacturing detail and full-body measurement depth stay in their specialist owners. This framework exists to judge bullet casing proportion, tip and band retention, and symmetry at a stated length, not to replace those owners.

Variant construction for stencil clarity

Nose shape, shells, and pairings help only when the case stays separated.

Each bullet variant adds a different nose, base, or story element, but every cavity, band, rib, and script line competes with the case for the same narrow span. Rank the case first, then admit one variant family.

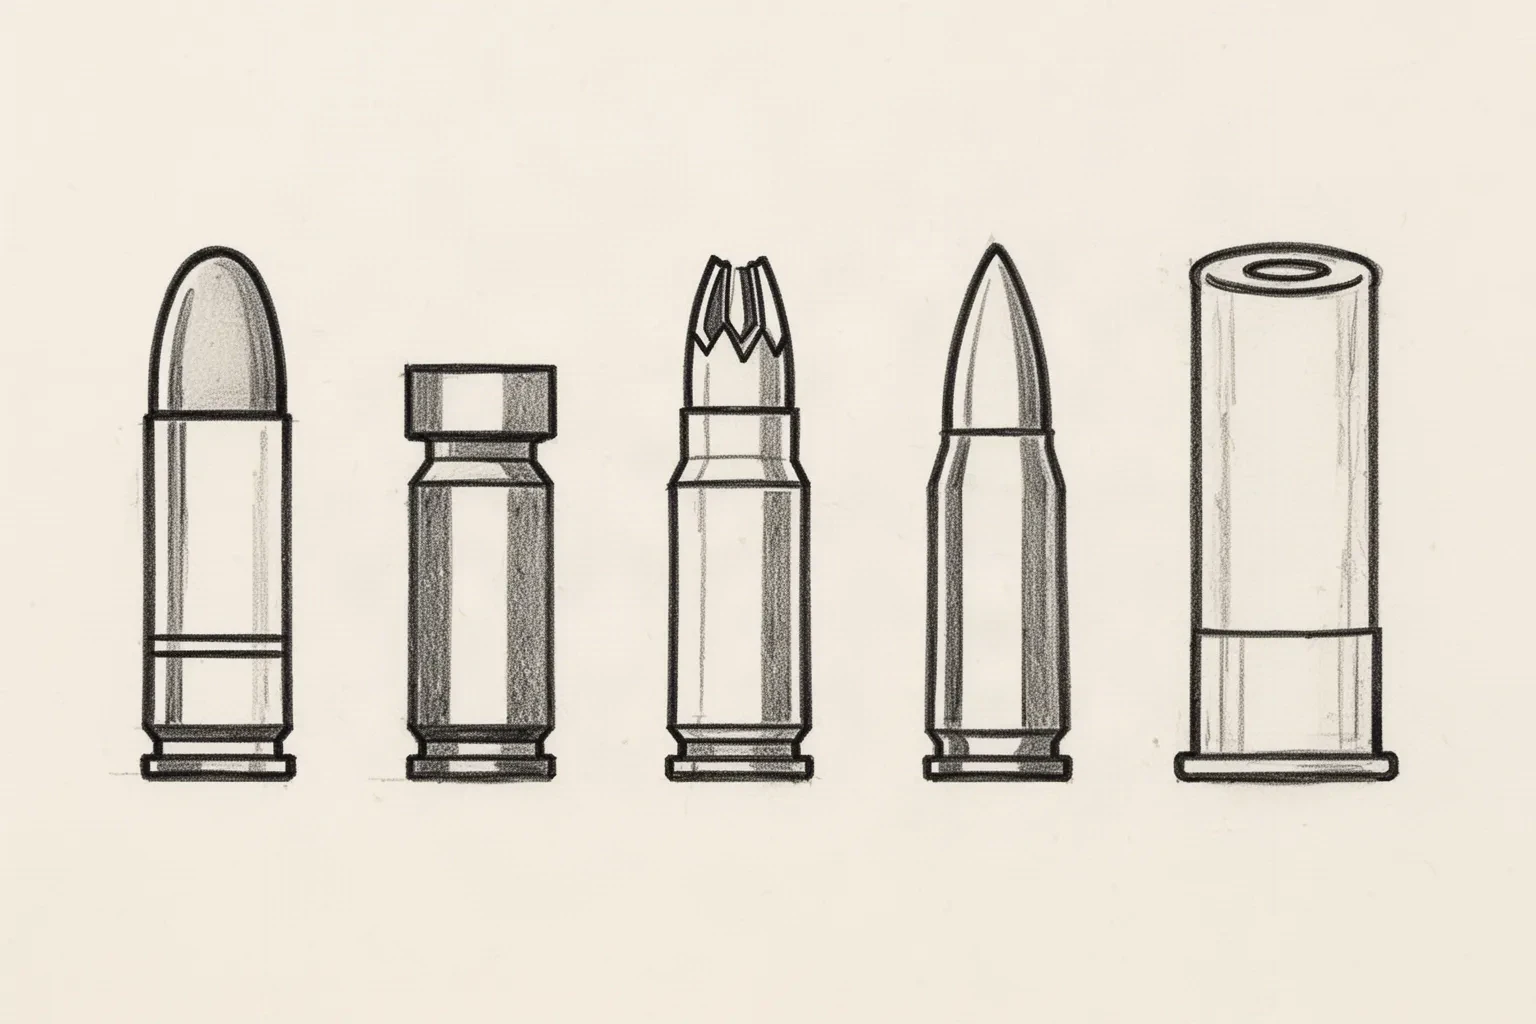
Original ink-outline reference plate of five bullet constructions in side profile: round-nose pistol round, flat wadcutter, hollow-point with an open cavity mouth, pointed rifle spitzer, and shotgun shell with crimped top and square rim.
Synthetic editorial illustration, not a customer reference or app output. Left to right: round-nose pistol round, flat wadcutter, hollow-point with open cavity, pointed rifle spitzer, and shotgun shell. Read each construction as casing proportion plus one tip family plus one band family; the plate carries no measurements, so verify separations at your own length.

Round-nose and flat wadcutter

Helps: The round nose gives the most forgiving tip at small sizes, while the flat wadcutter gives a blunt graphic read that suits bold short placements and gap-filler roles.

Hurts: Round noses lose their curve to a blob when the nose line is too thin, and wadcutter flats tilt visibly when the base is not square to the axis. Both fail silently on screen and obviously on skin.

Stencil rule: Keep the nose as one clean mass with the heaviest line on the outer nose curve. For wadcutters, square the flat to the axis first, then protect the two nose corners as the lead detail.

Hollow-point and pointed spitzer

Helps: The hollow-point cavity adds a focal opening that reads well at medium lengths, and the pointed spitzer adds length and direction that suits forearm and calf runs.

Hurts: Cavities fill shut below their minimum opening, and pointed tips drift off-axis or double up with outline echo lines. Both defects close or skew the narrowest zone first.

Stencil rule: Keep one countable cavity opening with open skin inside it, or one centered point with no echo line. Verify the tip zone alone at 1:1 before approving any band detail.

Shotgun shell and paired composition

Helps: The shell rim and hull give a wide base anchor that balances vertical placements, and small pairings like wings, banners, or dates add story without lengthening the object.

Hurts: Hull ribs, rim steps, and pairing script merge into one banded base when each keeps full detail. Script and rib lines drawn at the same mass as the rim close the base read entirely.

Stencil rule: Rank the shell as rim first, hull second, pairing last. Keep one hull rib family maximum and keep any script or date fully clear of the rim with an open skin ring.

About 5 cm and below

Finger panels, behind-ear marks, wrist and ankle accents, and small gap fillers.

Carry a recrop only, such as a nose plus case section with one band and a plain primer dot. Keep one contour family and two separations maximum. If the tip cavity, a band channel, or the primer ring closes at 1:1, enlarge or reselect rather than forcing reduction.

About 7 to 12 cm

Common forearm, calf, shoulder, and thigh bullet pieces, including most hollow-point and pistol-round builds.

The most flexible band. A full symmetric round with one ranked band and a plain primer circle can work when every gap is verified at true size. Check tip centering, case-wall straightness, band separation, and rim squareness before approving cavity or groove detail.

About 12 cm and above

Large thigh panels, back pieces, sternum, spine, and sleeve sections, including rifle rounds and shell builds.

Room for a full round with a ranked shell base or one pairing element, but only when open skin separates nose, case, bands, rim, and each pairing mark. Larger length does not rescue an off-center tip, a tilted rim, or a merged band.

Bullet feature checks by length band
FeatureAbout 5 cm and belowAbout 7 cm and above
Tip, nose, and cavityKeep the heaviest lines on the outer nose with the tip centered on the axis. Carry at most one short cavity mark, or none. If the nose outline disappears, the object loses its bullet read and becomes a plain slug.Same priority. Larger length allows a deeper cavity or sharper point, but separability of the nose from the first band still beats cavity texture or nose doubling.
Case walls, bands, and symmetryBoth case walls must match with open skin beside each band. Asymmetry means a bolder case redraw or a larger length, not thinner walls.Band and groove detail can carry more shape when each line keeps its own spacing at 1:1. Check the full round with a fold or mirror test at true size.
Rim, primer, and baseCarry a square rim with a plain primer circle and no letters. Rim steps, headstamp rings, and extractor hatching merge first at small lengths.Additional base hints can work when the rim stays square and the primer keeps its own ring. Base texture should never join the lowest band or close the primer gap.
Pairing marks and background fieldKeep no background field, banner script, or secondary wings. Pairing and background lines compete with case-wall and band gaps for the same room and should be recropped away.One shell hull, one wing hint, or one date line can add structure when the bullet clearly dominates. Equal-weight double pairings need hierarchy work before print.

Reference to clean stencil

Build from the centerline outward, then rank the bands.

Work in this order so one change at a time can be judged at the same length. Stop when case walls, nose, rim, and band gaps each read correctly.

  1. 01

    Lock length, placement, and nose direction first

    Set the intended physical length in millimeters, name the body area, and set nose direction with the client before judging the reference. A bullet that holds at 12 cm on a thigh can fail at 4 cm on a finger with no line being wrong on its own. Use the size calculator when target dimensions are still open.

  2. 02

    Verify casing proportion and centerline

    Confirm the case runs straight on one axis with the nose centered and the rim square, then rank the composition: outer silhouette first, tip and rim second, band and pairing detail last. Resolve wall waviness, rim tilt, and nose drift before touching line weight. A bullet with two straight walls, a centered nose, and a square rim is already halfway to stencil-ready.

  3. 03

    Set object versus detail roles

    Assign every mark a role: lead structure that carries the first read, support that shapes it, and detail that can be removed. Strengthen both case walls, nose outline, and rim first, keep band and groove lines lighter, and mark one removable texture row or lettering ring that can go if gaps close.

  4. 04

    Simplify tip, bands, and base density at 1:1

    Reduce nose doubling, extra cannelure lines, headstamp lettering, and hull rib rows before thinning contours. Keep open skin around the nose, on both sides of each band, and inside the primer ring, and run a squint check: step back until fine texture disappears and confirm the bullet still reads. The line-weight guide covers fine, normal, and bold behavior on the same stencil.

  5. 05

    Verify print and transfer path

    Export a true-size PDF with no fit-to-page scaling, inspect the narrowest nose channel, the tightest band gap, and the primer ring on plain paper, then measure the physical print with a ruler. If the digital file passes and only paper fails, move to print-stage evidence instead of simplifying again.

Placement and composition decisions

Long narrow bullets want skin that gives them a straight run

A bullet is a straight object with a small rim anchor and optional shell or pairing mass. Placements with a clear flat span preserve both case walls and rim squareness, while narrow limbs demand an axial run or a recrop.

Outer forearm and calf

Long narrow fields where the bullet should follow the limb axis. The straight case is the asset here, so nose direction and wall straightness need protection against wrap.

Check: Run the case along the limb axis with the nose set with the client, center the rim on the flattest span, and keep pairing marks to one compact element that does not cross the limb curve.

Thigh and back

Broad flat fields where a full round with a ranked shell base or one pairing mark can sit without wrapping. The length is the asset, so rim squareness and band separation need checks rather than compression.

Check: Center the case on the flattest span, set the nose direction with the client, and verify tip, band, and primer gaps at 1:1 before print.

Sternum and spine

Vertical centerline fields that suit the bullet axis naturally. The curve compresses one side of wide rims and shell hulls in photos and transfers.

Check: Align the bullet centerline with the body centerline, keep rims compact and square, and confirm base symmetry on a live body preview before locking the stencil.

Wrist, ankle, finger, and behind ear

Small wrapped fields where only a recrop survives. Full rifle rounds, shell hulls, and pairing banners forced into these bands merge first.

Check: Recrop to a nose plus case section with one band and a plain primer dot, then run the small-size checks at the exact length.

Stencil-ready checklist

Approve the bullet only when every line passes

Run this short sequence with scaling off and a ruler in hand. One failed line means fix, enlarge, or reselect before transfer.

  • Confirm intended length in millimeters, the named placement, and the nose direction.
  • Confirm two straight case walls with a centered nose and a square rim at 1:1.
  • Confirm each band and groove reads as a separate mark with open skin on both sides.
  • Confirm the cavity mouth or pointed tip, plus the primer ring, stays open at true size.
  • Confirm pairing marks keep an open skin ring where they meet case, rim, or hull.
  • Export a true-size PDF with scaling off and measure the physical print.
Centered nose first Verify symmetry at 1:1 Square rim plus open band gaps

FAQ

Bullet stencil decisions, answered

Short answers for the variant, tip and band gap, symmetry and small-size, and true-size print and transfer checks that recur when a bullet reference moves toward transfer-ready output.

Match the construction to the placement length: compact round-nose rounds suit short fields, hollow-points suit medium fields with room for one cavity opening, pointed rifle rounds suit long axial runs, and shotgun shells suit placements with room for a wider rim base. Whichever variant is chosen, it holds when the case, rim or base, and projectile each keep their own contour with the nose centered and the rim square at the exact length.

Next steps

Use the neighboring owners for adjacent jobs.

This guide covers bullet variant choice, length-tied tip and band gap rules, symmetry and small-size decisions, orientation and wrap handling, and reference-to-stencil preparation. Use the links below for related jobs such as styling, conversion, sizing, print checks, paper, and placement.

Generic photo conversion, firearm silhouette choice, dagger guard depth, fine-line tool depth, flash inventory mechanics, broad gallery browsing, paper manufacturing detail, and placement mechanics stay in their specialist owners. The links above hand off instead of repeating that detail.

From evaluated reference to working stencil

Turn the approved bullet into a stencil draft.

Start from the bullet that passed the variant, tip and band gap, and symmetry checks, then continue on iPhone for body fit, exact-size print, mirror and professional export.