

Black-and-grey stencil evaluation

Vet any black-and-grey reference before it becomes a stencil

Black-and-grey lives or dies on wash hierarchy. Compress any reference into separable wash steps, decide wash mapping versus line hierarchy for fades or hard edges, then verify gradients and skin breaks hold at your exact size.

Built for working artists preparing black-and-grey pieces. This page covers cross-subject wash vetting and transfer-ready prep only, not tattoo application, healing advice, or wash recipe formulation.

What makes black-and-grey stencil-viable

Separation, wash mapping, and final-size retention decide the result.

A black-and-grey reference is smooth tone drawn for the eye. A stencil is separable structure drawn for transfer. These three checks bridge that gap before print.

Tonal separation

Black-and-grey references carry smooth photographic tone, but transfer paper and thermal print carry only separable marks. A stencil-ready reference compresses its full value range into a small set of printable steps: solid anchor, dark wash shape, light wash shape, and protected skin. When five close mid-tones each need their own wash, they merge into one flat pocket on skin.

Check: Squint at the reference until only three or four tone masses remain. If the portrait, animal, or object still reads with clear dark, mid, and skin roles, the tones can separate. If the mid-tones collapse into one gray band, compress further before touching size.
Wash-vs-line hierarchy

Every soft area needs an explicit owner: smooth wash applied at tattoo time, separable whip or stipple texture drawn on the stencil, or a held line that defines a hard edge. References fail when soft fades are copied as smooth gradients onto transfer paper, where thermal and inkjet output renders them as smudge or drops them. The stencil plans softness as open structure, never as copied tone.

Check: Name each shaded zone and assign it wash, texture, line, or skin. If any zone is still described as shading on the stencil itself, it will not transfer as drawn and needs conversion before print.

Final-size gradient and skin-break retention

Soft fades and thin skin breaks are the first casualties of reduction. A gradient that breathes at 15 cm can close into solid at 9 cm, and a highlight sliver that separates two wash shapes can bridge shut on transfer. Paper and skin forgive nothing the screen forgives, so gradients and skin breaks must be judged on a measured 1:1 print at the exact width.

Check: Print at 100 percent with scaling off and confirm each must-keep gradient still shows a visible transition with open skin inside it, and each must-keep highlight still reads as background at arm's length. If either closes, enlarge the piece or simplify the wash map.

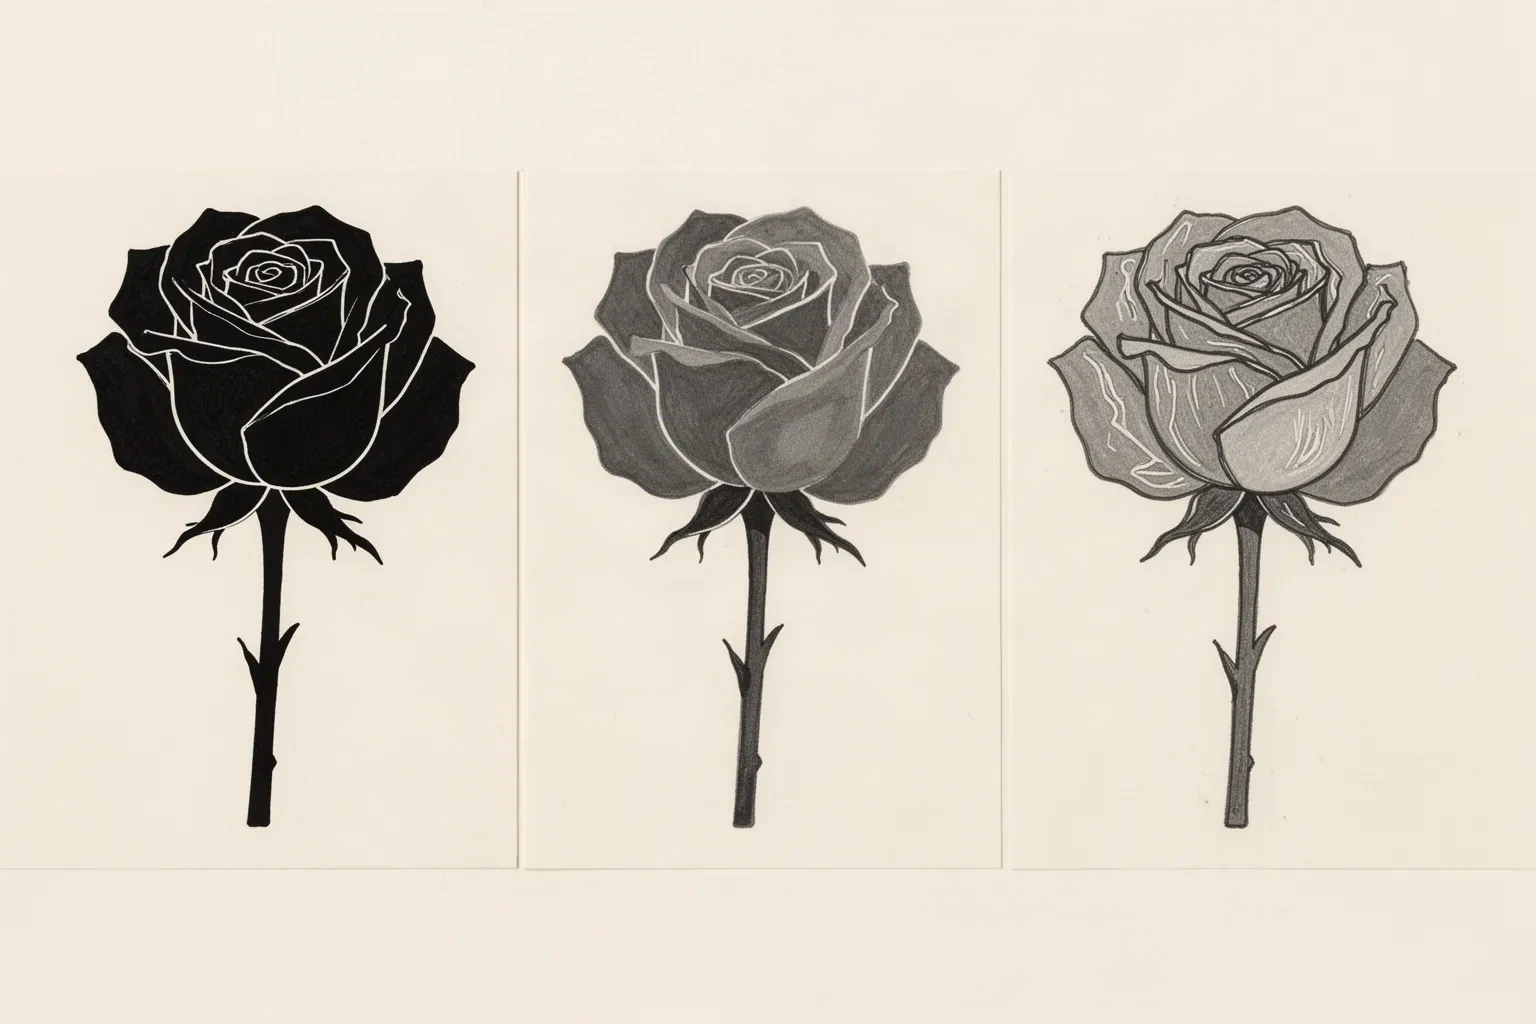
Illustrative black-and-grey tonal separation study showing the same rose motif in three stages: solid black anchor masses, a mid grey wash shape with hard outer boundaries, and a lighter wash with skin breaks and highlight channels left as open paper.

Wash hierarchy at a glance

One motif, three separation stages: solid anchor mass, then one mid wash shape with a hard outer boundary, then a lighter wash with skin breaks held open as paper. A reference that will not compress to this progression needs a larger piece or a simpler crop before it reaches transfer paper.

Illustrative synthetic reference art created for this guide. Not app output, not a customer tattoo, and not a measured scale example. Confirm every wash boundary and highlight on your own 1:1 print.

Wash-vs-line decision

Give every soft area one explicit owner.

Three black-and-grey constructions, three different risk profiles. Choose one owner per zone before vetting, because smooth tone, texture, and held edges fail in different places.

Smooth wash fields

Large tonal shapes assigned to wash caps applied at tattoo time: one solid anchor shape, one or two ranked wash shapes with hard outer boundaries, and open skin reserved for highlights. The stencil carries boundary lines only, and the softness inside each shape returns during tattooing.

Strengths: Strongest for soft portrait modeling, cloud and smoke backgrounds, and smooth animal fur transitions. Keeps the stencil readable because boundaries transfer while interior tone stays out of the transfer layer.

Constraints: The least forgiving at small sizes. Wash shapes narrower than the printable floor merge with their neighbors, and gradients drawn inside a single shape cannot be separated later. Needs real estate to keep each wash shape distinct.

Choose when: Choose it when the reference depends on soft continuous modeling and the final width keeps every wash shape separately printable at 1:1, with highlights reserved as genuine open skin.

Whip and stipple texture mapping

Mid-tones converted into separable marks on the stencil itself: whip lines that taper in one direction, stipple dots with visible skin between them, and short directional ticks that follow form. Texture density stands in for tone depth, so the transfer carries the full value plan.

Strengths: Most transfer-honest mid-tone method because every mark is already a printable line or dot. Good for fur, stone, fabric, and portrait secondary modeling where smooth wash would need more width than the placement allows.

Constraints: Dense texture packed tight reads as one flat patch at transfer size. Gradients need an open middle transition plus one solid anchor edge, or the texture fills in and the fade is lost.

Choose when: Choose it when wash shapes would merge at the target width, or when the reference already shows directional texture the stencil can formalize into countable marks with open skin between them.

Line-held edges with solid anchors

Hard edges and focal contours held with ranked linework plus a small number of solid black anchor shapes: outer silhouette, deepest shadow pocket, eye or focal accent. Lines define structure, solids define the darkest read, and everything between stays wash or skin.

Strengths: Keeps small and medium pieces readable at distance and through transfer. Gives the eye a path to follow when wash detail drops back, and protects focal contrast that soft-only plans lose.

Constraints: Too many anchored edges turns black-and-grey into bold blackwork and changes the style. Each anchor narrows adjacent gaps, so anchors demand the widest local spacing and the fewest possible placements.

Choose when: Choose it when the piece needs hard edges beside soft fades, when the focal point must survive reduction, or when the reference mixes crisp detail with atmospheric wash in one composition.

Wash recipe formulation, drop counts, and measured percentages stay with the grey-wash ratios guide and the grey-wash calculator. This comparison exists to assign each shaded zone to wash, texture, line, or skin on the stencil, not to formulate the caps themselves.

Final-size vetting framework

Score the reference in minutes, then act on the weakest check.

Four illustrative hypothetical black-and-grey cases at labeled sizes. Each one names the protected structure, the fix, and the go or no-go verdict at that exact size. Confirm every verdict with a measured 1:1 print.

HOLDS AT STATED SIZE

Portrait panel with separated wash shapes at 14 cm

Intended width 140 mm

Source
Illustrative hypothetical portrait reference with a solid hair mass, one ranked cheek shadow shape, one light forehead wash shape, and reserved skin highlights along the nose bridge and cheek plane.
Protect
The solid anchor in the hair, the boundary of each wash shape, and the open highlight channels that separate shadow from light.
Fix
Adjust nothing structural. Confirm each wash boundary and highlight channel at 1:1 and keep interior softness off the transfer layer.
Candidate stencil
Same composition with tones compressed to separable wash steps, wash-versus-line owners assigned, and highlights reserved as open skin for the stated size.
Final-size verdict
Holds at 14 cm. Each wash shape transfers as its own boundary, highlights stay open at arm's length, and softness returns at tattoo time inside already separated shapes.

CONVERT TONE TO TEXTURE

Animal fur study with smooth gradients at 11 cm

Intended width 110 mm

Source
Illustrative hypothetical animal reference with appealing directional fur tone that currently exists only as smooth gradients, plus one solid nose anchor and open eye highlights.
Protect
The nose anchor, the eye highlight openings, and the fur growth direction from anchor outward.
Fix
Convert each mid-tone fur zone to whip or stipple marks that follow growth direction, with countable skin gaps between marks. Keep the darkest fur row near the anchor densest and open the transition toward the highlight.
Candidate stencil
Same composition with tones compressed to separable wash steps, wash-versus-line owners assigned, and highlights reserved as open skin for the stated size.
Final-size verdict
Holds at 11 cm once every fur zone carries texture or skin assignment that survives a squint test at true size. Smooth tone copied onto the stencil would smudge; formalized texture transfers.

HOLD THE EDGES

Rose and script pairing with soft wash beside hard edges at 10 cm

Intended width 100 mm

Source
Illustrative hypothetical pairing of a shaded bloom with crisp script lettering. The bloom wants soft wash modeling while the lettering needs hard held edges and open counters.
Protect
Letter skeletons and counter openings, the bloom outer contour, and the one darkest petal-cup anchor.
Fix
Hold letter edges with ranked linework and keep wash shapes out of the counters. Assign the bloom interior to two ranked wash shapes maximum, and reserve skin where petals meet lettering.
Candidate stencil
Same composition with tones compressed to separable wash steps, wash-versus-line owners assigned, and highlights reserved as open skin for the stated size.
Final-size verdict
Holds at 10 cm when lettering reads without wash help and the bloom keeps two separable wash boundaries. If wash floods a counter or bridges a petal channel, reopen before print.

ENLARGE OR SIMPLIFY

Dense multi-figure scene forced into an 8 cm panel

Intended width 80 mm

Source
Illustrative hypothetical scene with layered figures, background wash, and small highlight slivers throughout, attractive on screen but drawn with five or more close mid-tones and touching wash boundaries.
Protect
The single strongest figure contour and the one shadow anchor that sets the value direction.
Fix
Keep one focal figure with two wash shapes maximum, convert secondary modeling to sparse texture or open skin, or recrop around the focal passage. Enlarge past the point where each wash shape stays separately printable.
Candidate stencil
Same composition with tones compressed to separable wash steps, wash-versus-line owners assigned, and highlights reserved as open skin for the stated size.
Final-size verdict
At 8 cm the layered mid-tones function as one gray pocket and highlight slivers bridge. Simplify to a focal passage, enlarge, or reselect a cleaner reference for this width.

Chicano portrait and lettering vetting stays with the chicano owner, solid-fill bloom hierarchy stays with the black-rose owner, and subject-specific anatomy stays with owners such as black-widow. Broad visual browsing stays with the stencils and subject hubs. This framework exists to judge cross-subject wash hierarchy and gradient retention at a stated size, not to replace those owners.

Gradients and skin breaks at final size

Judge the transition at the size you will print.

Screens forgive tonal crowding that paper and skin do not. Set the dimensions first, then inspect each feature below at true physical size with scaling off.

About 8 cm and below

Wrist accents, behind-ear marks, small script pairings, and single focal motifs.

Carry one solid anchor plus one wash shape maximum, with line-held edges for any hard detail. If any wash boundary merges or any highlight bridges at 1:1, enlarge or reselect rather than forcing reduction.

About 9 to 14 cm

Common forearm panels, calf work, shoulder pieces, and portrait or animal singles.

The most flexible band. A solid anchor plus two ranked wash shapes with protected highlights can hold when every boundary and texture field is verified open at true size. Confirm the wash map before approving texture density.

About 14 cm and above

Back panels, thigh pieces, large portrait compositions, and full atmospheric scenes.

Room for layered wash shapes and real texture gradients, but only when open skin separates every shape and every texture row. Larger size does not rescue merged mid-tones or copied smooth gradients.

Black-and-grey feature checks by size band
FeatureAbout 8 cm and belowAbout 9 cm and above
Solid anchorsKeep one anchor maximum on the focal dark mass. If an anchor-adjacent gap closes at 1:1, widen spacing or drop a neighboring shape rather than thinning the anchor.Same priority. Larger size allows a second anchor for background depth, but restraint still beats extra black mass.
Wash shape boundariesEach wash shape needs its own closed boundary with visible skin or line separation from its neighbor. Touching wash shapes merge into one pocket.Boundaries can sit closer relative to size, but each one must still survive print and transfer as a separate shape.
Whip and stipple textureKeep isolated countable marks with visible skin between them. Packed texture fills in first at small widths.Plan texture as dense edge fading into open skin with one solid anchor where the darkest tone should sit. If the middle reads as flat gray at 1:1, reopen it.
Highlights and skin breaksKeep at most one or two protected highlight slivers. Thin slivers that vanish on the 1:1 print will not reappear on skin.Slivers can work when each one reads as background at arm's length and survives transfer without bridging.

Reference to clean stencil

Compress, assign, then protect.

Work in this order so one change at a time can be judged at the same size. Stop when separation, wash mapping, gradients, and skin breaks each read correctly.

  1. 01

    Lock size and placement first

    Set the intended physical dimensions in millimeters and name the body area before judging the reference. A wash map that separates cleanly at 14 cm on a flat outer forearm can merge the same shapes at 8 cm on a curved wrist with no tone being wrong on its own. Use the size calculator when target dimensions are still open.

  2. 02

    Compress tones into separable steps

    Reduce the reference to solid anchor, dark wash shape, light wash shape, and protected skin. Squint until only those masses remain, then draw each wash shape with a hard outer boundary. A reference that needs five close mid-tones at the target width is asking for a larger piece or a simpler crop.

  3. 03

    Map wash versus line for every zone

    Assign each zone one owner: smooth wash applied at tattoo time, whip or stipple texture drawn on the stencil, held line for hard edges, or open skin for highlights. Convert any smooth gradient copied onto the stencil into one of these transferable decisions before print, because thermal output cannot carry continuous half-tones.

  4. 04

    Protect gradients and skin breaks at 1:1

    Print at 100 percent with scaling off, then confirm each gradient still shows a visible transition with open skin inside it and each highlight still reads as background at arm's length. Widen the tightest channel, thin the densest texture row, or enlarge the piece when anything closes. The shading guide holds generic landmark depth while this check stays wash-specific.

  5. 05

    Verify print and transfer path

    Export a true-size PDF with no fit-to-page scaling, inspect the narrowest wash boundary and smallest highlight on plain paper, then measure the physical print with a ruler. If the digital file passes and only paper fails, move to print-stage evidence instead of simplifying again.

Stencil-ready checklist

Approve the wash map only when every line passes

Run this short sequence with scaling off and a ruler in hand. One failed line means fix, enlarge, or reselect before transfer.

  • Confirm intended dimensions in millimeters and the named placement.
  • Confirm tones compress to anchor, one or two wash shapes, and protected skin.
  • Confirm every shaded zone has a wash, texture, line, or skin assignment.
  • Confirm each wash boundary stays separately printable at 1:1.
  • Confirm gradients show transition with open skin and highlights stay open at arm's length.
  • Export a true-size PDF with scaling off and measure the physical print.

Black-and-grey transfer prep

Transfer without losing the fades

Black-and-grey transfers fail at four predictable points. Each one below names the early sign and the prevention that keeps gradients and skin breaks intact.

Tonal merging on skin

Early sign: Two neighboring wash shapes that looked distinct on screen transfer as one connected gray pocket.

Prevention: Judge boundaries on the measured 1:1 paper print, not the screen. Keep hard outer boundaries on every wash shape, reserve genuine skin between neighbors, and enlarge the piece when the tightest must-keep boundary closes.

Fade loss in gradients

Early sign: A soft fade transfers as a hard band or vanishes, with no visible middle transition.

Prevention: Plan each gradient as dense edge fading into open middle skin with one solid anchor at the dark end. Confirm the middle transition on paper at true size before committing transfer paper.

Skin-break closure

Early sign: Highlight slivers and separation channels bridge shut during transfer and focal contrast disappears.

Prevention: Widen the tightest highlight channel before print, keep wash shapes out of protected openings, and recheck channels after any anchor increase. Thin slivers need more room on high-movement areas.

Smudged wash transfer

Early sign: Smooth copied tone prints as scattered burn spots or patchy smudge while boundaries read solid.

Prevention: Never carry smooth gradients onto the transfer layer. Convert tone to ranked boundaries plus whip or stipple texture first, then diagnose any remaining faint or patchy layer with the transfer troubleshooter instead of pressing harder.

Prerequisites before the transfer touches skin

Confirm the measured 1:1 paper print with a ruler, a clean dry placement area, and the planned anchor point (focal dark mass for open compositions, lead end for wrap placements). Transfer in sections from the anchor so the free end cannot drag wash boundaries together. If the first contact looks faint or patchy, diagnose the layer with the transfer troubleshooter instead of pressing harder.

Open the transfer troubleshooter
Compress tones first Assign wash, texture, line, or skin Verify gradients at 1:1

FAQ

Black-and-grey stencil decisions, answered

Short answers for the separation, wash-mapping, gradient, and transfer checks that recur when a black-and-grey reference moves toward transfer-ready output.

It is separable when a squint test leaves solid anchor, one or two wash shapes, and protected skin, and when each wash boundary plus each highlight stays open on a measured 1:1 print at the exact physical width. If mid-tones collapse into one band or a boundary closes on paper, compress the tones, convert texture, or enlarge the piece before print. The vetting framework on this page walks through four illustrative hypothetical cases at labeled sizes.

Next steps

Use the neighboring owners for adjacent jobs.

This guide covers cross-subject wash hierarchy, fade-versus-edge decisions, and final-size transfer prep. Use the links below for subject depth, recipe detail, and production tooling.

Ratio formulation, chicano subject workflow, solid-fill bloom method, generic conversion, broad gallery browsing, paper manufacturing detail, and placement mechanics stay in their specialist owners. The links above hand off instead of repeating that detail.

From vetted reference to working stencil

Turn the approved black-and-grey piece into a stencil draft.

Start from the wash map that passed the final-size check, then continue on iPhone for body fit, exact-size print, mirror and professional export.