

Viking stencil evaluation

Pick the Viking construction your size can hold

Viking work lives or dies on construction and open separation. Compare Vegvisir, rune, knotwork, warrior, and longship references, check stave order and gap retention at your exact size, then prepare a stencil that transfers as one readable piece.

Built for working artists preparing Viking pieces. This page covers Viking variant choice with stave, rune, knotwork, portrait, and ship evaluation plus transfer-ready preparation only, not tattoo application or healing advice. Nautical dial legibility stays in the compass owner, generic photo conversion stays in the how-to guides, and broad motif browsing stays in the subject index linked below.

What makes a Viking stencil viable

Construction, hierarchy, and gaps decide the result.

A Viking stencil is a deliberate construction with ranked line masses and protected separations. These three checks predict whether that construction survives reduction, print, and transfer.

Stave and rune structure

A Viking piece reads first as a deliberate construction: eight stave arms on one hub, a rune row with even rhythm, a knotwork weave with a followable path, or a figure or ship with a clear silhouette. Stencil viability comes from that construction holding together at final size, not from carved texture, photo shading, or dense background fill.

Check: Name the construction in one line, then confirm its skeleton at true size. If stave arms drift off radial order, runes crowd into uneven slots, knot strands lose their path, or the figure or hull loses its outline, repair the structure before judging detail.
Line hierarchy

Viking references mix three masses: bold contours that carry the first read, mid marks such as stave arms, rune stems, and knot bands, and fine texture such as hatching, dotwork, weathering, and fur or wave detail. When all three share one mass, reduction fuses them. When contours lead and texture stays removable, the piece survives small sizes.

Check: Squint at the 1:1 print until fine texture disappears. If the Vegvisir ring, rune row, knot rhythm, warrior silhouette, or hull line still reads, the hierarchy is sound. If only texture carried the read, re-rank the masses.

Gap retention

The open skin between stave arms, inside rune counters, between knot crossings, around facial features, and along rigging and wave lines carries the stencil read. Shaded backgrounds, engraved fills, and soft grey wash without a stencil mark print as one merged mass and close those separations on transfer.

Check: Trace each separation from open skin to open skin at true size. If a hub gap, a rune counter, a knot channel, an eye or nose bridge, or a rigging gap dead-ends into a shaded bridge before reaching open air, reopen it or convert the shading first.

Viking variant vetting

Choose the construction your placement can hold.

Five Viking constructions at labeled sizes. Each one names the protected structure, the fix, and the go or no-go verdict at that size. Confirm every verdict with a measured 1:1 print.

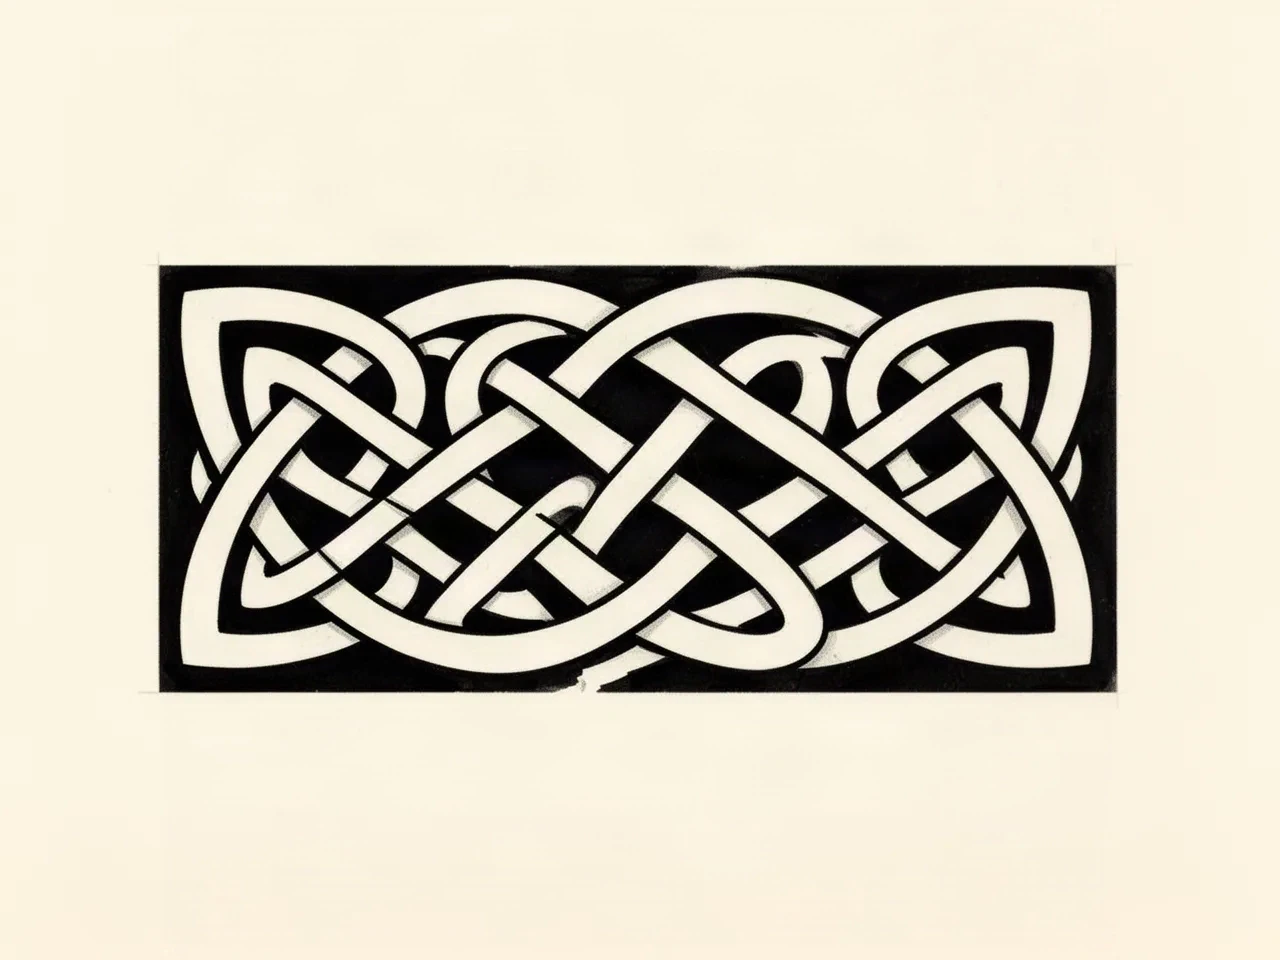
Illustrative Norse knotwork panel study with bold interlaced bands and open channels between crossings, shown light on a dark ground so band edges are easy to trace
Illustrative synthetic study of a Norse knotwork panel, not app output and not a finished client stencil. It is shown reversed, with light bands on a dark ground, so each band edge and each crossing is easy to trace by eye. The teaching point is the channel: every crossing keeps one open route between neighboring bands. In a stencil file that channel is bare paper rather than lighter ink, so widening it means removing band mass, not lightening the print. Use the panel at 12 cm as the reference for how many crossings your own weave can hold at true size.

REOPEN HUB GAPS

Vegvisir stave disc at 9 cm

Intended diameter 90 mm

Source read
Circular stave disc with eight runic arms radiating from a center hub, an outer ring, and small enclosed openings between neighboring arms. Strong radial rhythm on screen with narrow separations near the hub and light decorative ticks on the ring.
Protect
Center hub position, all eight arm directions in radial order, and the outer ring that bounds the disc.
Fix
Widen each hub separation until it reads as open skin at 1:1, merge or remove the weakest ring tick or flourish, and keep each stave arm as its own mark with skin between neighbors. Do not thicken arms to hide closing hub gaps.
Candidate stencil
Same Viking construction with settled structure, ranked line masses, and protected separations at transferable mass.
Final-size verdict
Holds at 9 cm once every hub separation and every inter-arm channel stays visibly open at true size. Stave rhythm comes from separated arms, not from hub contact.

EVEN THE SLOTS FIRST

Rune ring and rune band at 10 cm

Intended diameter 100 mm disc or 100 mm band length

Source read
Ring or straight row of Elder Futhark style runes with mixed stem weights, uneven slot widths, and tight counters inside angular letters. Authentic rhythm on screen, with two or three runes sharing narrow slots and fine serif-like ticks.
Protect
The rune sequence with its intended reading order, the ring circle or band baseline, and the tallest stem height that sets the row.
Fix
Rebuild the row on even slots with one stem mass, keep angular cuts open inside each rune, and remove fine ticks that close counters. Reduce the rune count or enlarge the disc or band when the tightest counter still closes at 1:1.
Candidate stencil
Same Viking construction with settled structure, ranked line masses, and protected separations at transferable mass.
Final-size verdict
Not stencil-ready until every rune counter stays countable at true size. Crowded slots merge first while the ring or baseline itself can stay.

THIN THE WEAVE FIRST

Norse knotwork panel at 12 cm

Intended width 120 mm

Source read
Rectangular interlace panel with animal-influenced knot bands, three or more crossings per strand, narrow counters, and one shared fine mass across bands and background hatch. Rich weave on screen with several crossings sharing the same tight channels.
Protect
The panel border with its corner turns, one followable strand path as the rebuild anchor, and the widest counters that already hold open skin.
Fix
Reduce to one or two crossings per strand with countable counters, rebuild overlaps as separate marks with open skin between them, and convert background hatch to spaced stipple or remove it. Keep band edges heaviest and background lightest.
Candidate stencil
Same Viking construction with settled structure, ranked line masses, and protected separations at transferable mass.
Final-size verdict
Holds at 12 cm when every counter and crossing gap stays open at true size and the weave reads as bands over background, not as one textured slab.

SILHOUETTE BEFORE DETAIL

Warrior portrait at 14 cm

Intended height 140 mm

Source read
Bearded warrior head with helmet, braids, fur collar, and weathered skin shading. Strong character on screen, with eyes, nose bridge, beard strands, and collar fur sharing one fine mass and soft shading standing in for stencil marks.
Protect
Head outline with helmet position, the eye line with nose bridge, and the beard mass boundary with the collar edge.
Fix
Rebuild the face read as three separations: eye gaps, nose bridge with open skin on both sides, and beard mass separated from the collar. Convert skin and fur shading to spaced stipple or one solid anchor, and mark one removable texture repeat that can drop out if gaps close.
Candidate stencil
Same Viking construction with settled structure, ranked line masses, and protected separations at transferable mass.
Final-size verdict
Not stencil-ready until the face reads at arm's length on the 1:1 print. Beard texture and collar fur merge first while the head outline and eye line can stay.

SEPARATE HULL, SAIL, AND SEA

Longship scene at 15 cm

Intended width 150 mm

Source read
Longship with striped sail, shield row, rigging, hull planks, and wave lines in one horizontal composition. Complete scene on screen, with sail stripes, shields, rigging, and waves competing at one fine mass and no held break between layers.
Protect
Hull curve with prow and stern positions, the sail rectangle with its mast axis, and the waterline that separates ship from sea.
Fix
Assign each layer its own break: sail stripes separated by open skin, shields as countable discs with gaps between neighbors, rigging as a few clean lines instead of a web, and waves as spaced marks below a held waterline. Remove one layer of wave or rigging detail before thinning the hull.
Candidate stencil
Same Viking construction with settled structure, ranked line masses, and protected separations at transferable mass.
Final-size verdict
Holds at 15 cm when hull, sail, and sea read as three stacked layers at arm's length. Rigging and wave webs merge first while the hull curve and sail mass can stay.

Nautical dial work with tick rings, lettering, and hands is judged on dial legibility in the compass owner, not here. This framework exists to judge Viking stave order, rune slots, knot rhythm, portrait face reads, and ship layer breaks at a stated size.

Staves, runes, weave, and texture at final size

Judge the white space at the size you will print.

Screens forgive crowding that paper and skin do not. Set the size first, then inspect each feature below at true physical size with scaling off.

About 8 cm and below

Wrist accents, ankle marks, behind-ear pieces, and small gap fillers.

Carry one simple construction only: a plain Vegvisir with open hub gaps, a short rune row with wide slots, or one slim knot band with no tight weave. No warrior faces and no ship scenes at this band. If any counter or hub gap closes at 1:1, enlarge or reselect rather than forcing reduction.

About 9 to 13 cm

Common forearm, calf, shoulder, and chest Viking pieces.

The flexible band. A Vegvisir disc, a rune ring, or a knotwork panel with one or two crossings per strand can work when every separation is verified at true size. Warrior and ship work needs the top of this band with simplified texture.

About 14 cm and above

Thigh, upper back, chest panels, and outer calf compositions.

Room for a warrior portrait with a protected face read or a longship scene with separated hull, sail, and sea layers, but only when open skin divides every layer from edge to edge. Larger size does not rescue drifted staves, uneven rune slots, lost strand paths, or a fused face.

Viking feature checks by size band
FeatureAbout 8 cm and belowAbout 9 cm and above
Stave arms and hubKeep wide hub separations with plain arms and no ring ticks. Tight hubs fill first at small diameters.Restrained ring ticks can work when every hub gap stays open at 1:1. Even radial order still beats decorative completeness.
Runes and countersCarry fewer runes on wide even slots with open angular counters. Mixed stem weights and tight slots merge first.Longer inscriptions can work when each counter stays countable at true size and one stem mass leads the row.
Knotwork crossings and backgroundKeep one or two crossings per strand with wide counters and no background hatch. Dense weaves with filled grounds merge first.Denser weaves can work when each crossing keeps its own separation and the background stays lighter than the bands.
Warrior faces, ships, and textureNo faces or scenes at this band. Texture without a stencil mark should go before contours change.One restrained texture family can stay when the face read or the hull, sail, and sea layers each hold their own breaks at arm's length.

Reference to clean stencil

Build from the construction outward, then protect the gaps.

Work in this order so one change at a time can be judged at the same size. Stop when structure, hierarchy, gaps, and orientation each pass.

  1. 01

    Lock size, placement, and variant intent

    Set the intended physical width, height, or diameter in millimeters, name the body area, and name the intent in one line: Vegvisir disc, rune ring or band, knotwork panel, warrior portrait, or longship scene. A knotwork panel that holds at 12 cm on a flat chest can fail at 7 cm on a wrist with no line being wrong on its own. Use the size calculator when target dimensions are still open.

  2. 02

    Verify the construction before detail

    Confirm stave arms sit in radial order on one hub, runes sit on even slots with open counters, knot strands follow one path through every crossing, the warrior face holds its eye and nose separations, or the ship holds its hull, sail, and waterline layers. Resolve drifted arms, crowded slots, lost strand paths, fused faces, or merged layers before touching line weight.

  3. 03

    Set contour, mid, and texture roles

    Assign every mark a role: contours and silhouettes that carry the first read, mid marks such as staves, rune stems, knot bands, shields, and sail stripes that shape it, and texture that can be removed. Strengthen contours first, keep mid marks second, and mark one removable texture repeat, tick run, or wave set that can go if gaps close.

  4. 04

    Simplify density and reopen gaps at 1:1

    Reduce crossing counts, rune counts, tick density, rigging lines, and wave rows before thinning contours. Convert photo shading, engraved fills, and weathered texture into clean lines, spaced stipple, or one solid anchor with open skin highlights, then run a squint check: step back until fine texture disappears and confirm the construction still reads.

  5. 05

    Verify print and transfer path

    Export a true-size PDF with no fit-to-page scaling, inspect the narrowest hub gap, the tightest rune counter, the smallest knot channel, the eye and nose separations, or the thinnest rigging gap on plain paper, then measure the physical print with a ruler. If the digital file passes and only paper fails, move to print-stage evidence instead of simplifying again.

Placement and orientation prep

Flat skin preserves discs and panels, curves demand simpler builds

Stave discs want flat centered skin, rune bands want straight axes, and portraits and ships want layered room. Each placement below names its constraint and its transfer check.

Outer forearm and calf

Long, relatively flat fields where stave discs, rune bands, and knotwork panels sit with little distortion. The most forgiving area for rune rows and moderate interlace.

Check: Center the disc or panel on the flattest span, keep rune baselines on the agreed axis, and verify hub gaps and rune counters at 1:1 before print.

Chest and upper back

Broad flat panels where knotwork panels, warrior portraits, and longship scenes breathe, but the body midline becomes part of the design. Drifted stave hubs or off-center faces are visible from across the room.

Check: Center the hub, face, or hull on the flattest span, mirror panel borders and shield rows against the midline, and preview on a body photo before locking density.

Thigh and outer shoulder

Large fields with curve and movement where warrior and ship compositions fit, but long rigid panels and tight borders pinch on the curve and flex lines cut across knot rhythms.

Check: Spend extra size on face separations and layer breaks first, keep panel borders inside the flattest span, and confirm the composition survives a flexed-versus-relaxed check before locking the stencil.

Wrist, ankle, and behind ear

Small wrapped fields where only a plain Vegvisir, a short rune row, or one slim knot rhythm survives. Warrior faces and ship scenes forced into these bands merge first.

Check: Recrop to one simple construction with wide gaps and no texture, then run the small-size checks at the exact millimeter size.

Stencil-ready checklist

Approve the Viking piece only when every line passes

Run this short sequence with scaling off and a ruler in hand. One failed line means fix, enlarge, or reselect before transfer.

  • Confirm intended size in millimeters, the named placement, and the variant intent.
  • Confirm stave order, rune slots, strand path, face separations, or hull, sail, and sea layers.
  • Confirm contours outrank mid marks and texture with one removable element marked.
  • Confirm every hub gap, rune counter, knot channel, and layer break reads as open skin at 1:1.
  • Confirm warrior and ship pieces read at arm's length before judging fine detail.
  • Confirm orientation marks for radial, vertical, or horizontal flow on the stencil margin.
  • Export a true-size PDF with scaling off and measure the physical print.

Transfer failure points

Catch the four Viking failures before skin contact

Viking transfers fail at four predictable points. Each one names the early sign on paper and the file-level prevention.

Stave hub closure

Early sign: The Vegvisir transfers as a solid center disc with no visible arm separation.

Prevention: Widen hub separations in the file until each one reads at arm's length on the 1:1 print, and remove one flourish repeat before thickening any arm.

Rune counter fill-in

Early sign: Angular rune openings print as solid pockets and neighboring runes read as one notched bar.

Prevention: Judge runes on the measured 1:1 paper print, not the screen. Widen slots, reduce the rune count, or enlarge the row when the tightest counter closes, and re-check after any line-weight increase.

Knotwork merge

Early sign: Adjacent bands print as one solid patch where the weave crosses, readable on screen but fused on paper.

Prevention: Rebuild each overlap as two separate marks with open skin between them at 1:1. Reduce the crossing count in the file rather than pressing lighter at transfer.

Face and layer fusion

Early sign: The warrior face reads as beard texture with no eyes, or the ship reads as one grey slab with no split between sail, hull, and sea.

Prevention: Protect the eye and nose separations or the waterline breaks in the file with open skin on both sides. Remove one texture or wave layer before changing the outline, and confirm the layered read at arm's length before transfer paper.

When to use the app versus an artist redraw

Use the app path when the construction already passes and only sizing, mirror, body fit, or print calibration is left: run the size calculator, the body-fit preview, and the print checker, then export. Hand the piece to an artist redraw when stave order is broken, rune slots are uneven with no source sequence, the strand path cannot be followed, the face has no separable read, or ship layers share one fused mass. Redraw first, then return to the app for the transfer-ready steps.

Open the photo-to-stencil path
Construction settled first Verify gaps at 1:1 Orientation marked

FAQ

Viking stencil decisions, answered

Short answers for the variant, stave, rune, gap, placement, and transfer checks that recur when a Viking reference moves toward transfer-ready output.

It is usable when three checks pass at the exact physical size: the construction holds (stave order, even rune slots, a followable strand path, a readable face, or separated ship layers), contours outrank mid marks and texture in a clear hierarchy, and every hub gap, rune counter, knot channel, and layer break stays visibly open at 1:1. If any check fails, the fix list on this page names what to simplify, reopen, or enlarge before print.

Next steps

Use the neighboring owners for adjacent jobs.

This guide covers Viking variant choice with size-tied stave, rune, knotwork, portrait, and ship vetting plus placement and orientation prep. Use the links below for related jobs such as dial comparison, sizing, print checks, paper, and placement.

Dial legibility, generic conversion mechanics, broad gallery browsing, paper manufacturing detail, and placement mechanics stay in their specialist owners. The links above hand off instead of repeating that detail.

From evaluated reference to working stencil

Turn the approved Viking piece into a stencil draft.

Start from the Vegvisir, rune, knotwork, warrior, or longship reference that passed the construction, hierarchy, and gap checks, then continue on iPhone for body fit, exact-size print, mirror and professional export.