

Japanese Tiger Tattoo Stencils: Tora Comparison and Transfer Vetting
Vet any Japanese tiger (tora) reference for stencil work by confirming the irezumi read first, comparing pose and background restraint against transfer survival, then si…
- 5
- Practical
- Artist-first
Vet any Japanese tiger (tora) reference for stencil work by confirming the irezumi read first, comparing pose and background restraint against transfer survival, then simplifying stripes and line hierarchy at the exact final size. This collection compares five honestly labeled structural studies drawn from reviewed stencil work: a graphic head-structure study, two floral pairing-restraint studies, one water-current restraint study, and one stripe-density study. The depicted tigers, koi, and hybrid portrait are studies for Japanese tiger construction, not irezumi photography; each one isolates a vetting lesson that tora references most often fail.
How a Japanese Tora Stencil Differs From a Generic Tiger Stencil
A generic tiger stencil succeeds when the face reads: eyes, nose bridge, muzzle width, and stripe rhythm, with support kept subordinate. A Japanese tora stencil must hold all of that plus three additional burdens: the stripe system behaves as bold bands with open skin between them rather than fine fur texture, the body or head carries an irezumi movement gesture (crouch, climb, turn, or confrontation) rather than a neutral portrait stare, and the composition expects a restrained background family such as wind bars, clouds, or water. If your reference has realistic fur striping with no open band rhythm, no directional gesture, and no background plan, it is a generic tiger reference and belongs on the tiger subject, not here.
Run the tora test before drawing anything: cover all background and floral detail with your hand. If the remaining animal still reads as a powerful striped feline through bold bands and a clear gesture, the reference can become a tora stencil. If it reads as a soft realistic cat, or if removing the background changes nothing because there was no background plan, simplify toward bold bands and one gesture, or choose the generic tiger direction instead.
Compare Pose and Movement Before Committing
Tora references fail on gesture before they fail on style, so commit to one movement story first. The classic irezumi tora poses form a short menu: confrontational front-facing head with open mouth, crouching body coiled to spring, climbing body stretched along a vertical axis, and turning body glancing back over the shoulder. Each pose answers a different placement: confrontation suits flat fields such as the chest, upper back, or outer thigh; crouch suits horizontal runs such as the side torso or upper arm wrap; climbing suits vertical runs such as the forearm, calf, or spine; turning suits curved fields such as the shoulder cap where the glance follows the body curve.
Judge each candidate at the intended physical width, because pose failures hide on screen. A climbing tiger whose paws and tail share edges with no skin between them will fuse into one column at transfer size; either reopen the gaps or switch to a pose with fewer limb crossings. A turning tiger whose head twist closes the neck striping into the shoulder mass needs the same treatment. Use the graphic head-structure study as the baseline for confrontation poses: both eyes, nose, and muzzle must stay separable with open skin between the bold stripe bands. For full-body poses, trace the spine gesture with one finger; if the gesture line kinks or the limbs cross it into illegibility, the pose is wrong for the size, not the detailing.
- Decision check: print each candidate pose at the exact width and hold it on the placement. Keep the pose whose gesture and head read at arm's length. If none survives, enlarge or simplify the pose before touching stripe detail.
Simplify Stripes and Line Hierarchy to Survive Final Size
Tora stripes are the classic transfer failure: they look powerful on screen and close into solid black on skin. Apply this simplification ladder from detailed to minimal, and stop at the rung that holds at your exact width.
- Full banding (large pieces only): keep bold stripe bands with countable separations plus secondary claw, fang, and facial-mark detail. This rung only survives on broad fields such as backs and full thighs where every kept band holds open neighbors at 100 percent.
- Reduced banding (medium sizes): keep the outer silhouette, the major stripe bands, and the eye-nose-muzzle landmarks; merge thin interior striping into the bands and drop whisker dots, fur breaks, and small facial subdivisions. If the tiger still reads as tora without the fine striping, that striping was decoration.
- Silhouette plus landmarks (small sizes): keep the head or body contour, the boldest stripe bands, and the eye line, and reduce everything else to open skin. The head-structure study sets this floor: contour plus bold bands carries the read because nothing inside can close up.
- Hierarchy rule: protect in this order, and never invert it: outer silhouette, eye-nose-muzzle landmarks, major stripe bands, claws and fangs, background separations, floral accents, fine interior striping. When two stripe bands share an edge with no skin between them, reopen the gap or merge the bands before adjusting any line mass.
Stripe weight alone never rescues merged bands. The line-weight guide owns the separate question of Fine versus Normal versus Bold treatment once the surviving geometry is right, and the size calculator inspects the file at a real physical size before print.
Keep Wind, Cloud, and Water Backgrounds Restrained
A tora without weather is a generic tiger; a tora with three competing weather systems is an unreadable stencil. Japanese-traditional work reads as one composition because one background family ties the motif together per zone. Pick exactly one family for the zone your tiger occupies, using the water-current study as the discipline baseline.
- Wind bars: one bar direction per zone and one bar width family per composition. Bars pass behind the tiger with open skin to every body edge and never cross the face, claws, or open mouth. When bars above and below a joint point at each other, delete or reverse one set.
- Clouds: size cloud lobes to the anchor they serve, with lobes clearly smaller than the tiger head they frame. Keep separating skin between adjacent lobes at true size. One cloud scale per panel reads as weather; three mixed scales read as clutter.
- Water and waves: lock the current direction before drawing a single wave crest, then keep every crest, foam gap, and flow line subordinate to it. Wave fingers must keep open channels at 1:1, and the current must round the limb the way water moves. Never let water fight the wind-bar direction in the same zone.
- Fail modes to reject: two opposing wind systems, bars crossing the face, cloud lobes touching the head edge, directionless chop with no readable current, wave fingers sealing into a solid band, or wind plus clouds plus water all filling the same gap.
If removing the background leaves the tiger floating with no world, the background is structural and stays, simplified. If removing it changes nothing, it is decoration and goes.
Check Pairing and Placement-Size Readability
Tora pairings follow one rule: the tiger stays the hero and everything else stays clearly subordinate. The two pairing-restraint studies set the standard: in the rose-column study the tiger eye and stripe read land before the roses act as decoration, and in the floral-framing study the blossoms sit on the perimeter while the face does the recognition work in the center. Pairings that most often break this rule are peony or rose massing kept as dark as the face, cherry blossom clusters touching the head contour at equal weight, and maple or bamboo accents crossing stripe bands instead of framing them. Hold every pairing at arm's length: if the companion reads first, lighten it, shrink it, or move it outside the outer contour before touching the tiger.
Placement decides how much pairing and background the stencil can carry. Confrontation heads suit chests, upper backs, and outer thighs where symmetry breathes; vertical tiger-plus-floral columns suit forearms and calves; crouching bodies suit side torsos and upper-arm wraps where the gesture runs with the limb; climbing bodies suit spines and full sleeves with vertical room. Preview direction on a body photo with Fit to Body while edits are still cheap, since a pose that fights the body line will distort at transfer no matter how clean the file is. When the planned width cannot keep the tightest stripe gap and the narrowest background channel open at 100 percent, allow more size or choose a simpler pose and pairing rather than forcing detail into space transfer cannot hold.
Run the Tora Transfer-Ready Checklist
Once the pose, stripe level, background family, and pairing are locked, work this checklist in order. Each step is tora-specific; generic paper and fit mechanics stay with their owners linked below.
- Lock pose and width: write down one movement story (confrontation, crouch, climb, or turn) plus the exact width in centimeters. If the width changed during simplification, re-run the gesture and stripe checks at the new size rather than trusting the earlier pass.
- Proof gaps at true size: print at 100 percent with no scaling and confirm open skin between all major stripe bands, around the eyes and muzzle, between paws and tail crossings, and inside the chosen background family. Any gap that looks doubtful on paper will vanish on skin.
- Confirm background restraint: name the single background family for the zone and verify no second family competes at equal weight. Check that wind bars, cloud lobes, or wave fingers all hold open channels and never touch the face or cross stripe bands.
- Confirm pairing hierarchy: verify the tiger reads first at arm's length and every companion sits below stripe weight and outside the outer contour. Simplify the pairing before weakening any tiger landmark.
- Set print and paper: verify exact dimensions with Size and Print, then follow the stencil paper guide for media choice and the placement guide for wrap and positioning depth. This page does not re-teach those workflows; it hands off once the tora decisions are made.
- Final transfer check: confirm mirror orientation for any asymmetrical pose, confirm the stencil reads at arm's length, and only then commit to skin. If one cluster still crowds, simplify that cluster rather than enlarging the whole piece past the placement limit.
See One Transformation Up Close
Open the tiger-and-roses source-to-stencil case study to compare one tiger reference with its stencil result and review what stays dominant at stencil stage, then apply the tora stripe, background, and pairing rules above before preparing your own reference.
Compare Japanese Tiger Studies Before Preparing Your Own Reference
These are curated structural studies for Japanese tiger stencil vetting, not a separate tora generator and not irezumi photography. Browse the broader animal tattoo stencil collection and the fantasy collection for adjacent construction logic, compare generic big-cat depth on the tiger subject when the brief has no Japanese gesture or background plan, or compare every curated direction from the subject index when the job might belong to a different animal. When the brief is still open across koi, sakura, samurai, kitsune, or bodysuit work, the Japanese tattoo stencil guide owns that broad direction comparison; this page owns only the tora reference decision, the pose and background restraint checks, the stripe simplification ladder, and the pairing and placement-size checklist. If you are starting from your own drawing or reference, use the photo-to-stencil workflow first, then generate one stencil online when the source is ready.
FAQ
How is a Japanese tiger stencil different from a generic tiger stencil?
A generic tiger stencil succeeds when the face reads through eyes, nose, muzzle, and stripe rhythm. A tora stencil adds three burdens: bold stripe bands with open skin between them instead of fine fur texture, one irezumi movement gesture such as confrontation, crouch, climb, or turn, and one restrained background family such as wind bars, clouds, or water. If your reference has none of those three, vet it on the tiger subject instead.
Which pose and background treatment keeps the stencil readable?
Pick one movement story matched to the placement: confrontation for chests and upper backs, crouch for horizontal runs, climbing for vertical runs, turning for curved fields. Then pick exactly one background family for the zone and keep it subordinate to the tiger with open skin at every edge. Print at the exact width and keep the combination whose gesture and head read at arm's length.
How must stripes and line hierarchy be simplified to survive transfer?
Work the ladder down: full banding with secondary detail on large pieces only, reduced banding with merged interior striping at medium sizes, silhouette plus landmarks at small sizes. Protect in order: outer silhouette, eye-nose-muzzle landmarks, major stripe bands, claws and fangs, background separations, floral accents, fine interior striping. If two bands share an edge with no skin between them at 100 percent, reopen the gap or merge the bands.
What pairing and placement-size combination should I choose or avoid?
Keep the tiger as the clear hero with every companion below stripe weight and outside the outer contour. Avoid blossom massing as dark as the face, companion detail touching the head contour at equal weight, and accents crossing stripe bands. Match the pose to the placement axis, preview on a body photo before print, and enlarge or simplify when the tightest stripe gap or background channel closes at true size.
Can I use a bodysuit layout for my Japanese tiger?
A multi-zone bodysuit with a back-panel anchor, sleeve modules, and legs under one background system is a different planning job from a standalone tora reference. When the client commits to that scale, the Japanese tattoo stencil guide owns the direction comparison that leads into bodysuit planning. This page vets the single tora reference: its gesture, stripes, background restraint, pairing, and size.
Can I turn my own Japanese tiger reference into a stencil here?
This page is a vetting and comparison guide, not a separate tora generator. Use the photo-to-stencil workflow or the online generator for your own reference, then use the tora test, the pose framework, the stripe ladder, the background restraint rules, and the transfer-ready checklist above to judge gesture, stripe survival, background discipline, pairing hierarchy, and size before print.
Examples
Japanese Tiger stencil examples
Compare the linework, spacing and detail choices that make each stencil read differently.
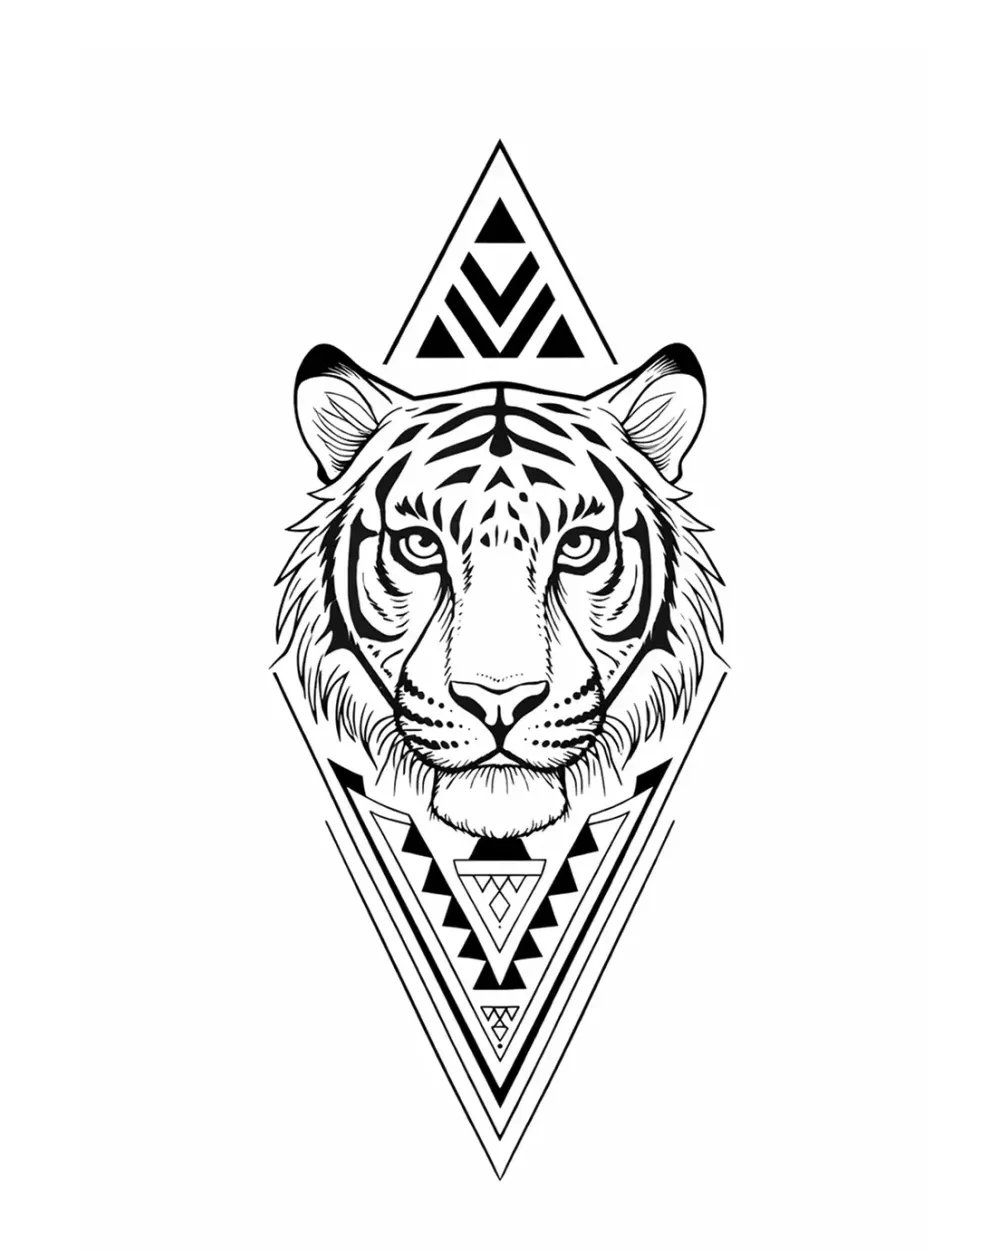
Head-structure study: a graphic tiger head where the eye line, nose, muzzle, and bold stripe rhythm carry the read before the restrained geometric frame.
Explore more animal tattoo stencil gallery stencils
- The face wins through large separable masses: both eyes, nose bridge, muzzle width, and thick stripe bands with open skin between them. That bold-band-plus-open-skin ranking is exactly what an irezumi tora head needs, since thin decorative striping is the first thing transfer erases.
- Artists deciding whether their Japanese tiger reference can survive as a compact head-led tora stencil for chest, shoulder, or thigh placements.
- Keep the triangle and geometric accents clearly lighter than the face; if the frame reaches face weight, a tora head loses the bold-versus-open contrast that separates it from a generic big-cat emblem.
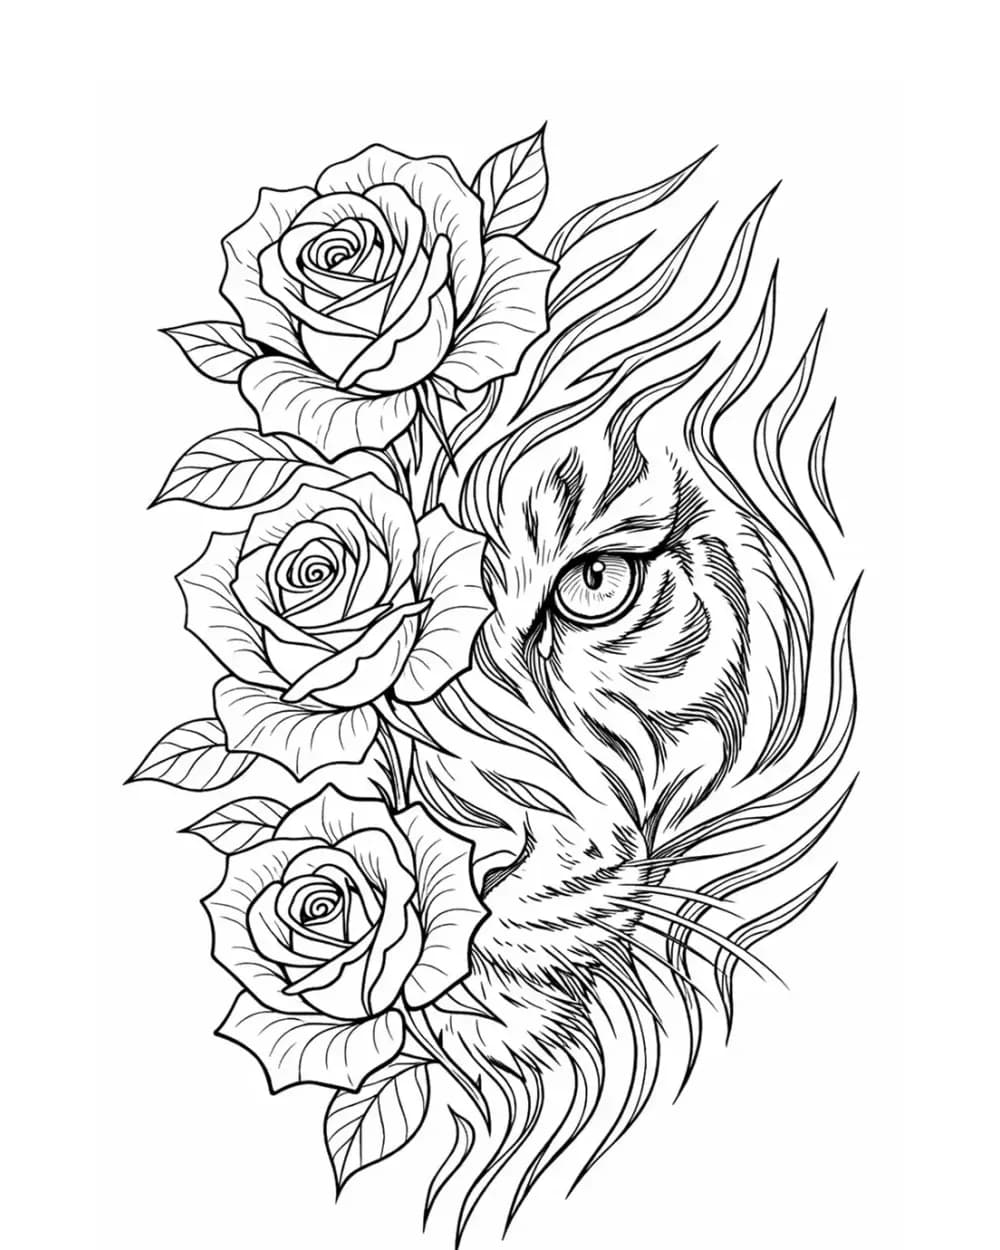
Pairing-restraint study: a tiger half-portrait held dominant inside a vertical rose column, showing how dense floral support must stay subordinate to stripe hierarchy.
Explore more animal tattoo stencil gallery stencils
- The tiger eye and stripe read land before the roses act as decoration, so the animal stays the first read inside a tall vertical composition that suits forearms and calves.
- Artists testing a Japanese tiger paired with peony or rose massing who need to confirm the pairing reads as tora with flowers, not flowers with a tiger in them.
- Thin petal separations and inner whisker lines close before the face does; lighten petals, cap flower centers below stripe weight, and protect the eye line and stripe bands first when reducing.

Floral-framing study: a tiger face crop with clean ornamental floral support balanced so the facial landmarks stay dominant.
Explore more animal tattoo stencil gallery stencils
- The face keeps a clear focal point with balanced support: florals sit on the perimeter while eyes, muzzle, and stripe rhythm do the recognition work in the center.
- Artists comparing a compact floral-framed tora direction where blossom massing must frame the face perimeter without touching the stripe structure.
- Flower overlaps kept as dark as the face read as face detail at transfer size; hold blossoms outside the outer face contour and simplify petal centers before touching any stripe band.
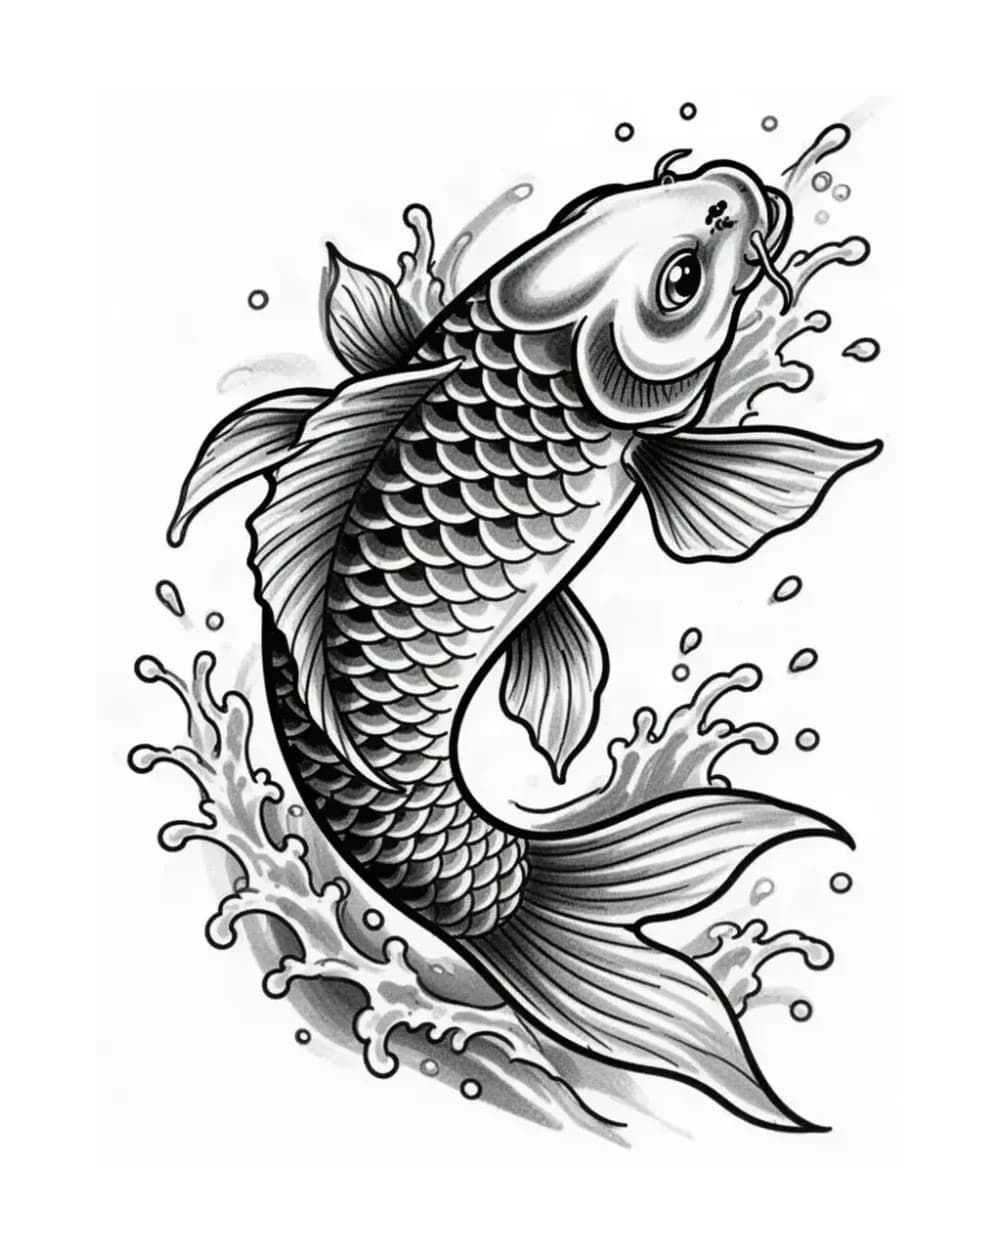
Water-restraint study: a rising koi holding one body arc inside a single current direction, the discipline a tora water background must obey.
Explore more animal tattoo stencil gallery stencils
- One swimming body with ranked fins reads through a single current, proving the restraint rule: one background family per zone, accents kept below anchor scale, open skin channels between masses.
- Artists planning wind, cloud, or water backgrounds behind a Japanese tiger who need a reference for single-direction restraint before adding weather to their own piece.
- Directionless chop, wave fingers sealing into a solid band, or water fighting the wind direction in the same zone are the failures to reject; lock one current direction first, then keep every crest and foam gap subordinate to it.

Stripe-density study: a split human-feline portrait with large peony-style florals, showing where stripe density near the nose crowds first.
Explore more fantasy tattoo stencil group stencils
- The bold outer contour carries the hybrid read while tiger stripes anchor one side, demonstrating the hierarchy a tora stencil needs: outer silhouette first, stripe bands second, floral subdivision last.
- Artists checking how much stripe and floral density their Japanese tiger can carry on back, chest, and thigh pieces before small interior marks fuse.
- Stripe density near the nose and small floral subdivisions merge into one texture field when reduced; separate or remove interior marks there first rather than shrinking the whole piece past the placement limit.
FAQ
Quick questions about japanese tiger stencils.
A generic tiger stencil succeeds when the face reads through eyes, nose, muzzle, and stripe rhythm. A tora stencil adds three burdens: bold stripe bands with open skin between them instead of fine fur texture, one irezumi movement gesture such as confrontation, crouch, climb, or turn, and one restrained background family such as wind bars, clouds, or water. If your reference has none of those three, vet it on the tiger subject instead.
Next step
Turn your own reference into a clean stencil draft.
Use what reads clearly here as direction, then start from your own reference.