Single-icon stencil vetting

Pick the right simple sun, then prove it at final size

One sun carries the whole read, so variant choice and gap math decide the result. Choose among minimal disc, ray-count, geometric, and tiny builds, vet every ray gap at your exact height, then transfer one clean mark.

Built for working artists preparing single-sun pieces. This page covers simple-sun variant choice, ray gap retention, and small-size transfer prep only. Triple compositions stay with the sun moon and stars owner and sun-stone focals stay with the aztec owner.

Variant comparison

Four sun builds, four different size budgets.

Simple suns are not one design. Each variant below spends its detail budget differently, so choose one before vetting gaps or line weight.

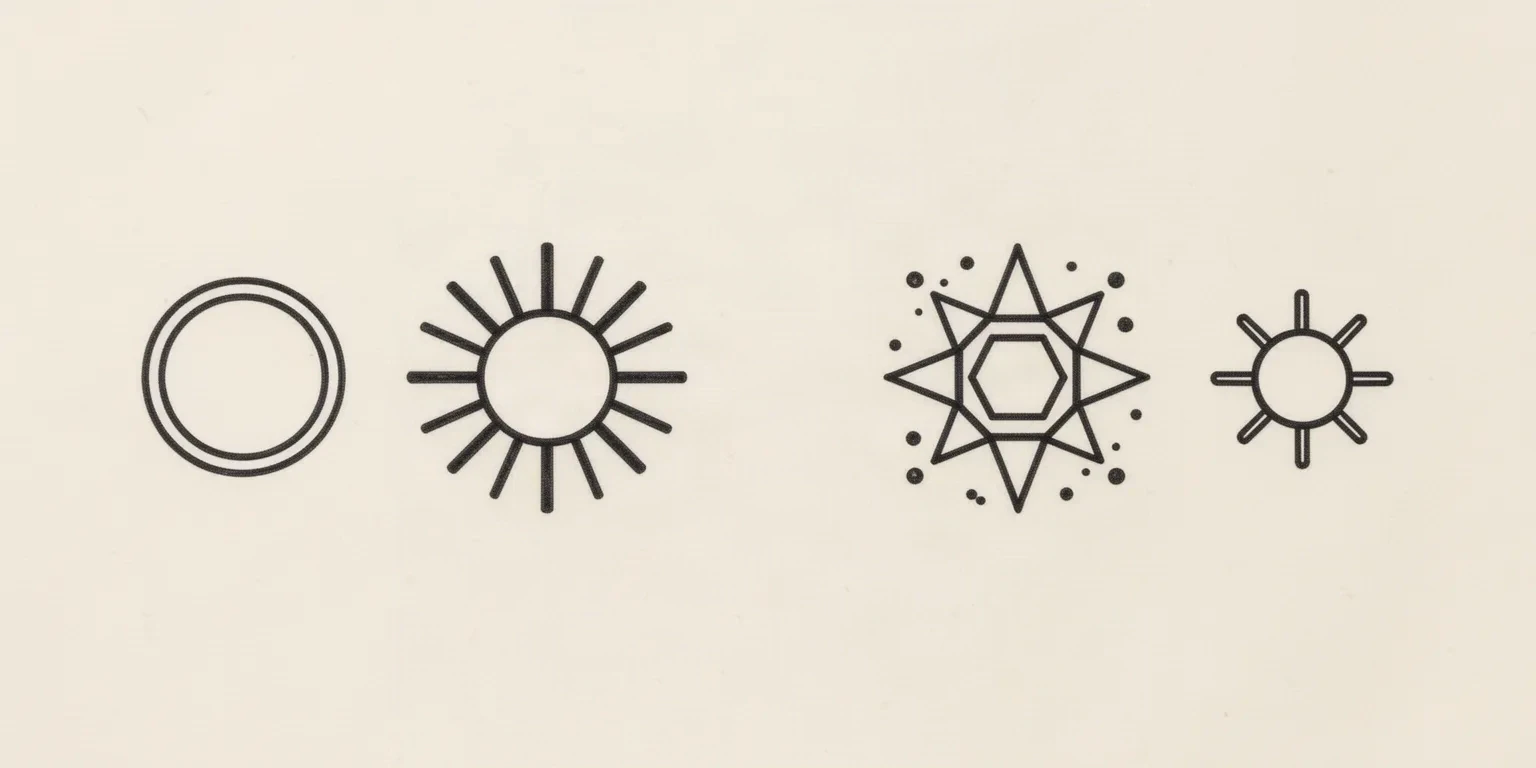
Four simple sun constructions in a row: a plain disc with one inner ring, a disc with twelve even blunt rays, a geometric sun with triangular rays on a hexagonal center and dot accents, and a small compact sun with short blunt rays.
Schematic comparison of the four constructions described below: disc, ray count, geometry, and tiny accent. This is an editorial illustration for structure comparison, not a transfer-ready stencil file or app output.

Minimal disc

A plain closed circle, sometimes with a single inner ring or one dot center. No rays, no face, no ornament. The whole read rests on one clean contour.

Strengths: Most forgiving at tiny sizes, fastest to transfer, and the easiest to place on tight curves such as finger sides, behind the ear, and wrist edges. One closed contour also heals the most predictably.

Constraints: Any wobble in the single circle shows immediately because there is no ray field to share attention. A disc drawn too small with hairline mass can print as a broken ring.

Choose when: Choose it when the brief says tiny, first-timer, or subtle, or when the final height sits near or below 2 cm and every ray would need removal anyway.

Ray-count sun

A disc plus a counted ray ring: typically 8, 12, or 16 straight rays, either uniform or alternating long and short. Ray tips and the gaps between rays carry the read as much as the disc does.

Strengths: Clearest sun read at a glance, simple to tune for size by changing count and length rather than redrawing the motif. Even spacing gives a built-in symmetry check before print.

Constraints: Ray count is the failure budget: too many rays at a small height turns gaps into slots that fill in. Thin tapered tips vanish first on paper and on skin.

Choose when: Choose it when the client wants an unmistakable sun at 3 cm and above, and when the placement offers a flat span wide enough to keep every inter-ray gap open at 1:1.

Geometric sun

Straight-edge construction: triangular rays, hexagonal or octagonal centers, line-built frames, and dot accents placed on a grid. Symmetry is exact rather than hand-drawn.

Strengths: Sharpest contemporary read, strong on flat panels such as the outer forearm, shoulder cap, and calf. Grid construction makes spacing errors easy to spot and fix before transfer.

Constraints: Sharp inner corners fill in first at small sizes, and dot accents below print minimum merge into the nearest line. Needs the most disciplined gap math of the four variants.

Choose when: Choose it when the brief names linework, geometric, or ornamental structure, and when the final size holds every corner and dot separation open on a measured print.

Tiny accent sun

A deliberately miniaturized mark: a 1 to 2 cm disc with four to eight short blunt rays, or a dot-and-dash ring. Designed to sit beside script, inside a gap filler cluster, or as a matching pair.

Strengths: Fits placements no other variant survives: finger, toe-adjacent skin, ear rim, and dense patchwork gaps. Blunt rays and heavier relative mass keep it legible where fine rays would disappear.

Constraints: Almost no detail budget. A face, alternating ray lengths, or dot rings pushed into this footprint merge into one spot. Reduction is not an option below the tested minimum: recrop or enlarge instead.

Choose when: Choose it when the placement caps height near 2 cm or below, or when the sun must share a crowded field and read as one small mark rather than a focal.


Final-size vetting framework

Score the reference in minutes, then act on the weakest check.

Four single-sun constructions at labeled heights. Each one names the protected structure, the fix, and the go or no-go verdict at that exact size. Confirm every verdict with a measured 1:1 print.

HOLDS AT STATED SIZE

Twelve-ray sun with even gaps at 5 cm

Intended height 50 mm

Source
Closed disc with twelve uniform blunt rays, even spacing around the full ring, and every inter-ray gap visibly wider than the ray beside it on screen.
Protect
The disc outer contour, the uniform ray length, and every open inter-ray gap from disc edge to ray tip.
Fix
Adjust nothing structural. Confirm the narrowest gap at 1:1 with scaling off and keep contour mass unchanged.
Candidate stencil
Same sun with count and spacing set, hierarchy ranked, and ornament reduced for the stated height.
Final-size verdict
Holds at 5 cm. Even blunt rays with gaps wider than ray mass survive print and transfer as separate marks.

THIN THE RING FIRST

Sixteen fine tapered rays crowding at 3 cm

Intended height 30 mm

Source
Appealing dense sunburst with sixteen long tapered rays, but neighboring gaps narrow toward the disc and several ray tips fall below reliable print width on screen.
Protect
The disc contour and the four cardinal ray positions as the spacing anchor.
Fix
Reduce to eight or ten blunt rays, shorten length so gaps stay open from base to tip, and recheck the narrowest gap at 1:1 before changing line mass.
Candidate stencil
Same sun with count and spacing set, hierarchy ranked, and ornament reduced for the stated height.
Final-size verdict
Not stencil-ready at 3 cm as drawn. Ray count must drop before line weight is judged, because no mass fixes closed gaps.

REBUILD THE GAPS

Geometric triangle-ray sun with closing corners at 4 cm

Intended height 40 mm

Source
Crisp triangular rays on a hexagonal center with dot accents, but inner corners between adjacent triangles pinch shut and two dots touch the nearest ray edge.
Protect
The center polygon shape and the outer ray silhouette as the rebuild reference.
Fix
Widen the angle at each inner corner, shorten adjacent rays until open skin separates them, and move both dots fully clear or remove them. Recheck corners on paper, not on screen.
Candidate stencil
Same sun with count and spacing set, hierarchy ranked, and ornament reduced for the stated height.
Final-size verdict
Holds at 4 cm once corners reopen. Sharp geometry transfers cleanly only when every inner angle keeps visible skin at true size.

ENLARGE OR RECROP

Detailed tiny sun with face and dot ring at 2 cm

Intended height 20 mm

Source
Charming disc with closed-eye face, twelve fine rays, and a dot ring, attractive on screen but drawn with almost no line mass and four competing detail families in a 2 cm footprint.
Protect
The disc contour and the single strongest ray direction as the recrop anchor.
Fix
Recrop to a plain disc with four to eight blunt rays and no face or dots, or enlarge past the point where each family transfers separately. Do not keep the full set at 2 cm with hairline mass.
Candidate stencil
Same sun with count and spacing set, hierarchy ranked, and ornament reduced for the stated height.
Final-size verdict
At 2 cm the rays, face, and dots function as one mark. Recrop to the tiny accent variant or choose a larger placement for this detail level.

Cross-subject outline theory and clean-contour systems stay with the detail-levels guide. Triple balance and star scatter stay with the sun moon and stars owner. This framework exists to judge single-sun count, gaps, and ray survival at a stated height, not to replace those owners.

Ray gaps and dropout at final size

Judge the white space at the size you will print.

Screens forgive crowding that paper and skin do not. Set the sun height first, then inspect each feature below at true physical size with scaling off.

About 2 cm and below

Finger sides, ear rim, toe-adjacent skin, and tight patchwork gaps.

Carry the tiny accent variant only: one closed disc with four to eight short blunt rays and no face, no dot ring, and no alternating lengths. If any gap closes at 1:1, remove a ray rather than thinning lines.

About 3 to 6 cm

Wrist, ankle, behind ear, shoulder cap, and small forearm accents.

The most requested band. A minimal disc or an 8 to 12 ray ring works when every inter-ray gap stays open from base to tip at true size. Check blunt tips, disc mass, and gap-to-ray ratio before approving geometric corners or dots.

About 7 cm and above

Outer forearm, calf, thigh, chest, and upper back panels.

Room for full 12 to 16 ray rings, alternating lengths, and restrained geometric or dot ornament, but only when open skin separates every family. Larger size does not rescue pinched corners, touching dots, or tapered tips drawn below print minimum.

Single-sun feature checks by size band
FeatureAbout 3 cm and belowAbout 7 cm and above
Inter-ray gapsKeep gaps visibly wider than the ray beside them at 1:1, from disc edge to ray tip. Blunt tips hold; needle tapers vanish first.Gaps can sit closer relative to width, but each one must still print as a separate opening. Alternating lengths need the short-ray gaps checked, not only the long ones.
Ray mass and tipsCarry fewer, heavier rays. If a tip measures near or below reliable print width on the 1:1 paper check, shorten or blunt it rather than redrawing it finer.Finer tapers can work when each tip survives the paper print. Keep one uniform mass family before adding a second decorative taper.
Disc contourThe disc edge is the heaviest line and the last to simplify. A broken or hairline disc at tiny sizes reads as a failed transfer, not a delicate one.Same priority. Larger discs allow a fine inner ring or single dot center, but the outer contour still carries the focal mass.
Corners, dots, and facesKeep none of them. Inner geometric corners pinch shut, dots merge into rays, and faces collapse below about 3 cm, so recrop beats reduction.One ornament family can stay when each mark keeps open skin on all sides. Judge dot-to-ray and corner clearance on paper with scaling off.

Reference to clean stencil

Set count and spacing first, then thin nothing.

Work in this order so one change at a time can be judged at the same height. Stop when variant, gaps, hierarchy, and print each read correctly.

  1. 01

    Lock variant, size, and placement first

    Name one variant from this page, set the intended physical height in millimeters, and name the body area. A twelve-ray sun that holds at 6 cm on a flat forearm can fail at 2 cm on a finger with no line being wrong on its own. Use the size calculator when target dimensions are still open.

  2. 02

    Set count and spacing before line weight

    Fix the ray count, ray length, and gap rhythm first, then judge mass. Count the rays, confirm even spacing around the full ring, and confirm every gap runs open from disc edge to ray tip at true size. Resolve crowding by removing rays before thinning or thickening any contour.

  3. 03

    Assign two line levels

    Give the disc outer contour the heaviest mass and the ray ring one supporting mass. Mark dots, inner rings, and ornament as removable: at least one family that can go if gaps close. Never promote ornament to contour weight to fill an empty ring.

  4. 04

    Run the 1:1 gap and dropout check

    Export a true-size PDF with no fit-to-page scaling, inspect the narrowest inter-ray gap and the thinnest ray tip on plain paper, then measure the physical print with a ruler. Squint test: step back until fine detail disappears and confirm the sun still reads as one clean mark. The line-weight guide covers fine, normal, and bold behavior on the same stencil.

  5. 05

    Verify print and transfer path

    Confirm the narrowest gap stays open on the paper print, confirm the disc prints as one unbroken ring, then transfer with the sun centered on the flattest span of the placement. If the digital file passes and only paper fails, move to print-stage evidence instead of simplifying again.

Placement and size decisions

Small suns want flat skin that preserves their gaps

A single sun is a one-mark gap composition. Flat placements preserve ray separations with little compensation, while tight curves demand shorter rays and heavier relative mass.

Fingers, ear rim, and tight gaps

Curved micro fields where only the tiny accent variant survives. Fine tapers, faces, and dot rings forced into these spots merge first.

Check: Recrop to a disc with four to eight blunt rays, then run every gap check at the exact height.

Wrist, ankle, and behind ear

Small wrapped fields where ray tips crowd fastest on the curve. Minimal disc and restrained ray-count builds read best here.

Check: Center the sun on the flattest span, keep ray length short, and confirm tip clearance at 1:1 before print.

Outer forearm, shoulder cap, and calf

Flat stable fields with room for full ray rings and restrained geometric construction. The most forgiving area for alternating lengths and dot accents.

Check: Spend the extra room on gap rhythm first, align the disc center to the flattest span, and let ornament fall toward open skin.

Chest, thigh, and upper back

Broad panels where larger ray counts and geometric frames work, but symmetry errors show fast near the body midline.

Check: Align the disc center to the placement landmark on a body preview, then verify every corner and dot separation at true size.

Stencil-ready checklist

Approve the sun only when every line passes

Run this short sequence with scaling off and a ruler in hand. One failed line means remove, enlarge, or reselect before transfer.

  • Confirm the chosen variant, intended height in millimeters, and named placement in one sentence.
  • Confirm ray count and even spacing with every inter-ray gap open from base to tip at 1:1.
  • Confirm the disc prints as one unbroken contour with the heaviest line mass.
  • Confirm each surviving dot, corner, or inner ring keeps open skin on all sides.
  • Confirm one removable ornament family is marked before transfer.
  • Export a true-size PDF with scaling off and measure the physical print.

Small-sun transfer prep

Transfer without losing rays or gaps

Small suns fail at four predictable points. Each one below names the early sign and the prevention that keeps the single mark honest.

Ray tip dropout

Early sign: Fine tapered tips look complete on screen but print as broken dashes or vanish on the transfer.

Prevention: Judge tips on the measured 1:1 paper print, not the screen. Blunt or shorten any tip that falls near print minimum, and recheck after any line-weight change.

Inter-ray gap fill-in

Early sign: Neighboring rays print as one connected fan with no visible separation near the disc.

Prevention: Remove rays until every gap stays open from base to tip at true size. Widen spacing or shorten length rather than thinning lines when gaps close.

Disc bleed at tiny sizes

Early sign: The single disc contour prints heavier than intended or closes small inner clearances around it.

Prevention: Keep the disc as the one heavy contour with open skin inside and out, confirm it as an unbroken ring on paper, and enlarge or recrop when the ring plus rays share one merged mass.

Dot and corner merger

Early sign: Dot accents join the nearest ray and geometric inner corners print as solid wedges.

Prevention: Move each dot fully clear of every ray edge or remove it, widen pinched inner corners, and run the squint test at 1:1 before committing transfer paper.

Prerequisites before the transfer touches skin

Confirm the measured 1:1 paper print with a ruler, a clean dry placement area, and the disc center as the anchor point. Press the disc first, then smooth outward toward the ray tips in short passes so the outer ring cannot drag. If the first contact looks faint or patchy, diagnose the layer with the transfer troubleshooter instead of pressing harder.

Open the transfer troubleshooter
One sun, one read Verify ray gaps at 1:1 Tips and disc transfer clean

FAQ

Simple-sun stencil decisions, answered

Short answers for the variant, gap, tiny-size, prep, and boundary checks that recur when a simple sun reference moves toward transfer-ready output.

Match the variant to the final height and the field shape. Near or below 2 cm on fingers, ear rims, or crowded gaps, use the tiny accent variant with four to eight blunt rays. At 3 to 6 cm on wrists, ankles, and behind the ear, use a minimal disc or an 8 to 12 ray ring with even gaps. At 7 cm and above on flat panels, fuller ray counts and restrained geometric construction work when every gap is verified at true size. The comparison on this page names the structure and limits of each variant so the choice happens before stencil prep.

Next steps

Use the neighboring owners for adjacent jobs.

This guide covers single-sun variant choice, size-tied ray and gap rules, two-level hierarchy, and reference-to-stencil preparation. Use the links below for related jobs such as sizing, print checks, paper, and placement.

Triple balance, eclipse corona work, aztec fretwork, detail-level theory, board organization, photo-quality scoring, paper manufacturing detail, and placement mechanics stay in their specialist owners. The links above hand off instead of repeating that detail.

From evaluated reference to working stencil

Turn the approved sun into a stencil draft.

Start from the sun that passed the variant and gap checks, then continue on iPhone for body fit, exact-size print, mirror and professional export.