

Single-motif motion stencil vetting

Vet the shooting star head to tail before transfer

A shooting star lives or dies on its taper. Prove the head anchor, pick a tail system that survives your size and placement, then pass a true-size print check so thin trails transfer as motion instead of dropout.

Built for working artists preparing single shooting-star pieces. This page covers head-to-tail taper, trail bridges, and thin-trail print prep only. Triple sun moon and stars balancing stays with its owner and multi-motif celestial selection stays with the constellation and space owners.

Transfer-ready construction

Head anchors, trail tapers, bridges stay open.

Every failed shooting-star transfer traces back to one of these three checks. Run them in order before comparing tail systems or fitting placement.

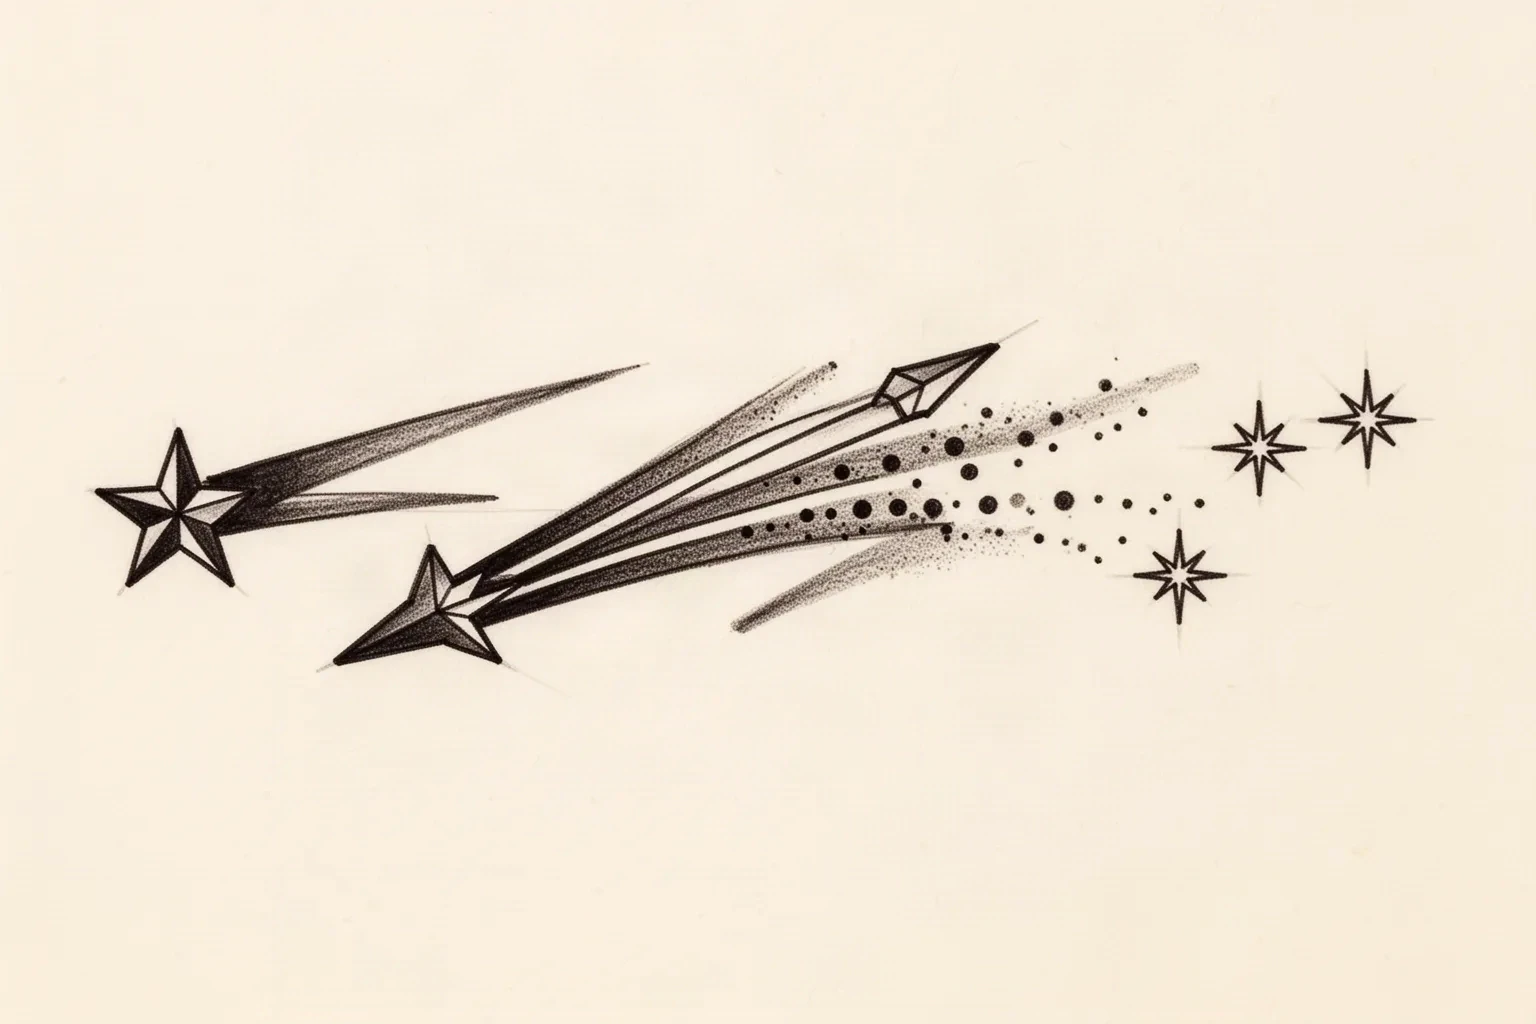
Illustrative ink drawing of shooting stars showing a four-point head, a trail tapering toward the tip, two rails converging around an open channel, a dotwork dissolve, and detached four-point sparks.
Synthetic illustration of the construction elements discussed here, not app output or a transfer-ready file. Taper steps, channel width, and spark clearance are drawn larger than micro sizes for legibility; verify each one on your own true-size print.

Head carries the first read

The star head is the only closed contour in the motif, usually a four or five point star with a filled or firmly outlined center. It should be the heaviest mark on the stencil so the eye lands there first. When the head shares line weight with the trail, the whole motif reads as a scratch instead of a falling star.

Check: Cover the trail with a finger. If the head still reads as a clean star at true size, the anchor holds. If it looks like a dot or a smudge alone, strengthen the head contour before touching the trail.

Trail thins head to tail

A convincing shooting star tapers from full width at the head to nearly nothing at the tail tip, with spacing that opens or particle size that shrinks along the path. The taper is what sells motion. Parallel rails of constant width read as a comet bar or a scar, not a falling star, and they age into one filled band faster.

Check: Sight along the trail from head to tip. Width, particle size, or dot density should step down at least twice along the run. If any middle segment is as heavy as the head, thin it or shorten the trail.

Bridges stay open at 1:1

Every gap between trail rails, between head and trail start, and between scatter sparks must hold as open skin on the physical print. Thin trails fail when two rails merge into a pocket or when a spark touches a rail. Merged pockets fill during transfer and heal as blobs, so gaps are structural, not decoration.

Check: Trace each gap from one open end to the other on a true-size print. If any gap dead-ends into a touching line or a spark, widen the layout, remove one spark, or shorten the trail. Never fix a closed bridge by drawing thinner.

Tail-variant selection

Pick the tail your size can actually hold.

Four trail systems, each with its build, its best body fit, its characteristic failure, and the check that approves it. Decide here and the placement and print steps get simpler.

MOST FORGIVING AT MICRO SIZES

Single-line trail

Construction
One tapered stroke from head to tail tip, widest at the head and lifting to a point. No parallel rails, no enclosed pockets.
Best fit
Best for wrist edges, ankles, and behind-ear pieces around 4 to 6 cm, where two rails would merge on the curve. Also the safest choice when the client wants fine-line healing.
Failure mode
Fails when the single line stays the same width end to end or ends in a blunt stop. A blunt heavy tail reads as a falling matchstick and the tip blows out first.
Approval check
Confirm the stroke visibly narrows along its run at true size and the tip lifts clean off the skin zone with open space past it.

BEST FOR LONGER CURVED RUNS

Double-line trail

Construction
Two converging rails that leave an open channel between them, joined only at the tail tip. The channel is the bridge that must survive print and transfer.
Best fit
Best for collarbone and forearm runs around 6 to 10 cm, where the open channel adds lightness a single heavy line cannot. Needs enough length for the rails to converge gradually.
Failure mode
Fails when rails run parallel too long or pinch closed mid-trail. A mid-trail pinch splits one channel into two pockets, and both fill. Short double trails forced under 5 cm merge almost every time.
Approval check
Confirm the channel stays open from head to tip at 1:1 with visible skin throughout. If the middle narrows to a touch point, keep one rail only.

BEST MOTION ON FLAT SKIN

Dotwork fade trail

Construction
A short solid start at the head dissolving into spaced dots that shrink and spread toward the tail. No continuous rails past the first third of the run.
Best fit
Best for flat mid-size fields such as outer forearm, calf, and shoulder blade, where stipple has room to breathe. Gives the softest tail and the most forgiving aging when dots are spaced.
Failure mode
Fails when dots crowd near the head or shrink below what the printer holds. Packed micro dots merge into grey mud on thermal transfer, and the fade reads as a smudge instead of a dissolve.
Approval check
Confirm each dot stands separate on the true-size print with open paper between neighbors. Remove the smallest tail dots until every survivor is individually visible.

HIGHEST RISK, USE SPARINGLY

Spark scatter trail

Construction
A short trail plus two to four detached four-point sparks or micro stars falling away from the main path. Each spark is a separate island that must hold alone.
Best fit
Best as an accent on larger pieces above about 7 cm with open surrounding skin, or as a pairing element beside script. Adds celebration without lengthening the trail.
Failure mode
Fails when sparks crowd the rails or each other. Touching sparks join the trail into one ragged edge, and isolated micro sparks below printable size vanish from the transfer entirely.
Approval check
Confirm every spark keeps open skin on all sides at true size and can be covered individually without touching the trail. Keep two or three sparks maximum at small sizes.

Combining two systems, such as a dotwork fade plus heavy scatter, in one small run is the most common overbuild. Pick one primary tail per piece. Full photo-to-stencil conversion technique stays with the photo to stencil owner, which this page does not repeat.

Body-fit adaptation

Fit length and curve to the zone, not the screen.

Screens show trails floating on flat white. Skin curves, creases, and moves. These four zones cover where shooting stars are actually requested.

Inner wrist and wrist edge

Narrow, curved, high-movement field. Long trails cross the wrist crease and distort when the hand flexes. Double rails and scatter crowd fast here.

Fit: Keep total length short, about 4 to 6 cm, with a gentle curve that follows the forearm line, never across it. Prefer a single-line trail with the head toward the hand or elbow consistently. Run the readability test with the wrist flexed.

Ankle and ankle wrap

Curved bone with footwear friction. Trails that wrap past the bone front foreshorten from most viewing angles, and thin tails wear faster inside shoe lines.

Fit: Keep the run to one side of the bone, about 5 to 7 cm, curving with the leg line. Place the head on the flatter side and let the tail rise along the calf or fall toward the foot, not across the bone ridge. Prefer single-line or short double-line with a verified open channel.

Collarbone

Long, shallow curve with excellent visibility. The most forgiving of the four zones, but straight trails look pasted on and symmetric pairs must match.

Fit: Use the longest comfortable run, about 6 to 10 cm, arcing parallel to the bone with the head outer and the tail sweeping inward, or mirrored pairs with matched length and curvature. Double-line and dotwork fade both work here when the channel and dot spacing verify at 1:1.

Behind the ear

Tiny, sharply curved pocket with hairline proximity. The smallest of the four zones. Almost nothing survives here except compact builds, and hair product plus glasses arms punish fine tails.

Fit: Keep total height compact, about 3 to 5 cm, with a tight arc hugging the ear curve and the head seated in the flattest spot. Prefer a short single-line trail with zero scatter, or one spark maximum. If the design needs more length or sparks, move it to the wrist or collarbone instead.

Reference to clean stencil

Five passes from idea to transfer-ready.

Work in this order so each change is judged at the same size. Stop when taper, bridges, fit, and print each read correctly.

  1. 01

    Name the tail system and size first

    Write one sentence: which of the four tail systems, the intended physical length in millimeters, and the named placement. A double-line trail that holds at 8 cm on a collarbone is a different stencil than a single-line trail at 4 cm behind an ear. Lock this sentence before judging any line.

  2. 02

    Prove head, taper, and bridges

    Cover the trail and confirm the head reads alone, sight the taper from head to tip for at least two visible step-downs, then trace every gap end to end on screen. Fix contacts and parallel rails now, while the file is still easy to restructure.

  3. 03

    Fit length and curvature to the body zone

    Lay the trail along the body line of the chosen placement, not across creases or bone ridges, using the zone guidance below. Shorten, steepen, or flatten the arc until the full run sits on one continuous skin plane at the stated length.

  4. 04

    Run the final-size readability test

    Print at true size with scaling off, tape it to the body zone or a matching curve, and step back two meters. The head should read first, the trail direction second, and no segment should merge into a band. Squint: if the trail becomes one grey bar, thin the middle or remove one spark.

  5. 05

    Pass the pre-transfer print checklist

    Work through the checklist below with a ruler on the physical print. Only a file that passes every line moves to thermal transfer. If the digital file passes and only the paper fails, the printer, heat, or media is the suspect, not the design.

Pre-transfer print checklist

Approve the trail only when every line passes

Run this sequence on the physical print with a ruler in hand. One failed line means reselect, shorten, enlarge, or remove before transfer.

  • Confirm tail system, physical length in millimeters, and named placement in one sentence.
  • Confirm the head reads alone with the trail covered at true size.
  • Confirm taper steps down at least twice from head to tail tip.
  • Confirm every rail channel, head gap, and spark clearance traces open end to end at 1:1.
  • Confirm no parallel rail segment and no dot cluster merges when squinted at two meters.
  • Confirm trail sits along one skin plane without crossing a crease or bone ridge.
  • Export a true-size PDF with scaling off and measure the physical print with a ruler.
Head anchors the read Verify taper at 1:1 Trail transfers clean

FAQ

Shooting-star stencil decisions, answered

Short answers for the taper, tail-system, body-fit, and print checks that recur when a single falling-star reference moves toward transfer-ready output.

Three things verified at the exact physical size: a head that reads as a star with the trail covered, a trail that visibly tapers from head to tip with at least two step-downs, and every gap between rails, head, and sparks tracing open as skin on a true-size print. If any gap closes or the trail reads as constant width, restructure before thermal transfer.

Next steps

Use the neighboring owners for adjacent jobs.

This guide covers single shooting-star taper, tail-system choice, zone fit, and thin-trail print prep. Use the links below for related jobs such as triple balance, constellation mapping, sizing, and print checks.

Triple-composition balancing, constellation mapping, generic symbol browsing, photo conversion detail, paper manufacturing detail, and placement mechanics stay in their specialist owners. The links above hand off instead of repeating that detail.

From evaluated reference to working stencil

Turn the approved shooting star into a stencil draft.

Start from the trail that passed the taper and print checks, then continue on iPhone for body fit, exact-size print, mirror and professional export.