

Neo-traditional stencil evaluation

Judge whether ornate detail survives transfer

Neo-traditional pieces live or die on ranked linework and shading that stays open. Check the line hierarchy against the bold-traditional floor, verify gradients and texture at your exact size, then prepare a clean stencil that transfers as one readable ornate motif.

Built for working artists preparing neo-traditional pieces. This page covers neo-traditional evaluation and stencil preparation only, not tattoo application or healing advice. Bold-floor depth stays with the American Traditional owner, motif composition stays with motif owners, and multi-image curation stays with the reference board maker.

Two related constructions

Bold floor versus line range: pick the right stencil job.

Neo-traditional shares vocabulary with American Traditional but asks a different stencil question. This comparison tells you which treatment your reference actually needs, then hands bold-floor depth to its owner.

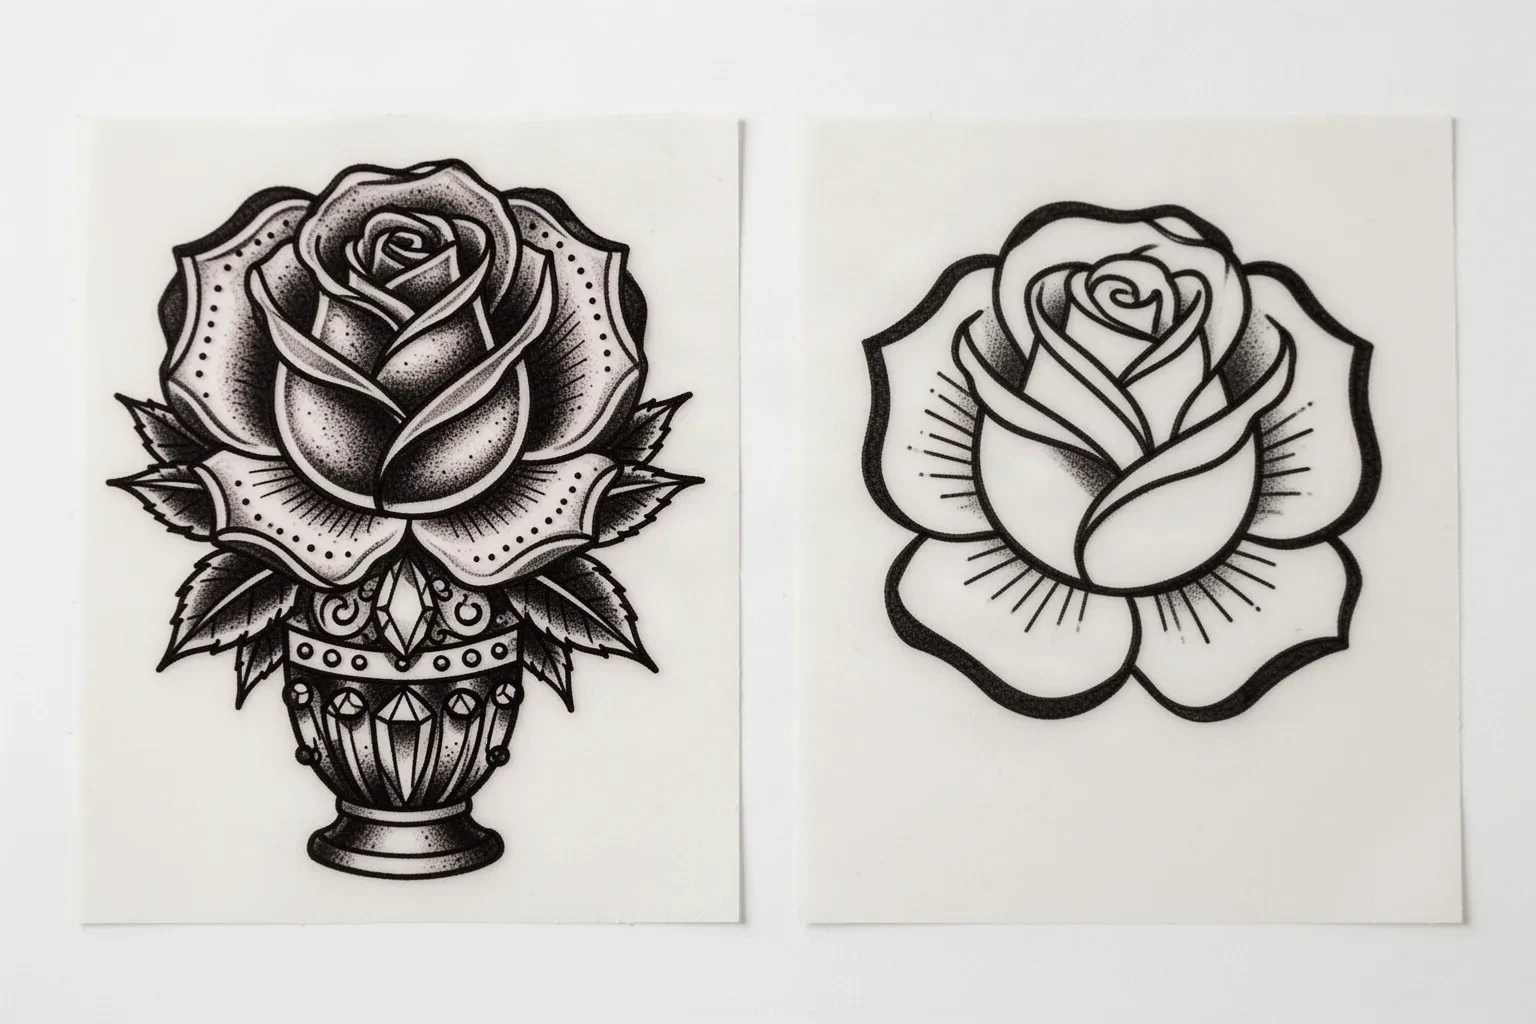
Illustrative stencil comparison: an ornate neo-traditional rose drawn with a bold outer contour, medium tapered modeling lines and fine spaced texture dots, beside a simpler rose drawn with one even heavy outline and only a few short interior lines.
Synthetic illustration, not app output and not a measured print. Left: an ornate rose with ranked line families, where the bold frame carries the read, medium lines model the cup and leaves, and fine dot rows carry texture. Right: one even bold outline with minimal interior, the American Traditional floor. Read the hierarchy idea here, then confirm your own file at 1:1 with scaling off.
Stencil construction: American Traditional versus neo-traditional
DimensionAmerican TraditionalNeo-traditional (this page)
Outline logicEven bold outer contours at one heavy weight carry the whole first read.Ranked line range: bold structure lines frame the motif, medium lines model form, fine lines carry texture only.
Interior lineworkFew short inner lines, kept lighter than the perimeter and widely spaced.More interior lines allowed, but each family must stay visibly distinct at final size or it merges into one band.
Color and shadingSmall flat palette with black packing, short pepper transitions, and skin as the highlight.Expanded palette with smooth gradients, jewel tones, and layered dotwork or soft blends inside modeled forms.
Skin-break roleWide open breaks separate every color field and black mass.Breaks are narrower and sit inside modeled areas, so each gradient needs a light end that stays open at 1:1.
Typical stencil failureThin outer contours that print broken at small heights.Interior detail and gradient rows that look layered on screen but close into solid grey at final size.

Choose bold treatment when

The design must read at distance with flat color and minimal interior: classic roses with banners, daggers, panther heads, swallow pairs. Judge those with the bold-floor framework.

Open the American Traditional owner

Choose neo-traditional treatment when

The design needs sculpted modeling, varied line weight, jewel tones, or layered shading inside the motif: ornate portraits, beveled daggers, gem roses, winged moths. Judge those with the ranked-hierarchy framework below.

Continue to the hierarchy check

Line-hierarchy framework

Rank every mark before judging any shading.

Three line families decide whether ornate detail transfers or merges. Assign each mark one role, then verify the families stay distinct at the exact height you will print.

Structure lines

The boldest family. It frames the head, petals, dagger, or wing edges and carries the motif read after all texture is covered. If this family does not name the motif on its own, no interior detail will save the stencil.

Check: Cover every interior mark at final size. If the motif still names itself in two seconds and each structure path traces without a lift, the frame holds. Rebuild weight here before judging shading.

Modeling lines

The medium family. It sculpts cheeks, petal cups, fur direction, and jewel facets with varied weight that tapers rather than staying even. These lines create the sculpted neo-traditional look that flat bold work deliberately skips.

Check: Confirm each modeling line is visibly lighter than the structure frame and visibly heavier than texture at 1:1. If two families print at the same mass, demote one or space them wider.

Texture lines

The finest family. Short fur ticks, dot rows, filigree curls, and wing-vein detail that reward close viewing. This family merges first when the piece is reduced, so it is always the first candidate for removal.

Check: Name one removable texture family before print. If dot rows touch, curls close, or ticks band together at true size, delete that family first and re-check the modeling layer beneath.

HOLDS AT STATED SIZE

Ornate rose with jewels at 12 cm

Intended height 120 mm

Structure, modeling, texture: three masses that must stay visibly distinct at 1:1. Confirm on a measured print.

Source
Layered rose cup with five petal separations, two leaves with tapered modeling lines, and one small gem with four facet lines plus a short dot tail. Illustrative example, not a measured case.
Protect
Cup silhouette and the two longest petal separations, leaf structure edges, gem outline with one facet cross, and the dot tail spacing.
Fix
Shorten only the shortest inner petal line and drop every second dot in the tail if dots touch at 1:1. Keep cup size, leaf count, and gem placement unchanged.
Candidate stencil
Same neo-traditional construction with the structure frame held bold, modeling lines tapered and separated, texture thinned, and gradient tails ending in open skin.
Final-size verdict
Holds at 12 cm after a petal-tip and dot-spacing check. Three line families stay distinct at true size and the cup reads from a normal viewing distance.

SIMPLIFY TEXTURE FIRST

Fox portrait with fur and frame at 11 cm

Intended height 110 mm

Structure, modeling, texture: three masses that must stay visibly distinct at 1:1. Confirm on a measured print.

Source
Animal head with layered fur ticks across cheeks and brow, jeweled eyes, and a decorative laurel frame with fine curl pairs. Illustrative example, not a measured case.
Protect
Head wedge silhouette, ear points, eye and nose placement, and the outer frame contour that sets the composition.
Fix
Cut fur ticks to one short row per cheek with visible skin between rows, widen eye-corner breaks, and keep only the outer curl of each filigree pair. Reduce texture count before touching modeling lines.
Candidate stencil
Same neo-traditional construction with the structure frame held bold, modeling lines tapered and separated, texture thinned, and gradient tails ending in open skin.
Final-size verdict
Holds at 11 cm once fur rows and curl pairs stay open at 1:1. The portrait read comes from the wedge and eyes, so texture is expendable and structure is not.

REOPEN GRADIENT LIGHT ENDS

Dagger with filigree and gem at 10 cm

Intended height 100 mm

Structure, modeling, texture: three masses that must stay visibly distinct at 1:1. Confirm on a measured print.

Source
Straight dagger with beveled blade, ornamental hilt with gem facets, and graduated dotwork fading off the blade edges into skin. Illustrative example, not a measured case.
Protect
Blade axis and edge lines, hilt symmetry, gem outline, and the skin gap between blade and filigree.
Fix
Shorten each gradient tail until the light end shows open skin at true size, and keep dot rows visibly spaced rather than blended. Do not widen the blade to fix a shading problem.
Candidate stencil
Same neo-traditional construction with the structure frame held bold, modeling lines tapered and separated, texture thinned, and gradient tails ending in open skin.
Final-size verdict
Holds at 10 cm when every gradient fades into visible skin at 1:1. Fades that close into solid grey need shortening, not darker structure lines.

ENLARGE OR RECROP

Moth with mandala wings at 7 cm

Intended height 70 mm

Structure, modeling, texture: three masses that must stay visibly distinct at 1:1. Confirm on a measured print.

Source
Symmetric moth with fine wing-vein rows, small enclosed dot rings, antennae ticks, and a mandala dot halo. Attractive on screen, but three texture families compete inside a small wing span. Illustrative example, not a measured case.
Protect
Wing symmetry axis and outer wing contour as the rebuild anchors.
Fix
Enlarge past the point where each dot ring and vein gap transfers as open skin, or recrop to the head and upper wings with one dot ring. Do not keep full vein rows plus halo rings at 7 cm.
Candidate stencil
Same neo-traditional construction with the structure frame held bold, modeling lines tapered and separated, texture thinned, and gradient tails ending in open skin.
Final-size verdict
At 7 cm the wing interior functions as one band. Enlarge, recrop, or choose a simpler neo-traditional construction for this height.

Motif-specific composition depth stays with the motif owners. Broad visual browsing stays on the stencils and subject hubs. This framework exists to judge neo-traditional ranked linework and gradient behavior at a stated height, not to replace those owners.

Detail density and shading at final size

Judge the gradient tails and texture rows at the height you will print.

Screens forgive crowding that paper and skin do not. Set the height first, then inspect each feature below at true physical size with scaling off.

About 8 cm and below

Small neo-traditional accents: single roses, small daggers, compact moth heads.

Carry structure plus one modeling family only. One short gradient tail maximum with a visible skin fade, and no mandala dot rings or paired filigree. If a texture family closes at 1:1, delete it rather than enlarging lines to compensate.

About 9 to 13 cm

Classic palm-size neo-traditional: ornate roses, portraits, daggers with ornament.

The most flexible band. Two interior families can work when each stays visibly distinct at true size and every gradient ends in open skin. Check structure first, then modeling separation, then texture spacing.

About 13 cm and above

Large panels: full animal portraits with frames, large florals with jewels, winged compositions.

Room for three line families plus dotwork, but only when dot rows stay spaced and gradient light ends stay open at 1:1. Larger height does not rescue families that print at identical mass.

Neo-traditional feature checks by height band
FeatureAbout 8 cm and belowAbout 9 cm and above
Structure frameKeep the boldest marks here. If a structure path disappears, the piece loses its neo-traditional read and becomes generic fine linework.Same priority. Larger height allows more modeling detail, but the frame still carries the first read at distance.
Modeling lines and gradientsCarry at most one short gradient tail per form, with visible skin at the light end. Repeated medium lines merge first at small heights.Longer blends can work when dot rows stay visibly spaced at 1:1 and the dark end never touches a neighboring color field.
Texture, filigree, and dot ringsKeep one texture family maximum. Paired curls, dot halos, and fur rows close before the frame does.Two texture families can coexist when each ring, curl, and tick row is checked at true size with print scaling off.
Gem facets and small openingsKeep gem outlines bold with one facet cross. Eye corners, nostrils, facet joints, and dot centers close early.Extra facets and small openings can work when each counter is checked at true size on plain paper.

Reference to clean stencil

Build from the frame inward, then protect the fades.

Work in this order so one change at a time can be judged at the same height. Stop when the frame, family separation, gradient tails, and small openings each read correctly.

  1. 01

    Lock height, placement, and motif intent first

    Set the intended physical height in millimeters, name the body area, and name the construction in one line: ornate rose with gem, fox portrait with frame, dagger with filigree, or moth with wing pattern. A portrait that holds at 13 cm on a thigh can fail at 7 cm on a wrist with no line being wrong on its own. Use the size calculator when target dimensions are still open.

  2. 02

    Rank the three line families

    Assign every mark a role: structure that frames the read, modeling that sculpts form, texture that rewards close viewing. Resolve equal-weight clutter before touching shading. A neo-traditional piece with a clean frame and ranked interior is already halfway to stencil-ready.

  3. 03

    Set gradient endpoints and skin reserves

    Mark where each blend starts dark and where it must end in open skin. Shorten tails until the light end survives print, keep dot rows spaced at 1:1, and name one removable texture family that can go if rows close.

  4. 04

    Simplify texture before widening structure

    Delete or thin the finest family first. Widening structure lines to rescue crowded texture expands ink toward nearby breaks and makes merging worse. Run a squint check: step back until texture drops out and confirm the motif still names itself through structure and modeling alone.

  5. 05

    Verify print and transfer path

    Export a true-size PDF with no fit-to-page scaling, inspect the narrowest gradient tail and smallest dot cluster on plain paper, then measure the physical print with a ruler. If the digital file passes and only paper fails, move to print-stage evidence instead of simplifying again.

Placement and composition decisions

Ornate motifs want skin that preserves frame and fades

A neo-traditional piece is a layered illustration. Flat or gently curved placements preserve ranked detail with little compensation, while wrapped bands demand a single-motif recrop.

Outer forearm and calf

Long narrow fields where daggers, vertical florals, and portrait-and-frame stacks follow the limb axis. Wide wing spreads wrap fast and crowd vein tips.

Check: Align the structure axis with the limb, shorten cross-limb texture while edits are still cheap, and keep ornamental frames inside the flattest span.

Upper arm and shoulder

Compact curved panels with room for a portrait head, an ornate rose with gem, or a dagger with hilt ornament. The curve compresses one side of symmetric frames in photos and transfers.

Check: Center the lead structure on the flattest span, let support leaves or frame curls fall toward the slope, then verify texture spacing at 1:1.

Thigh and upper back

Broad panels with room for full portraits with frames, large winged moths, and layered florals with jewels. Symmetry around the composition axis becomes part of the design.

Check: Mirror wing and frame ends around the centerline on the live placement photo before locking height.

Wrist, ankle, and hand-adjacent filler

Small wrapped fields where only a single recrop survives. Full portrait-plus-frame compositions forced into these bands merge first.

Check: Recrop to one rose head, one dagger, or one moth head with a single dot ring, then run the texture and gradient checks at the exact height.

Stencil-ready checklist

Approve the neo-traditional piece only when every line passes

Run this short sequence with scaling off and a ruler in hand. One failed line means fix, enlarge, or reselect before transfer.

  • Confirm intended height in millimeters, the named placement, and the motif construction.
  • Confirm structure lines read the motif alone with texture covered at 1:1.
  • Confirm modeling and texture families print at visibly distinct masses.
  • Confirm every gradient tail fades into open skin at true size.
  • Confirm dot rows, curls, facets, and small openings read as separate marks.
  • Export a true-size PDF with scaling off and measure the physical print.
Frame first Fades end in skin Families stay distinct

FAQ

Neo-traditional stencil decisions, answered

Short answers for the hierarchy, density, shading, and placement checks that recur when an ornate reference moves toward transfer-ready output.

American Traditional uses even bold outlines at one heavy weight with a small flat palette, and this page does not repeat that depth: the dedicated American Traditional owner holds the bold-floor and first-read silhouette vetting. Neo-traditional uses a ranked line range instead, with bold structure lines framing the motif, medium lines sculpting form, and fine lines carrying texture, plus an expanded palette with gradients. Choose bold treatment when the job needs distance reading with minimal interior detail, and neo-traditional treatment when the design needs sculpted modeling and layered shading that still separates at final size.

Next steps

Use the neighboring owners for adjacent jobs.

This guide covers neo-traditional hierarchy checks, height-tied density and gradient rules, construction comparison, and reference-to-stencil preparation. Use the links below for related jobs such as sizing, print checks, paper, and placement.

Bold-floor depth, motif-specific composition, broad gallery browsing, board curation mechanics, paper manufacturing detail, and placement mechanics stay in their specialist owners. The links above hand off instead of repeating that detail.

From evaluated reference to working stencil

Turn the approved ornate motif into a stencil draft.

Start from the neo-traditional reference that passed the hierarchy, gradient, and density checks, then continue on iPhone for body fit, exact-size print, mirror and professional export.