Gemini stencil vetting

Vet a Gemini stencil before it touches skin

Gemini lives or dies on duality. Compare the II glyph, the twins figures, and the constellation against your size and placement, verify mirrored symmetry and spacing, then prepare a transfer that reads as twins from across the room.

Built for working artists preparing client-ready Gemini pieces. This page covers Gemini variant choice, mirrored-pair vetting, II stroke and gap prep, and Gemini constellation spacing only, not tattoo application or healing advice. Libra construction stays with the Libra owner, generic constellation accuracy stays with the constellation owner, and broad space motifs stay with the space owner linked below.

II glyph vs twins figures vs constellation

Choose the construction your size can hold.

Three Gemini constructions with transfer trade-offs. Each one names its form, its strengths, its failure modes, and the placement where it earns its keep.

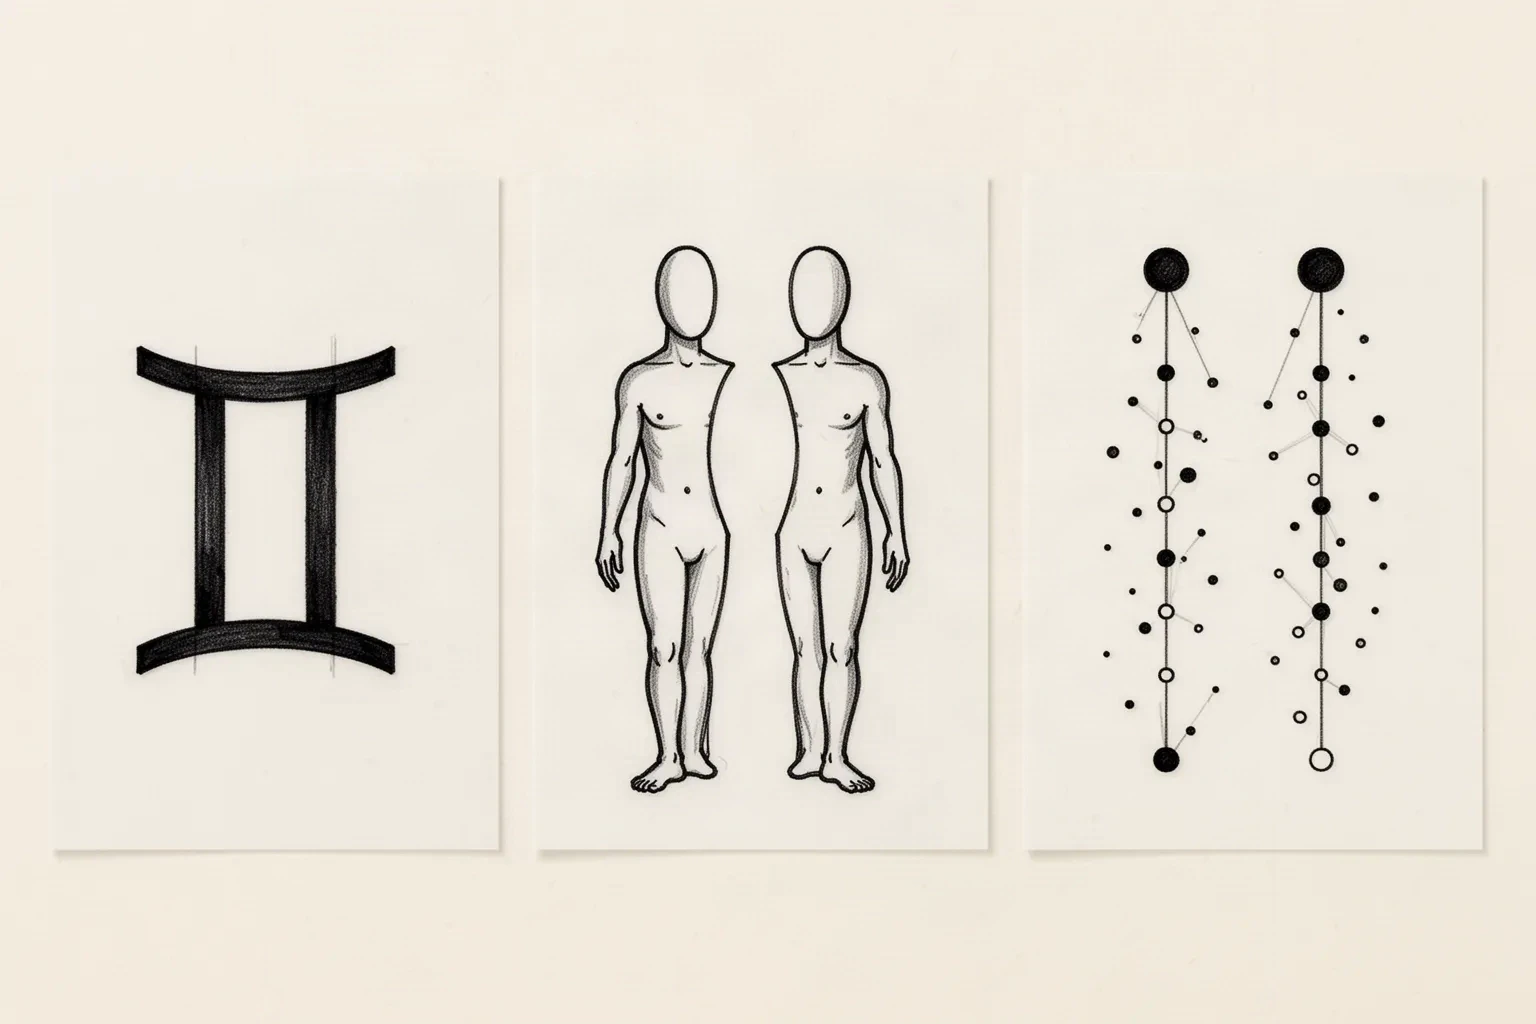
Line-art comparison of three Gemini tattoo stencil constructions: a compact II glyph with two vertical strokes and level bars, two matched figures with open space between them, and a twin-column star pattern with a large anchor dot heading each column.
Editorial illustration of the three Gemini construction families, not a stencil file or app output. Left to right: II glyph, twins figures with open space between the bodies, and a twin-column constellation. Shapes are illustrative only, so settle the measured axis, gap, and connector limits with the checks below rather than copying the drawing.

II glyph

The Gemini sign: two parallel vertical strokes joined by short horizontal bars top and bottom, read as one compact rectangular mark.

Strengths: Most forgiving at small sizes. Two strokes plus two bars carry the whole read, so it survives narrow fields such as wrist, ankle, finger side, and behind ear with minimal linework.

Risks: Stroke spacing is the whole design. Bars that drift off level, strokes that lean, or an inter-stroke gap that closes on transfer turns the mark into a blurry rectangle with no second read to rescue it.

Choose when: Choose the II glyph when the final size is under about 5 cm, when the placement is narrow or curved, or when the client wants a discreet sign that reads at a glance.

Twins figures

Two facing or mirrored human or abstract figures, read through bilateral duality: matched heads, torsos, and limbs around a central vertical axis.

Strengths: Strongest Gemini recognition at medium sizes. The mirrored pair gives the artist distinct masses to rank, and the composition suits flat fields such as sternum, upper back, forearm, and calf.

Risks: Mirrored-pair failure is the dominant failure. Uneven face ovals, mismatched limb lengths, a tilted axis, or touching figures merge into one mass. Faces and hands collapse first below about 7 cm.

Choose when: Choose the twins figures when the final width is about 8 cm or more on a flat or gently curved field where axis level and figure match can be verified at true size.

Gemini constellation

The Gemini star pattern: two bright anchors (Castor and Pollux) heading two roughly parallel stick-figure columns, often paired with a thin frame or a small II cue.

Strengths: Airy and minimal, well suited to fine-line placements on ribs, shoulder blade, collarbone, and forearm where the client wants subtlety rather than emblem weight.

Risks: Dots and hairline connectors are the first marks to fade on transfer and the first to close on skin. Without one anchor cue or clear twin-column structure the pattern reads as random dots, while a heavy frame can overpower the stars at small diameters.

Choose when: Choose the constellation when the client wants fine-line subtlety at small to medium sizes and accepts simplification: the two anchors, one connector family, one anchor cue, and no filler.


Mirrored-pair duality vetting

Duality is a measured axis, not a feeling.

Run these five checks at true size before judging line weight or detail. One failed axis means rebuild in the file, then re-check on paper.

Central axis level and figure match

The vertical duality axis must sit plumb and both figures must match across it: head height, shoulder width, torso length, and foot line. Sight the axis against a drawn vertical, then flip the file horizontally and overlay one twin on the other at true size.

Fix: Rebuild the weaker twin from the stronger one rather than nudging curves by eye. Re-level the axis in the file first, then re-check on the measured 1:1 print. No gap fix repairs a pair whose axis is already tilted.

Inter-figure gap held edge to edge

Open skin must run the full height between the twins at final size: forehead to forehead, torso to torso, knee to knee. Figures that touch at one point print as one merged silhouette, and touching heads are the most common merge.

Fix: Open the narrowest contact first, usually heads or inner hands, and hold the gap along the full run. If the gap closes at 1:1, separate the figures, simplify inner arms, or enlarge the piece. Do not thin outlines to hide a pinch.

Face and hand simplification at size

Eyes, lips, and fingers are the smallest marks in the composition and the first to close. Below about 7 cm, detailed faces and spread fingers that look fine on screen print as filled ovals and fused bars.

Fix: Reduce faces to one oval with at most two interior marks, or drop interior detail and carry solid head silhouettes. Reduce hands to mitten or single-line forms, or crop arms above the wrist. Judge every face and hand with a squint test on the 1:1 print.

Limb separation inside each figure

Arms must hold open separation from torsos and legs from each other along their full runs. Parallel limbs that touch the torso edge or each other print as one bar, which reads as a missing arm on skin.

Fix: Hold open skin between every limb run at 1:1, shorten or re-angle the inner arm when it crowds the torso, and keep one consistent outline weight across both figures. Check the tightest limb gap before approving any detail.

Mirror direction marked before transfer

Mirrored twins punish an unmarked flip: the approved left-right pairing arrives on skin reversed and the composition favors the wrong side of an asymmetric placement. Decide which twin leads on the body side that matters, then mirror the file for the transfer method.

Fix: Mirror deliberately for the transfer method, label the skin-top and skin-left edges on the stencil margin, and confirm with a dry paper wrap before transfer paper. Re-check the axis after mirroring, because flips expose asymmetries the screen hid.

Generic compact-symbol silhouette comparison stays with the small and simple stencil guides. This framework exists to judge Gemini figure match, inter-figure spacing, face and limb hold, and mirror direction at a stated size, not to replace those owners.

II stroke weight, gap retention, and constellation floors

Judge the white space at the size you will print.

Screens forgive crowding that paper and skin do not. Set the size first, then inspect glyph strokes, star pairs, and anchor clearances at true physical size with scaling off.

About 5 cm and below

Wrist, ankle, finger side, behind ear, small gap fillers.

II glyph or simplified constellation only. No full twins pair: faces, hands, and inter-figure gaps merge into one mass at this width. Keep one contour family, open gaps only, and remove figure detail that closes at 1:1.

About 5 to 8 cm

Common forearm, shoulder, calf, and rib placements.

Compact abstract twins can work when faces are blank ovals and every limb gap stays open at true size. Constellation needs one connector family and a separated anchor cue. Judge every separation on the measured print, not the screen.

About 8 cm and above

Sternum, upper back, thigh, and chest compositions.

Full mirrored twins with simplified faces have room here, but larger size does not rescue a tilted axis or mismatched figures. Spend the extra room on gap clearance and ranked masses first, ornament second.

II glyph prep rules
FeaturePrep rule
Vertical stroke weightHold both strokes at one consistent medium weight that prints cleanly at final size. Hairline strokes under about 5 cm vanish on thermal transfer, while one heavy and one light stroke reads as a printing error.
Inter-stroke gap retentionKeep the gap between the two verticals visibly open at true size, roughly proportional to one stroke width or wider. A gap that closes on the 1:1 print turns II into a solid block. Open the gap before thickening strokes.
Top and bottom barsKeep both bars level, centered, and slightly lighter than or equal to the verticals. Bars that overshoot the strokes or tilt even slightly read as damage at arm's length. Re-level bars against a drawn horizontal, never by eye alone.
Serif and style restraintOne serif or flourish family maximum, and none at all under about 4 cm. Doubled outlines, inline fills, and star-cut counters close first. Rank the four bars and strokes as the primary mass and mark every flourish removable before print.
Gemini constellation spacing floors by size band
FeatureAbout 5 cm and belowAbout 8 cm and above
Twin-column structureTwo anchor dots (Castor and Pollux heads) plus the two column lines must read at arm's length. If the columns merge, the piece becomes one ladder, not twins.Full stick-figure columns can work when each column keeps its own lane and connectors never cross between columns except at the named junctions.
Anchor dot size and clearanceKeep anchor dots large enough to print as filled marks with at least 1 mm of clear skin to the nearest connector. Tiny anchors with hairline halos are the first failure.Smaller anchors are usable when each one keeps full clearance, verified with a squint test at true size.
Inter-star gap along columnsKeep at least 2 mm of open skin between adjacent star edges at 1:1. Below that, two stars print as one blob and the column count changes.Gaps can sit proportionally tighter, but each one must still trace to open skin edge to edge on the physical print.
Filler and second cuesZero filler at 5 cm and below. One anchor cue maximum (thin ring or small II mark), fully separated from the star field with visible skin on all sides.A sparse accent is possible when the twin columns read with all filler covered. Filler never fixes weak anchor spacing.

Chart-level asterism accuracy, from star counts to connection logic, stays with the generic constellation owner. This page covers only the Gemini twin-column application: two anchors, parallel lanes, and small-size floors at a stated field width.

Reference to clean stencil

Build from the axis outward, then protect the gaps.

Work in this order so one change at a time can be judged at the same size. Stop when variant, axis, hierarchy, gaps, and mirror each pass.

  1. 01

    Lock variant, size, and placement

    Name one variant (II glyph, twins figures, or constellation), the final width or height in millimeters, and the body area. A twins pair that holds at 10 cm on a sternum cannot be judged with glyph logic, and a constellation that holds at 7 cm on ribs can fail at 4 cm on a wrist with no line being wrong on its own.

  2. 02

    Vet the variant axis before line weight

    For twins, level the duality axis and match the figures with a horizontal flip overlay. For the II glyph, level the bars and equalize the strokes. For the constellation, lock the two anchors and the twin-column lanes. No gap fix rescues a composition whose axis is already off.

  3. 03

    Rank masses and simplify detail

    Assign every mark a role: primary contours (figure outlines, glyph strokes, anchor dots) heaviest, support marks (bars, connectors, ring) second, ornament last. Mark one removable element that can drop out if gaps close at print.

  4. 04

    Judge thin lines and small gaps at final size

    Print at 1:1 with scaling off, measure with a ruler, and squint until fine detail disappears. If faces, fingers, stroke gaps, or star pairs close, widen the gap, thicken the survivor, or remove one repeat. Re-check after every mass change.

  5. 05

    Set orientation and mirror, then verify

    Decide which way the duality reads on the body, mirror the file for transfer so the skin result matches the approved view, and confirm with a dry paper wrap before transfer paper. Placement sections below name the per-area checks.

Placement and mirrored orientation

Mirror deliberately, then seat the duality on the body

Gemini reads through two matched halves on a shared axis. Each placement below names its constraint and its transfer check.

Sternum and upper back

Flat centered fields where the body midline becomes part of the twins composition. An axis even slightly off center or a pair with mismatched heights reads as broken duality from across the room.

Check: Center the duality axis on the midline, level the head line against a drawn horizontal on skin, and preview figure tips against the midline mirror before locking inter-figure spacing.

Forearm and calf

Gently curved fields where twins and II glyphs read well but wide pairs bridge the curve and outer limbs lift at the edges. Constellation columns flex better here than rigid wide pairs.

Check: Keep pair width inside the flattest span, confirm outer limbs contact through a dry wrap, and mirror the stencil so the duality axis follows the limb line rather than fighting it.

Wrist, ankle, and behind ear

Narrow recessed fields where only II glyph or minimal constellation survives. Full twins forced into these widths merge faces and hands on first contact.

Check: Recrop to a glyph or a compact two-anchor column cluster, run the small-size checks at exact millimeters, and confirm clearance from creases, cartilage folds, and straps.

Ribs and shoulder blade

Breathing and blade movement shift the field between stencil seating and healed read. Wide mirrored pairs can look level on relaxed skin and tilted on stretch.

Check: Seat the stencil in a neutral breath position, agree the axis reference line with the client standing naturally, and favor glyph or constellation over wide twins where movement is strong.

Transfer failure points

Catch the four Gemini failures before skin contact

Gemini transfers fail at four predictable points. Each one names the early sign on paper and the file-level prevention.

Merged twins read as one figure

Early sign: The pair looks like two people on screen but prints as a single lumpy silhouette, usually joined at heads or inner hands.

Prevention: Hold open skin along the full inter-figure run at 1:1, simplify inner arms first, and confirm the gap survives the squint check before print.

Collapsed faces and fingers

Early sign: Eyes, lips, and finger separations that read on the monitor fill in on the 1:1 print or on the dry wrap.

Prevention: Reduce faces to blank ovals below about 7 cm, convert hands to mitten or single-line forms, and re-check every interior mark at final millimeters.

Closed II stroke gap

Early sign: The two verticals look separated on screen but the inter-stroke channel fills on paper, turning II into a solid block.

Prevention: Open the gap to at least one stroke width at 1:1 before thickening strokes, and re-measure the physical print with scaling off.

Inverted transfer orientation

Early sign: The approved pairing arrives on skin left-right reversed, or the intended leading twin ends up on the wrong side of an asymmetric placement.

Prevention: Mirror deliberately for the transfer method, label the skin-top and skin-left edges on the stencil margin, and confirm the dry wrap matches the approved view before contact.

Stencil-ready checklist

Approve the Gemini piece only when every line passes

Run this short sequence with scaling off and a ruler in hand. One failed line means fix, enlarge, or reselect before transfer.

  • Confirm one variant, final millimeters, and the named placement.
  • Confirm the twins axis is level and both figures match, or the II bars are level with equal strokes, or the two constellation anchors sit in their lanes.
  • Confirm the inter-figure gap, the II stroke gap, or the tightest star pair holds open skin at 1:1.
  • Confirm faces, hands, flourishes, and filler are simplified or removed for the size band.
  • Confirm the anchor cue or frame sits fully clear of the star field where used.
  • Confirm orientation and mirror direction are marked before transfer.
  • Export a true-size PDF with scaling off and measure the print.
Matched twins, level axis Verify gaps at 1:1 Orientation and mirror marked

FAQ

Gemini stencil decisions, answered

Short answers for the variant, twins, glyph, constellation, small-size, and mirror checks that recur when a Gemini reference moves toward transfer-ready output.

Match the variant to final size and placement. The II glyph suits marks under about 5 cm on narrow or curved skin because two strokes carry the read. The twins figures suit widths around 8 cm and above on flat fields where axis level and figure match can be verified. The constellation suits fine-line placements where the client wants subtlety and accepts two anchors, one connector family, and one separated cue. The variant comparison on this page names the exact trade-offs and size cutoffs.

Next steps

Use the neighboring owners for adjacent jobs.

This guide covers Gemini variant choice, mirrored-pair vetting, II stroke and gap prep, constellation spacing floors, and orientation plus mirror prep. Use the links below for related jobs such as Libra construction, generic constellation accuracy, space composition, and sizing.

Libra scales method, generic constellation theory, broad space composition, numeral spacing, board organization, generic conversion, and print mechanics stay in their specialist owners. The links above hand off instead of repeating that detail.

From evaluated reference to working stencil

Turn the approved Gemini piece into a stencil draft.

Start from the II glyph, twins pair, or constellation that passed the symmetry, spacing, and mirror checks, then continue on iPhone for body fit, exact-size print, mirror and professional export.