

Fern frond stencil evaluation

Vet the frond before it becomes a stencil

Ferns live or die on pinna discipline. Choose the frond, sprig, cluster, or curl construction that fits your length, protect the open gaps between pinnae and the rachis path, and confirm the arch reads at your exact size for a clean transfer-ready stencil.

Built for working artists preparing fern pieces. This page covers frond construction, pinna separation and taper, arch curvature and placement flow, and transfer prep only, not tattoo application or healing advice. Generic leaf lamina vetting, paper choice, and body-fit mechanics stay with the specialist owners linked below.

Reading a fern plate

  • Rachis: Trace the central stem base to tip. Kinks collide inside pinnae before gaps fail, so the arch must run smooth first.
  • Pinnae: Count the leaflet pairs and check taper. Full photo counts merge into fill below about 8 cm, so cut base crowding first.
  • Gaps: Find the skin channel between every pinna and the rachis. Any touching bases seal the frond into one band on transfer.

Use this checklist to read any fern reference, then verify your own reference at the length you will print.

Fern construction chooser

One frond, one sprig, one ranked cluster, or one curl decides the read.

A fern piece is a rachis plus its repeated pinnae. Pick the construction that fits the placement length, then protect the gaps that keep it separable.

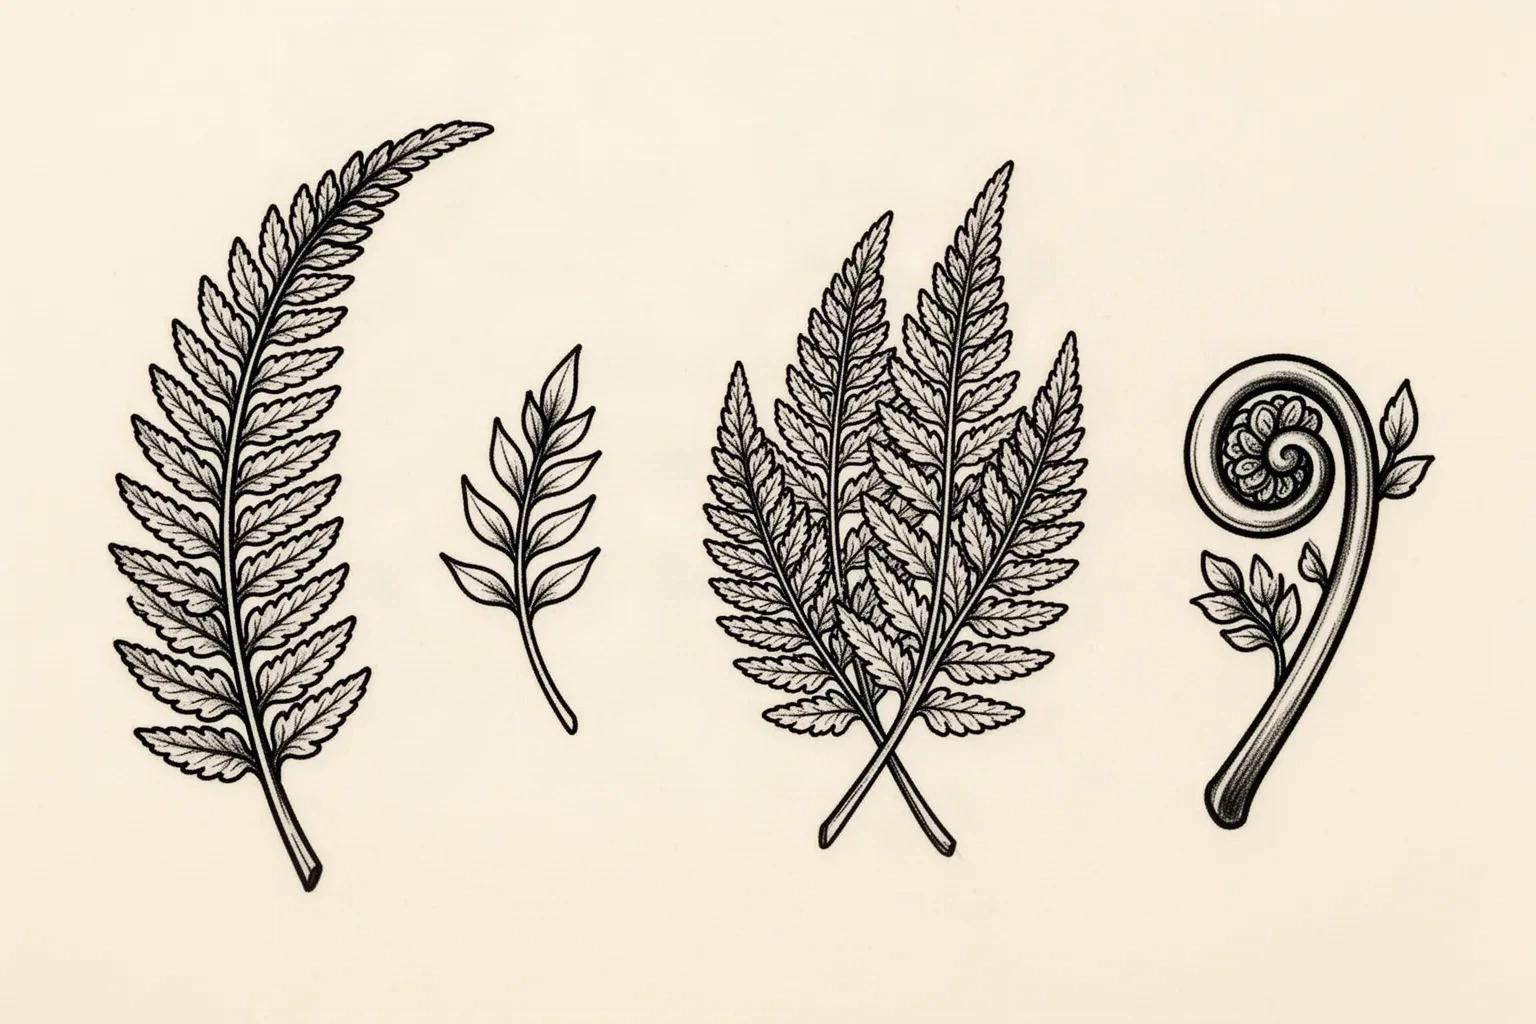
Botanical line-art plate showing four fern constructions left to right: an arching pinnate frond with paired pinnae and open gaps, a simple sprig with a few tapered leaflets, a layered three-frond cluster with overlap channels, and a curled fiddlehead with an open inner spiral.
Construction plate, left to right: pinnate frond, simple sprig, multi-frond cluster, fiddlehead curl. Compare arch, taper, and open channels before choosing. Original illustration, not app output or a printable stencil.

Pinnate frond

Use when: Forearm, calf, spine, rib, and shoulder-to-arm flows where one arching frond carries the whole idea and the placement has a clear long axis.

Construction: One central rachis stem running base to tip with paired pinnae set along it, largest near the base third and stepping down toward a small terminal tip. Keep open skin between every pinna base and the rachis, and keep the rachis unbroken from cut end to tip.

Failure mode: Fails when pinnae sit opposite at equal size with no taper, or when pinna bases touch the rachis and each other. That frond prints as a ladder band instead of a tapering arch with direction.

Simple sprig

Use when: Wrist, ankle, collarbone, behind-ear, and sternum accents where a short fern hint fits better than a full arching frond.

Construction: A short stem with a small count of simplified leaflets, not full pinnae pairs. Reduce each leaflet to a clean tapered mark with one clear gap to the stem, and let the tip leaflet be smallest so the run reads as young fern growth.

Failure mode: Fails when a full pinnate frond is shrunk into a tiny width without simplification. Dozens of true pinnae at 3 to 4 cm merge into one textured strip on transfer.

Multi-frond cluster

Use when: Thigh, calf panels, shoulder caps, and back accents where layered fern volume is the point and the width supports ranked overlaps.

Construction: Rank two or three fronds front to back, give the front frond a complete rachis and full pinna set, and tuck the rest behind it with a clear overlap edge at every crossing. Keep one skin channel at every frond-over-frond contact at 1:1.

Failure mode: Fails when every frond is drawn complete at equal weight with all rachises and pinnae crossing. Equal-weight fern layers read as a thicket once reduced and bridge first on transfer.

Curled fiddlehead accent

Use when: Small circular or spiral placements, filler beside a larger frond, and minimalist pieces where the curl carries the fern read without full pinnae.

Construction: One confident spiral stem with a small count of tucked leaflets on the outer curve only. Keep the inner spiral channel open at true size and let the stem weight carry the read, since small leaflets cannot.

Failure mode: Fails when the spiral is drawn with tight touching coils plus full pinnae inside the curl. A closed inner channel plus packed leaflets seals into one dark coil below about 5 cm.

Fern evaluation framework

Score the reference in minutes, then act on the weakest check.

Four fern constructions at labeled lengths. Each one names the protected structure, the fix, and the go or no-go verdict at that exact size. Confirm every verdict with a measured 1:1 print.

HOLDS AT STATED SIZE

Single arching frond with open pinna gaps at 12 cm

Intended length 120 mm

Source
One pinnate frond with a clear rachis, paired pinnae tapering from base to tip, open skin between every pinna base and the rachis, and a gentle arch with no kinks.
Protect
The rachis path, the pinna taper rhythm from large base pinnae to a small tip, and the open channels between neighboring pinnae.
Fix
No structural fix needed. Confirm pinna gaps, rachis continuity, and tip taper at 1:1 and print true size with scaling off.
Candidate stencil
Same fern with the construction set, pinna count reduced to what the length supports, gaps reopened at the rachis, overlaps ranked front to back, and arch smoothed to the placement axis.
Final-size verdict
Holds at 12 cm. Rachis, pinnae, and gaps each keep their own separation, so the frond reads from structure alone without shading.

SIMPLIFY OR ENLARGE FIRST

Dense photo frond with touching pinnae at 6 cm

Intended length 60 mm

Source
A realistic fern photo where lower pinnae overlap and touch, mid pinnae sit edge to edge with hairline gaps, and the tip carries many tiny leaflets the reference barely resolves.
Protect
The overall arch direction and the base-to-tip taper proportion worth keeping.
Fix
Reduce pinna count by about one third starting at the crowded base, reopen a skin channel between every remaining pinna and the rachis, and merge the tiny tip leaflets into one clean tapered tip before touching rachis weight.
Candidate stencil
Same fern with the construction set, pinna count reduced to what the length supports, gaps reopened at the rachis, overlaps ranked front to back, and arch smoothed to the placement axis.
Final-size verdict
Not stencil-ready until gaps hold open at true size. A photo-accurate pinna count functions as one filled band below about 8 cm.

REOPEN ARCH FIRST

Straightened frond with kinked rachis at 10 cm

Intended length 100 mm

Source
A frond with good pinnae but a rachis that bends sharply in two places, forcing pinnae on the inside of each bend to collide while outside pinnae splay with dead space.
Protect
The pinna shapes and the intended placement direction.
Fix
Redraw the rachis as one smooth arch matched to the placement long axis, respread pinnae evenly along the new curve, and trim or shorten the pinnae that still collide on the inside of the curve.
Candidate stencil
Same fern with the construction set, pinna count reduced to what the length supports, gaps reopened at the rachis, overlaps ranked front to back, and arch smoothed to the placement axis.
Final-size verdict
At 10 cm a kinked rachis fails on flow before gaps fail on size. Repair the arch first, because evenly spaced pinnae on a smooth curve need fewer gaps than crowded pinnae on a kinked one.

SEPARATE OR ENLARGE FIRST

Three-frond cluster with contact overlaps at 9 cm

Intended width 90 mm

Source
A full cluster where three fronds cross at equal weight with shared rachis contacts, pinnae from one frond touching pinnae of the next, and no planned front-to-back order.
Protect
The front-frond arch and the overall cluster direction worth keeping.
Fix
Rank one front frond, tuck the rest behind it with one skin channel at every crossing, subordinate the back rachises, and enlarge only after separations are planned at true size.
Candidate stencil
Same fern with the construction set, pinna count reduced to what the length supports, gaps reopened at the rachis, overlaps ranked front to back, and arch smoothed to the placement axis.
Final-size verdict
Not stencil-ready while fronds share contact. Separate the stack or enlarge past the point where every overlap channel stays open.

Generic lamina and vein-tier vetting stays out of this framework. Single-leaf edge, midrib, and side-vein checks are judged on the leaf stencil page, traveling stem runs on the vine page, and broad visual browsing on the stencils and subject hubs, while this framework judges rachis continuity, pinna count and taper, inter-pinna gaps, arch curvature, and cluster overlap separation on the fern.

Pinnae and gaps at final size

Judge the white space at the length you will print.

Screens forgive crowding that paper and skin do not. Set the length first, then inspect each feature below at true physical size with scaling off.

About 6 cm and below

Finger, behind ear, wrist, and tiny ankle accents.

Carry a simple sprig or fiddlehead curl only, with no true pinnate structure. If any leaflet gap closes at 1:1, remove leaflets before thinning the stem.

About 7 to 12 cm

The most common fern band: wrist, ankle, collarbone, shoulder accents, and small forearm or calf pieces.

The flexible band for one simplified frond with reduced pinna count and open rachis channels. Verify every inter-pinna gap and the tip taper at true size with scaling off.

About 13 cm and above

Forearm, calf, thigh, spine, and cluster compositions with layered fronds.

Room for full pinnate fronds and ranked two-frond clusters, but only when every pinna gap and overlap channel stays open at 1:1. Larger length never rescues touching pinna bases.

Fern feature checks by length band
FeatureAbout 6 cm and belowAbout 13 cm and above
Inter-pinna gapsKeep none in the true sense: simplified leaflets only, each with a clear gap to the stem. Packed pinna pairs merge first, so cut count before narrowing gaps.Every neighboring pinna pair keeps its own visible skin separation at 1:1, widest at the base and narrowing only with the taper. If two pinnae share one merged boundary, remove one before touching rachis weight.
Pinna-to-rachis clearanceEach leaflet base stands clear of the stem with open skin on both sides. A leaflet sitting flush against the stem turns sprig rhythm into one band.Each pinna base keeps open skin between leaflet and rachis at true size. Check the inside of the arch curve first, where gaps close fastest.
Tip taperEnd the sprig with one smallest tip leaflet or a clean curl. A blunt crowded tip reads as a cut stem at small widths.Step pinna size down toward a small terminal tip so the frond narrows continuously. Never carry full-size pinnae to the last centimeter.
Frond overlapsCarry none. One construction only. Small widths suit one sprig or curl, and any second frond forced into these bands bridges first.Rank front-to-back order and keep one skin channel at every frond-over-frond and pinna-over-rachis crossing. Check the full cluster with a squint test at true size.

Fine-detail fallout risk checklist: pinnae, gaps, and arch

  • Touching pinna bases: leaflets that meet the rachis and each other seal the frond into one band at small lengths.
  • Photo-accurate pinna counts: every tiny leaflet from the reference carried into a 6 cm stencil merges into textured fill.
  • Kinked rachis bends: sharp bends collide inside pinnae and open dead space outside, breaking the arch before gaps fail.
  • Blunt crowded tips: full-size pinnae run to the last centimeter leave no taper and read as a cut stem.
  • Equal-weight cluster layers: fronds drawn complete at the same weight bridge at every crossing.
  • Sealed fiddlehead coils: tight touching spirals with packed inner leaflets close into one dark coil.

Reference to clean stencil

Lock the rachis, then build outward along the pinnae.

Work in this order so one change at a time can be judged at the same length. Stop when rachis, pinnae, gaps, placement, and print each read correctly.

  1. 01

    Lock length, construction, and placement first

    Set the intended physical length in millimeters, choose one construction (pinnate frond, simple sprig, ranked cluster, or fiddlehead accent), and name the body area before judging the reference. A frond that holds at 14 cm on a flat calf can fail at 6 cm on a curved wrist with no line being wrong on its own.

  2. 02

    Rank rachis, pinnae, and gaps

    Name the rachis, the pinna set, and the gaps between them, then assign every mark a role: the rachis that carries direction and flow, the pinnae that carry fern texture, and the skin channels that keep them separable. Strengthen rachis continuity first, and mark one removable pinna group that can go if gaps close.

  3. 03

    Simplify pinnae and reopen gaps for final size

    Cut pinna count starting at the crowded base, reopen skin between every remaining pinna and the rachis, and merge tiny tip leaflets into one tapered tip before thinning any stem. Run a squint check: step back until pinnae blur and confirm the rachis arch plus taper still read.

  4. 04

    Set arch curvature to placement flow

    Draw the rachis as one smooth arch matched to the body long axis, respread pinnae evenly along the new curve, and shorten cross-axis pinnae while edits are still cheap. Preview the placement on a body photo when curve, wrap, or viewing angle could change the frond read.

  5. 05

    Verify print and transfer path

    Export a true-size PDF with no fit-to-page scaling, inspect the narrowest inter-pinna gap and the rachis-to-skin clearance on plain paper, then measure the physical print with a ruler. If the digital file passes and only paper fails, move to print-stage evidence instead of simplifying again.

Placement and size decisions

Long arches want long spans that keep curvature honest

A fern is a directional arch with a base and a tip. Placements with a clear long axis preserve that curvature with little compensation, while small wrapped placements demand a simplified recrop.

Finger, behind ear, and wrist

Very small curved fields with movement and friction. Only simple sprigs or small fiddlehead curls hold here, with no true pinnate structure.

Check: Recrop to stem plus a few tapered leaflets, drop the full pinna set, and confirm stem and leaflet clearance at the exact length before print.

Ankle, collarbone, and sternum line

Narrow linear fields where frond direction matters most. The rachis tip should travel with the bone or limb line, not across it.

Check: Run the rachis along the longest span, taper pinna size toward the tip, and keep every pinna base clear of the rachis at 1:1.

Forearm, calf, and shoulder

Medium panels with room for one simplified frond with an arching curve along the limb or bone line, plus graceful tip exits.

Check: Seat the widest base pinnae on the flattest area, let the tip exit along the limb, and confirm gaps stay open at true size.

Spine, rib, thigh, and back accents

Long or large panels with room for full fronds and ranked clusters, but wide compositions compress on curves in photos and transfers.

Check: Spend extra room on arch smoothness and overlap separation first, keep pinna count controlled, and verify inside-curve gaps separately at 1:1.

Stencil-ready checklist

Approve the fern only when every line passes

Run this short sequence with scaling off and a ruler in hand. One failed line means fix, enlarge, or reselect before transfer.

  • Confirm intended length in millimeters, the chosen fern construction, and the named placement.
  • Confirm the rachis runs unbroken from cut end to tip as one smooth arch at 1:1.
  • Confirm every pinna base stands clear of the rachis with open skin on both sides.
  • Confirm neighboring pinnae keep visible separation, and the tip tapers to a small finish.
  • Confirm every frond overlap keeps its own skin channel with a ranked front-to-back order.
  • Export a true-size PDF with scaling off and measure the physical print.
Rachis, pinnae, taper, arch Verify gaps at 1:1 Arch survives transfer

FAQ

Fern stencil decisions, answered

Short answers for the construction, gap, arch, placement, and handoff checks that recur when a fern reference moves toward transfer-ready output.

Use one pinnate frond for medium and long placements with a clear long axis, a simple sprig or fiddlehead curl for small accents at about 6 cm and below, and a ranked multi-frond cluster only when the width supports a skin channel at every overlap. A full frond shrunk into a tiny width merges into a band, and an equal-weight cluster reads as a thicket, so match the construction to the length first.

Next steps

Use the neighboring owners for adjacent jobs.

This guide covers fern frond construction, pinna separation and taper, arch curvature and placement flow, and fern transfer preparation. Use the links below for adjacent jobs such as generic leaf vetting, vine runs, sizing, print checks, and placement.

Generic lamina and vein-tier depth, vine path mechanics, broad gallery browsing, paper manufacturing detail, and placement mechanics stay in their specialist owners. The links above hand off instead of repeating that detail.

From evaluated reference to working stencil

Turn the approved fern into a stencil draft.

Start from the fern construction that passed the rachis, pinna, and gap checks, then continue on iPhone for body fit, exact-size print, mirror and professional export.