Father-son dyad stencil

Pick the two-figure dyad first, then make it transfer-ready

Father-son pieces fail most often before linework starts: the wrong dyad for the available skin, a grip that bridges at true size, or a child figure that drops out beside a full-weight adult. Settle the dyad first, then protect scale contrast, hand contact, and every spacing gap at your exact size.

Built for working artists handling father-son commissions. This page covers dyad archetype choice, adult-child readability at final size, and two-figure transfer QA only. Broad family name-list method, portrait engine steps, and placement-zone detail live with the neighboring owners linked below.

Dyad archetypes

Four father-son dyads, four different stencil contracts.

Each dyad asks the skin for something different. Name the composition before judging any reference, because the dyad decides the minimum size and the failure point.

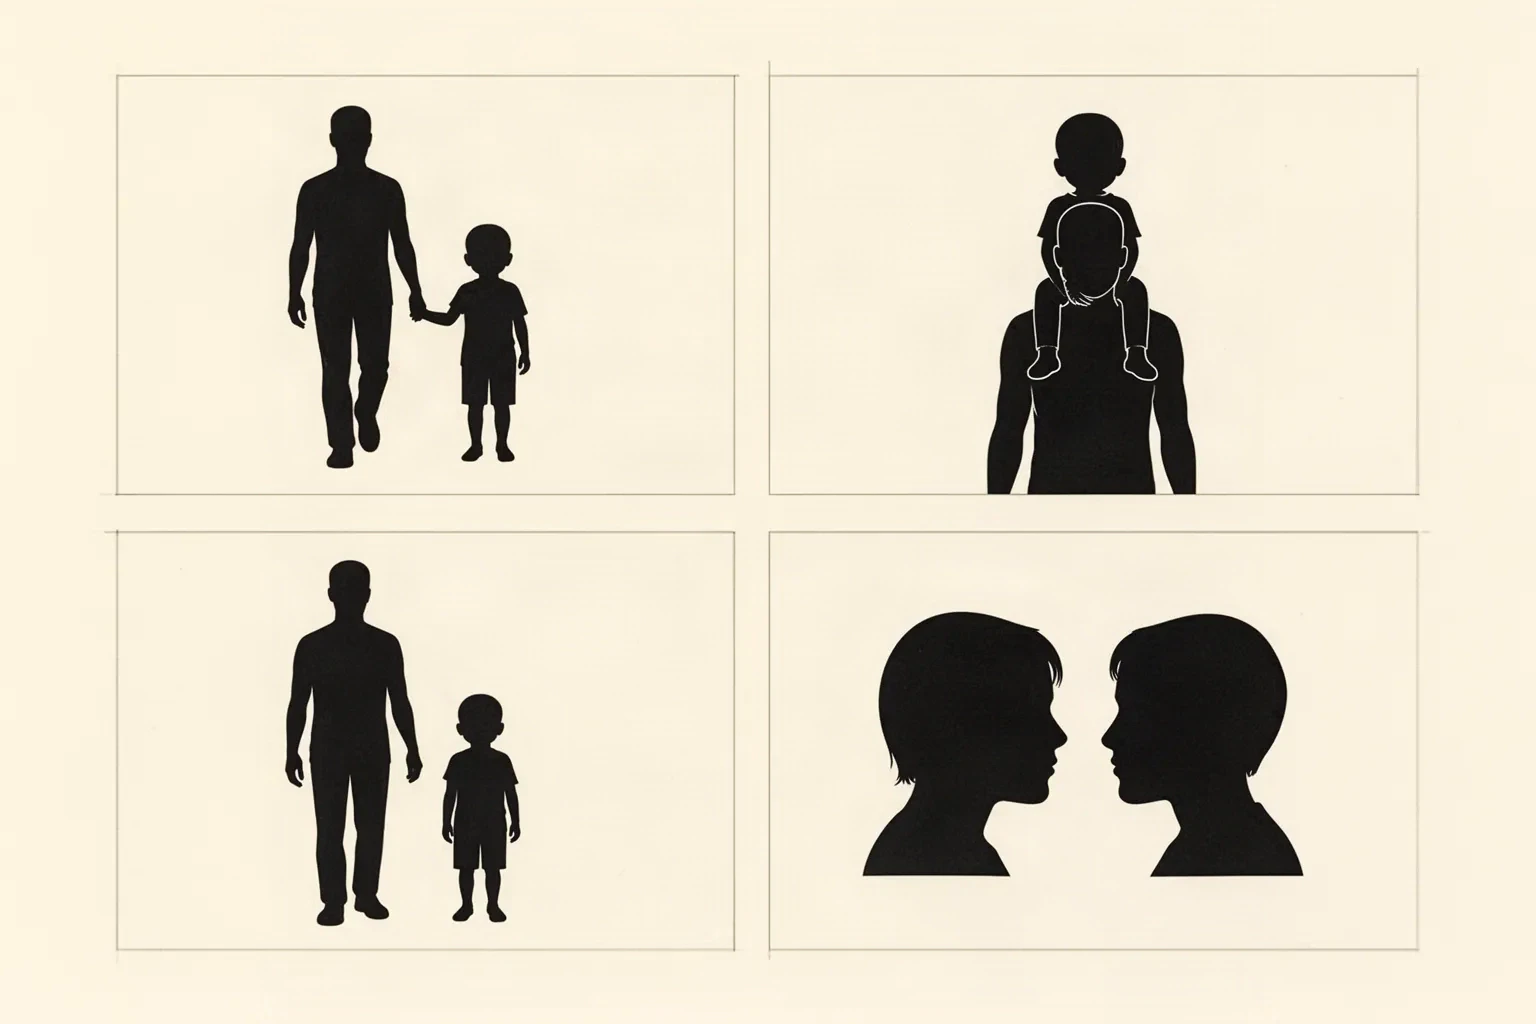
Four flat silhouette study panels comparing father-son dyad compositions: a walking adult and child holding hands, a child seated on an adult's shoulders, a tall adult standing beside a much smaller child with open space between them, and two facing profile heads at different scales.
Composition study only, in the same reading order as the four dyads below. Synthetic editorial illustration by the publisher, not a stencil file, app output, or a client tattoo. Rebuild each chosen dyad from the client reference and approve it at your own millimeter size.

Hand-hold silhouette

Looks like: Adult and child outlines joined at the hands: walking figures, a large hand holding a small hand, or two shadows meeting at one grip point.

Best for: Clients who want the bond readable at a glance on a forearm, calf, shoulder blade, or upper arm with a clear horizontal or diagonal flow.

Trade-off: The grip is the failure point. Fingers merge into one blob below true-size thresholds, wrists collide with cuffs or borders, and two full bodies shrink every limb when the grip is drawn too small.

Stencil rule: Draw the grip as one open channel with daylight between every finger mass, keep wrists clear of frame edges, and size the smallest finger gap before judging faces or clothing.

Verdict: Choose it when the placement offers enough length for two figures plus separated hands, and switch dyads when the grip closes at true size.

Shoulder-carry silhouette

Looks like: Child seated on the adult shoulders, legs framing the head, often reduced to a head-plus-torso anchor with two dangling legs.

Best for: Clients who want a compact vertical emblem: one stacked column that fits a calf, outer arm, or side back with a strong head-and-shoulders first read.

Trade-off: Stacking compresses faces. The child legs cross the adult face, chins touch foreheads, and three heads compete at widths where none of them read.

Stencil rule: One face leads, the rest subordinate: separate chins from foreheads with open skin, keep leg masses off eye and mouth anchors, and confirm the lead face reads alone at the exact width.

Verdict: Choose it when the placement favors vertical stacking and the client accepts one lead face, otherwise pick a side-by-side dyad.

Scale-contrast pair

Looks like: Large adult figure beside a small child figure, sometimes as facing silhouettes, walking pairs, or a big lion with a cub standing in for the dyad.

Best for: Clients who want the age and size difference to carry the meaning: a tall anchor beside a small companion on a chest panel, thigh, or back field.

Trade-off: Contrast collapses at small sizes. The child shrinks into decoration, thin child limbs drop on thermal transfer, and the pair reads as one adult with an unexplained mark beside it.

Stencil rule: Floor the child figure: no limb or gap narrower than the minimum transfer weight, hold open skin between the two figures across the full height, and test the child alone at final size before approving the pair.

Verdict: Choose it when the placement fits a full-height anchor plus a self-sufficient child mark, and enlarge or simplify the child before cutting detail.

Side-by-side likeness pairing

Looks like: Two portraits, profiles, or half-faces sharing one frame: father and son facing the same way or facing each other with names or dates in a separate band.

Best for: Clients who want recognition first: two identities that must each read as a person, usually on a chest, back, or thigh with portrait-scale skin.

Trade-off: Likeness doubles the minimum size. Eyes, nostrils, and mouth corners close fast, the two faces compete for hierarchy, and squeezed text becomes unreadable filler beside the portraits.

Stencil rule: One shared light logic, one hierarchy pass, text parked in its own band with open skin from both faces, and the smaller face sized for its own transfer before any shading is judged.

Verdict: Choose it only when the placement fits two portrait-scale faces plus a separated text zone, otherwise let a silhouette dyad carry the piece.

Sibling groups, multi-name lists, script words, and heart or infinity carriers follow the broad family stencil guide, not the two-figure dyad patterns on this page.


Adult-child readability

The smallest gap decides the whole dyad size.

Two figures share one transfer, so the tightest hand contact, face break, or child limb sets the minimum width. Apply these rules before approving any father-son stencil.

Size the smallest hand gap first

In hand-hold dyads the narrowest finger separation decides the whole width. Print at the exact millimeter size and confirm every finger mass holds daylight. When one channel bridges, widen the grip, drop a finger division, or enlarge the piece before touching faces or clothing.

Separate stacked faces with skin

In shoulder-carry dyads the child chin, the adult forehead, and the leg masses need visible breaks between them. If a chin touches a forehead or a leg crosses an eye at true size, shift the stack or subordinate one face rather than thinning every line.

Floor the child figure weight

In scale-contrast pairs the child limbs are the first marks to drop on thermal paper and on skin. Hold every child limb and gap at or above the minimum transfer weight, and confirm the child reads as its own figure when the adult half is covered.

Give each likeness its own anchor

In likeness pairings each face needs one clear anchor: an eye pair, a brow and nose read, or a profile line that survives simplification. When both faces share one muddy middle zone, split them with open skin or enlarge the frame instead of adding detail.

Hold open skin between the figures

Two figures that touch along their full height read as one mass at arm's length. Keep one continuous skin channel between adult and child masses from top to bottom, and confirm the pair still reads as two when fine interior detail drops out in a squint check.

Test at final size, not on screen

Dyads that look balanced zoomed in fail when the child is 3 cm tall on a wrist. Export a true-size PDF with scaling off, measure the physical print with a ruler, and run every check in this section on paper before transfer.

From dyad decision to clean stencil

Work in this order so one change can be judged at size.

Dyad preparation is sequencing work. Lock the archetype, rank the figures, protect the gaps, then prove the print.

  1. 01

    Name the dyad in one line

    Write down which archetype carries the piece, the adult and child heights in millimeters, and the placement. A shoulder-carry that holds at 18 cm on a calf can fail at 8 cm on a forearm with no line being wrong on its own. Settle the dyad before judging any reference.

  2. 02

    Rank the two figures before refining detail

    Assign every mark a role: lead figure that carries the first read, companion that supports it, and optional text band. Resolve touching edges, shared outlines, and competing faces before adjusting line weight, shading, or background anywhere.

  3. 03

    Lock the gap budget at true size

    Protect the grip channel, the inter-figure channel, and the smallest face or limb gap first. Size the whole composition around the tightest of the three, and when it needs more room, enlarge the piece, drop a detail pass, or reselect the dyad instead of shrinking everything to fit.

  4. 04

    Simplify each figure as its own stencil

    Reduce each figure to countable separations, keep any text zone free of figure texture, and hold crossings open. Cover one figure and confirm the other still reads alone at the exact size, then reverse the test.

  5. 05

    Verify print, mirror, and placement path

    Export a true-size PDF with no fit-to-page scaling, inspect the tightest grip, gap, and face anchor on plain paper, confirm mirror orientation for the placement side, then measure the physical print with a ruler and preview it on the body area. If the digital file passes and only paper fails, move to print-stage evidence instead of redesigning the dyad.

Transfer-ready checklist

Approve the dyad only when every line passes

Run this sequence with scaling off and a ruler in hand. One failed line means fix, enlarge, simplify, split, or reselect before transfer.

  • Confirm the dyad archetype, both figure heights, placement, and intended millimeter size in one written line.
  • Confirm open skin separates the two figures across their full shared height at true size.
  • Confirm every finger gap, face anchor, and child limb transfers as its own mark.
  • Confirm any names or dates sit in a separated band, verified against the client source.
  • Confirm mirror orientation is correct for the placement side before print.
  • Export a true-size PDF with scaling off and measure the physical print with a ruler.
One dyad, one clear lead figure Smallest gap sets the size Each figure reads alone

Placement orientation

Brief placement read, then hand off for zone depth.

Dyads need length or height more than most compositions. Use this orientation to shortlist zones, then follow the placement owners for marking, wrap, and transfer detail.

Zone marking, curvature compensation, breathing and movement allowance, and transfer alignment stay in the placement owners. This page only orients the dyad toward zones with enough length or height for two figures.

FAQ

Father-son dyad decisions, answered

Short answers for dyad choice, adult-child readability, spacing and sizing, text placement, vetting failures, and where neighboring depth lives.

Match the dyad to what must read first and to the available skin. A hand-hold silhouette suits a bond-led piece with enough length for two figures plus separated hands. A shoulder-carry suits a compact vertical field where one lead face can dominate. A scale-contrast pair suits placements where the size difference itself is the message and the child can hold transfer weight alone. A side-by-side likeness pairing suits recognition-led work with portrait-scale skin plus a separated text band, and this page recommends switching to a silhouette dyad when two faces cannot each hold their anchors at the booked size.

From dyad decision to working stencil

Turn the approved dyad layout into a stencil draft.

Start from the dyad that passed the readability, spacing, and transfer checks, then continue on iPhone for body fit, exact-size print, mirror and professional export.