Covered here
Crown silhouette choice across band, pointed, jeweled, and cross-topped constructions, internal-gap and symmetry plus orientation checks at final size, and transfer-ready mirror and placement notes scoped to the crown emblem.


Crown stencil evaluation
A crown reads through a level base, mirrored points or arches, and open gaps inside every valley and jewel. Choose the variant for your width, prove symmetry and voids at true size, then transfer with a crown-specific mirror and placement plan.
Built for working artists preparing crown emblem pieces. This page covers crown silhouette choice, point, band, and jewel gap checks at final size, plus symmetry, orientation, mirror, and placement notes only, not tattoo application or healing advice. Generic first-read principles stay with the symbol depth, centerpiece framing stays with the ornament guide, and thorn-crown reverent context stays with the Jesus guide.
Crown versus neighboring jobs
A crown emblem is a symmetric insignia judged on base level, point rhythm, jewel voids, and upright orientation. These boundaries keep it out of neighboring owners that solve different stencil problems.
Covered here
Crown silhouette choice across band, pointed, jeweled, and cross-topped constructions, internal-gap and symmetry plus orientation checks at final size, and transfer-ready mirror and placement notes scoped to the crown emblem.
Neighboring owners keep
Generic first-read silhouette principles stay with symbol depth, centerpiece and frame adaptation to body flow stays with the ornament guide, and thorn-crown reverent portrait context stays with the Jesus guide.
Ornament guide for frame depth, Jesus guide for thorn-crown portrait depth, and head guide for scalp-zone placement depth.
Crown evaluation framework
Four crown constructions at labeled widths. Each one names the protected structure, the fix, the placement fit, and the go or no-go verdict at that exact size. Confirm with a measured 1:1 print.
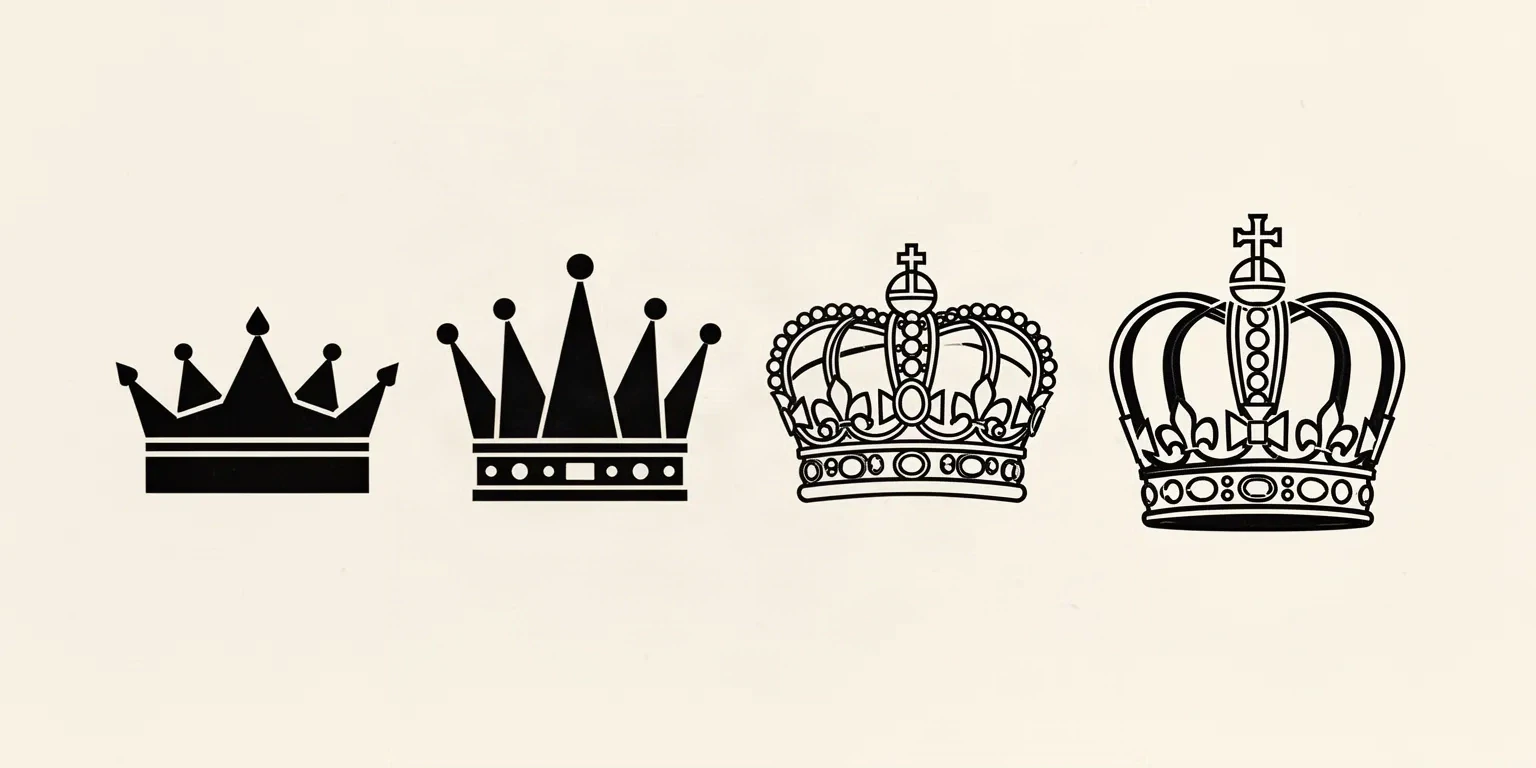
MOST FORGIVING STARTER
Intended width 80 mm
CHECK POINT GAPS
Intended width 100 mm
CHECK JEWEL VOIDS
Intended width 120 mm
NEEDS THE MOST HEIGHT
Intended height 140 mm
Generic photo-to-stencil conversion steps, ornament centerpiece composition, and reverent portrait handling stay in their owners. This framework exists to judge crown variant fit, point and jewel spacing, and symmetry at a stated width, not to replace those guides.
Internal-gap and symmetry vetting
Crowns fail on three contacts first: closing point valleys, doubled band lines, and filled jewel voids, plus one tilt axis when arches or the finial drift off center. Run each check below at true size.
Point valleys and tips
Fails as: Valley floors pinch shut where two points share one edge, or ball and cross tips touch the point apex and trap the gap between them.
Fix: Widen each valley until it traces from open air above to open skin at the base at 1:1. Build one point, mirror it across the midline, and hold every tip mark clear of its point with a visible break.
Base band lines
Fails as: The band carries a doubled inner line that prints as one thick bar, or rim ticks touch the band edge and close the channel above it.
Fix: Carry one base contour with level top and bottom edges. Remove the second inner line rather than thinning it, and keep rim ticks as separate marks with open skin on every side facing the band.
Jewel and gem voids
Fails as: Circle and oval jewels fill into solid dots because the enclosing line is too thin for the void, or neighboring gems share one edge and print as a single blob.
Fix: Keep one countable jewel row with open centers at true size. Convert the smallest gems to spaced dots or remove them, and hold open skin between every pair of neighboring jewels.
Arch symmetry
Fails as: Left and right arches differ in height, curve, or jewel count, so the crown tilts even when the base sits level on skin.
Fix: Build one arch, mirror it across the vertical midline, then judge both at 1:1 before adding any jewel. Size jewels from the center pair outward so both sides stay matched.
Finial centering
Fails as: A cross, orb, or fleur topper drifts off the midline or touches the arch apex, so the crown reads lopsided at a glance.
Fix: Center the finial on the drawn midline with open skin between it and the arch apex. When the gap closes, enlarge the field or simplify the finial, never shift the arches to meet a drifting topper.
Band text and micro detail
Fails as: Lettering, dates, or micro dots inside the band print as broken scratches because the interior height cannot carry enclosed counters at final size.
Fix: Move names and dates out of the band or enlarge past the point where every counter stays open. For small crowns, keep the band plain and let the silhouette carry the meaning.
About 8 cm and below
Finger sides, wrists, ankles, behind-ear pieces, and small gap fillers.
Carry a band crown or a tight 3-point recrop only, with one base contour and countable rim points. Keep no jewel rows, no finial, and no band lettering. If a valley or tip gap closes at 1:1, enlarge or reselect rather than forcing reduction.
About 10 to 12 cm
Common forearm, calf, shoulder, and chest crown pieces.
The most flexible band. A pointed crown or a simplified jeweled crown can work when every valley, tip break, band channel, and jewel void is verified at true size. Check mirror symmetry before approving jewel detail.
About 14 cm and above
Large thigh, back, chest, and sternum panels.
Room for jeweled royal crowns and cross-topped ceremonial crowns with full arches, but only when open skin separates band, arches, jewels, and finial at true size. Extra height does not rescue merged valleys or filled jewel centers.
Density diagnostic
Use the final-size density check when points, jewels, and band detail compete for the same width.
Gap diagnostic
Follow one closing valley or jewel void when a single separation is the blocker.
Line-weight guide
Compare fine, normal and bold behavior on the same crown before changing base or jewel line mass.
Reference to clean stencil
Crown preparation is sequencing work. Lock the variant, prove symmetry, rank decoration, then prove the print.
Set the intended physical width in millimeters, name the body area, and choose band, pointed, jeweled, or cross-topped construction before judging the reference. A jeweled crown that holds at 12 cm on a thigh can fail at 6 cm on a wrist with no line being wrong on its own. Use the size calculator when target dimensions are still open.
Draw the vertical center, level the base band against the body axis, then mirror points and arches left to right before judging any jewel. Fix asymmetry by mirroring the stronger side, not by adding more ornament to the weaker one.
Assign every mark a role: silhouette that carries the first read, support that frames it, and decoration that can be removed. Protect base level, point rhythm, and arch mirror first, then decide which jewel row or finial earns its room at this width.
Export a true-size PDF with no fit-to-page scaling, inspect the narrowest point valley, the tightest tip break, and the smallest jewel void on plain paper, then measure the physical print with a ruler. Run a squint check: step back until fine ticks disappear and confirm the crown still reads as a crown.
If the digital file passes and only the paper print fails, move to print-stage evidence: the print checker and the paper guide linked below. Do not simplify the crown further to compensate for a scaling or printer setting error.
Mirror and placement notes
A crown is directional ornament: the base must sit level on the body and the points must read upright, so mirroring and anchoring are part of the stencil, not an afterthought.
Long straight fields where the base band can sit level along the limb axis. Points read cleanly here with little compensation.
Check: Align the base with the limb axis, keep full point height inside the flat run, and mirror tip spacing at 1:1 before print.
Broad or vertical panels with room for jeweled and cross-topped crowns, but the body midline becomes part of the design and any arch asymmetry shows immediately.
Check: Center the crown midline on the body midline, hold the finial clear of the arch apex, and preview on a body photo before locking jewel count.
Small curved fields where only band and short-point crowns survive. Jewels fill and tall points overhang the bone line.
Check: Carry a band crown or 3-point recrop, keep the band plain with no lettering, and confirm every valley stays open at the exact millimeter width.
Large panels with room for full royal and ceremonial crowns, including arches and finials. Extra room suits jewel rows, but valley and void checks still apply.
Check: Spend the extra room on jewel voids and arch separation first, then decide whether a second jewel row or finial texture earns its detail.
Transfer-ready checklist
Run this sequence with scaling off and a ruler in hand. One failed line means fix, enlarge, remove a jewel row, or reselect before transfer.
Print preflight
Inspect fine valleys, tip breaks, and jewel voids at the intended width before blaming the printer.
Exact width and true-size PDF
Set physical dimensions and calibration so the 1:1 check measures what the stencil will be.
Paper choice
Match the media family to the production method after the file passes.
Body-fit preview
Check base level and arch symmetry on curved placements while edits are still cheap.
FAQ
Short answers for the variant, gap, symmetry, mirror, and placement checks that recur when a crown reference moves toward transfer-ready output.
Match the construction to the available width. A band crown suits fields at about 8 cm and below because the base alone carries the read. A 3 or 5 point crown suits forearm and calf fields near 10 cm when every valley stays open. A jeweled royal crown needs about 12 cm so each gem keeps an open center. A cross-topped ceremonial crown needs the most height, near 14 cm, so the arches mirror and the finial stays centered.
Next steps
This guide covers crown variant choice, point, band, and jewel gap checks, symmetry and orientation verification, and crown mirror and placement prep. Use the links below for related jobs such as sizing, print checks, and specialist emblem depth.
Exact size and true-size PDF
Set physical width, calibration, and page layout for the evaluated crown.
ContinueFinished-file preflight
Check fine valleys, tip breaks, and jewel voids at the intended width.
ContinueOrnament construction
Use the ornament owner for centerpiece and frame adaptation to body flow.
ContinueJesus thorn-crown depth
Use the Jesus owner when the crown is a thorn crown inside a reverent portrait.
ContinueHead placement depth
Use the head owner when the question is scalp zone and orientation, not crown silhouette.
ContinueSymmetric emblem pattern
Study the sugar-skull owner for a parallel symmetric-ornament vetting pattern.
ContinueBody-fit preview
Preview base level and arch symmetry on a real body photo while edits are still cheap.
ContinuePhoto to stencil path
Start from a crown photo when the reference itself still needs conversion into stencil-ready linework.
ContinuePaper choice
Match the media family to the production method after the file passes.
ContinueGap diagnostic
Follow one closing valley or jewel void when a single separation is the blocker.
ContinueBrowse collections
Return to broad visual browsing once the crown construction is decided.
ContinueCreate a stencil draft
Start from the evaluated crown once the go decision is made.
ContinueGeneric symbol first-read comparison, ornament frame-to-flow composition, Jesus reverent context, photo conversion mechanics, paper manufacturing detail, and placement mechanics stay in their specialist owners. The links above hand off instead of repeating that detail.
From evaluated reference to working stencil
Start from the crown that passed the variant, gap, symmetry, and placement checks, then continue on iPhone for body fit, exact-size print, mirror and professional export.