

Brick stencil evaluation

Judge any brick pattern before it becomes a stencil

Brick lives or dies on mortar gaps and course discipline. Check the mortar channels, the course level and joint offset, and the texture load at your exact field size, then prepare a clean wall stencil that stays legible through print and transfer.

Built for working artists preparing brick walls, brick filler panels, and broken-wall focal sections. This page covers running-bond course geometry, mortar-gap retention, texture simplification, curvature control, and transfer QA only, not tattoo application or healing advice.

What makes a brick pattern stencil-viable

Gaps, courses, and restraint decide the result.

A brick stencil is a repeating rectangular grid that must read as a wall at tattoo size. These three pillars predict whether that grid survives reduction, print, curve fit, and transfer.

Mortar-gap retention

A brick pattern reads as brick only when open mortar channels separate every unit. Stencil viability comes from continuous light lines (or held skin breaks) between bricks, not from shaded mortar texture or photo gradients. When neighboring brick edges touch at true size, the wall read collapses into one dark mass with no course structure.

Check: Follow one horizontal mortar line across the full width, then one vertical joint in each course. If either channel closes, pinches to a hairline, or fills solid at 1:1, the pattern needs gap work before any texture is judged.
Course alignment and offset

Courses are the second read: level horizontal rows with a consistent offset between them, most often running bond where each vertical joint sits near the center of the brick below. Transfer needs every row to stay level and every offset to repeat predictably, because one drifting row or one wandering joint breaks the wall logic across the whole field. Photo reference hides this with perspective, shadows, and broken edges that a stencil cannot carry.

Check: Mark the top edge of three neighboring courses and compare their spacing, then check that vertical joints repeat the same offset step course to course. If rows converge or joints wander, re-level the courses before changing line mass.

Texture simplification hierarchy

Brick texture is the third read and the first thing to cut: surface speckle, chipped edges, gradient shading, and weathering inside each brick. A transfer-ready brick keeps the outer silhouette of each unit plus a small number of short interior accents, and drops everything else. Detail that survives on screen merges on skin, and every surviving interior mark must earn its place against the mortar gaps it competes with.

Check: Cover all interior texture with a thumb and confirm the wall still reads as brick from mortar lines alone. If it does not, the courses are the problem, not the missing texture. Add back at most one short accent per brick after gaps pass.

Course evaluation framework

Score the pattern in minutes, then act on the weakest check.

Four brick constructions at labeled field sizes. Each one names the protected structure, the fix, and the go or no-go verdict at that exact size. Confirm with a measured 1:1 print plus a curve-fit check on the placement.

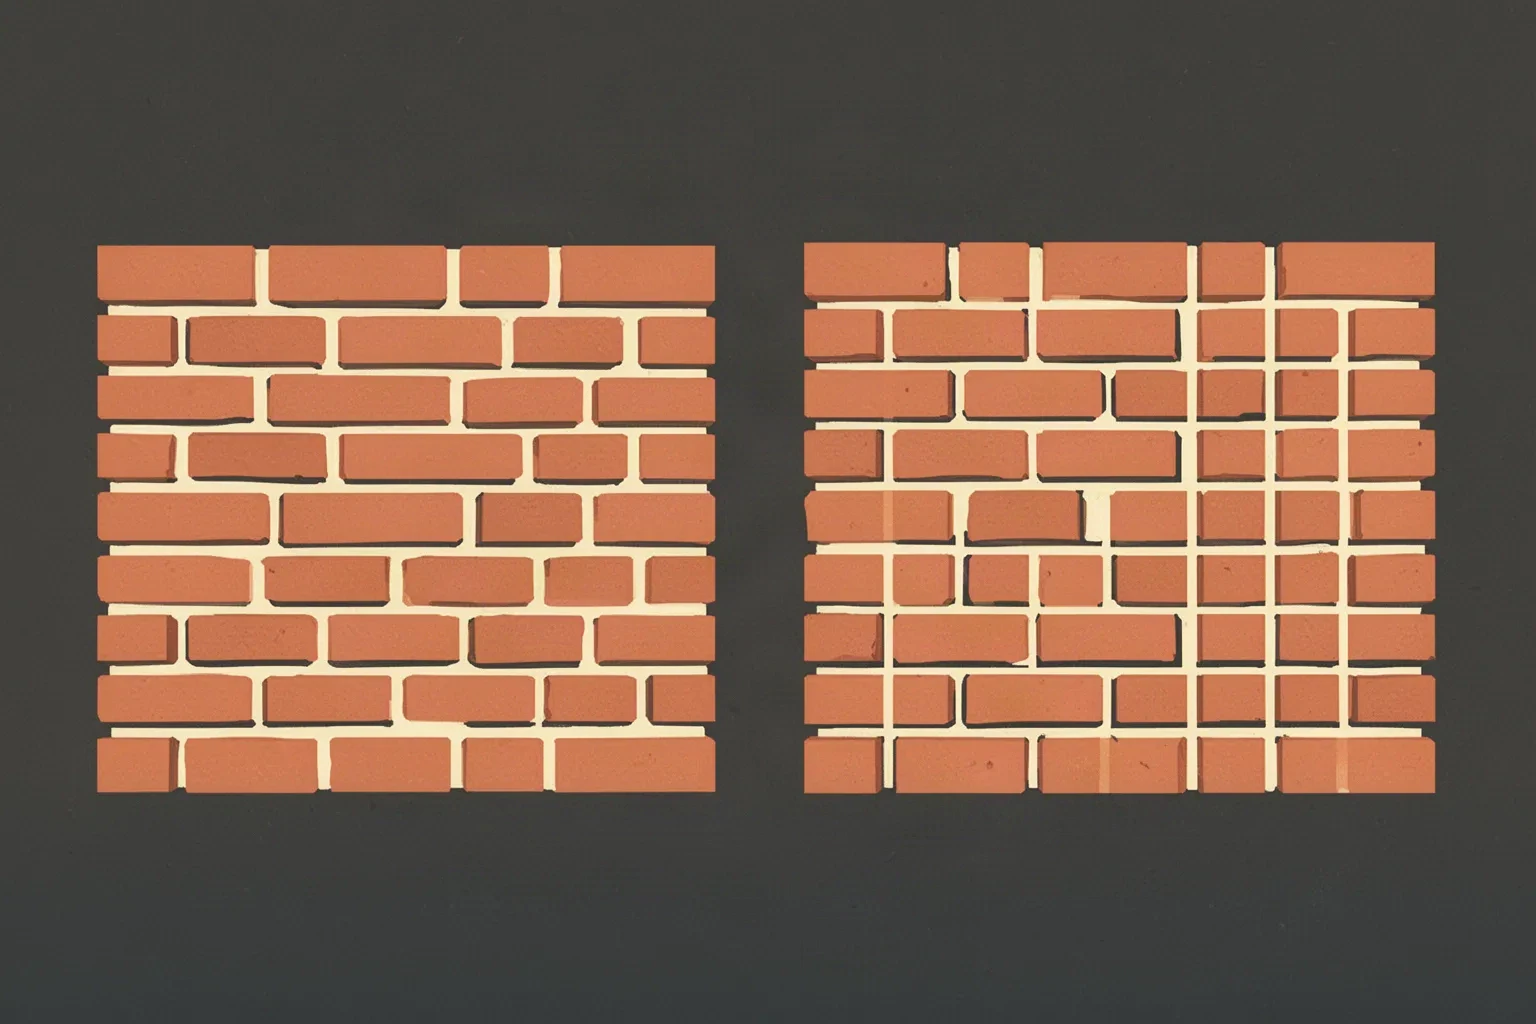
Two brick fields side by side: a running-bond field with offset vertical joints and wide open mortar channels, next to a stacked-grid field with vertically aligned joints.
Schematic illustration of course geometry, not a scale print. Left: running bond, where the repeating vertical-joint offset and open mortar channels in both directions carry the wall read. Right: stacked joints, which can transfer cleanly but read as tile, and where one drifting column repeats down the whole field.

HOLDS AT STATED SIZE

Running-bond filler panel at 12 cm wide

Field 120 mm wide x 80 mm tall, three full courses

Pattern read

Clean running-bond layout with level courses, centered vertical joints, open mortar channels throughout, and plain brick faces with no interior shading. Quiet on screen, which is why it transfers well.

Protect
Level course lines with the running-bond offset, open mortar channels in both directions, and plain brick faces that leave room for the gaps.
Fix
No structural fix needed. Confirm the narrowest mortar channel and the tightest vertical joint on the 1:1 paper print, then lock this geometry before adding any interior accent.
Candidate stencil
Same course grid with settled level and offset, open mortar in both directions, and plain brick faces (plus at most one short accent per brick) at transferable mass for the stated field size.
Final-size verdict
Holds at 12 cm after a 1:1 print check. Every mortar channel stays visibly open and the offset rhythm reads at arm's length.

SIMPLIFY TEXTURE FIRST

Photo-realistic brick wall at 10 cm wide

Field 100 mm wide, four tight courses with shaded faces

Pattern read

Attractive reference with shaded mortar beds, speckled brick faces, chipped corners, and soft photographic edges. On screen it looks like a real wall, but mortar channels are gradients rather than open separations, and interior speckle competes with every joint for the same room.

Protect
The course count, the running-bond rhythm, and the overall field proportion, which are sound and worth keeping as the rebuild base.
Fix
Convert every mortar channel to one clean open separation, delete face speckle and gradient shading, square the softest edges, and keep at most one short accent per brick. Do not shrink the field to preserve photographic texture.
Candidate stencil
Same course grid with settled level and offset, open mortar in both directions, and plain brick faces (plus at most one short accent per brick) at transferable mass for the stated field size.
Final-size verdict
Not stencil-ready until mortar reads as open skin, not shading. Texture reduction decides this case, never finer lines across the whole field.

RE-LEVEL COURSES FIRST

Stacked-grid brick patch at 14 cm wide

Field 140 mm wide x 90 mm tall, vertically aligned joints

Pattern read

Neat stacked layout with vertical joints aligned column to column instead of offset. Transfers cleanly as linework, but it reads as tile, not brick, and any single column error repeats down the whole field with no offset to absorb it.

Protect
Open channels and even brick sizing, which transfer well and can carry the rebuild.
Fix
Shift alternate courses to a running-bond offset (vertical joints near the center of the brick below) or confirm with the client that a stacked tile read is the actual goal. Re-check every joint after the shift at 1:1 before approving.
Candidate stencil
Same course grid with settled level and offset, open mortar in both directions, and plain brick faces (plus at most one short accent per brick) at transferable mass for the stated field size.
Final-size verdict
Holds as tile, fails as brick. Re-offset the courses when the brief asks for a brick wall read.

ENLARGE OR RECROP

Dense brick band forced into a wrist strip at 4 cm tall

Strip 90 mm wide x 40 mm tall, five miniature courses

Pattern read

Five full courses compressed into a narrow wrist-height band with hairline mortar channels and tiny vertical joints. Delicate on screen, but every horizontal channel and most vertical joints sit at or below the transfer floor at this height.

Protect
The offset rhythm and the field proportion, which can survive if rebuilt with fewer courses.
Fix
Reduce to two or at most three courses for the strip height, reopen every mortar channel at 1:1, or enlarge the band past the point where channels stay open. Do not keep hairline mortar mass across five courses at 40 mm height.
Candidate stencil
Same course grid with settled level and offset, open mortar in both directions, and plain brick faces (plus at most one short accent per brick) at transferable mass for the stated field size.
Final-size verdict
At this height the courses merge into banded stripes. Fewer courses, larger gaps, or a larger placement is the only stencil-ready path.

Generic photo conversion steps stay on the photo-to-stencil owner, and Mayan, Polynesian, and ornament motif vetting stay on their own pages. This framework exists to judge brick-course geometry, mortar-gap retention, and wall texture simplification at a stated field size, not to replace those owners.

Mortar, joints, and texture at final size

Judge the white space at the size you will print.

Screens forgive crowding that paper and skin do not. Set the field dimensions first, then inspect each feature below at true physical size with scaling off.

Small fields, about 6 cm wide and below

Wrist strips, ankle accents, behind-ear fillers, and small gap fillers.

Carry two or at most three courses with generous mortar channels and plain brick faces. If any channel or joint closes at 1:1, drop a course or reselect rather than forcing the full wall into the field.

Medium fields, about 6 to 15 cm wide

Common forearm panels, bicep patches, calf fillers, and shoulder blocks.

The most flexible band. Full running bond with three to five courses works when every channel and joint is verified at true size. Check course level and joint offset before adding any interior accent.

Large fields, above about 15 cm wide

Back panels, thigh walls, chest sections, and broken-wall focal scenes.

Room for more courses or one focal break (a missing-brick opening or edge stair-step), but only when open mortar separates every unit. Greater width does not rescue converging courses or gradient mortar shading.

Brick feature checks by field size
FeatureAbout 6 cm wide and belowAbove 6 cm wide
Mortar channelsHold the widest channels the design allows. Mortar is the brick read at small sizes, so channels are protected before any brick face detail.Same priority. Larger fields allow slightly narrower channels, but every channel must still read as open skin at 1:1, never as shading.
Vertical joints and offsetKeep joints few, short, and clearly offset. Omit the joints that crowd first rather than thinning all of them.Full offset rhythm can stay when each joint keeps open skin on both sides at true size. Check the full rhythm with a squint test across the field.
Interior brick textureNo interior texture at this band. Plain faces with open mortar carry the whole read.At most one short accent per brick, kept well clear of every joint. Texture that touches a mortar line belongs deleted.
Course countFewer courses with taller bricks beat more courses with hairline mortar. Course count is the main simplification lever.Added courses are fine only after gaps pass. New rows must repeat the same level and offset, not introduce a second rhythm.

Reference to clean stencil

Build along the courses, then control the curve.

Work in this order so one change at a time can be judged at the same field size. Stop when courses, offset, gaps, and texture each read correctly.

  1. 01

    Lock final size, field shape, and placement first

    Set the exact field width and height plus the named placement before judging any line. A brick panel that holds flat at 12 cm can crowd on a curved wrist at 4 cm tall with no line being wrong on its own. Use the size calculator when target dimensions are still open.

  2. 02

    Verify course geometry

    Confirm level horizontal courses with even spacing and a repeating vertical-joint offset across the whole field. Resolve converging rows, wandering joints, and stacked columns mistaken for brick bond before touching texture or line weight. A settled course grid is already halfway to stencil-ready.

  3. 03

    Set mortar-versus-brick roles

    Assign every mark a role: mortar channels that carry the wall read, brick outlines that bound each unit, and interior texture that must convert or go. Protect mortar first, keep brick edges second, and mark interior accents as removable so one closing gap has a named sacrifice.

  4. 04

    Simplify texture and reopen gaps at 1:1

    Delete speckle, gradients, and chips first, then shorten or drop interior accents until every mortar channel and joint stays open on the true-size print. Run a squint check: step back until fine detail disappears and confirm courses and offset still read. The density diagnostic covers whole-field crowding and the gap diagnostic covers one closing separation.

  5. 05

    Verify print, curve fit, and transfer path

    Export at true size with scaling off (tile across sheets when the field exceeds one page), inspect the narrowest mortar channel and the tightest joint on plain paper, measure the physical print with a ruler, then confirm the field on the body curve before committing transfer paper. If the digital file passes and only paper fails, move to print-stage evidence instead of simplifying again.

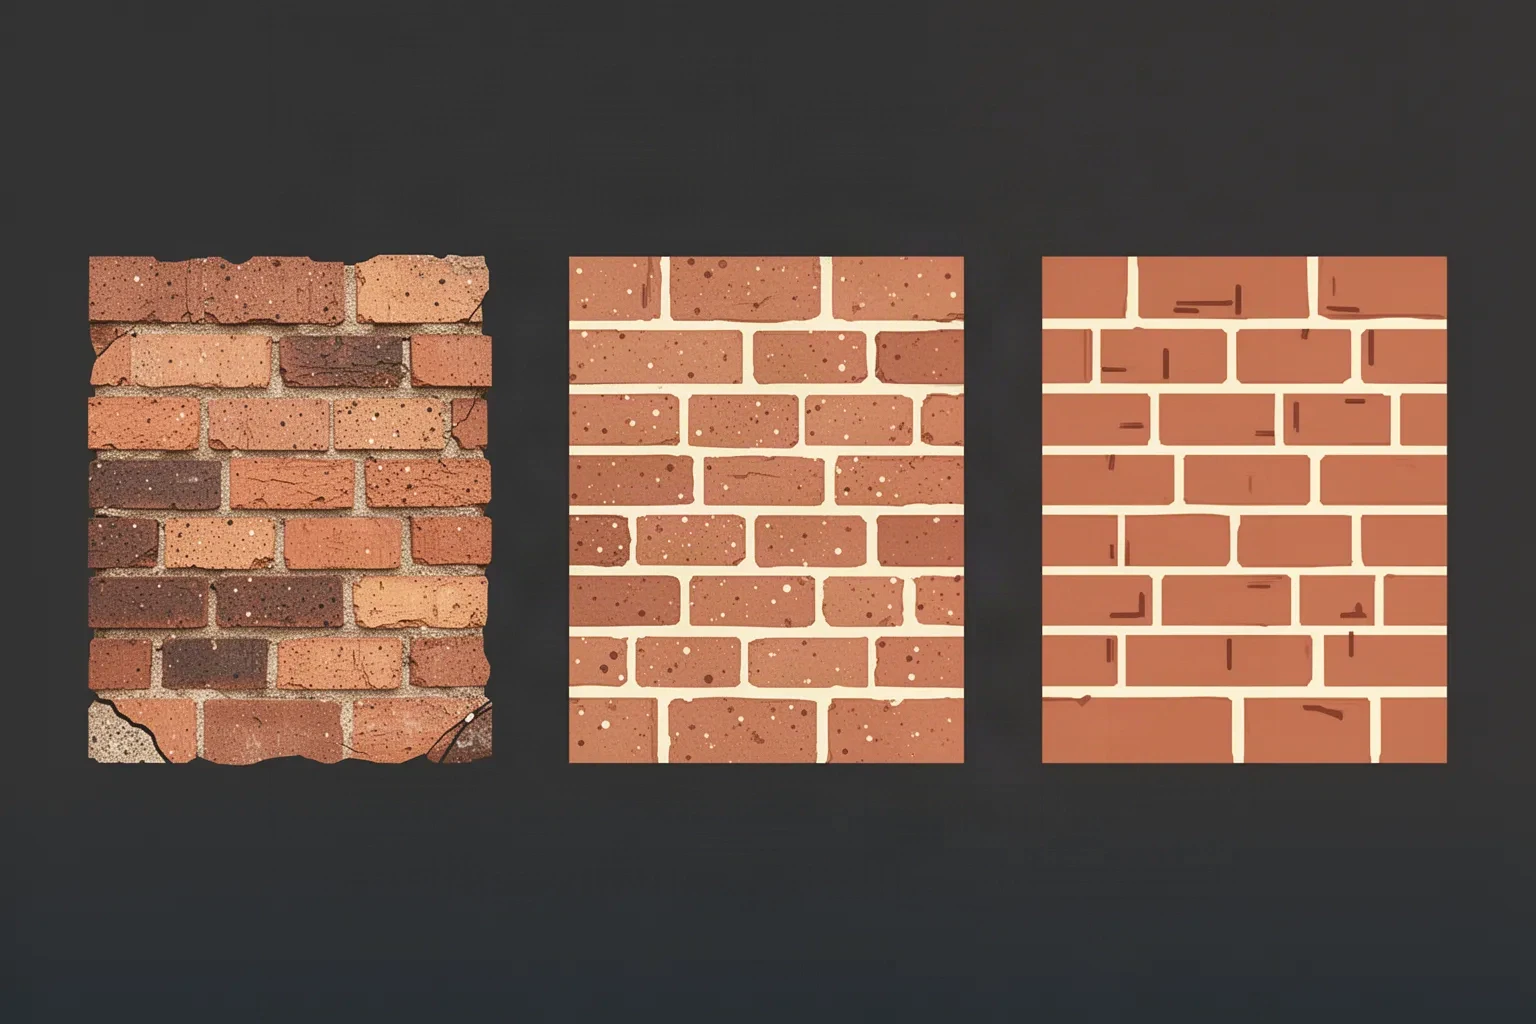
Three brick wall stages left to right: photographic speckle and gradient mortar shading, then cleaned flat bricks with leftover face speckle, then a fully simplified wall with open mortar channels and one short interior accent per brick.
Illustration of the simplification order, not a scale print. Remove photographic speckle and gradient mortar shading first, then leftover face dots, leaving plain brick faces, open mortar, and at most one short accent per brick. Confirm the real reduction on the measured 1:1 paper print.

Placement and curvature decisions

Flat grids want curved placements checked early

A brick field is drawn flat and worn on curves. Every placement below is a distortion decision with its own axis alignment and edge treatment.

Forearm and bicep panels

Gently curved fields where a rectangular brick grid must sit without looking pasted on. Long horizontal courses follow the limb well, but vertical joints compress toward the curve edges.

Check: Align courses with the limb axis, keep joints slightly more open near the field edges, and confirm the full grid on a body photo before transfer.

Back, thigh, and chest blocks

Large, relatively flat fields with room for full running bond or a broken-wall focal. The risk is overfilling: too many courses or heavy texture that looked rich on screen.

Check: Spend the extra room on mortar clarity and one focal break at most, preview the full field flat, and confirm the offset rhythm at arm's length on the 1:1 print.

Wrist, ankle, and small bands

Narrow fields where only two or three courses survive. Full-height brick walls forced into these strips merge into banded stripes.

Check: Recrop to fewer, taller courses with plain faces, then run the small-field checks at the exact millimeter height.

Wrap edges and joint-adjacent skin

Fields that turn around a limb edge or sit near a flexing joint, where the far course stretches and compresses with movement.

Check: Keep the outermost course simpler than the center, avoid focal breaks on the turn itself, and confirm the edge courses survive a flexed-versus-relaxed check before locking the stencil.

Stencil-ready checklist

Approve the wall only when every line passes

Run this short sequence with scaling off, a ruler in hand, and the field checked against the placement curve. One failed line means fix, enlarge, or reselect before transfer.

  • Confirm field width, height, course count, and the named placement.
  • Confirm level courses with a repeating vertical-joint offset at 1:1.
  • Confirm every mortar channel and joint stays visibly open on the paper print.
  • Confirm interior accents are capped at one short mark per brick, clear of joints.
  • Confirm the squint read still shows courses and offset at arm's length.
  • Export at true size with scaling off, measure the physical print, and confirm the curve fit.

Brick transfer prep

Transfer without losing the mortar

Brick transfers fail at four predictable points. Each one below names the early sign and the prevention that keeps courses and gaps intact.

Mortar fill-in

Early sign: Mortar channels print as thin grey lines or transfer as one dark field with the neighboring bricks.

Prevention: Judge channels on the measured 1:1 paper print, not the screen. Widen the tightest channel, drop the nearest interior accent, or remove one course when the narrowest gap closes, then re-check after any line-weight increase.

Course drift on curve

Early sign: Courses read level on the flat print but tilt, converge, or stair-step where the field wraps the limb.

Prevention: Confirm the field on the real curve (paper preview or body-photo fit) before transfer paper. If a row drifts on curve, re-level it in the file or rotate the whole field to the limb axis rather than stretching the transfer into place.

Joint crowding at field edges

Early sign: Center joints hold but edge joints pinch where bricks were cropped by the field boundary.

Prevention: Give cropped edge bricks slightly wider joints in the file, or recrop the field so no sliver joint sits closer than the narrowest passing gap. Verify every edge joint individually at 1:1.

Texture ghosting

Early sign: Surviving speckle or chips transfer as stray dots that read as dirt around clean brick edges.

Prevention: Delete photographic texture before print rather than after transfer. If an accent survives the file, keep it short, centered in its brick, and well clear of every mortar line.

Prerequisites before the transfer touches skin

Confirm the measured 1:1 paper print with a ruler, confirm course direction and edge joints against the placement, and mark the top-course orientation on the stencil margin. Transfer from the center outward so the free edge cannot drag courses off level. If the first contact looks faint or patchy, diagnose the layer with the transfer troubleshooter instead of pressing harder.

Open the transfer troubleshooter
Mortar stays open Courses stay level Texture stays restrained

FAQ

Brick stencil decisions, answered

Short answers for the mortar, course, texture, and placement checks that recur when a brick pattern moves toward transfer-ready output.

It works when three checks pass at the exact field size: courses stay level with a repeating joint offset, every mortar channel and joint stays visibly open at 1:1 on the paper print, and interior texture is capped so no accent touches a mortar line. If any check fails, the fix list on this page names what to re-level, simplify, or enlarge before print.

Next steps

Use the neighboring owners for adjacent jobs.

This guide covers brick-course geometry checks, mortar-gap retention, texture simplification, curvature control, and reference-to-stencil preparation. Use the links below for related jobs such as sizing, print checks, paper, and placement.

Generic conversion steps, broad gallery browsing, paper manufacturing detail, and placement mechanics stay in their specialist owners. The links above hand off instead of repeating that detail.

From evaluated pattern to working stencil

Turn the approved brick field into a stencil draft.

Start from the brick pattern that passed the mortar, course, and texture checks, then continue on iPhone for body fit, exact-size print, mirror and professional export.