Mandala-to-thigh fit

Center the mandala on the thigh, then prove it at thigh scale

A mandala is a flat disc built from one center, and a thigh is a broad crowned panel with taper and movement. This page bridges the two: thigh zone and flow choice, center alignment on the standing leg, symmetry hold at final size, wrap and taper sizing, and a single-thigh transfer-ready checklist.

Built for working artists preparing thigh mandala centerpieces. This page covers stencil preparation and visual review only, not tattoo application or healing advice.

Thigh flow decision

One thigh, four reading faces, one centerpiece decision.

A thigh mandala reads from exactly one face at a time. Pick the face first, because the center position, the usable diameter, and the taper compensation all follow that choice.

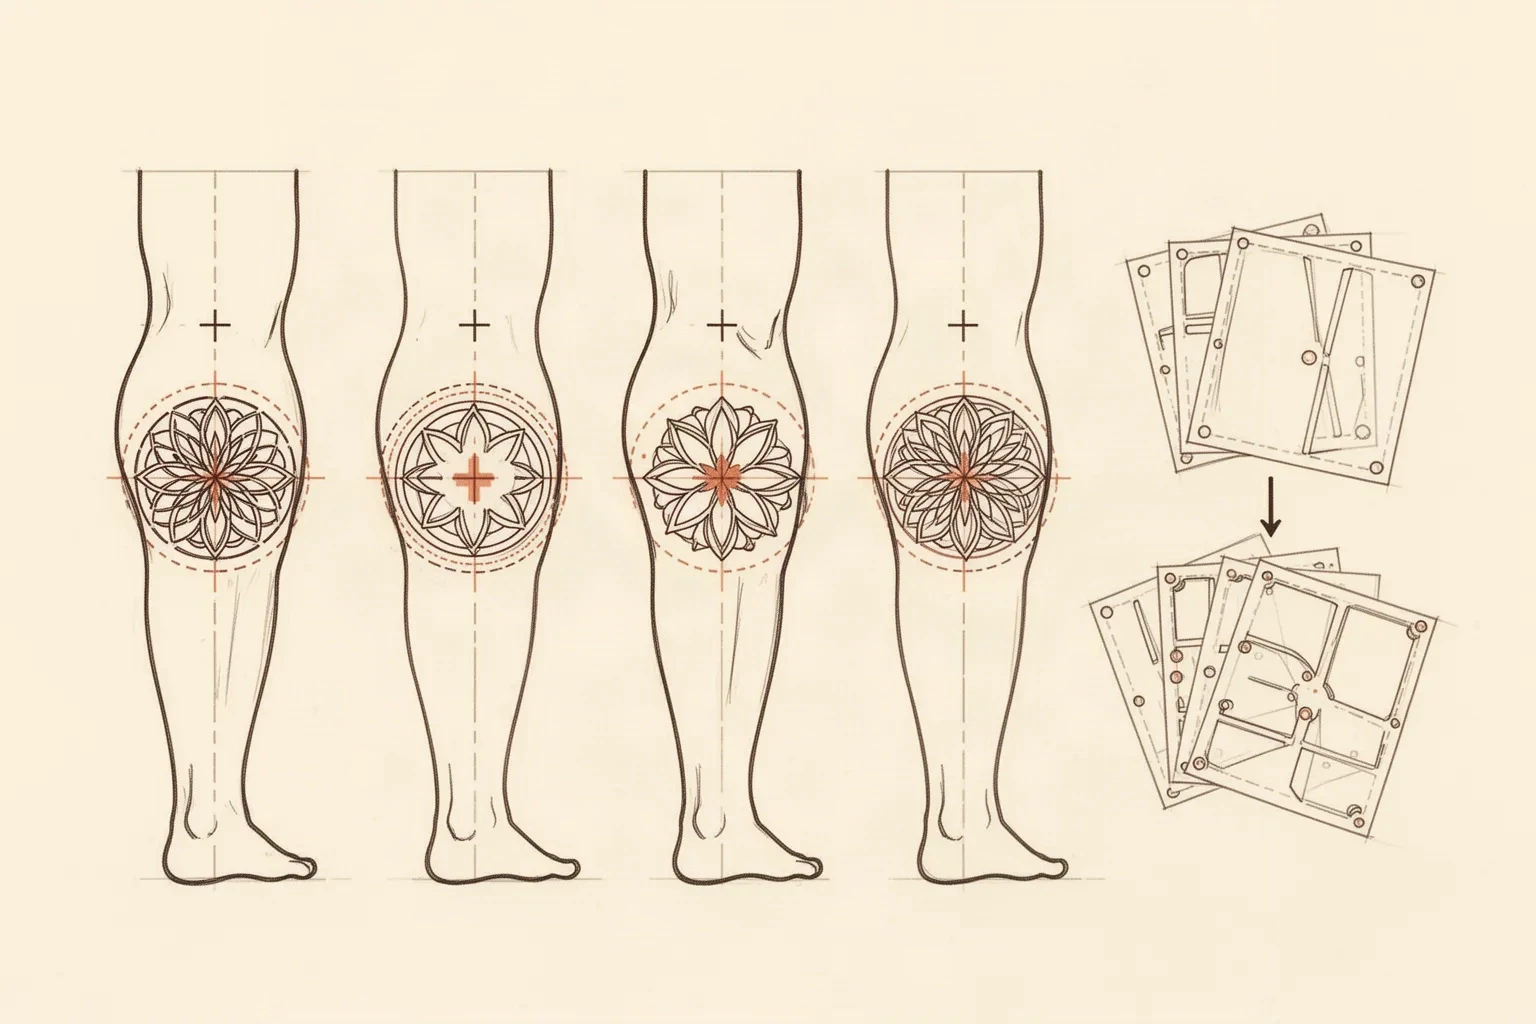
Stencil-prep line diagram of one standing leg shown from four reading faces, each with a mandala disc centered on the limb axis, plus a side inset of three overlapping stencil sheets with registration dots, showing sectioned transfer from the center outward.
Planning sketch, not a scale drawing and not a size reference: one mandala disc read from the front, outer, inner, and back faces of a standing leg, with the center on the limb axis and the sectioned transfer order running from the center sheet outward.

Front thigh

Broadest flat span, read head-on at standing distance

The flattest thigh panel, and the most forgiving bed for a true circle. The mandala center sits on the long axis of the thigh, with petal axes running with the limb so the disc reads upright in stance photos. Taper toward the knee narrows the lower half, so the bottom quadrant needs slightly narrower ornament or wider separations to survive the wrap.

Check: Center on the flattest span with the client standing, weight even. Judge symmetry head-on first, then confirm the three-quarter view before print.

Outer thigh

Gently crowned side face, most publicly visible in stride

The classic thigh centerpiece face. The surface crowns gently, so the disc stays readable but the far rim turns away fast. Wide outer rings that look generous on screen can spill past the visible face. Keep the full diameter inside the side view and let extra ornament resolve toward the front or back rather than adding a second focal.

Check: Size the diameter to the visible side panel in the outer side view. Photograph standing and walking, and treat spillover width as lost, not bonus visibility.

Inner thigh

Sheltered face, read at close range with skin contact

Fine detail stays protected here, but the field is narrower and skin meets skin in stance. Wide discs bridge the inner curve and crease on transfer, and dense dotwork bands close faster where the surface flexes. Only slim, open constructions belong here, with gaps judged in a natural stance, never spread flat.

Check: Keep the diameter inside the sheltered span with legs in a natural stance. Protect every channel with extra margin and confirm the read at close range.

Back of thigh

Rear face under the glute fold, read from behind

A workable rear centerpiece face when the design must face backward, but the top of the field meets the glute fold and the surface moves with stance and gait. Keep transfer-critical detail clear of the fold line, seat the center below it with open skin as a buffer, and verify with the client standing and walking.

Check: Mark the fold line first and stop the top ring short of it. Confirm the rear view at two to three meters before locking size.

Multi-zone thigh, calf, shin, and knee mapping stays on the leg stencil guide linked below. Full-leg flow across the knee stays on the leg-sleeve guide. This framework exists only for a single-thigh mandala centerpiece and where its center sits.

Thigh center alignment

A centered thigh mandala starts from leg landmarks, not from the artwork.

The thigh has a real center defined by stance, the limb axis, and the chosen face. Find it first, square the mandala to it, then prove it in motion before judging any ring or dot.

  1. 01

    Mark the thigh center on the standing leg

    With the client standing, weight even and feet neutral, find the midpoint of the chosen panel vertically and center it on the long axis of the thigh for front work, or on the visible side panel for outer work. Draw the center lightly on skin or on a photo before placing any ring. A center chosen from the artwork alone drifts once taper, crown, and stance enter the picture.

  2. 02

    Square the mandala to the limb axis

    Rotate the reference so one primary petal axis runs with the thigh, from hip toward knee, and the opposite axis points back up the leg. Check the left and right halves against the panel edges. If one side crowds the inner curve while the other floats over open skin, the rotation is off, not the thigh.

  3. 03

    Prove the center in stance, step, and sit

    Check the marked center standing, then repeat after one short walk and one sit-to-stand. Thigh skin shifts several millimeters with gait and flexion, and a mandala that only looks centered on a relaxed table reads tilted on the standing leg. Keep the center only when all three checks agree within a few millimeters.

Placement-independent radial evaluation without thigh fit stays on the mandala stencil guide linked below. This sequence exists only for center hold on the thigh plane.


Symmetry hold at thigh scale

Large discs fail in the gaps first, not in the lines.

Thigh diameters leave room for layered petals and dotwork gradients, which is exactly why channels close unnoticed. Run the four checks below at the exact print diameter with scaling off.

Quarter-turn agreement at final diameter

Count the intended segment repeat, then compare the segment at twelve o'clock against three, six, and nine o'clock at the exact print diameter. Petal axes should land consistently on ring axes or exactly between them in every quadrant.

Fail signal: One quadrant runs denser, taller, or rotated relative to the others. Match the weakest quadrant to the cleanest one before judging dotwork, and never thicken lines to hide the offset.

Center-to-rim channel tracing

Trace every channel from the center outward through petal separations, dotwork bands, and ring gaps with a finger at true size. Each channel should run unbroken from center to rim as visible skin.

Fail signal: A channel that dead-ends where a petal tip touches a dot cluster or a ring contour is a bridge. Reopen it by removing dots or shortening the tip, never by thinning both contours at once.

Open-gap retention at thigh scale

At 120 mm and above there is room for a real dotwork gradient and finer secondary ornament, but only when open skin survives between every mark. Inspect the narrowest petal channel, ring separation, and dot spacing on a measured 1:1 print with scaling off.

Fail signal: Channels that read as bands instead of gaps, or a dot band that squints down to flat gray, mean the construction is too dense for the diameter. Remove one secondary family or enlarge the diameter before print.

Taper and wrap symmetry read

Photograph the taped 1:1 print on the standing thigh from the front, the reading face, and the three-quarter view. The lower half narrows toward the knee, so compare the bottom quadrant against the top quadrant on the body, not on screen.

Fail signal: Lower ornament that looks even on paper but tightens or crowds on skin needs taper compensation: narrow the knee end of the stencil slightly and widen separations there, then re-check at 1:1.

Compact thigh mandala, about 100 to 140 mm

Inner thigh accents, first centerpieces on smaller frames, and open constructions with one dot band.

Keep eight or fewer segments, two structural rings maximum, and isolated dots with visible skin between them. If any channel closes at 1:1, simplify one family before enlarging.

Standard thigh centerpiece, about 140 to 180 mm

Front and outer thigh focal work with two structural rings plus one controlled secondary ring or dotwork band.

The most flexible thigh band. Verify quarter-turn agreement first, then approve dot density. Judge the bottom quadrant on the standing leg before locking the file.

Large thigh centerpiece, about 180 to 220 mm

Bold front and outer thigh centerpieces with layered petals and a real dotwork gradient.

Room for finer secondary ornament only when every gap stays open at true size. Larger size never rescues a drifted center. Plan tiling when the disc exceeds one page.

Wrap, taper, stretch, and tiling

Adjust the flat disc where the thigh actually moves

Even spacing on screen becomes uneven spacing on skin wherever the thigh crowns, tapers, or flexes. Match the compensation to the row below before changing line weight or density.

Thigh shape behavior and stencil compensation
ShapeWhat happens to the discStencil compensation
Thigh wrap around the panelThe thigh is a broad, gently crowned cylinder. A flat disc wider than the visible reading face turns away at the rim, so outer ornament disappears from the intended view.Keep the full diameter inside the visible face for the chosen view. Let surplus width resolve toward the secondary faces instead of stretching the disc wider.
Taper toward the kneeThe thigh narrows toward the knee, so equal-width bands and evenly spaced lower ornament read tighter and closer together once wrapped.Narrow the knee end of the stencil slightly, widen separations in the lower quadrant, and confirm the narrowest gap at 1:1 before print.
Stretch with stance, gait, and sittingThigh skin moves with every step and sit-to-stand. Detail aligned while the client is reclined shifts once the client stands and walks.Mark top and bottom anchors with the client standing, then re-check after a short walk and a sit-to-stand before committing to transfer.
Multi-page span and sectioned transferLarge centerpieces exceed a single sheet, and one-piece transfer across a curved thigh creases where the surface resists.Tile with overlap registration marks of about 10 to 20 mm, cut the stencil into two or three sections along open channels, and transfer the center section first with the client standing.

Transfer-ready checklist

Approve the thigh centerpiece only when every line passes

Run this sequence with scaling off and a ruler in hand, on the standing leg. One failed line means re-space, simplify, or reprint before transfer.

  • Confirm the thigh zone and flow direction plus the intended diameter in millimeters.
  • Confirm one center with matching opposite and quarter-turn segments at final size.
  • Confirm every petal channel, ring separation, and dot spacing stays open at 1:1.
  • Mark the thigh center, top and bottom anchors, and the glute-fold or knee clearance line with the client standing.
  • Dry-fit the uncut stencil, then cut short relief slits where the crown or taper resists.
  • Press from the center outward so excess length moves toward the panel edges, not back into the core.
  • Walk, stand, and sit-to-stand once, then confirm no transfer-critical line entered a fold or clearance line.
  • Measure the physical print with a ruler and photograph the placed stencil from the reading face before committing.
One thigh centerpiece, one face Center holds standing and walking Gaps open at 1:1

FAQ

Mandala thigh decisions, answered

Short answers for the zone, center, sizing, and verification questions that recur when a mandala moves onto the thigh.

Use the front thigh for the truest circle on the flattest span, and the outer thigh for the classic side-read centerpiece with the diameter kept inside the visible side panel. Use the inner thigh only for slimmer, open constructions judged in a natural stance, and the back of the thigh only with the top ring stopped short of the glute fold. When a disc needs more width than the chosen face allows, change the face or reduce one ornament family rather than stretching across the curve.

Next steps

Use the neighboring owners for adjacent jobs.

This guide covers single-thigh mandala fit: zone and flow choice, center hold at thigh scale, wrap and taper sizing with tiling, and the transfer-ready checklist. Use the links below for related jobs held elsewhere.

Generic mandala theory without thigh placement, generic leg-zone mapping without mandala geometry, full-leg sequencing, and lotus-mandala pairing detail stay in their specialist owners. The links above hand off instead of repeating that detail.

From thigh plan to working stencil

Turn the verified thigh mandala into a stencil draft.

Start from the mandala that passed zone, center, gap, and size checks, then continue on iPhone for body fit, exact-size print, mirror and professional export.