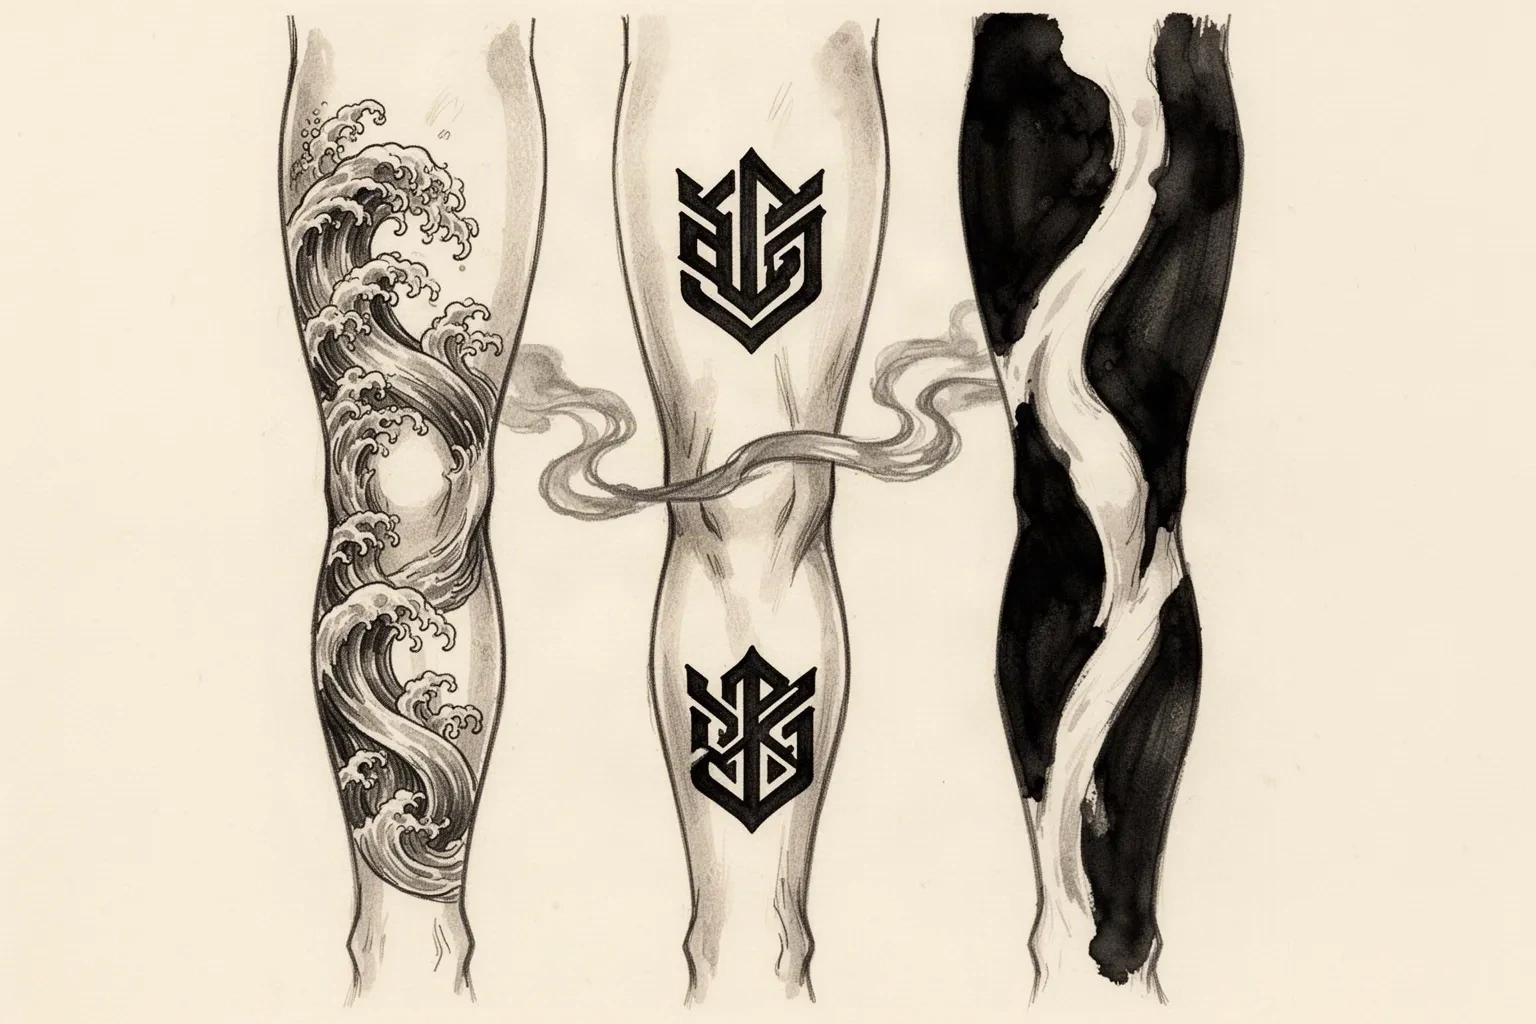
Full-leg sleeve stencil reference

Connect thigh to calf without losing the knee

A leg sleeve fails at the joint, not inside either anchor. Choose one thigh-to-calf flow system, name the knee treatment before sizing, then size for taper and stretch and sequence segmented transfer so sessions build on each other.

Built for working artists preparing full-leg sleeve stencils. This page covers stencil preparation and visual review only, not tattoo application or healing advice.

Thigh-to-calf flow systems

Three leg-sleeve systems, three knee demands.

Pick the system before judging any single reference. Each composition below names what carries continuity across the knee, what filler load it needs, and where it usually breaks at transfer size.

Conceptual ink illustration of three leg-sleeve flow systems across the knee: one continuous wave motif wrapping thigh to calf, two bold anchors joined by a single smoke band across the knee, and blackwork masses separated by an open skin corridor.
Original conceptual illustration of the three systems compared below, left to right. Synthetic editorial artwork, not app output, not a body template, and not to scale: verify every span and corridor on the actual leg.

One theme from outer thigh to calf with the knee as a bridge

Continuous vertical wrap

A single subject family (for example a dragon coil, a floral vine, or a wind-and-wave band) travels down one reading face with one direction of travel. Scale steps down from the broad thigh panel to the narrower calf panel, while line mass and shading language stay constant.

Continuity test: Strongest when the reference already shares one axis above and below the knee. Reject any reference whose thigh half flows down while the calf half flows sideways, since the knee will expose the split at standing distance.

Filler load: Low added filler. Background texture inside the reference (water, clouds, leaves) already bridges the knee corridor.

Two large focals joined by one background system across the joint

Thigh and calf anchors with a planned knee bridge

Each anchor keeps its own read (thigh portrait or emblem above, calf emblem or mask below), while one background family (smoke, dot fade, drapery, or slim ornamental bands) runs behind both in a single direction across the knee.

Continuity test: Judge the bridge first, not the anchors. If the background direction or density changes at the knee, the leg reads as two separate tattoos even when each focal is strong.

Filler load: Medium. The bridge is planned filler, so reserve its corridors early and keep small decorative filler out until both anchors pass at true size.

Bold masses with skin corridors doing the separation work

Blackwork and negative-space leg system

Large black panels, thick line groupings, or dense dot fields carry the thigh and calf, and open skin forms the highlights, separations, and the knee transition. Contrast does the work that detail does in a narrative sleeve.

Continuity test: Check skin corridors, not ink shapes. One pinched or sealed corridor at the knee or behind it breaks the system faster than a weak focal, because the eye follows the light paths down the leg.

Filler load: Minimal added filler. Extend the black or dot field with the same mass instead of inserting new motifs into reserved skin corridors.

Independent-piece collections with their own anchors and spacing belong to the patchwork planner linked below. This comparison exists to judge full-leg continuity across the knee, not to replace that collection workflow. Arm continuity logic stays with the sleeve owner linked below.

Thigh-to-calf continuity

Vet every handoff the leg actually moves through.

A leg sleeve crosses a taper, a folding hinge, a sculpted crown, a fast ankle taper, and a stance that shifts between sessions. Match the compensation to the row below before changing density or line mass.

Leg-sleeve continuity behavior and stencil compensation
Segment handoffWhat happens to a flat stencilStencil compensation
Outer thigh panel to knee approachThe thigh narrows toward the knee, so equal-width bands and parallel lines read tighter at the lower end once wrapped. A focal centered for the flat screen sits too low once the taper pulls it down.Center the thigh focal on the flattest outer span, narrow the knee end of the stencil slightly, and keep full width inside the visible face in front and three-quarter photos.
Knee flexion zoneThe kneecap slides and the skin folds with every sit-to-stand, and the hollow behind the knee creases deeply. Dense detail, hard borders, and small enclosed shapes placed on the bend line distort with flexion.Treat the knee as a transition corridor first. Keep transfer-critical detail off the deepest fold, leave connectable skin above and below it, and re-check with the knee straight, bent, and in one walking pass.
Knee exit to calf crownThe calf crowns outward just below the knee and then falls away at both sides. A flat panel wide enough to look generous on screen bridges the crown and lifts at the edges on transfer.Seat the calf focal on the crown, keep width inside the visible rear or outer panel, and dry-fit with short relief slits where the falloff resists before committing.
Calf to ankle taperThe lower leg tightens fast toward the ankle, and shoe collars cross the field. A leg-sleeve flow carried straight down seals at the ankle bone or drifts onto the foot.Taper the flow to a slim continuation above the ankle and hand malleolus wrap and shoe clearance to the leg placement owner linked below. Name the stopping width on the plan.
Full-leg stance and rotationStance, weight shift, and gait move the leg skin several millimeters between sessions. Width placed past the visible edge disappears from the main view, and seated alignment shifts once the client stands.Align every segment with the client standing, weight even, feet neutral. Design bridges for one reading face at a time and judge the sleeve standing, then re-check with bend and walk.

Open skin corridor across the knee

Use when: Best when thigh and calf anchors are dense or a future knee piece is possible.

Rule: Reserve a clear strip across the bend line (about 60 to 100 mm per the leg zone guide), keep hard borders and small counters out of it, and name it on the plan so later filler does not close it casually.

Directional bridge across the knee

Use when: Best when one background system must carry continuity, such as smoke, dot fade, drapery, or slim botanical flow.

Rule: Run the bridge in one direction only, thin its density toward the deepest fold, keep the lightest marks off the crease, and prove the bridge straight, bent, and walking before print.

Kneecap medallion as a deliberate focal

Use when: Best only when the reference is built for the joint, such as a bold mandala, mask, or emblem sized to the cap with open surround.

Rule: Size the medallion to the cap with the knee straight, surround it with open skin on all sides, and confirm the working artist accepts the joint placement. Fine detail and small enclosed counters stay out of this option.

Choose exactly one knee treatment on the small-scale map before any segment is printed at size. Single-zone knee bend detail stays with the leg placement owner linked below.

Knee bridging filler and negative space

Bridges carry the leg sleeve. Filler only fills the named gaps.

Knee filler fails when it arrives before the anchors are stable, when its direction fights the leg flow, or when it seals the flexion corridor. Match the filler family to the anchor language, keep one direction, and treat open skin as a deliberate bridge.

Smoke, cloud, and wind bands

Long directional gaps between thigh and calf anchors that need movement without a new focal.

Watch for: Keep one flow direction above and below the knee. Opposing bands on the thigh and calf read as two sleeves joined at the joint.

Drapery, petals, and slim botanical sprays

Medium gaps beside floral or organic anchors where a soft edge fits the style logic and must flex with the knee.

Watch for: Keep sprays slim and directional. A dense flower inserted as knee filler becomes a third focal, crowds both anchors, and closes the flexion corridor.

Dotwork and stipple fades

Knee transitions that need tone without linework, especially beside blackwork or grey anchors.

Watch for: Match dot mass to the neighbor anchor and thin toward the fold. Fine stipple beside bold black heals into a visual gap, and heavy dots beside fine linework overpower the calf anchor.

Slim ornamental and geometric bands

Vertical rhythm along the outer leg where repeat carries the bridge around the knee without a focal.

Watch for: Verify repeat alignment across the knee corridor and the wrap seam. A band that meets itself half a unit off at the seam reads as an error from every stance view.

Reserved open skin

The strongest option when thigh and calf anchors are dense. A clean corridor separates two heavy panels and preserves the knee transition.

Watch for: Name the reservation on the plan (knee corridor, breathing room, future bridge). Unnamed open skin gets filled casually in a later session and seals the joint.

A useful control is the corridor check: trace every reserved skin path from thigh open skin to calf open skin at true size. If a filler motif pinches that path shut before the anchors are connected, remove the filler, not the corridor.


Taper and stretch sizing

Start from leg-segment spans, then prove the gaps

These starting spans are stencil-prep guides, not placement rules. Lock one segment, judge the narrowest gap at true size, and let the working artist confirm the final call for the specific leg and skin.

Starting spans by leg-sleeve segment
SegmentStarting pointDecision rule
Thigh anchor panelLength about 180 to 260 mm, width about 100 to 150 mmSize by focal read at one to three meters. If interior gaps close at 1:1, reduce secondary texture before enlarging the panel.
Knee transition reserve or bridgeReserve or bridge about 60 to 100 mm across the bend lineReserve, do not crowd. When a composition needs this span to fit, split it into thigh and calf panels instead of shrinking the gap shut.
Calf anchor panelLength about 150 to 230 mm, width about 80 to 125 mmSize by crown fit first. When the panel must cross the falloff to fit, shorten the composition or change the reading face rather than stretching across it.
Lower-leg taper to ankle stopTaper to about 20 to 40 mm wide above the ankleLeg-sleeve flow resolves before the ankle owner begins. Detail past this width hands off to ankle checks for bone and shoe clearance.

Multi-session transfer sequencing

Sequence transfers so each session helps the next

Leg-sleeve segments land weeks apart on healing skin that shifts with stance. Run this order while each stencil is still easy to lift and reposition.

  1. Lock the full-leg map at small scale first: thigh anchor, calf anchor, one flow direction, knee treatment, filler corridors, and the ankle stop, before any segment is printed at size.
  2. Transfer the anchor segment first, usually the thigh panel, with the client standing, weight even, knees soft, and feet neutral.
  3. Mark the leg centerline, top and bottom anchors, the knee bend line, and the ankle-junction stop line, then dry-fit the uncut stencil before committing.
  4. Cut segments with short overlap registration marks (about 10 to 20 mm) so the next session has a visible handoff instead of a guessed seam across the knee.
  5. Work outward from the anchor one segment per session, photographing the healed result in front, outer, inner, and rear views plus one walking frame before cutting the next stencil.
  6. Re-verify the flow axis at each session before transfer, since swelling, healing, and stance shift the skin between sessions.
  7. Hold small filler until the thigh anchor, knee bridge, and calf anchor are stable at true size, then place filler into the named corridors only.

Failure points

Five ways leg sleeves lose continuity

Check this list against the plan before any segment is printed at size. Each failure below is cheaper to fix on the map than on healed skin.

  • Sealing the knee bend with a focal or a hard border, which splits the leg sleeve into two disconnected halves on flexion.
  • Flipping background direction between the thigh and calf panels, which breaks continuity even when each anchor is strong.
  • Sizing thigh and calf panels at equal width, which lets the calf end arrive denser and tighter once the taper and crown act on it.
  • Letting scale drift between sessions, so the calf panel heals finer or bolder than the thigh work beside it.
  • Carrying leg flow straight into the ankle bone with no stop, which fails the same way ankle bands fail at the malleolus and shoe line.

Leg-scale readability and print

Prove each segment on paper before skin

Long leg segments hide one small closing gap among many correct ones. Run this short sequence with scaling off and a ruler in hand.

  • Confirm intended length and width in millimeters for the current leg segment.
  • Export a true-size PDF with no fit-to-page scaling, including tiled sheets when the segment exceeds one page.
  • Inspect the smallest opening, counter, and wrap separation in that segment at 1:1 on plain paper.
  • Compare the stencil against a photo of the actual leg with the client standing, not a generic leg template.
  • Confirm knee reserve width, tile overlap marks, and ankle-stop width on the physical print with a ruler.
Verify gaps at 1:1 Name the knee treatment Measure every segment

FAQ

Leg-sleeve stencil decisions, answered

Short answers for the flow, knee, filler, sizing, and sequencing questions that recur on full-leg sleeve plans.

Pick one of the three systems above (continuous wrap, anchors with a planned bridge, or a blackwork skin-corridor system), lock one flow direction and one reading face, then plan the thigh, knee, and calf as three panels sharing that axis. This page recommends treating the knee as a named transition first and judging the bridge before either anchor, with single-zone thigh, calf, and shin depth staying with the leg placement owner linked below.

Next steps

Use the neighboring owners for adjacent jobs.

This guide covers thigh-to-calf flow comparison, knee-gap bridging and filler, taper and stretch sizing, multi-session transfer sequencing, and leg-scale readability vetting. Use the links below for related jobs held elsewhere.

Single-zone placement maps, arm-sleeve filler and sequencing, generic multi-piece arrangement mechanics, and exact-size print mechanics stay in their specialist owners. The links above hand off instead of repeating that detail.

From leg-sleeve plan to working stencil

Turn the approved leg-sleeve direction into a stencil draft.

Start from the composition that passed the flow, knee, filler, and size checks, then continue on iPhone for body fit, exact-size print, mirror and professional export.