

Amulet stencil evaluation

Choose an evil-eye amulet that stays clean at size

Evil-eye amulets live or die on concentric ring hierarchy, shared centering, and ornament restraint. Compare the traditional nazar, minimal dot-ring, ornate boho, and Hamsa pairing against your placement and width, vet every channel at final size, then prepare a stencil that transfers as one even protective mark.

Built for working artists preparing protective amulet pieces. This page covers evil-eye amulet archetype choice, concentric ring and dot hierarchy with bleed control, small-size readability, and amulet transfer prep only. General eye variant choice across realistic, third eye, and crying eye stays on the eye owner linked below.

What makes an amulet stencil-viable

Flat rings, shared centering, and one ornament budget.

An evil-eye amulet is stacked flat bands around one center, not a portrait eye. These three pillars predict whether that stack survives reduction, print, and transfer.

Flat concentric hierarchy

An evil-eye amulet reads as stacked flat rings, not as a portrait eye. The stencil ranks the outer almond contour first, the concentric color rings second, and the centered pupil third. Reference photos show glass shading, iris striations, and sclera veins that suggest depth but close every ring channel at transfer size. Viability comes from flat separable bands with open skin between each before any shading or texture.

Check: Cover rays, dots, lashes, and shading. If the bare rings plus pupil still read as one calm centered amulet at a glance, hierarchy is sound. If rings touch or the pupil drifts off center, lock ring spacing and centering before touching ornament.
Two-axis symmetry plus centering

Protective amulets are judged at a glance for evenness. The outer contour mirrors left to right and top to bottom around one shared center, and every inner ring shares that same center point. Bead photos shot at an angle, boho drawings with hand-drawn wobble, and Hamsa pairings with off-center eyes all transfer as a tilted or drifting read. Symmetry and shared centering carry the protective graphic feel more than line weight does.

Check: Fold the design mentally on vertical and horizontal axes at true size. If outer contour, rings, and pupil all mirror and share one center, symmetry holds. If any ring thickens on one side or the pupil sits high, recenter before print.

Ornament budget with skin breaks

Rays, dot halos, lash ticks, and Hamsa frames are support, never structure. Each ornament needs its own open-skin break from the outer contour and from its neighbors, because thin parallel gaps around a small amulet bridge first during transfer. A clean amulet with one spaced ornament row outlasts a rich amulet with four crowded rows at the same width.

Check: Trace every ray tip, dot, and lash tick to open skin at true size. If each ornament keeps its own clearance from the contour and from its neighbors, the budget holds. If two rows share one thin gap, cut one row before thinning lines.

Nazar versus dot-ring versus boho versus Hamsa

Choose the amulet construction the placement can hold.

Archetype is the highest-cost decision on an amulet stencil. Set it against width, curve, and wrap before refining a single dot or ray.

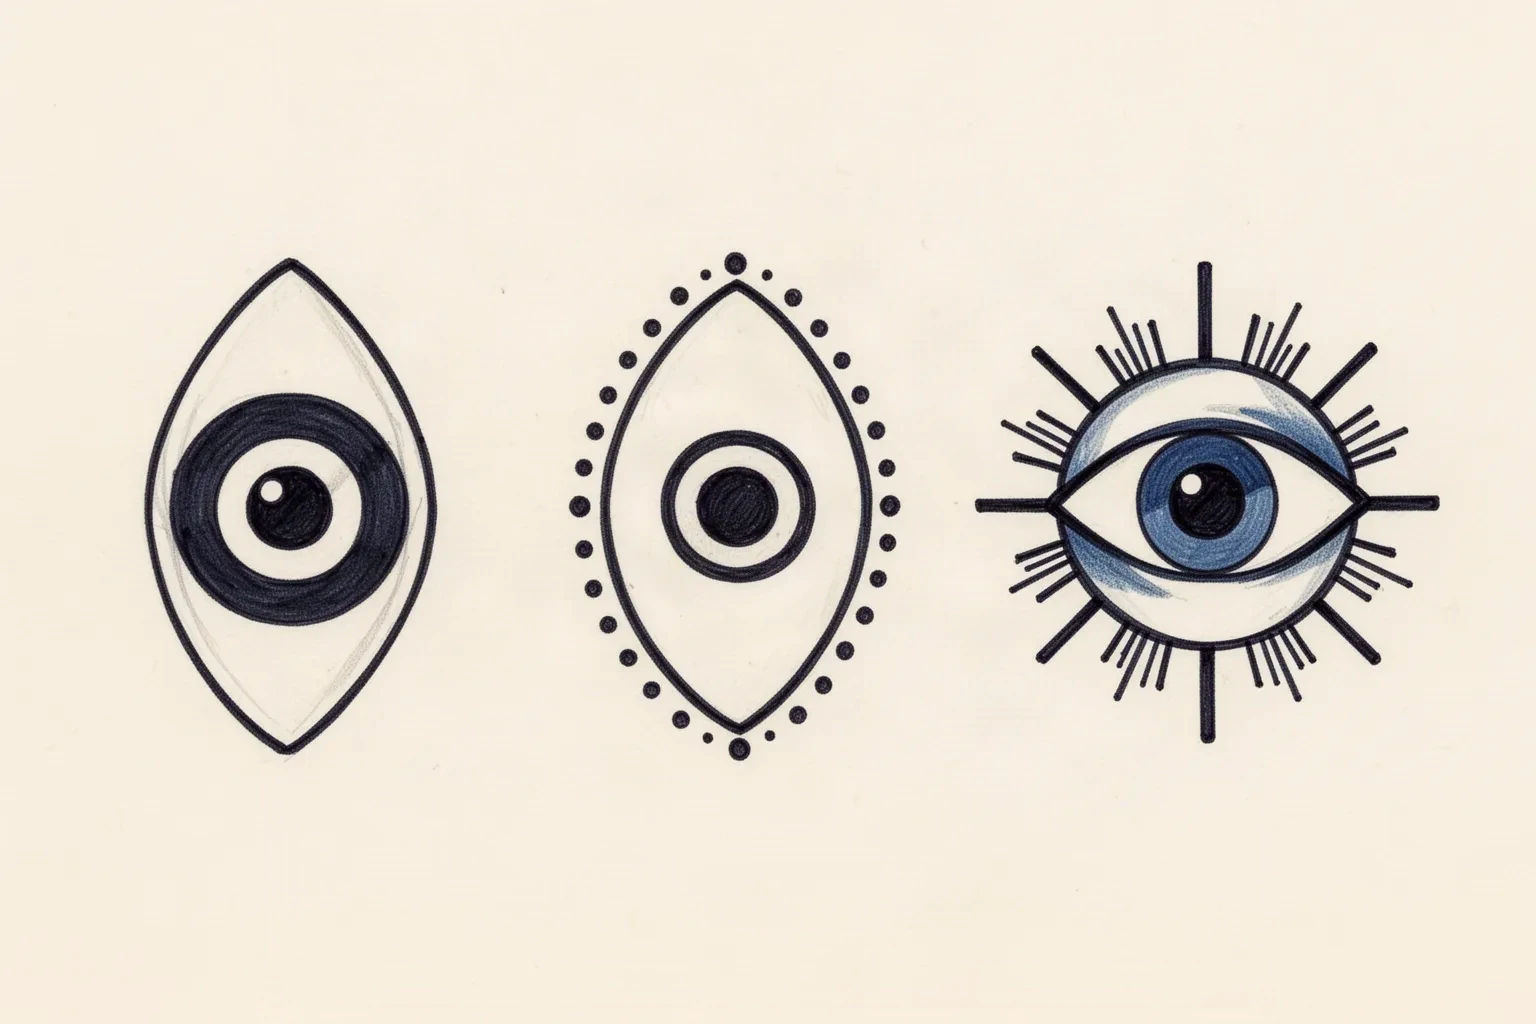
Ink reference plate showing three evil-eye amulet constructions side by side: a flat nazar medallion with a bold outer ring and a centered pupil, a dot-halo amulet with an evenly spaced ring of small dots around the contour, and an ornate amulet with short rays radiating outside the contour.
Three construction directions side by side: a flat ringed nazar, a dot-halo amulet, and a rayed amulet. Compare ring channels, dot spacing, and ornament clearance from the contour rather than shading. Synthetic editorial illustration, not StencilStudio app output.

Traditional nazar bead

Best for: Wrist, ankle, sternum center, and upper back center where a flat protective graphic must read fast with no portrait depth.

Build: One symmetric almond contour with two to three flat concentric rings inside plus one centered round pupil. White ring reads as open skin on the stencil. Protect outer contour symmetry, even ring channels, and dead-center pupil placement.

Failure mode: Extra fourth rings, thin pinstripe dividers, and glass highlight dots crowd the channels first. Four rings plus highlights at small widths merge into one dark bead with no separation.

Size floor: Holds from about 4 cm wide upward with three rings; below that, keep two rings plus pupil with no extra dividers.

Minimal dot-ring amulet

Best for: Behind-ear marks, finger-adjacent panels, and small gap fillers where the amulet must survive as a quiet ward at very small widths.

Build: One outer almond plus one inner ring plus pupil, with a single spaced dot halo outside the contour. Protect dot spacing, contour symmetry, and the ring-to-dot clearance band.

Failure mode: Dense dot halos and double dot rows close into a scalloped edge first. Dots placed tight to the contour bridge to it during transfer and read as edge wobble.

Size floor: Holds from about 3 cm upward with one spaced dot row; below that, drop dots and keep rings plus pupil only.

Ornate boho amulet with lashes and rays

Best for: Forearm, calf, and shoulder panels where detail has room and the amulet is a decorative focal rather than a small ward.

Build: Nazar core with short outer rays or grouped lash ticks plus one optional dot row, each ornament row separated from the contour by its own skin break. Protect core ring spacing first, then ray tip clearance, then lash grouping.

Failure mode: Long rays, hair-by-hair lashes, and dot rows stacked together consume every gap at once. Ray bases touch the contour while dot halos touch ray tips, closing two separations in one move.

Size floor: Holds from about 6 cm wide upward with one ornament row; below that, keep the nazar core and cut rays or lashes first.

Hamsa-centered pairing

Best for: Sternum, upper back center, and forearm panels where two protective symbols combine into one framed composition.

Build: One Hamsa palm outline with the amulet seated at the palm center, amulet rings simplified to two plus pupil so the hand stays the frame. Protect amulet centering inside the palm, finger separation gaps, and the amulet-to-palm clearance ring.

Failure mode: Detailed fingers, palm patterning, and a full three-ring amulet compete for the same small field. Finger webs close while amulet channels merge, so both symbols fail together.

Size floor: Holds from about 7 cm tall upward combined; below that, choose the amulet alone or enlarge before keeping both symbols.

General eye variant choice across realistic, third eye, and crying eye anatomy stays on the eye owner. This comparison exists to place one protective amulet correctly, not to replace that owner.

Amulet evaluation framework

Score the reference in minutes, then act on the weakest check.

Four amulet constructions at labeled sizes. Each one names the protected structure, the fix, and the go or no-go verdict at that exact size. Confirm with a measured 1:1 print.

HOLDS AT STATED SIZE

Traditional three-ring nazar at 45 mm

Intended width 45 mm

Reference read

Flat nazar bead with a symmetric almond contour, three even concentric rings, and one centered round pupil. Demanding on screen because ring channels look narrow next to bold color fills, but every channel and the pupil surround stay open at this width.

Protect
Outer almond with two-axis symmetry, even ring channels with open skin between rings, and centered pupil with its own surround.
Fix
Measure every ring channel at 1:1 and even the narrowest channel to match the widest. Hold highlights to one small counter or none. Keep contour symmetry unchanged.
Candidate stencil
Same amulet with a symmetric outer contour, even ring channels sharing one center, a centered pupil with its own surround, and any dots, rays, lashes, or Hamsa frame kept outside the contour with independent skin breaks at transferable mass.
Final-size verdict
Holds at 45 mm once every channel measures even at true size. Concentric spacing carries the bead read while the centered pupil anchors it.

HOLDS AT STATED SIZE

Minimal dot-ring amulet at 32 mm

Intended width 32 mm

Reference read

Small amulet with outer almond, one inner ring, centered pupil, and one spaced dot halo outside the contour. Strong at small widths because only two rings compete for interior room and dots sit clear of the edge.

Protect
Two-ring interior with pupil surround, contour symmetry, and dot-to-contour clearance band around the full perimeter.
Fix
Keep dots to one row with gaps at least as wide as one dot, hold the clearance band even on all sides, and remove any second dot row before reducing ring count.
Candidate stencil
Same amulet with a symmetric outer contour, even ring channels sharing one center, a centered pupil with its own surround, and any dots, rays, lashes, or Hamsa frame kept outside the contour with independent skin breaks at transferable mass.
Final-size verdict
Holds at 32 mm as a quiet ward once dots keep spacing and clearance. The simplified interior keeps the bead readable where a three-ring core would crowd.

SEPARATE ROWS FIRST

Ornate boho amulet with rays and dots at 60 mm

Intended width 60 mm

Reference read

Boho amulet with three-ring core, short outer rays, grouped lash ticks, and a dot row beyond the rays. Rich on screen because layered ornament suggests handcrafted detail, but ray tips approach dot halos while lash bases approach the contour in the same small band.

Protect
Core ring spacing with centered pupil, plus the outer contour as the boundary every ornament must clear.
Fix
Keep one ornament row at this width: either short rays with tip clearance or grouped lashes with separations, plus dots only when both keep independent gaps. Shorten rays so tips clear dots, regroup lashes into countable ticks, and cut the weakest row when gaps still touch at 1:1.
Candidate stencil
Same amulet with a symmetric outer contour, even ring channels sharing one center, a centered pupil with its own surround, and any dots, rays, lashes, or Hamsa frame kept outside the contour with independent skin breaks at transferable mass.
Final-size verdict
Holds at 60 mm once the core plus one ornament row each keep independent separations. Stacked rays plus lashes plus dots together need a larger width.

ENLARGE OR SEPARATE

Crowded Hamsa pairing with full amulet at 40 mm

Intended height 40 mm

Reference read

Hamsa palm with patterned fingers holding a full three-ring amulet with ray tips and dot accents in one small field. Appealing on screen because both symbols appear complete, but finger webs, palm pattern, ring channels, and dot halos share separations that all narrow together.

Protect
Amulet centering inside the palm and the overall palm direction with finger count.
Fix
Enlarge past the point where every finger web, ring channel, and dot gap transfers open, or separate the job: simplify the amulet to two rings plus pupil with no rays or dots, reduce palm pattern to one outline, and keep a visible clearance ring between amulet and palm. Do not keep full amulet detail plus patterned palm together at 40 mm.
Candidate stencil
Same amulet with a symmetric outer contour, even ring channels sharing one center, a centered pupil with its own surround, and any dots, rays, lashes, or Hamsa frame kept outside the contour with independent skin breaks at transferable mass.
Final-size verdict
At 40 mm the finger webs bridge, ring channels merge, and dots join ray tips. Enlarge, simplify to amulet alone, or reserve this pairing for widths near 70 mm and above.

Rings, dots, and ornament at final size

Judge the white space at the size you will print.

Screens forgive crowding that paper and skin do not. Set the size first, then inspect each feature below at true physical size with scaling off.

About 3 cm and below

Behind-ear marks, finger-adjacent panels, and tiny gap fillers.

Carry a simplified core only: two rings plus pupil with no rays, lashes, or dots, or one minimal outline recrop. If any ring channel closes at 1:1, enlarge or reselect rather than forcing reduction.

About 3 to 5 cm

Common wrist, ankle, and small sternum wards.

The standard amulet band. A three-ring nazar or a two-ring core with one spaced dot row can work when every channel and every dot gap is verified at true size with a ruler.

About 6 cm and above

Forearm, calf, shoulder, and framed Hamsa compositions.

Room for one ornament row plus a full core, or a simplified Hamsa pairing, but only when the core, each ornament row, and finger separations each keep independent skin breaks. Larger width does not rescue merged centers or touching rows.

Amulet feature checks by size band
FeatureAbout 3 cm and belowAbout 6 cm and above
Concentric rings and pupilKeep two rings plus a centered pupil with one even channel each. Third rings, pinstripe dividers, and second highlights merge first and should be removed at small widths.Three rings plus one pupil can work when every channel measures even at 1:1 and the pupil keeps its own surround. Check centering on both axes, not one.
Dots, rays, and lash ticksKeep one spaced row or none, with gaps at least as wide as one mark and a clear band between ornament and contour. Double rows and long rays bridge first.One ornament row with tip and base clearance can work when each mark traces to open skin. Stacked rays plus lashes plus dots need independent breaks or a larger width.
Hamsa frame and finger gapsKeep no Hamsa frame, or one plain palm outline with a simplified two-ring amulet. Patterned palms and full amulet cores together close finger webs and ring channels at once.A plain palm with separated fingers plus a two-ring amulet can work when the amulet-to-palm clearance ring stays open around the full perimeter. Keep patterning to one short contour or spaced stipple.
Shading and glass textureKeep no glass gradients, bead shading, or stipple fields. Plan modeling as open skin or one flat ring on the stencil itself.Spaced stipple or one short contour can suggest bead roundness when each mark keeps spacing. Photo-style gradients and fine iris striations stay out of the stencil.

Reference to clean stencil

Build from the contour inward, then protect the gaps.

Work in this order so one change at a time can be judged at the same size. Stop when contour, rings, pupil, and ornament each read correctly.

  1. 01

    Lock archetype, size, and placement first

    Set the amulet archetype in one line (traditional nazar, minimal dot-ring, ornate boho, or Hamsa pairing), the intended physical width or height in millimeters, and the named body area. A boho amulet that holds at 60 mm on a forearm fails as a 30 mm wrist ward with no line being wrong on its own. Use the size calculator when target dimensions are still open.

  2. 02

    Verify symmetry and ring hierarchy

    Confirm the outer contour mirrors on both axes with every ring sharing one center, then rank the composition: contour first, ring channels second, pupil third, ornament last. Resolve off-center pupils, uneven channels, and tilted contours before touching ornament. An amulet with even channels and a centered pupil is already halfway to stencil-ready.

  3. 03

    Set core versus ornament roles

    Assign every mark a role: core structure that carries the protective read, support ornament that frames it, and texture that can be removed. Strengthen contour, ring boundaries, and pupil mass first, keep one ornament row lighter, and mark one removable row or pattern that can go if gaps close.

  4. 04

    Simplify ornament and counters at 1:1

    Reduce dots to one spaced row, shorten rays for tip clearance, regroup lashes into countable ticks, and hold the Hamsa clearance ring open where paired. Run a squint check: step back until fine rows disappear and confirm rings plus pupil still read. The line-weight guide covers fine, normal and bold behavior on the same stencil.

  5. 05

    Verify print and transfer path

    Export a true-size PDF with no fit-to-page scaling, inspect the narrowest ring channel, the tightest dot gap, and the smallest finger web on plain paper, then measure the physical print with a ruler. If the digital file passes and only paper fails, move to print-stage evidence instead of simplifying again.

Placement and composition decisions

Centerlines want symmetry, small wraps want restraint

An amulet is either a small ward, a decorative focal, or a framed Hamsa composition. Flat placements preserve channels with little compensation, while curved wraps demand the matching simplification.

Sternum and upper back center

Flat centerline fields where symmetric amulets read strongest, but breathing movement and underbust folds shift small wards during wear. Centerline placement makes any asymmetry immediately visible.

Check: Center the amulet on the flattest span, verify two-axis symmetry at 1:1, and keep Hamsa pairings to larger widths with an open clearance ring.

Wrist and ankle

Small wrapped fields where standard 30 to 50 mm amulets live. Curvature narrows ring channels on the outer edge while footwear and watch friction wear small transfers fast.

Check: Choose a two or three-ring core with one ornament row maximum, verify every channel at the exact millimeter width, and confirm orientation on a live body preview.

Behind ear and finger-adjacent panels

Very small recessed fields where only a simplified core survives. Dot halos and rays forced into these bands bridge to the contour first.

Check: Recrop to two rings plus pupil with no ornament, or one spaced dot row only when each gap proves open at true size.

Forearm, calf, and shoulder

Larger fields with room for ornate boho rows or Hamsa pairings along the limb axis. Width is available, but stacked ornament rows still compete for the same clearance band.

Check: Spend width on core channel separation first, then award one ornament row its own skin break, and preview wrap and taper on a body photo before locking the stencil.

Stencil-ready checklist

Approve the amulet only when every line passes

Run this short sequence with scaling off and a ruler in hand. One failed line means fix, enlarge, or reselect before transfer.

  • Confirm the amulet archetype with intended size in millimeters and the named placement.
  • Confirm the outer contour mirrors on both axes with every ring sharing one center at 1:1.
  • Confirm every ring channel stays open with even spacing and the pupil keeps its own surround.
  • Confirm ornament totals one spaced row or zero at small sizes, with tip and base clearance intact.
  • Confirm any Hamsa pairing keeps finger webs open plus an amulet-to-palm clearance ring.
  • Export a true-size PDF with scaling off and measure the physical print.
Contour plus rings first Verify channels at 1:1 One ornament row keeps its own break

FAQ

Amulet stencil decisions, answered

Short answers for the archetype, ring hierarchy, Hamsa pairing, size, and placement checks that recur when an evil-eye reference moves toward transfer-ready output.

Match the archetype to placement and available size. A traditional nazar suits wrist, ankle, and sternum wards where a flat graphic must read fast. A minimal dot-ring suits behind-ear and finger-adjacent fields where only a simplified core survives. An ornate boho amulet with rays or lashes suits forearm, calf, and shoulder panels with room for one ornament row. A Hamsa pairing suits larger sternum, back, and forearm compositions near 70 mm and above. If ring channels, dot gaps, or finger webs close at 1:1, simplify or enlarge before thinning any line.

Next steps

Use the neighboring owners for adjacent jobs.

This guide covers evil-eye amulet archetype choice, size-tied ring hierarchy and bleed control, small-placement readability, Hamsa pairing vetting, and reference-to-stencil preparation. Use the links below for related jobs such as sizing, print checks, paper, and placement.

Realistic, third-eye, and crying-eye anatomy, cross-subject small-size theory, and zone-specific wrap mechanics stay in their specialist owners. The links above hand off instead of repeating that detail.

From evaluated reference to working stencil

Turn the approved amulet into a stencil draft.

Start from the amulet that passed the ring, centering, ornament, and counter checks, then continue on iPhone for body fit, exact-size print, mirror and professional export.