

Realistic rose vetting reference

Vet the realistic rose before transfer

A realistic rose photo holds more petal detail than transfer paper can carry. Rank the bloom into readable layers, hold separation floors along every overlap, restrain thorns and leaves, then prove the outline with a measured true-size print.

Built for working artists preparing client-ready realistic roses. This page covers stencil preparation and visual review only, not tattoo application or healing advice. Generic conversion mechanics, placement-specific fit and fill execution live in the neighboring owners linked below.

Petal-overlap framework

Read a realistic rose as three ranks, not forty lines.

Photo detail flattens every petal into equal importance. Ranking restores the hierarchy a stencil needs: protect the cup, prove the middle overlap order, simplify the outer silhouette first.

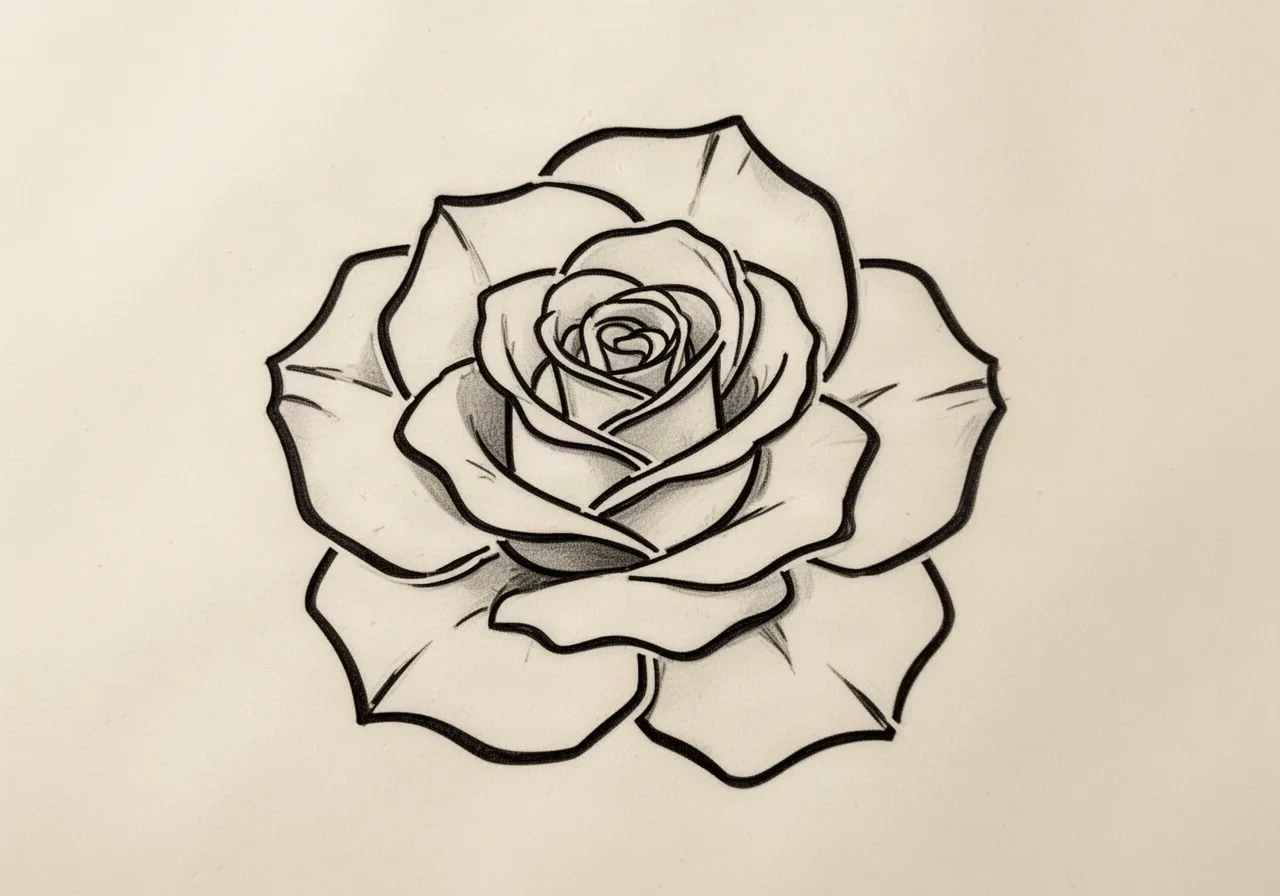
Illustrative realistic rose outline organized into three ranks: a tight inner cup, a middle rank of wrapping petals, and a simplified outer rank, with visible open gaps between adjacent petal contours
Reading order, not a finished tattoo: the illustration separates the inner cup, the middle rank that proves overlap order, and the outer rank that receives the simplifications. Follow the open gaps between adjacent petal contours as the channels the vetting floors below protect. This is editorial synthetic artwork for layer reading, not transfer-ready stencil output, and it does not substitute for the measured 1:1 print check.

Layer 1: inner cup

The anchor that sets bloom direction

The tight center swirl where petals wrap closest together. In a photo this zone holds the most detail: curled edges, deep shadow pockets, tiny reflected highlights. On a stencil it must become the simplest read in the drawing, usually two or three cup contours plus one open counter that marks the deepest point. Everything else in the bloom is judged against this anchor.

Check: Cover the rest of the bloom and read the cup alone at final size. If the cup direction is unclear here, no outer petal will rescue it later.

Layer 2: middle rank

The petals that prove the overlap order

The two to four petals wrapping directly around the cup. Each one needs a full visible edge from its outer rim to the point where it tucks behind a neighbor, plus an unbroken skin channel along that edge. Photo references often show these petals touching with soft gradient transitions between them. The stencil job is to convert each soft transition into a deliberate open gap, because thermal and inkjet transfer renders gradients as smudge or drops them.

Check: Trace each middle petal edge end to end. If two petals share one drawn edge with no skin between them, that channel needs reopening before anything else changes.

Layer 3: outer rank

The silhouette petals, thinned first

The broad outer petals that set overall width and bloom posture. They carry the least structural load and the most removable detail: ruffled rims, secondary folds, edge serration, surface veining. When a realistic rose fails at final size, the failure almost always lives here, where three outer folds converge into one crowded corner. Simplify this rank before touching the cup or the middle rank.

Check: Name every line on each outer petal and keep only the rim contour, the tuck point, and one fold line. Move the rest to tattoo-time shading, not transfer paper.

Rose-specific reference set

Three realistic roses judged at stated widths.

Each card below is a realistic rose construction at an exact intended width: what to protect, what to remove, and the go or no-go verdict at that size. Confirm every verdict with a measured 1:1 print before transfer.

HOLDS AT STATED SIZE

Three-quarter bloom at 100 mm, two ranked tiers

Intended width 100 mm

Source
Three-quarter realistic rose with a defined inner cup, a middle rank of three wrapping petals, and an outer rank of four broad petals with light fold detail. Prepared with open skin channels along every overlap edge.
Protect
Cup position and direction, the channels separating the middle rank from the cup, outer petal rhythm, and the two strongest tuck points that set the overlap order.
Reduce
Secondary fold lines inside the outer petals, rim ruffles that converge in one corner, and soft gradient shading carried over from the photo.
Candidate stencil
Same rose construction with overlap compensation applied: tier channels held open, outer rank reduced to representative folds, support elements restrained, and protected cup and tuck contours kept at transferable mass.
Final-size verdict
Holds at 100 mm once every overlap edge keeps open skin at 1:1 and the outer rank carries at most one fold line per petal. The bloom still reads as realistic because the layer order survived, not because every fold was kept.

SIMPLIFY ONE RANK

Front-facing open bloom at 80 mm, crowded outer corner

Intended width 80 mm

Source
Front-facing open bloom where the cup and middle rank are clean but three outer petal folds meet in one lower corner with touching contours and enclosed separations.
Protect
Cup anchor, middle-rank overlap order, overall bloom width, and the two outer petals that set the silhouette.
Reduce
Two of the three converging fold lines in the crowded corner, plus rim texture that narrows the corner channels. Keep one fold as the representative crease.
Candidate stencil
Same rose construction with overlap compensation applied: tier channels held open, outer rank reduced to representative folds, support elements restrained, and protected cup and tuck contours kept at transferable mass.
Final-size verdict
Holds at 80 mm after the corner is reduced to one fold with open channels on both sides. Verified with a squint test at true size: the corner reads as one shadow pocket, not three competing lines.

RECROP OR ENLARGE

Full spray with stem, leaves and thorns at 70 mm

Intended width 70 mm

Source
Realistic bloom trailed by a long stem with two large leaves, serrated edges, center veins, and a run of thorn accents. Attractive on screen, but the stem furniture competes with the bloom for line density at this width.
Protect
Bloom layering, stem direction, and one leaf as the support element.
Reduce
Second leaf, thorn run, leaf serration, and vein branches. Restrain the support elements to subordinate contours or remove them for this width.
Candidate stencil
Same rose construction with overlap compensation applied: tier channels held open, outer rank reduced to representative folds, support elements restrained, and protected cup and tuck contours kept at transferable mass.
Final-size verdict
At 70 mm the full spray transfers as bloom plus visual noise, and narrow leaf counters bridge first. Recrop around the bloom with a short stem stub, or enlarge past the point where every leaf and thorn channel stays open.

Placement-independent rose composition comparison stays in the rose subject hub linked below. This set exists only to compare realistic-rose outline vetting, not to replace that collection.

Separation and readability floors

Hold these gaps before judging line quality.

Realistic roses fail when neighboring contours share skin. Apply these practical vetting floors at the locked final width, on paper, before changing any line weight.

Separation floors for realistic rose outlines at final size
FeatureVetting floorDecision rule
Neighboring petal edgesOpen skin along the full overlap, about 1 mm minimum at final sizeTrace each petal edge from rim to tuck point and confirm skin follows it without bridging. Where two contours sit closer than about 1 mm at the intended width, treat them as one merged line: reopen the channel, recrop one petal, or grow the width before adjusting line weight.
Parallel fold and rim linesGap at least equal to the line width itselfJudge fold lines inside a petal against the rim contour beside them. If the gap is narrower than the lines themselves, one of the two lines goes. Keeping both produces a single heavier mark on skin that reads as a mistake rather than detail.
Inner-cup detailTwo to three cup contours plus one open counter, nothing finerThe cup is the smallest zone with the densest photo detail, so it needs the hardest restraint. If the cup needs a magnifier to read on the 1:1 print, it will not transfer. Keep the anchor contours and move fine curls to tattoo-time work.
Thorn and leaf-vein marksEvery accent separated from its neighbor by visible skinThorns, serrations and vein branches are the first elements to merge because they are drawn smallest. If an accent cannot hold its own skin separation at final size, remove it rather than thinning every line on the sheet.

These floors are stencil-prep guides for judging a realistic rose, not placement rules or healing predictions. The working artist confirms the final call for the specific client and placement. Generic weight tiers and junction floors across subjects stay in the linework owner linked below.

Thorn, leaf and stem restraint

Support elements stay subordinate

Bloom detail earns its place through layer order. Stem furniture earns its place only through separation. Apply the restraint row before approving texture.

Restraint rules for realistic rose support elements
ElementWhy it crowds the stencilRestraint
ThornsSmall triangular accents along the stem that read as sharp detail on screen but print as dots, then merge into the stem contour on skin when crowded.Keep at most three thorns on a stem segment, each with open skin on both sides of its base. Below about 80 mm total width, prefer one thorn or none. Never ring the stem with thorns on both edges at small sizes.
LeavesLarge veined masses that compete with the bloom when kept at photo scale. Serrated edges and branching veins create enclosed counters that close first at transfer size.One leaf per stem segment as the default. Keep the leaf rim, one center vein, and smooth the serration into a clean contour. Second leaves, vein branches and serrated edges return only above widths where every leaf channel holds at 1:1.
StemA long curved connector that invites extra detail: bark texture, secondary stems, background shading strokes. Each addition narrows the skin separating stem furniture from bloom petals.One continuous stem contour with one direction change at most. Texture and secondary stems are tattoo-time decisions, not stencil marks, until the bloom channels are proven at final size.

Final-size dropout check

Prove the rose on paper before skin

Screen detail hides dropout that paper reveals. Run this short sequence with scaling off and a ruler in hand.

  1. Lock the intended millimeter width for the realistic rose, then export a true-size PDF at 100 percent with no fit-to-page scaling.
  2. Print on plain paper and measure a 50 mm calibration line with a ruler to confirm the print is honestly 1:1.
  3. Hold the print at arm's length and squint: the bloom should still read as layered petals with open channels, not one grey disc.
  4. Inspect the narrowest petal channel, the cup counter, and every thorn and leaf-vein gap on the physical print, not on screen.
  5. Circle each bridge or merge directly on the paper, then fix the file: reopen the channel, remove one fold or accent, or grow the width.
  6. Reprint after the fix and confirm every circled spot stays open before cutting the transfer.

Transfer-ready checklist

  • Bloom layering proven: cup anchor, middle-rank overlap order and outer silhouette each read separately at 1:1.
  • Every petal overlap edge carries open skin along its full length at the intended width.
  • Outer rank simplified to rim contour, tuck point and at most one fold line per petal.
  • Thorns, leaves and stem restrained to subordinate roles with separated accents.
  • True-size print measured with a ruler, squint-tested, and circled failures corrected and reprinted.
  • Mirroring set for the placement side before transfer, with version and width recorded on the sheet.
Layer order first Verify channels at 1:1 Restrain support elements

FAQ

Realistic-rose vetting, answered

Short answers for the layer, separation, restraint and verification questions that recur when a realistic rose reference meets transfer paper.

Rank the bloom into three layers: the inner cup anchor, the middle petals that prove the overlap order, and the outer silhouette petals. Protect the cup and the middle-rank tuck points, and simplify the outer rank first by keeping the rim contour, the tuck point and at most one fold line per petal. Realism survives when the layer order reads at final size, not when every photographed fold is kept.

From vetted rose to working stencil

Turn the approved realistic rose into a stencil draft.

Start from the rose construction that passed the layer, separation and size checks, then continue on iPhone for body fit, exact-size print, mirror and professional export.