

Last Supper stencil evaluation

Vet the full table before it becomes a stencil

Thirteen figures on one horizontal table live or die on width, grouping, and open separation. Check the variant fit, the symmetry and face spacing, and the panel plan at your exact width, then prepare a clean stencil that transfers as one readable scene.

Built for working artists preparing Last Supper pieces. This page covers scene-variant vetting, 13-figure grouping and simplification, and exact-size large horizontal transfer prep only, not tattoo application or healing advice. Single-figure Jesus vetting and general print troubleshooting live in the linked owners.

Intent, width, and anchor first

Triage the scene before judging lines.

Last Supper failures are rarely about one bad line. They come from the wrong variant for the width, a lost table read, or a reverence problem that simplification cannot fix.

01

Confirm reverent intent in one line

Ask the client to name the meaning in one sentence: devotion, memorial, gratitude, or fellowship. A devotional Last Supper, a memorial back piece, and a fellowship chest panel are different promises. Resolve vague or mixed intent before judging lines, because no gap fix rescues the wrong scene choice.

Check: Decline caricatured apostles, casual mixing with unrelated sacred systems, or a devotional face placed where it will distort badly. Offer a cross, emblem, or single-figure recrop instead.
02

Lock physical width before variant choice

Measure the placement in millimeters before comparing crops. A full 13-figure table that holds across a 30 cm back can fail at 12 cm on a forearm with no line being wrong on its own. Width is the stencil decision here, not taste: below the minima below, the only honest options are enlarge, move the piece, or recrop.

Check: If the client insists on all 13 figures at a small width, show the recrop option early: central group, simplified architectural band, or a different family from the religious owner.

03

Name the recognition anchor

Every Last Supper piece must still read from across the room: the long horizontal table with a calm central figure and ranked figure groups on both sides. Cover the fine faces and check whether that table-plus-center read survives at a glance. If it needs small faces to make sense, the reference is not ready for reduction.

Check: If the table edge and the central figure compete with drapery texture at equal weight, pick the table and center as lead now. Drapery becomes support or is removed.

Scene variant comparison

Three constructions, three different width bargains.

Each variant below names what carries the first read, the defensible width minima, where it shines, what closes first at transfer size, and when to pick it. Confirm with a measured 1:1 print.

Full table, 13 figures

Needs the largest width: plan for a back, full chest, or large thigh panel, roughly 25 to 35 cm wide or more. Below about 20 cm wide, individual faces stop separating.

Reads through
One long table edge with a centered calm figure and three-figure groups stepping outward on each side.
Strengths
Strongest narrative weight. Keeps the complete fellowship read when every face gap and hand gap holds.
Stencil risk
Thirteen faces plus hands plus drapery folds compete for the same fine mass. Adjacent heads merge first, finger channels close where hands meet the table, and drapery folds fill into one band.
Choose when
Choose when the placement offers a wide flat span and the client wants the complete scene with every figure present.

Cropped central group

Fits a chest panel, upper back, or thigh at roughly 15 to 22 cm wide. Holds faces the full table cannot hold at the same width.

Reads through
The central figure with the two nearest three-figure groups, usually five to seven figures around the table center.
Strengths
Best recognition-per-centimeter bargain. Fewer faces means each face keeps open skin, and the table edge still signals the full scene.
Stencil risk
Outer groups are cut, so the crop edge must be composed deliberately. A careless crop reads as a printing error rather than a choice.
Choose when
Choose when width is limited but the client wants a multi-figure read, or when the full table fails the face-spacing test below.

Simplified architectural band

Fits narrower bands such as a forearm wrap or calf panel at roughly 12 to 18 cm wide, only when faces are reduced to calm head shapes with one nose hint each.

Reads through
Table edge, central figure silhouette, and ranked head positions with drapery reduced to long directional folds.
Strengths
Most forgiving at small widths. Reads as the scene through rhythm and symmetry rather than through thirteen likenesses.
Stencil risk
Over-simplified heads lose the devotional calm and read as generic crowd. Keep the central face fully worked even when outer faces simplify.
Choose when
Choose when the job must sit on a limb or narrow panel, or as the fallback when neither full nor cropped variants pass the 1:1 check.

Cross-versus-Jesus-versus-angel-versus-hands family choice stays on the religious owner, and single-portrait likeness drafting stays on the Jesus owner. This comparison exists to judge which Last Supper crop survives at your width, not to replace those owners.

13-figure grouping map

Hold the table, the rhythm, and the center.

Read the scene as groups first and faces second. These four checks predict whether thirteen figures stay countable after print and transfer.

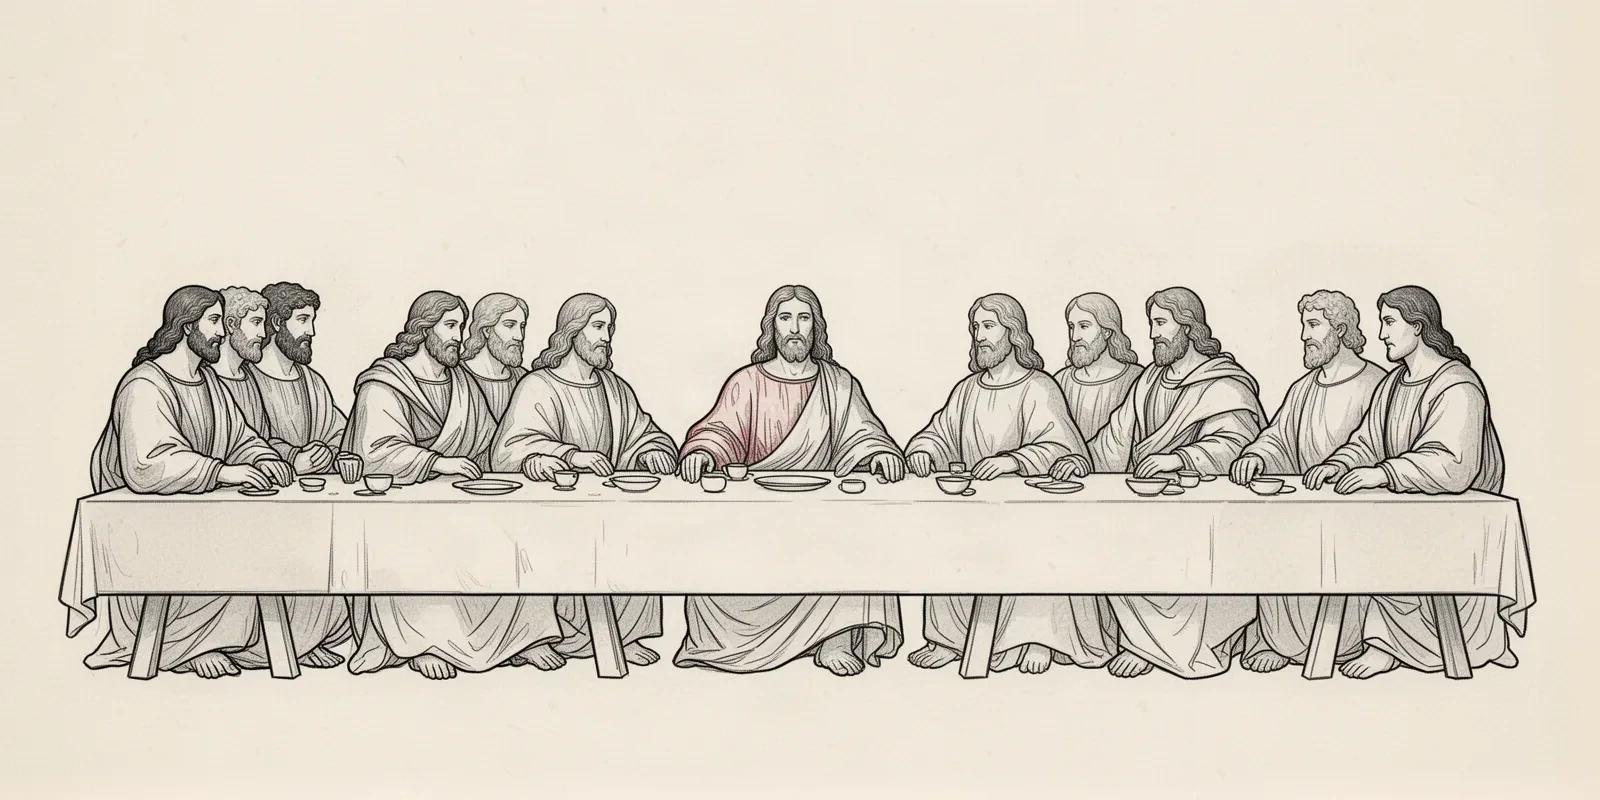
Line-art illustration of thirteen figures seated behind one long table, grouped three, three, one central figure, three, then three, with open space between adjacent heads and an unbroken table edge.
Synthetic editorial illustration of the 3-3-1-3-3 cadence: two inner triads, two outer triads, and one central figure held highest. Read grouping and separation here first, then judge faces and drapery at your locked width.

Three-plus-three rhythm on each side

The classic composition reads as two inner triads near the center plus two outer triads, with the central figure alone. Protect that 3-3-1-3-3 cadence: equal head heights inside each triad, small height steps between triads, and the center head held highest and calmest.

Fails when: Two neighboring heads at the same height with no gap between them merge into one wide shape at transfer size. Widen the inter-head channel or restagger heights before touching face detail.

Table edge as the unbroken horizon

The table front edge is the single continuous horizontal that holds thirteen figures together. Keep it one clean line with open skin above and below along its full run, and keep hands, vessels, and drapery marks clear of it.

Fails when: Hands, cups, or fold lines touching the table edge create filled pockets along the horizon. Those contacts close first on skin. Reopen each contact or shorten the intruding mark.

Symmetry around the center without rigidity

Outer groups mirror in mass, not in pose: left outer triad balances right outer triad in head count and total width, and the center stays on the placement midline. On backs and chests the body midline becomes part of the design, so center drift is visible from across the room.

Fails when: One side carrying four heads against three on the other, or the center sitting off the spine or sternum line, reads as a layout error after transfer. Rebalance head count per side or recenter before print.

Hand and vessel spacing along the table

Hands meeting across the table and small vessels between figures need their own skin breaks at final width. Trace each finger channel and each vessel outline from open skin to open skin at true size.

Fails when: Two hands sharing one pocket, or a vessel outline touching a sleeve edge, prints as one dark bridge. Separate, merge neighboring texture first, or enlarge before changing hand mass.

Face, hand, and drapery simplification by width
FeatureNarrower widthsWide back and chest panels
Faces: center first, then rank outwardOuter faces carry eyes, one nose hint, and a composed mouth maximum, with open skin between neighboring heads. Beard texture, wrinkles, and gaze detail merge first at small widths.Inner faces near the center can carry soft modeling when each mark keeps its own spacing at 1:1. Give the central face the most complete treatment and simplify outward symmetrically.
Head spacing and separationsEvery inter-head gap must read as open skin at 1:1. If two heads share one pocket, widen the channel or restagger heights rather than thinning face lines.Hair masses between heads can stay when the longest flow direction clearly dominates. Equal-weight hair bands bridging two heads need hierarchy work before print.
Hands along the tableKeep one clear gesture per visible hand pair maximum, with one separation between adjacent hands. Finger texture and knuckle marks go before hand mass when channels close.Full hand groups can work when every finger channel traces to open skin. Keep hands clear of the table edge and vessel outlines.
Drapery and table linenReduce drapery to two or three long directional folds per figure group with open skin between them. Fine parallel fold strands and linen texture merge into one band first.Inner fold groups can add weight when the longest fold clearly leads. Confirm with a squint test: step back until fine folds disappear and the groups, table, and center still read.

Pass or fail recognition test at final size

Print at the locked width with scaling off. Cover the drapery and table, then name each visible head left to right without guessing. Uncover, then cover the faces and confirm the table edge plus central figure still read. If either read fails, widen gaps, restagger heights, or recrop before changing line mass. The working artist judges healing behavior for the specific placement and skin.

Exact-size large horizontal transfer

Tile the width, seat the center, protect the joins.

A Last Supper is a wide-field print job with a devotional composition inside it. Work in this order so one stage at a time can be judged at the locked width.

  1. 01

    Lock exact width, height, and placement

    Record the intended physical width and height in millimeters, name the body zone, and mark the center against the spine or sternum line on the standing client. Use the size calculator when target dimensions are still open, and record the agreed numbers on a measurement sheet so reprints match.

  2. 02

    Tile with overlap marks, never shrink to fit

    When the scene exceeds one sheet, build a multi-page 1:1 layout with numbered panels and printed overlap registration marks instead of scaling the design down to one page. Confirm the assembled proof measures the locked width with a ruler before it reaches skin.

  3. 03

    Compensate for body curvature

    Preview the stencil on a photo of the actual placement while edits are still cheap. Shoulder blades, pectoral crown, and thigh taper pull a long horizontal out of true: shorten cross-width details near the wrap edges and keep the center on the flattest span.

  4. 04

    Seat panels in order from center outward

    Apply the center panel first on the marked midline, then work outward panel by panel with light repositioning checks between joins. Lifting and re-seating a large back or chest stencil is normal placement work, not a failed attempt. Check table-edge continuity across every join before committing.

  5. 05

    Verify with a true-size print and ruler

    Export with no fit-to-page scaling, inspect the narrowest face gap, the tightest finger channel, and the longest fold separation on plain paper, then measure the physical print. If the digital file passes and only paper fails, move to print-stage evidence instead of simplifying again.

Placement and size limits

Wide horizontals want flat skin that holds the table line

A Last Supper is a long horizontal with a strict center. Flat placements preserve it with little compensation, while narrow limbs force a recrop.

Upper back and full back

The natural home for the full 13-figure table: the widest flat span available, with room for every face gap and the unbroken table edge. Blade glide and breathing move the field during long sessions.

Check: Center the central figure on the spine line, prove symmetry standing, allow for blade movement, and verify table-edge continuity across panel joins at 1:1.

Chest panel

Good width for a cropped central group or a restrained full table, but the pectoral crown and the body midline reshape the horizontal. Clothing friction affects healing on this zone.

Check: Keep the center on the flattest span, mirror outer group mass against the midline, and confirm face gaps on a live body preview before locking the stencil.

Thigh and upper arm

Large curved panels that accept a cropped group or simplified band along the limb. Extra room suits drapery flow, but taper pulls the outer figures inward on wrap placements.

Check: Align the table edge with the limb axis or the flattest span, shorten cross-width detail near wrap edges, and spend extra room on finger channels and face gaps first.

Forearm, wrist, and small fields

Too narrow for thirteen recognizable faces. A full table forced here becomes one textured band where heads, hands, and folds share the same mass.

Check: Recrop to the central group or simplified band, or move the piece. Do not keep the full scene plus fine detail at these widths.

Stencil-ready checklist

Approve the scene only when every line passes

Run this short sequence with scaling off and a ruler in hand. One failed line means fix, enlarge, recrop, or move the piece before transfer.

  • Confirm the one-line reverent intent, the chosen variant, the exact width in millimeters, and the named placement.
  • Confirm the 3-3-1-3-3 grouping rhythm with the center on the body midline.
  • Confirm the table edge runs unbroken with open skin above and below along its full run.
  • Confirm every inter-head gap and finger channel traces to open skin at 1:1.
  • Confirm drapery holds two or three ranked folds per group with no merged bands.
  • Confirm the multi-panel proof assembles to the locked width with overlap marks matched.
  • Export a true-size PDF with scaling off and measure the physical print with a ruler.
Grouping verified at 1:1 Exact width locked Joins matched

FAQ

Last Supper stencil decisions, answered

Short answers for the variant, grouping, recognition, transfer, and delegation checks that recur when a 13-figure scene moves toward transfer-ready output.

It can when width, variant, and gaps agree: a full 13-figure table needs a wide flat span such as a back or full chest at roughly 25 to 35 cm wide, a cropped central group fits a chest, upper back, or thigh at roughly 15 to 22 cm, and a simplified band fits a limb at roughly 12 to 18 cm. Below those widths the honest fix is enlarge, move the piece, or recrop, because shrinking a full table merges faces, hands, and folds into one band.

Next steps

Use the neighboring owners for adjacent jobs.

This guide covers Last Supper variant vetting, 13-figure grouping and simplification, placement-size limits, and exact-size horizontal transfer prep. Use the links below for family choice, single-figure depth, sizing, print, and placement.

Family-level comparison, single-portrait likeness drafting, general gallery browsing, and step-by-step print and transfer mechanics stay in their specialist owners. The links above hand off instead of repeating that detail.

From evaluated scene to working stencil

Turn the approved Last Supper into a stencil draft.

Start from the variant that passed the grouping, recognition, and width checks, then continue on iPhone for body fit, exact-size multi-page print, mirror and professional export.