

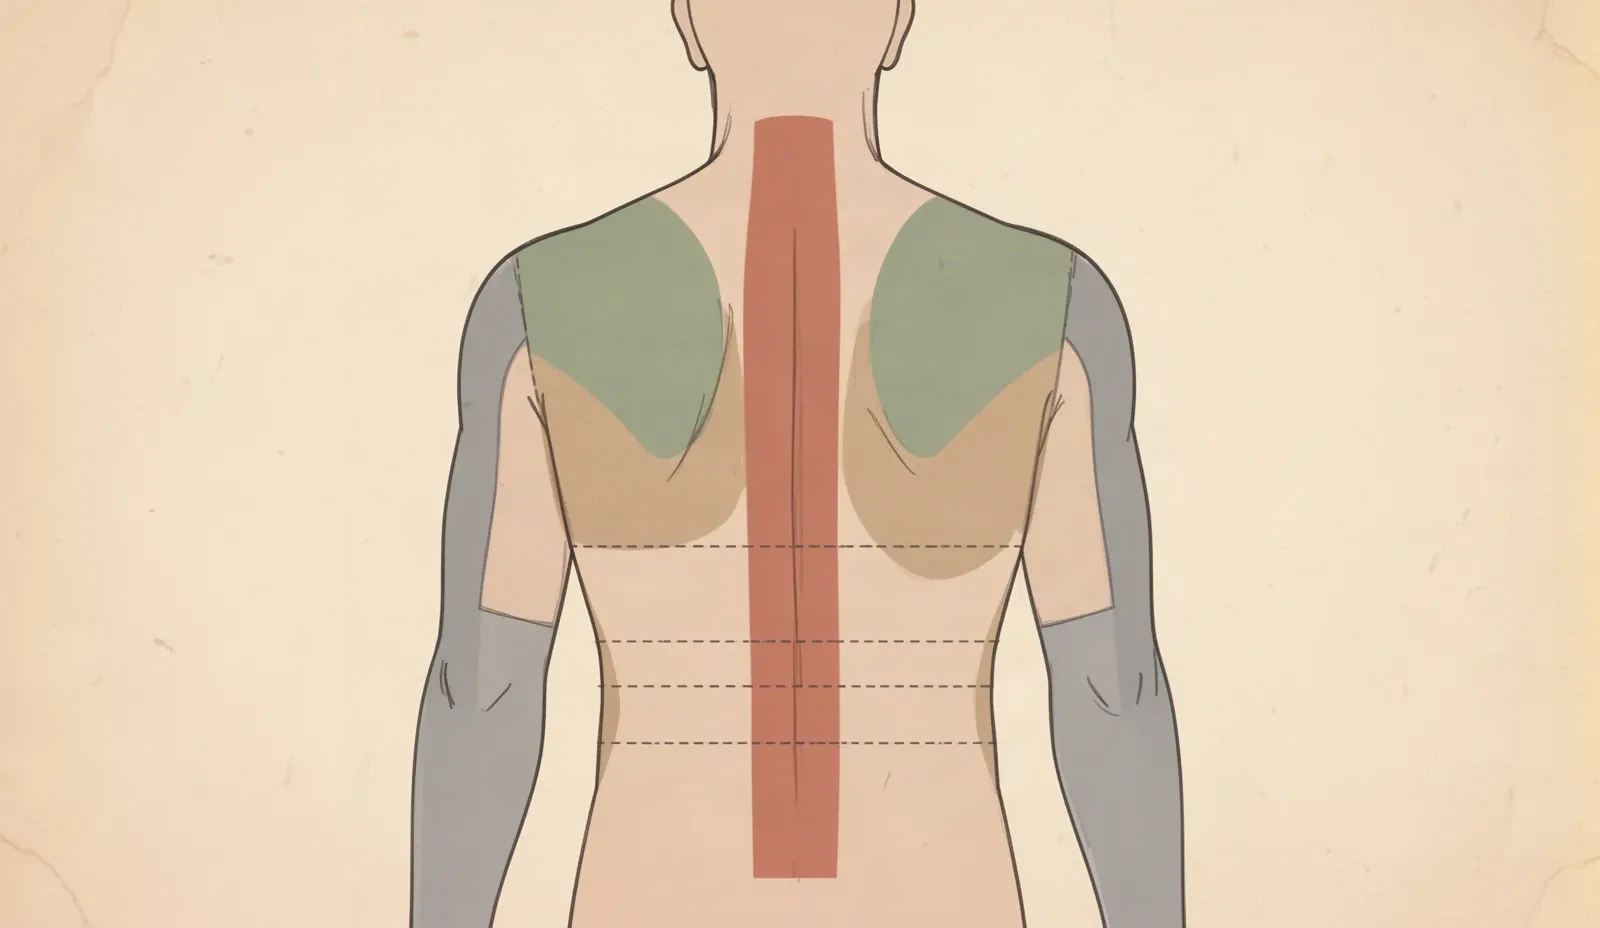
Back stencil reference

Vet the back field before print

The back is the largest flat-looking placement with the most hidden curvature. Name the zone, prove spine symmetry on the standing client, allow for blade glide and breathing, then pass the final-size transfer gate before the stencil reaches skin.

Built for working artists preparing back stencils. This page covers stencil preparation and visual review only, not tattoo application or healing advice.

Back zones that change the stencil

Three zones, three different symmetry problems.

A back is not one flat canvas. Name the zone before judging the composition, because the spine line, blade curvature, and side-plane turn each punish a different kind of guess.

Abstract back-field zone map on a neutral standing back silhouette showing a spine center column, paired blade fields, side-back wrap edges, and upper, mid, and lower bands as flat zones.
Original illustrative zone reference, not app output or customer work. Abstract spine, blade, side-back, and upper/mid/lower zones only. Not to scale; verify symmetry, curvature, and size on the standing client at true size.

Spine center column

Vertical panel over the spinous processes, read head-on at distance

The strictest back field. Symmetric spines, vertical script, and centered emblems belong here because the eye checks them against the backbone instantly. Bones sit close under the skin, so the panel feels stable, but every millimeter of drift reads as off-center in photos. Wide pieces that cross both blades from this anchor lose symmetry control fast.

Check: Seat the design axis on the marked C7-to-tailbone line with the client standing neutral, then judge centering head-on from two meters, not from beside the table.

Blade pair

Paired fields over the left and right shoulder blades

The curved, mobile workhorse of the back. Blades glide when arms move, and each blade rounds toward the shoulder and the ribs, so mirrored pairs must survive independent curvature. Single-blade emblems and mirrored wings read settled here. One wide motif stretched across both blades without a spine anchor skews when posture shifts.

Check: Mark each blade's inner border and top corner standing with arms relaxed, vet each side at 1:1 separately, then confirm the pair matches across the spine line.

Side-back and lower wrap edge

Lateral bands from the ribs toward the flanks plus the lower back above the waistband

The boundary field where back work meets torso wrap. Ribs expand with breath, waistbands and posture creases cross the lower band, and designs that run past the side plane foreshorten from the front view. Treat this as the limit of back ownership: detail that must read from the side or wrap the ribs belongs to a wrap plan, not to a wider back print.

Check: Hold transfer-critical detail inside the flat back plane, confirm the lower edge clears the waistband standing, and hand side-wrap continuity to a fit preview before widening.

  • Upper back: widest flat panel between the blade tops. Good for first large pieces because posture is easiest to hold steady here.
  • Mid-back: calmest symmetry field around the lower blade tips. Long vertical compositions stay readable when the spine line is marked first.
  • Lower back: most mobile band with breathing and waistband travel. Shorten compositions to end above the crease line instead of compressing the lower third.

The C7 bump, the tailbone point, the blade-top and blade-tip lines, and the waistband line bound every back plan. Keep the design axis on the C7-to-tailbone line found standing, and keep transfer-critical detail clear of the waistband travel zone.

Spine symmetry and centerline

Find the centerline on the body, then prove it

Backs are wide and screens are symmetric, so a drawing that looks centered digitally still drifts on skin. Build the reference line from two bony anchors on the standing client, then require a second viewer plus photos before the stencil is committed.

  1. Stand the client with feet even, arms relaxed at the sides, shoulders neutral, chin level. Mark nothing seated, bent forward, or with arms raised.
  2. Mark the C7 bump at the base of the neck and the tailbone point as the two fixed vertical anchors.
  3. Ask for a normal exhale, pause briefly, and draw the light vertical centerline connecting the two anchors at that rest position.
  4. Add horizontal anchors at the blade tops, the lower blade tips, and the waistband line so vertical drift is visible during transfer.
  5. Seat the design axis on that drawn centerline, then step back two meters and judge it head-on. The eye checks back work against the spine, not against the paper.
  6. Ask a second person to confirm centering from straight behind while you confirm from the same spot. One viewer alone misses lateral drift on a wide field.
  7. Photograph straight-on plus slight left and right angles. Confirm mirrored halves match in the photos before committing, since the camera catches drift the eye excuses in person.
  8. Expect several repositions on large fields. Lifting and re-seating a back stencil is normal placement work, not a failed attempt.

Blade curvature and movement

Design for blades that glide and ribs that breathe

The back moves under the stencil. Run these checks while the design is still easy to lift and re-seat, not after transfer.

  • Judge every back stencil standing with arms relaxed, never seated hunched and never lying face down.
  • Expect flat width to shorten over each blade crown and flat circles to read narrower from a pure rear view.
  • Run blade-following detail slightly wider on paper than the intended skin read, since each blade pulls edges inward.
  • Watch the blades glide while the client slowly raises and lowers the arms. Any mirrored pair that skews asymmetrically needs re-seating.
  • Confirm rib expansion with three slow breaths. Designs that bridge the side plane should rise evenly, never tighter on one side.
  • Photograph rear, left three-quarter, and right three-quarter views. The side photos catch wrap pinch the eye excuses straight-on.

Back sizing

Start from back sizes, then prove the zone

These starting sizes are stencil-prep guides, not placement rules. Lock one size, check curvature and boundary clearance at true size, and let the working artist confirm the final call for the specific back.

Starting sizes by back field
FieldStarting pointDecision rule
Single blade markWidth about 100 to 160 mm, height about 120 to 200 mmSize by blade fit first. When any edge crosses the spine line or the side plane at 1:1, shrink the panel before thinning the lines.
Spine column pieceWidth about 80 to 140 mm, height about 200 to 400 mmSize by centerline discipline first. When side detail pulls the axis off the marked line at 1:1, narrow the panel rather than widening the spine band.
Half-back compositionWidth about 200 to 300 mm, height about 300 to 450 mmSize by two-view survival. Check rear plus both three-quarter views; when one view crowds the side plane, narrow the panel rather than compressing one third.
Full-back compositionWidth about 350 to 500 mm, height about 450 to 650 mmSize by panel coverage and movement first, and confirm in sections. When the lower third enters the waistband travel zone at 1:1, shorten the composition rather than shrinking motifs to fit.

Final-size readability and print

Prove the back stencil on paper before skin

Back work is judged at distance, so one closing gap hides among many correct ones. Run this short sequence with scaling off and a ruler in hand.

  • Confirm intended width and height in millimeters for the chosen back zone.
  • Export a true-size PDF with no fit-to-page scaling, tiled only if the printer requires it.
  • Inspect the smallest opening, counter, and mark separation at 1:1 on plain paper.
  • Compare the stencil against rear and three-quarter photos of the actual back at standing rest.
  • Confirm the narrowest line still transfers as one continuous mark at true size.
  • Measure the physical print with a ruler and re-check centerline offset before transfer.

Transfer alignment

Transfer on the standing client, not the flat table

Back stencils skew when aligned flat and then wrapped onto curved, moving blades. Run these steps while the stencil is still easy to lift and reposition.

  • Confirm standing posture with arms relaxed and shoulders neutral before the stencil touches the client.
  • Mark the C7 point, tailbone point, blade-top and blade-tip lines, and the waistband line before placing the design.
  • Dry-fit the uncut stencil on the standing client and confirm zone choice against those marks.
  • Cut short relief slits one at a time only where a blade crown or the lower band resists.
  • Press from the spine centerline outward so excess length moves toward the sides, not into the center.
  • Verify with a second-person straight-on check plus rear, left, and right photos after three slow breaths, then commit.

Failure checks

Catch the five back failures before transfer

Each failure below has one visible cause and one correction that keeps the design identity. Apply the correction before changing line mass.

Common back stencil failures and corrections
FailureCauseCorrection
Stencil centered on screen, drifting on skinCenterline taken from the digital canvas instead of the standing client's C7-to-tailbone anchors.Re-mark the spine line standing at breathing rest and re-seat the design axis on it.
Mirrored pair skewing across the spinePair judged flat, where independent blade curvature and glide read hidden.Vet each blade side at 1:1 separately standing, then confirm the pair matches across the spine line.
Lower detail diving into the waistband creaseLower boundary vetted without standing posture and breathing travel.Shorten the composition to end above the standing waistband line instead of compressing the lower third.
Side edges foreshortening out of viewWidth judged rear-only, where the side plane turn sits farther around the curve than it looks flat.Narrow the panel until the outer edge clears the turn in three-quarter view, then re-check interior openings.
Interior openings closing after transferCounters judged zoomed-in on screen instead of at true size across the curve and at distance.Run the 1:1 paper check, widen the narrowest gap or remove one texture unit, and re-check at standing distance.
Name the zone first Prove the centerline Measure the print

FAQ

Back stencil decisions, answered

Short answers for the zone, symmetry, curvature, sizing, and verification questions that recur on back placements.

Match the design structure to the zone. This page recommends the spine column for symmetric vertical pieces that must read centered, the blade pair for single or mirrored compositions that follow blade curvature, and the side-back only as a boundary that stops before the side plane. When a design needs more width than one zone allows, change the composition or split the plan rather than stretching one print across spine, blades, and sides at once.

Next steps

Use the neighboring owners for adjacent jobs.

This guide covers back zone choice, spine symmetry and centerline offset, blade curvature and breathing allowance, back sizing, final-size readability, and transfer alignment. Use the links below for related jobs held elsewhere.

Generic wrap and taper execution, neutral body-map depth, landmark recording sheets, bodysuit sequencing, and sternum or shoulder-cap specifics stay in their specialist owners. The links above hand off instead of repeating that detail.

From back plan to working stencil

Turn the approved back reference into a stencil draft.

Start from the reference that passed the zone, symmetry, size, and transfer checks, then continue on iPhone for body fit, exact-size print, mirror and professional export.