

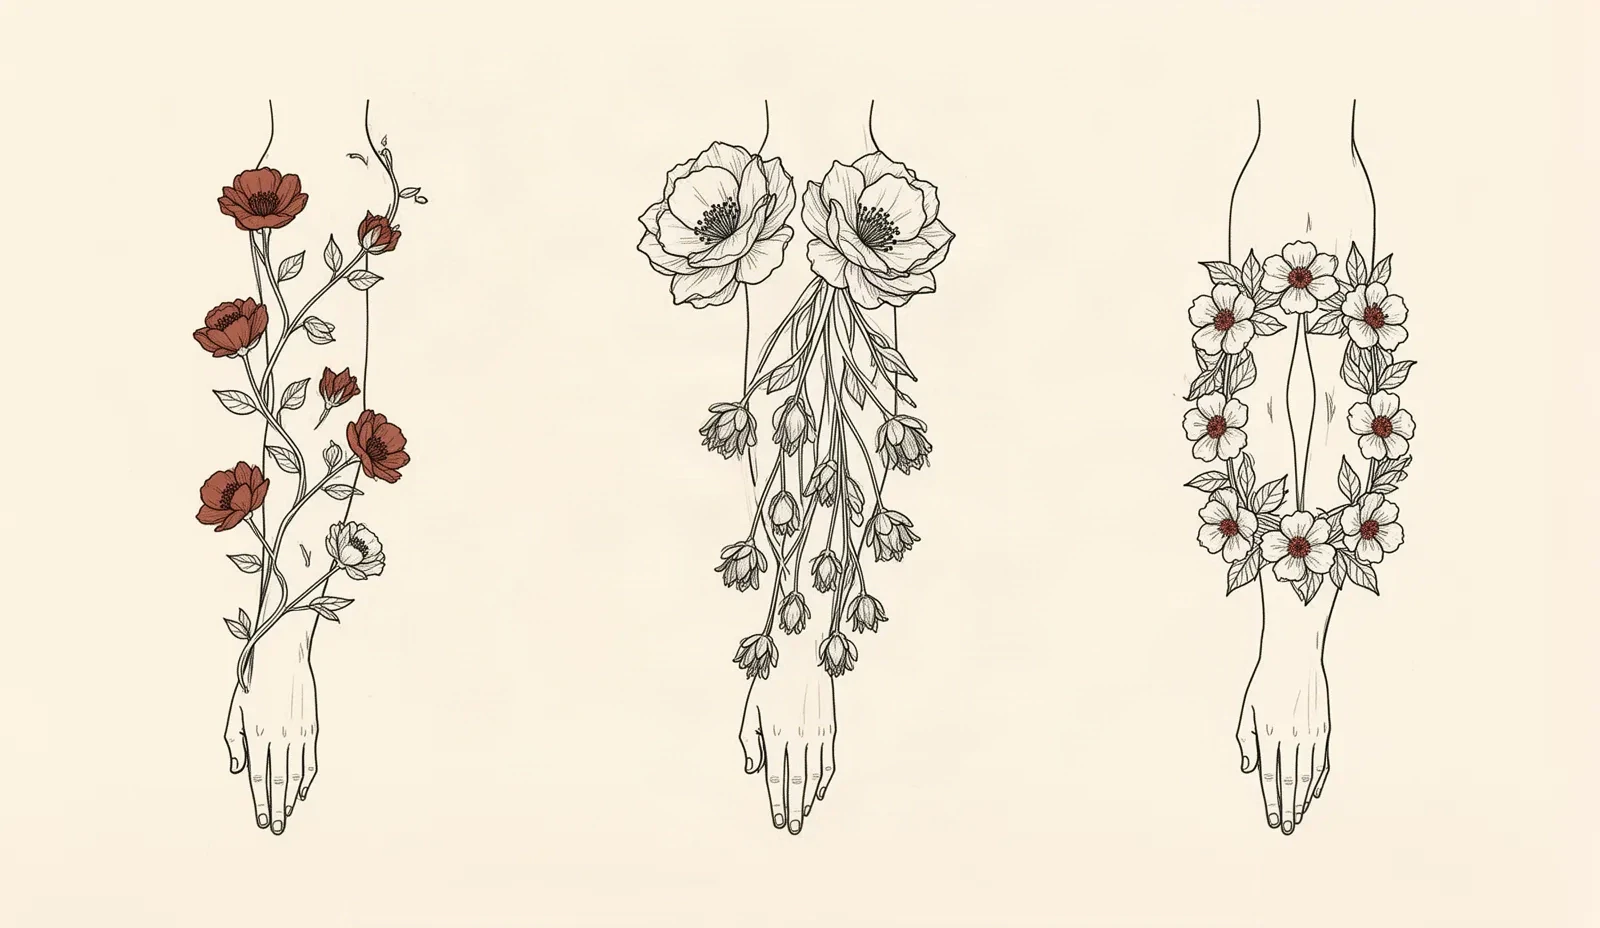
Flower-sleeve composition reference

Make blooms flow as one sleeve

A flower sleeve fails when beautiful blooms never connect. Pick a vine, cascade, or band flow for the shoulder-to-forearm run, bridge blooms with stems, leaves, and buds, then transfer in flower order so sessions build on each other.

Built for working artists planning sleeve-scale floral work. This page covers floral flow, botanical bridging, wrap checks, and transfer sequencing only, not tattoo application or healing advice.

Shoulder-to-forearm flow

Three floral patterns, three continuity contracts.

Pick the pattern before judging any bloom reference. Each one names when it fits, which filler it earns, how wrap is checked, and which bloom transfers first.

Synthetic line-art schematic of three arm-length floral flow patterns: a trailing vine stepping blooms down from shoulder to wrist, a bouquet cascade clustering large blooms at the shoulder and thinning into buds and leaves, and a wrap-around floral band with an open seam gap.
Synthetic composition illustration, not app output or a healed client sleeve. Left: trailing vine carried by one continuous stem. Center: bouquet cascade thinning toward the wrist. Right: wrap band closing with an intentional open gap. Prove the real gaps at 1:1 on paper for the actual arm.

One stem path from shoulder to wrist

Trailing vine

A single dominant stem winds around the arm and carries blooms of decreasing size as it travels. Large focal blooms sit on the shoulder cap and outer upper arm, medium blooms cross the elbow transition, and small blooms plus buds finish the forearm. The stem is the continuity device, so every bloom must attach to it at a believable node.

When to use: Use when the client wants mixed species or mixed bloom sizes without a heavy background. It is the most forgiving pattern for long arms because the stem can absorb extra length by adding one more wrap.

Filler recipe: Small leaves alternating along the stem, single buds at outer curves, and short side shoots. Keep leaf size below half the nearest bloom so leaves never become second focals.

Wrap check: Confirm the stem crosses the inner elbow at a shallow angle with open skin on both sides, and that no bloom center sits on the ditch crease.

Transfer order: Map the stem first, transfer the shoulder bloom second, then work down the stem one bloom per session.

Clustered blooms falling shoulder to forearm

Bouquet cascade

Two or three large blooms cluster near the shoulder and upper arm as the bouquet head, then progressively smaller blooms, buds, and leaves trail down the forearm like falling petals. Density is highest at the top and deliberately thins toward the wrist, which suits taper without forcing it.

When to use: Use when the brief centers two or three hero blooms (peony, rose, chrysanthemum) with visible petal architecture. It suits shorter arms because the cascade can compress by dropping one mid-tier bloom.

Filler recipe: Layered leaves tucked under bloom edges, bud pairs flanking the cascade axis, and reserved skin channels between tiers so each bloom silhouette stays separable at wrap distance.

Wrap check: Confirm each bloom silhouette reads from front and side views with the arm relaxed, and that tier gaps stay open where the forearm narrows.

Transfer order: Transfer the bouquet head first, then extend the cascade downward one tier per session with overlap marks at each tier boundary.

Circumferential blooms circling the arm

Wrap-around floral band

Blooms and foliage repeat around the circumference of the upper arm, forearm, or both, with one consistent travel direction. Each band has a start bloom, a rhythm of medium blooms and leaves around the wrap, and a planned meeting point where the band closes or deliberately stays open.

When to use: Use when the client wants 360-degree readability or a half-sleeve that reads from every angle. It demands the most precise wrap math, so reserve it for references with repeatable bloom sizes.

Filler recipe: Repeat leaves and buds at fixed intervals between blooms, plus one open skin corridor per band so the wrap never seals into a solid ring.

Wrap check: Confirm the repeat meets cleanly at the seam with no half-leaf or clipped petal, and prove the narrowest seam gap at 1:1 before print.

Transfer order: Transfer the start bloom on the outer panel first, wrap toward the inner arm next, and close the seam last with the arm in the same posture.

Single-bloom construction stays with the single-flower owners linked below. This comparison judges only how blooms travel the arm as a sleeve system, not which species or petal structure to draw.

Botanical filler bridging

Bridge with stems and leaves. Reserve skin on purpose.

Botanical filler fails when a bloom is inserted as filler or when leaves arrive before the bloom structure is stable. Match the bridge to the gap size, keep one flow direction, and name every reserved corridor on the plan.

Stem bridges

Long gaps between blooms along the flow axis, especially across the elbow transition where a bloom cannot sit.

Recipe: Run one stem with a visible node at each end. Keep the stem thinner than the smallest adjacent petal mass and let it curve with the arm, never straight across the ditch.

Watch for: Two parallel stems of equal weight split the flow into competing paths. One stem leads, any second shoot stays shorter and thinner.

Leaves as directional filler

Medium gaps beside an established bloom where the eye needs movement without a new focal.

Recipe: Tuck each leaf base under a bloom edge or stem node, angle tips along the flow direction, and step leaf size down as the arm narrows. Two or three graduated leaves beat one large leaf.

Watch for: A leaf tip touching a neighboring petal bridges first under wrap. Keep a visible skin gap between every leaf tip and petal edge at 1:1.

Buds and bud pairs

Tapering zones near the wrist and inner arm where a full bloom would crowd the taper.

Recipe: Place single buds on short stems with open skin around each bud head. Bud pairs work when they sit on opposite sides of the stem with unequal stem lengths.

Watch for: Three or more touching buds print as one lumpy mass at sleeve scale. Thin the run to one or two separated buds before reducing bloom size.

Reserved negative space

The strongest bridge when blooms are dense. A named skin corridor separates the upper cluster from the forearm run and preserves a future path.

Recipe: Draw the corridor on the plan with a name (breathing channel, joint corridor, future path) and protect it through every session stencil. Trace it from open skin to open skin at true size.

Watch for: Unnamed open skin gets filled casually in a later session. If the corridor has no name on the map, it will not survive session three.

Generic sleeve filler families such as smoke, dot fades, and ornamental bands belong to the generic sleeve guide. Use them only when the floral reference already earns a non-botanical bridge, and keep one flow direction across all segments either way.

Wrap, taper, and petal-gap retention

Vet every handoff with flowers on it.

Flat files hide the failures that wrap reveals: bridged crowns, split ditch blooms, pinched wrist gaps, and sealed band seams. Run each row below with the arm hanging relaxed before changing bloom density.

Flower-sleeve wrap behavior and stencil compensation
Segment handoffWhat happens to flat floral lineworkStencil compensation
Shoulder cap to upper panelLarge blooms crown over the deltoid, so a flat reference that looks balanced on screen bridges the crown and creases at the cap edge on transfer.Center the largest bloom on the flattest cap span, shorten trailing vines that run past the crown, and confirm the cap handoff in front and three-quarter photos.
Upper panel to elbowBloom centers placed on the inner ditch split into two halves on bend, and petal gaps drawn across the crease seal shut when the arm flexes.Move bloom centers off the crease, route the stem or a leaf bridge across the ditch instead, and reserve open skin on both sides of the fold.
Elbow to forearm runThe forearm narrows toward the wrist, so equal-size blooms and equal petal gaps read denser and tighter at the wrist end once wrapped.Step bloom size down along the run, widen petal and bud separations near the wrist, and prove the narrowest wrist gap at 1:1 before print.
Full-arm rotationWidth placed past the visible side edge disappears from the main view, and pronation plus supination shift bloom alignment by several millimeters.Judge each bloom from front, side, and three-quarter views with the arm hanging relaxed, then re-check with rotation. Keep full blooms inside the visible edge per view.
Wrist terminationA cascade that ends in a clipped bloom looks cut off, while a vine with no planned ending drifts toward the hand.End with intent: a single terminal bud, a fading leaf pair, or an open skin break placed clear of the wrist crease. Confirm the stop in palm-down and side views.

Petal-gap retention checklist at sleeve scale

  • Confirm every petal separation stays open from center to tip at 1:1 on the largest bloom first, then re-check the smallest wrist bloom at the same scale.
  • Confirm bud heads keep visible stem gaps and never touch a neighboring petal edge at true size.
  • Confirm leaf tips stop short of petal edges with open skin between them on both the outer and inner arm views.
  • Confirm tier gaps between bouquet levels stay open where the forearm narrows, not only on the flat file.
  • Confirm the wrap seam introduces no half-petals, clipped leaves, or sealed gaps where the band meets itself.
  • Run a squint check per segment: step back until center detail disappears and confirm each bloom still reads as a flower, not a solid mass.

Small-flower gap rules at 2 to 5 cm belong to the small-flower guide linked below. The checklist above judges gaps at sleeve bloom sizes under wrap and taper, not miniature thresholds.

Flower-ordered transfer sequence

Transfer blooms in flow order, filler last

Floral sleeve sections land weeks apart on healing skin. This order keeps each bloom registered to the stem or cascade axis while the stencil is still easy to lift and reposition.

  1. Lock the full flower-sleeve map at small scale first: flow pattern, bloom positions by segment, filler corridors, reserved elbow and wrist transitions, and the termination point.
  2. Size every bloom for its own segment before printing anything. Shoulder blooms carry the most detail, wrist blooms carry the most separation.
  3. Transfer the anchor bloom first, usually the shoulder or upper bouquet head, on the standing arm with the arm hanging relaxed and palm neutral.
  4. Mark the stem axis plus top and bottom anchor points for the segment, then dry-fit the uncut stencil before committing.
  5. Cut bloom segments with short overlap registration marks (about 10 to 20 mm) at tier boundaries so the next session has a visible handoff.
  6. Work outward from the anchor in flower order: anchor bloom, then the next bloom down the stem or cascade, one bloom per session. Photograph the healed result in front, side, and three-quarter views before cutting the next stencil.
  7. Hold leaves, buds, and small filler until neighboring blooms are stable at true size, then place filler into the named corridors only.

Failure points

Five ways flower sleeves lose the flow

Check this list against the composition map before any bloom is printed at size. Each failure below is cheaper to fix on the map than on healed skin.

  • Centering a bloom on the elbow ditch, which splits the flower into two panels on bend and seals its petal gaps.
  • Letting the vine or cascade change direction between the upper and forearm spans, which breaks sleeve flow even when each bloom is strong.
  • Inserting a full-size bloom as gap filler, which creates a fourth focal and crowds the neighbor anchor.
  • Placing buds and leaves before blooms are stable, which fills the corridors the next bloom needed and forces awkward recuts.
  • Sealing the wrap band into a solid ring with no open skin corridor, which removes the breathing room taper needs near the wrist.

Final-size proof

Prove each bloom on paper before skin

Long floral runs hide one sealed petal gap among many correct ones. Run this short sequence with scaling off and a ruler in hand.

  • Confirm intended bloom width in millimeters for the current segment.
  • Export a true-size PDF with no fit-to-page scaling, including tiled sheets when a bloom run exceeds one page.
  • Inspect the narrowest petal gap, bud separation, and wrap-seam gap in that segment at 1:1 on plain paper.
  • Compare the stencil against a photo of the actual arm, not a generic arm template.
  • Confirm tile overlap marks and registration before transfer, and measure the physical print with a ruler.
Blooms bridge through stems Prove petal gaps at 1:1 Transfer in flower order

FAQ

Flower-sleeve stencil decisions, answered

Short answers for the pattern, bridging, wrap, sequencing, and handoff questions that recur on sleeve-scale floral plans.

Choose by bloom count and arm length. A trailing vine suits mixed bloom sizes on a long arm because the stem absorbs extra length. A bouquet cascade suits two or three hero blooms with dense petal work because density thins naturally toward the wrist. A wrap-around floral band suits 360-degree readability but demands exact seam math. This page recommends locking the pattern before judging any single bloom reference.

Next steps

Use the neighboring owners for adjacent jobs.

This guide covers flower-sleeve flow patterns, botanical filler bridging, wrap and petal-gap retention at sleeve scale, and flower-ordered multi-session transfer. Use the links below for related jobs held elsewhere.

Single-bloom identification, generic sleeve filler catalogs, interactive piece arrangement, and exact-size print mechanics stay in their specialist owners. The links above hand off instead of repeating that detail.

From flower plan to working stencil

Turn the approved floral flow into a stencil draft.

Start from the pattern and bloom order that passed the bridging, wrap, and size checks, then continue on iPhone for body fit, exact-size print, mirror and professional export.