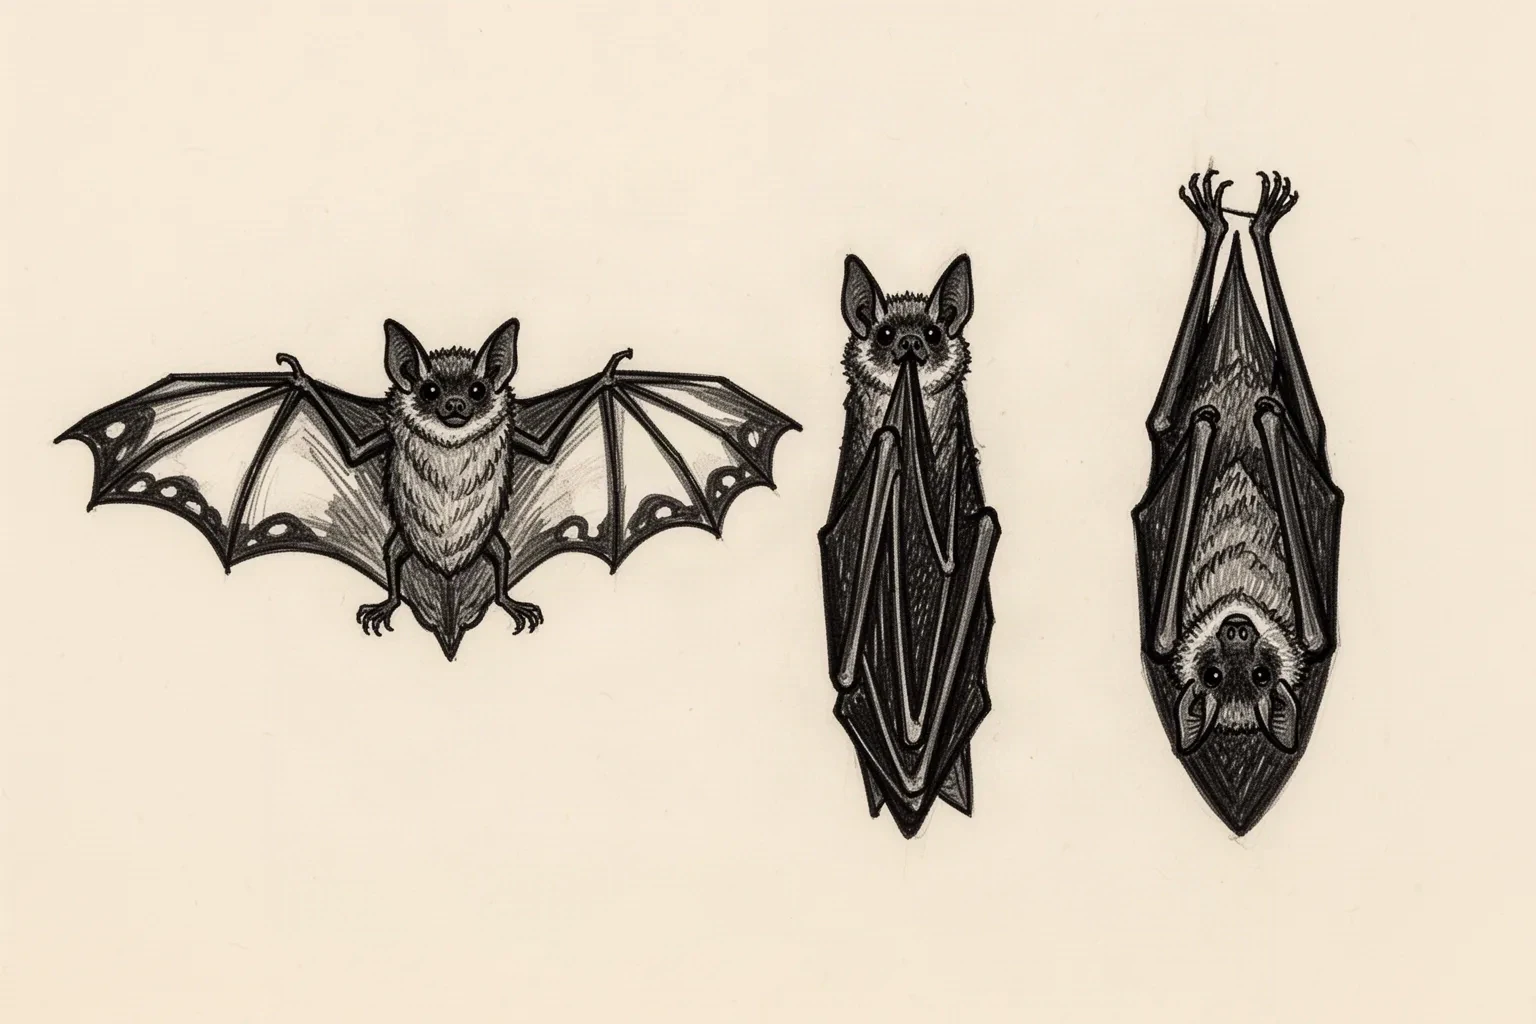
Bat neck stencil reference

Match the bat pose to the neck zone first

A neck bat fails when a throat span is squeezed onto the side, or a side column is stretched across the throat. Choose spread-wing for the throat band and perched or hanging for side and nape verticals, then prove ears, finger bays, and membrane gaps at exact neck size under wrap and head movement.

Built for working artists preparing neck bats. This page covers pose-to-zone selection plus small-scale readability and curved transfer verification only, not tattoo application or healing advice. General bat variant depth stays on the bat owner and generic neck flow stays on the neck owners.

Pose to neck zone

Throat wants span, side and nape want a column.

Three batched decisions below. Each names the zone size, the flow logic, what to protect, what to remove, and the pass verdict. Pick one row before judging any line.

Synthetic reference illustration of three ink-drawn bats: a spread-wing bat extended horizontally, a perched bat with folded wings forming an upright column, and a hanging inverted bat wrapped into a tall teardrop.
Synthetic reference illustration, not app output. The three archetypes this page maps to neck zones: left, spread-wing for the throat band; center, perched folded-wing column for the side neck; right, hanging inverted teardrop for the nape or a narrow side strip. Judge your own file at 1:1 rather than copying this plate.

Spread-wing throat band

Front throat | Width about 50 to 70 mm

The bat hangs horizontally across the windpipe with the body centered on the midline and both wingtips stopping inside the visible front panel. This is the only neck pose that uses span as the first read, because the front view is wide enough to carry symmetry while the head stays neutral.

Protect: Midline body placement, mirrored finger fans with open bays on both wings, both ear points with the gap between them, and the scalloped trailing edge with its own skin break from the throat hollow.

Remove: Wingtips that run past the side turn, finger counts above three per wing at this width, membrane veins, moon discs, or branch cues sharing the throat field.

Verdict: Stencil-ready when mirrored halves match head-on with the chin neutral, every finger bay stays open at 1:1, and both wingtips clear the jaw-to-collar side turns with open skin.

Perched side column

Side neck | Length about 60 to 90 mm, width about 25 to 40 mm

The bat stands upright along the muscle cord from behind the ear toward the collarbone, wings folded tight to a vertical body column. Flow runs with the muscle, never across it, so head-turn stretch lengthens the column instead of skewing a span.

Protect: Single vertical body axis, both ear outlines with the gap between them, one folded-wing outer edge per side with open skin beside it, and foot placement clear of the jaw and collar ends.

Remove: Any spread wingtip crossing the muscle cord, horizontal bars, ear hatching plus wrinkle lines plus fur ticks stacked together, and enclosed detail at the jaw end that pinches on head-turn.

Verdict: Holds when the column reads from the side view alone, survives neutral plus full left plus full right head-turn at 1:1, and no wingtip depends on the front view to complete the bat.

Hanging nape or side vertical

Nape center or side neck | Height about 50 to 80 mm

The bat hangs inverted with feet anchored above and wings wrapped close to the body, forming a tall narrow teardrop. On the nape it centers on the spine line below the hairline; on the side it hangs along the muscle cord. The vertical composition fits narrow curved fields where a span cannot survive wrap.

Protect: Full inverted teardrop outline, both foot anchors above with separation between them, ear direction inside the head mass, wrap-to-body gap with open skin, and the lower membrane fan with its own skin break.

Remove: Wrapped-wing edges touching the body outline, merged foot anchors, deep trailing scallops at small heights, and top extensions reaching into hair or ear cartilage.

Verdict: Holds when the wrap gap and every foot separation stay open at 1:1, centering stays true with the head tilted forward for nape work, and the teardrop reads as bat before any vein or fur detail is added.

General bat variant comparison without neck mapping stays on the bat owner, and generic throat, side, and nape sizing without bat logic stays on the neck owners. This decision set exists only to lock a zone-correct bat pose before any density or transfer check.

Neck-scale readability

Prove ears, bays, and edges at the size the neck allows.

Screens forgive crowding that curved neck skin does not. Set the millimeter size first, then judge each anchor below at true physical size with scaling off.

Ear separation

Keep one outline per ear with a visible skin gap between ears and between each ear and the head mass. At neck widths the ear gap is the first closure point, ahead of any membrane bay.

Fails when: Inner-ear hatching, fur ticks inside the ear, or ears drawn touching the wing edge. If the ears merge at 1:1, remove interior ear lines before touching the span.

Finger-fan bays

Carry at most three finger struts per wing on throat bands at 50 to 70 mm, and two per side on hanging wraps at small heights. Every bay must read as countable open skin at true size, mirrored left to right on throat work.

Fails when: Four or five struts squeezed into a neck band, vein rows paralleling struts without skin breaks, or scallops sharing a bay edge. Reopen, reduce strut count, or recrop; never thin neighboring struts to fit more.

Wing anchors and trailing edge

Hold the outer wing contour, the body-to-wing junction, and one clean trailing-edge line as the load-bearing triangle. Scallops stay shallow at neck scale, each with its own break from body and foot lines.

Fails when: Deep notches that need wider bays than the neck allows, trailing edges bridged to body shading, or foot and tail lines sharing one contact. Keep one contour family and let texture go first.

Wrap and stretch behavior

Throat bands compress when the chin drops and widen on chin lift; side columns stretch on the turned-away side and pinch on the turned-toward side; nape pieces stretch on forward tilt. Judge anchors in the stretched position, since relaxed-only approval hides the closure.

Fails when: Approving the stencil flat on a table, or with the head in one position only. Run neutral, chin lift, full left, full right, and forward tilt before locking the file.

Membrane gap thresholds

Judge white space, not line count

At neck scale every bat is an outline plus separations. Hold these four gaps open on the physical 1:1 print before any vein, fur, or background cue earns room.

Ear gap and head separation

Must stay visibly open on the physical 1:1 print with the naked eye, with daylight between the ears and around each ear base. If a loupe is needed to find the gap, it will not survive transfer on throat skin.

Finger bays between struts

Each bay must read as a separate light channel at 1:1, not a gray gradient. Adjacent struts that share one blurred valley on paper share one filled band on skin.

Wrap-to-body gap on hanging bats

The wrapped-wing edge must hold open skin between wing and body along its full length at 1:1. Any touch point becomes the fill start, and the whole wrap follows.

Trailing-edge scallops

Each scallop notch must show its own skin break at 1:1. Shallow scallops pass; deep notches that close on paper need widening, shallowing, or one fewer notch before print is approved.

Failure patterns

Four neck-bat failures and the cheapest fix

Each failure below pairs the visible cause with the minimum correction. Fix zone fit before redrawing lines, and reopen gaps before changing line weight.

Neck bat failures and stencil corrections
FailureCauseFix
Span squeezed onto the sideA spread-wing bat drawn for the throat is forced into a side strip, so outer finger tips cross the muscle cord and crowd at the jaw turn.Switch the side placement to a perched column or hanging teardrop, or move the spread to the throat at a width the front panel actually holds.
Ears lost in the wrapEar interiors plus fur ticks plus wing-edge lines stack into one dark head mass where the neck curves, so the bat reads headless at conversational distance.Reduce each ear to one outline plus open skin, clear the ear-to-wing contact, and re-check head-on for throat work or side-on for column work at 1:1.
Membrane fill across baysVein rows drawn as parallel neighbors without skin breaks print as one filled band, and the trailing edge follows. Small throat and nape fields accelerate the merge.Convert veins to spaced stipple or remove them, hold three struts maximum per wing at neck widths, and reopen every bay before approving texture of any kind.
Wingtips crossing the side turnA throat band drawn wider than the visible front panel bridges the neck cylinder, then lifts or creases at the edges on transfer and drags one wing off center.Design for one viewing angle, keep full width inside the visible panel, and shorten wingtips while edits are still cheap. Verify front, side, and back photos before locking size.

Curved-neck transfer verification

Run the wrap proof while the stencil can still change.

Work in this order so each step can be judged at the same millimeter size. Stop when pose, gaps, movement, and paper proof all pass together.

  1. 01

    Lock zone, pose, and millimeters

    Name the zone (throat, side, or nape), name the pose (spread-wing band, perched column, or hanging teardrop), and write the physical width and height in millimeters on the file. A spread-wing bat approved at 70 mm throat width is a different stencil than the same bat squeezed to a 35 mm side strip. Do not judge gaps until these three are fixed.

  2. 02

    Run the squint and bay count at true size

    Export at 100 percent with scaling off, then squint until veins and texture disappear. Count open finger bays per wing, confirm both ear points, and confirm the trailing edge still reads. If the bat becomes a bird or leaf shape at this step, lock span symmetry and ear separation before touching membrane detail.

  3. 03

    Dry-fit on the upright neck with movement

    Seat the client upright with the chin neutral. Tape the uncut print to the zone, then run the movement set: chin lift for throat bands, full left and full right turns for side columns, forward tilt for nape pieces. Photograph front, both sides, and back. Redraw zone fit before redrawing lines.

  4. 04

    Cut relief and press from the focal outward

    Cut short relief slits where the throat hollow or the jaw turn resists, mark the midline for throat and nape work or the muscle line for side work plus top and bottom anchors, then press from the body focal outward so excess length moves toward hairline, ear, and collar transitions. Keep transfer-critical detail off jaw cartilage, ear folds, and hair.

  5. 05

    Pass the paper proof before skin

    Measure the physical print with a ruler, inspect the narrowest ear gap, tightest finger bay, and smallest scallop on plain paper, and compare against a photo of the actual neck rather than a generic template. If the file passes and only the transfer skews, treat it as placement evidence and adjust fit, not linework.


Approval checklist: sign the bat only when every line passes

  • Zone and pose are named and compatible: spread-wing band for throat, perched column or hanging teardrop for side and nape.
  • Both ears read as separate shapes with an open gap at 1:1, judged in the stretched head position.
  • Finger struts keep countable open bays on both wings at 1:1, mirrored on throat bands.
  • Wrap-to-body gap stays open along its full length on hanging bats at 1:1.
  • Trailing edge is one clean contour with open scallops, clear of body and foot lines.
  • True-size PDF exported with scaling off, measured with a ruler, and movement-tested upright before transfer.

FAQ

Bat neck decisions, answered

Short answers for the pose, size, membrane, wrap, and proof checks that recur when a neck bat moves toward transfer-ready output.

Use a spread-wing bat as a horizontal band only on the front throat, where the head-on view carries symmetry. Use a perched bat with folded wings as a vertical column on the side neck, running with the muscle cord. Use a hanging inverted bat for the nape center or a narrow side strip, where the tall teardrop fits the curve. A spread forced onto the side is the most common failure on this page: switch the pose before shrinking the span.

Throat span vs side column Gaps proven at 1:1 Movement-tested upright

From neck-bat decision to working stencil

Turn the approved neck bat into a stencil draft.

Start from the pose that passed the zone, gap, and movement checks, then continue on iPhone for body fit, exact-size print, mirror and professional export.