

Outline rosary stencil prep

Plan the drape, then prove the beads hold

An outline rosary lives or dies on loop geometry and bead uniformity. Choose the drape that fits the placement, verify every bead gap at final size, integrate the cross pendant without closing its gaps, then confirm the stencil transfers as one readable loop.

Built for working artists preparing outline rosary pieces for print, transfer, and placement. This page covers drape choice, bead spacing and uniformity checks, cross-pendant integration, and wrap, hand, and neck sizing only, not tattoo application or healing advice.

Drape decision framework

Four loops, four different stencil bargains.

Pick the drape before touching bead size or pendant detail. Each option below names its shape, when it earns its place, and the failure that shows up first at transfer size.

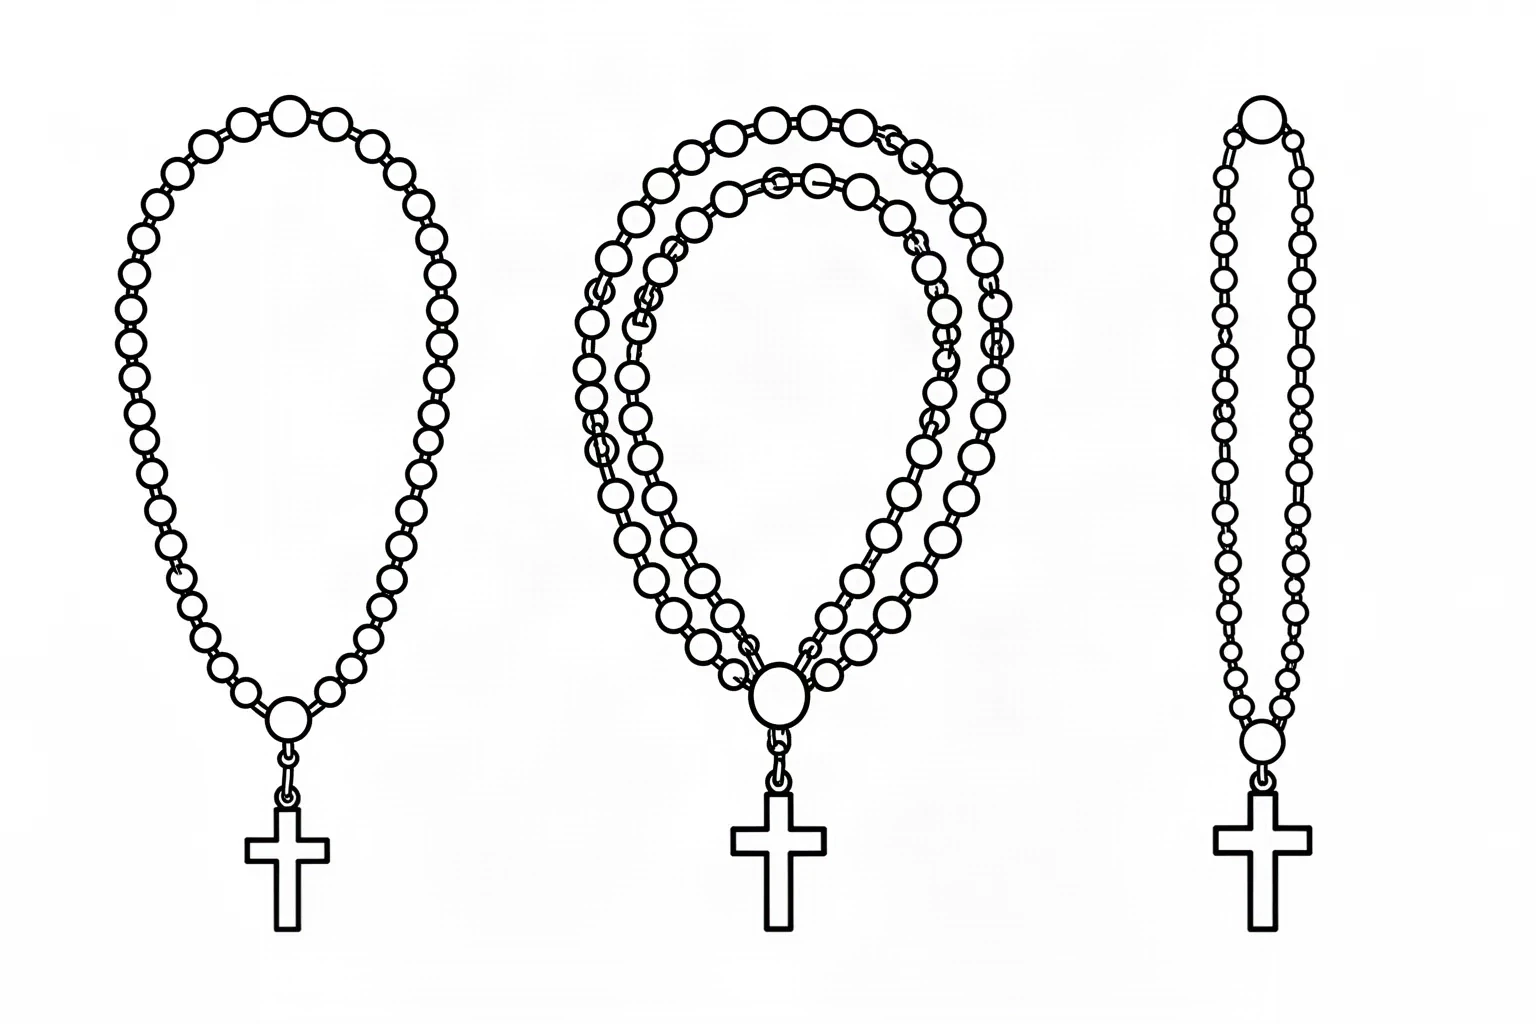
Outline stencil reference showing three rosary drapes side by side: a single bead loop with a cross pendant, a double wrap loop with two separate bead runs, and a vertical pendant drop strand ending in a cross.
Reference sketch for drape choice: single drape loop, double wrap loop, and pendant drop, with every bead drawn as an open ring at one size. The hand and wrist wrap below is a shorter variant of the double wrap. Original illustration, not app output or a client tattoo photo.

Single drape loop

One continuous bead loop with a natural hanging curve and the cross pendant falling from the lowest point of the loop.

Use when: Use when the placement offers one flat span: upper chest, sternum, forearm, calf, or thigh. It is the most forgiving drape because the full loop reads at a glance and every bead has the same neighbor relationship.

First failure: Fails when the loop is drawn too flat: the top beads crowd together while the bottom sags, and spacing that looked even on screen closes at the curve shoulders. Rehang the loop with a deeper drop before judging bead size.

Double wrap loop

Two near-parallel bead runs that circle the limb or placement twice, joined at the pendant strand. The two runs must stay visually separate along their whole length.

Use when: Use for wrap placements around the forearm, bicep, wrist, or ankle where one loop would look lost on the circumference. Each run reads as its own line from working distance.

First failure: Fails when the two runs drift together: at wrap curvature the inner run compresses and beads from opposite runs touch, merging two lines into one beaded band. Keep the runs apart at the tightest point first, then check the rest.

Hand and wrist wrap loop

A short bead run that crosses the back of the hand or circles the wrist, with the pendant resting on the hand or dropping toward the fingers.

Use when: Use for hand and wrist rosary pieces where the beads themselves are the bracelet. Keep the bead count low so every bead keeps open skin around it on thin, high-movement skin.

First failure: Fails when finger-side beads are drawn the same size as wrist beads: knuckle movement and thin skin close small gaps fast, and the pendant crowds the finger bases. Enlarge the hand-zone beads or shorten the run.

Pendant drop

A mostly vertical bead strand falling from the neck or upper chest with the cross pendant as the terminal anchor, often with a small centerpiece bead where the loop would join.

Use when: Use for neck, throat-to-sternum, and spine placements where the strand follows the body midline. The vertical axis keeps the cross centered without the symmetry demands of a full loop.

First failure: Fails when the strand drifts off the midline or the pendant is drawn at the same weight as the beads: the cross disappears into the strand instead of anchoring it. Lock the vertical axis on the flattest span, then give the pendant its own separation.

Bead spacing and uniformity

Uniform beads with open gaps around every one.

Bead crowding is the most common outline rosary failure. Run these four checks at the exact loop length before judging the pendant or the placement.

Uniform bead size

Every bead in one run shares one outline size and one interior treatment. Mixed bead sizes read as mistakes at stencil scale unless one centerpiece bead is deliberately set apart near the pendant join.

Verify: Cover the pendant and scan the run bead by bead at true size. If any single bead looks larger, smaller, or heavier than its neighbors without a named reason, redraw it to the run standard before judging spacing.

Even loop spacing

The gap between neighboring beads stays consistent around curves, not just on straight runs. Curve shoulders compress spacing while straight spans stretch it, so the loop reads unevenly even when the average gap is correct.

Verify: Check the three tightest neighbor pairs on the 1:1 print: both curve shoulders and the pendant join. As a practical starting point, many artists test outline bead gaps at about 2 mm of open skin between bead outlines at common sizes, and allow more room on hands, fingers, and high-movement areas.

Open bead interiors

In outline style each bead is an open ring, not a filled dot. The interior of every bead must hold open skin at final size, or the run prints as a dotted band instead of a bead loop.

Verify: Inspect the smallest bead interior on plain paper without zoom. If the center fills at true size, enlarge the beads, reduce the bead count for the same loop length, or choose a larger placement before changing the drape.

Link behavior

Outline rosaries show the strand as short links or touching points between beads. Each link must read as its own mark with open skin on both sides, never as a continuous second line running alongside the beads.

Verify: Trace each link from bead edge to bead edge at 1:1. If two links plus a bead merge into one mass, shorten the link marks or widen the bead gap at that point only.

Cross-subject clean-contour principles, including single-weight hierarchy and the remove-one-mark test, belong to the simple-outline owner linked below. This section keeps only rosary-specific bead uniformity: size consistency, loop spacing, open interiors, and link behavior.

Cross-pendant integration

Anchor the loop without closing the cross.

The pendant is the smallest cross on the stencil and the easiest to over-detail. These four rules keep it readable as the loop terminal without building a standalone cross catalog here.

Give the pendant its own separation

The cross hangs from the strand, it does not grow out of it. Keep one clear gap between the last strand bead and the top of the cross, plus open skin around the cross arms, so the pendant reads as a terminal anchor rather than a continuation of the beads.

Size the cross to the beads, not to the page

A pendant cross roughly two to three bead-heights tall keeps the hierarchy: beads carry the loop, the cross closes it. A cross drawn much larger dominates the loop and needs the loop enlarged to match; a cross near bead size vanishes into the run at transfer.

Hold the pendant outline gaps

Trace the cross arm separations and any interior notch from open skin to open skin at true size. Rosary pendants are small, usually in the 2 to 5 cm range, so interior cross detail that would hold on a standalone cross piece often fills here. Simplify the pendant to one plain cross construction when any interior gap closes.

Lock the pendant axis to the drape

On a single loop the pendant hangs from the lowest loop point; on a pendant drop it continues the strand axis. A pendant rotated off that axis looks detached after transfer, especially on curved placements where the skin pulls the strand straight.

Placement sizing for open-gap hold

Size wraps, hands, and necks by their weakest gap

Curved placements punish generic sizing. Each placement below names its curvature constraint and the sizing move that preserves open gaps.

Wrap placements (forearm, bicep, ankle)

Circumference compresses the inner run of a double wrap and stretches stencil paper across the curve. Bead runs that are parallel on screen converge on skin.

Sizing move: Size by the tightest run-to-run gap, not the overall loop. Confirm both runs stay separate at 1:1 on the narrowest part of the limb, and cut the stencil into two or three panels for application so each panel sits flat.

Hand and fingers

Thin skin, constant movement, knuckle curvature, and fast ink spread. Small bead interiors fill first here, and pendant detail near finger bases crowds quickly.

Sizing move: Carry the fewest beads that still read as a loop, keep bead interiors generous, and simplify the pendant to a plain cross with no interior detail. If any bead interior or link gap closes at the exact millimeter size, shorten the run or move the piece rather than forcing reduction.

Neck and throat-to-sternum

A long vertical field with breathing movement, collarbone breaks, and high visibility of asymmetry. Any drift off the midline reads immediately, and swallowing motion works the transfer during application.

Sizing move: Use the pendant drop, keep the strand on the flattest midline span, and center the cross on the sternum flat. Verify the full strand length on a body photo before print, because a strand that fits the screen rarely matches the neck-to-sternum distance at true size.

Transfer-ready verification

Approve the rosary only when every line passes

Run this short sequence with scaling off and a ruler in hand. One failed line means fix, shorten, enlarge, or move the piece before transfer.

  • Confirm the drape choice, the intended loop length or strand length in millimeters, and the named placement.
  • Confirm uniform bead size across each run, with at most one deliberate centerpiece bead near the pendant join.
  • Confirm the three tightest bead-to-bead gaps stay open at 1:1, including both curve shoulders and the pendant join.
  • Confirm every bead interior holds open skin at final size without zoom.
  • Confirm the cross pendant has its own separation from the strand and its arm gaps stay open at true size.
  • Confirm placement sizing: run separation on wraps, bead count on hands, midline fit on neck pieces.
  • Export a true-size PDF with scaling off, measure the physical print with a ruler, and confirm it matches the locked length.
Uniform beads first Verify gaps at 1:1 Pendant stays separate

FAQ

Rosary stencil decisions, answered

Short answers for the drape, bead-spacing, pendant, placement-sizing, and print checks that recur when an outline rosary moves toward transfer-ready output.

Match the drape to the skin available. A single drape loop suits flat spans such as the chest, sternum, forearm, or thigh. A double wrap loop suits limbs where one loop would look lost, provided both runs stay separate at the tightest point. A short hand and wrist wrap suits bracelet-style pieces with a low bead count. A pendant drop suits neck and spine placements that follow the body midline. The drape comparison on this page names the shape, the use case, and the first failure point for each option.

Next steps

Use the neighboring owners for adjacent jobs.

This guide covers rosary drape choice, bead spacing and uniformity, cross-pendant integration, and wrap, hand, and neck sizing. Use the links below for related jobs such as cross construction, contour principles, photo conversion, and transfer execution.

Standalone cross-variant tables stay on the cross owner, cross-subject contour principles on the simple-outline owner, grey-wash simplification in the chicano system, photo-conversion steps on the photo owner, and step-by-step execution in the transfer guide. The links above hand off instead of repeating that detail.

From evaluated drape to working stencil

Turn the approved rosary loop into a stencil draft.

Start from the drape that passed the bead-spacing, pendant, and placement-sizing checks, then continue on iPhone for body fit, exact-size print, mirror and professional export.