Lace garter thigh-band reference

Vet the lace, then close a level thigh ring

A lace garter is a measured thigh loop with a retention test attached. Confirm the mesh, bow, straps, and scallop edge survive at final band height, tape the thigh and set strip length with overlap closure, then transfer with stretch and stride checks before the stencil reaches skin.

Built for working artists preparing wrap-around lace garter bands. This page covers lace retention vetting, measured thigh-wrap sizing with overlap closure, and stretch-aware transfer prep only, not tattoo application or healing advice.

Lace retention at final size

Five lace elements decide stencil-ready or not.

Judge the reference at the exact band height you will print, not on screen. Each row below names what survival looks like, what failure looks like, and which fix comes first.

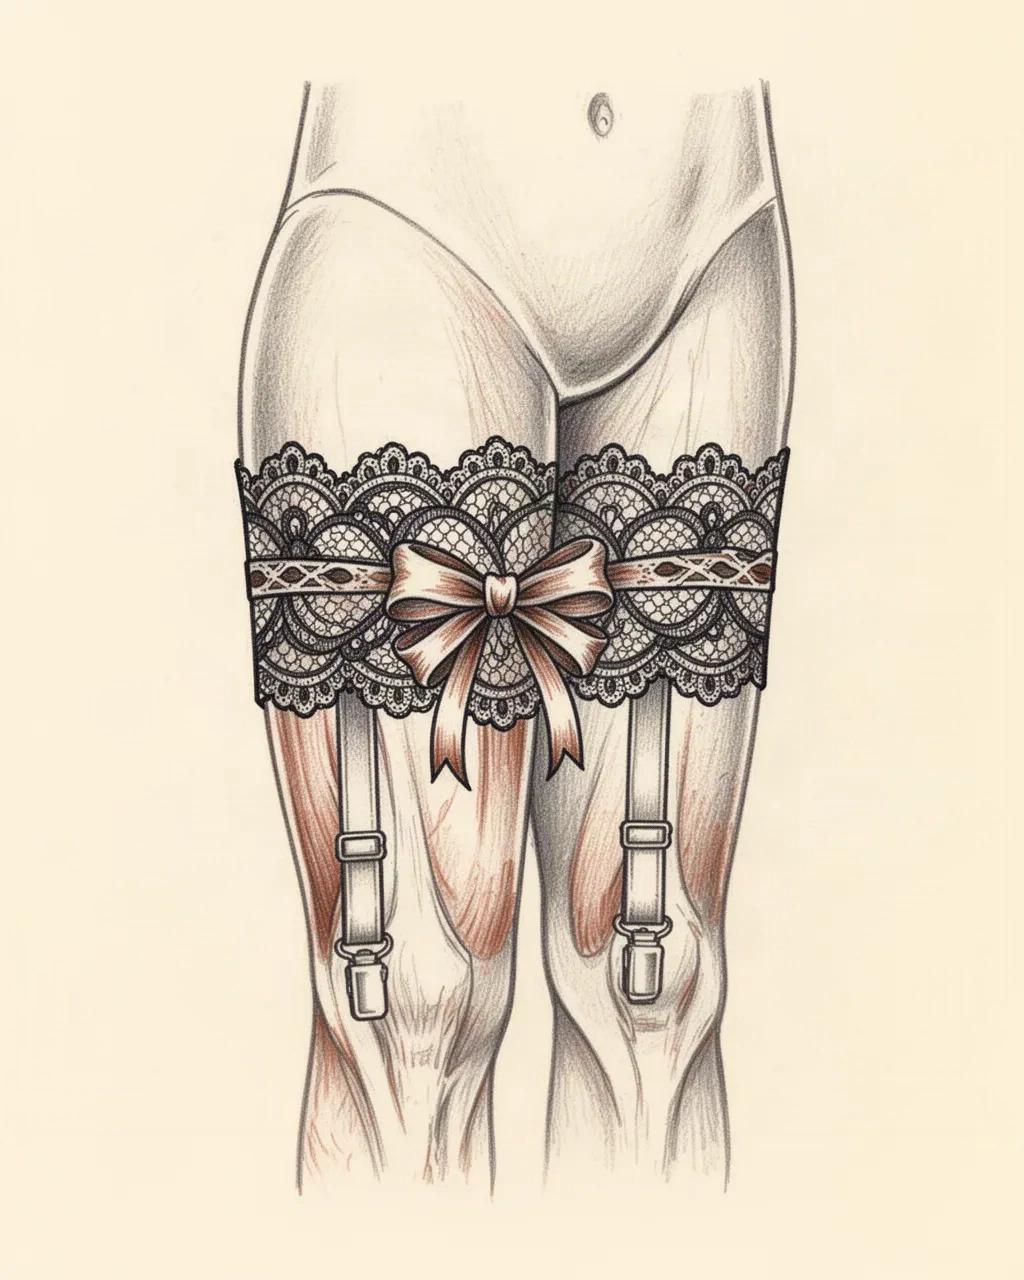
Editorial illustration of a lace garter band drawn around the mid-thigh, showing open lace mesh, scalloped top and bottom edges, a front ribbon bow, and two suspender straps ending in clips.
Original editorial illustration of a lace garter band, not a stencil proof or app output.

One band, five retention surfaces

Every row in the table below names one of the surfaces visible here: the mesh field, the gaps that have to stay open as skin, the bow, the suspender straps, and the scalloped edge. Treat them as separate approvals rather than one overall impression of lace.

This drawing is deliberately finer than most stencil pages can hold at garter band height. At true size the mesh thins, the valleys fill, and the straps crowd, which is why each element gets its own read on the 1:1 print before the file is called stencil-ready.

Lace garter retention framework at final band height
ElementSurvives whenFails whenFirst fix
Lace mesh densityEvery mesh opening reads as separate skin on the 1:1 print, with open channels reaching an edge instead of ending in blind pockets.Mesh rows are drawn denser toward the center or the bow, so openings merge into gray texture once reduced to band height.Remove one mesh row across the band, reopen every channel to an edge, and re-check the narrowest opening at true size before touching line mass.
Mesh gap retentionThe narrowest gap stays visibly open at arm's length on paper with scaling off, and stays open again on the curved dry wrap.Gaps that read open flat pinch shut on curve, especially on the inner thigh where the surface falls away fastest.Widen the tightest gap in the file first. Many artists test close lace detail at about 2 mm separation and allow more room on soft or high-movement thigh skin, with the working artist judging the final call.
Bow and ribbon focalThe bow reads as two loops, two tails, and one knot with open skin between each part at final band height.Loops collapse into the knot, tails merge into the lace field, or the bow lands on the seam and loses one loop in the overlap.Simplify to one bow per band, seat it on the chosen reading face away from the seam, and protect loop openings before adding tail detail.
Strap and suspender tabsEach strap reads as one clean bar with even spacing on both sides, ending in a clip or ring that stays separate from the lace edge.Straps lean across the band axis, crowd each other near the inner thigh, or end in clips that touch the scallop edge.Set strap count from band height, keep straps parallel to the limb axis, and trim the plan to fewer, cleaner straps when spacing touches on the dry wrap.
Scallop edgeEach scallop keeps its own crown and valley with open skin between repeats, and the edge sits level around the thigh.Scallops share one merged border line, valleys fill on curve, or the edge rides uphill because the strip was cut straight for a tapered thigh.Reopen every valley to skin, keep one contour family for the edge, and give the strip a slight curve toward the narrow end before re-checking level.

Run the framework on a 1:1 print with scaling off and a ruler in hand, then repeat the narrowest-gap read on the curved dry wrap. Generic symmetry and density theory without a garter seam stays with the ornament owner linked below.

Bow, strap, and scallop variants

Choose the garter build for the measured thigh.

Four garter builds for the same thigh job. Each one is judged on read, retention behavior, and wrap closure so the choice fits the band height, the brief, and the loop you measured.

Continuous lace band, no bow

Read: One even lace ring with repeating mesh and a scalloped edge on one or both sides. The quietest garter read, judged on rhythm and spacing consistency.

Retention: Strongest gap survival because there is no focal competing for room. The seam carries the whole result.

Wrap closure: Closure means the mesh repeat continues through the overlap with no pinched or doubled opening on the joint. Shift the trim line by one mesh unit when a valley lands on the seam.

Lace band with front bow

Read: A lace ring with one ribbon bow seated on the front or outer thigh. The common bridal and feminine brief, read at close to middle range.

Retention: The bow needs protected openings at band height. Budget band height for loops plus tails before approving mesh density around it.

Wrap closure: Seat the bow on the chosen reading face and place the seam at the inner thigh where it draws less attention. Never let the bow and the seam share one position.

Lace band with straps and clips

Read: A lace ring with two to four suspender straps dropping from the lower edge. Decorative, with strong vertical rhythm on the front thigh.

Retention: Straps need even side spacing and separate clip marks. Crowded straps merge faster than mesh does.

Wrap closure: Straps hang with the limb axis, so level the band first and let straps follow. Confirm on the standing client because seated skin shifts strap spacing.

Double lace band with skin break

Read: Two parallel lace runs with an open skin channel between them. The richest garter read and the hardest to hold on a short thigh field.

Retention: Two rhythms plus a break must all stay open at 1:1. The skin break is a design element, not leftover space.

Wrap closure: Two seams staggered to opposite sides of the thigh, with the break staying visibly open on curve. Drop to a single band when the break touches on the dry wrap.


Measured thigh-wrap worksheet

Measure the loop, then set the strip.

Work in this order so each number can be checked before the next one locks. Stop when suitability, circumference, variant, overlap, seam, and dry wrap each have a written value.

  1. 01

    Confirm garter suitability for the thigh

    Check that the brief truly wants a wrap band: a continuous or near-continuous lace ring, a bow or strap composition that survives as a band, and enough flat thigh height for the chosen band height plus straps. When the reference is a thigh panel scene or a focal better read as a front-thigh composition, hand the zone decision to the leg owner linked below instead of forcing it into a ring.

  2. 02

    Measure the thigh loop at the exact height

    Wrap a tape around the thigh at the agreed band height with the client standing, weight even, and record the circumference in millimeters. On tapered thighs, also measure 10 to 15 mm above and below that line so the strip can be curved instead of cut straight. Measure where the band will sit, not where it is easiest to reach.

  3. 03

    Set band height and variant for that loop

    Match band height to the measured loop and the brief: continuous lace for the slimmest fields, bow or strap variants where height allows the focal plus mesh, double band only where two rhythms plus an open skin break all fit. Lock single versus double band and bow position before simplifying any lace detail, because each build has its own spacing and seam plan.

  4. 04

    Set strip length with overlap closure

    Set the strip length to measured circumference plus an overlap allowance. Start at 20 to 30 mm for thigh lace and confirm on the dry wrap: enough length that the ends double over each other instead of meeting edge to edge, short enough that the doubled section does not lift or bulk under transfer paper. Mark the overlap zone on the stencil margin so trimming happens inside that zone only.

  5. 05

    Plan continuity and seam position

    Trace one lace repeat across the planned joint on the 1:1 print and confirm the mesh rhythm continues without a flipped repeat, a pinched gap, or a scallop valley landing exactly on the joint. Place the seam toward the inner thigh unless the client asks otherwise, keep the bow on the reading face, and shift the trim line by one mesh unit inside the marked overlap when the joint collides with detail.

  6. 06

    Dry-wrap the paper strip before transfer paper

    Print the strip at true length with scaling off, measure the physical print with a ruler, then wrap the paper strip on the real thigh while the client stands. Confirm the overlap doubles cleanly, the mesh stays open on curve, the scallop edge sits level, and straps hang with the limb. Fix file issues in the file; fix transfer issues at transfer.

Stretch-aware transfer prep

Prove the lace band on the moving thigh

Thigh lace fails in motion, not on the table. Run these four checks standing, with relief slits cut and a stride test before committing transfer paper.

Standing neutral first

How: Place and verify with the client standing, weight even, feet neutral. Thigh skin shifts several millimeters between seated and standing, and garter spacing locked while seated reads differently once the client stands.

If it fails: A band leveled on a seated thigh rides or gaps on the standing loop. Re-anchor at the agreed height standing and re-check all marks instead of stretching one side.

Relief for wrap and soft tissue

How: Dry-fit the uncut strip, then cut short relief slits where the thigh crown or inner curve resists so the paper settles without bridging or creasing across the lace field.

If it fails: A flat strip wider than the settled panel bridges the curve, then lifts at the scallop edge or creases through the mesh. Shorten the settled width or add relief before pressing.

Anchor, then smooth toward the free end

How: Anchor the bow or the lead end first, smooth toward the free end in short passes, and lift to confirm the lace axis before the second half touches skin. Re-check the scallop edge against the level marks after placement.

If it fails: Long lace bands smear when the free end slides. Re-lay the strip instead of pressing harder, and diagnose faint or patchy first contact by layer with the transfer troubleshooter.

Stretch and stride confirmation

How: Have the client take a few walking steps, shift weight side to side, and sit then stand once. Confirm mesh openings still read as separate skin, straps still hang parallel, and no transfer-critical line has migrated onto a crease.

If it fails: Gaps that passed static inspection pinch shut in motion. Widen the tightest separation in the file and re-run the dry wrap rather than accepting a static-only pass.

Stencil-ready checklist

Approve the garter only when every line passes

Short sequence for the final sign-off. Judge it on the measured paper strip on the thigh, not on screen.

  • Confirm the reference passed the retention framework: mesh, gaps, bow or straps, and scallop edge each survive at final band height.
  • Confirm taped thigh circumference, band height, variant choice, and the named seam position away from the bow.
  • Confirm strip length equals circumference plus a marked overlap allowance, with trimming limited to that zone.
  • Confirm the lace repeat continues through the seam with no motif landing exactly on the joint.
  • Confirm level marks on skin at front, outer, inner, and back with the client standing.
  • Export a true-length print with scaling off, measure the physical print, and dry-wrap the strip on the thigh.
Lace vetted at 1:1 Loop measured, overlap marked Stride test passed standing

FAQ

Lace garter decisions, answered

Short answers for the retention, measurement, continuity, transfer, variant, and handoff questions that recur on thigh lace band jobs.

It survives when every mesh opening, bow loop, strap gap, and scallop valley stays visibly open on a 1:1 paper print with scaling off, and stays open again on the curved dry wrap. Print the band at its true height, judge the narrowest opening at arm's length, and remove one mesh row, drop one strap, or enlarge the band when anything merges. The retention framework on this page names which element to fix first so line mass is not blamed for a spacing problem.

From vetted garter to working stencil

Turn the approved lace band into a stencil draft.

Start from the garter build that passed retention, loop, seam, and stride checks, then continue on iPhone for body fit, exact-length print, mirror and professional export.