

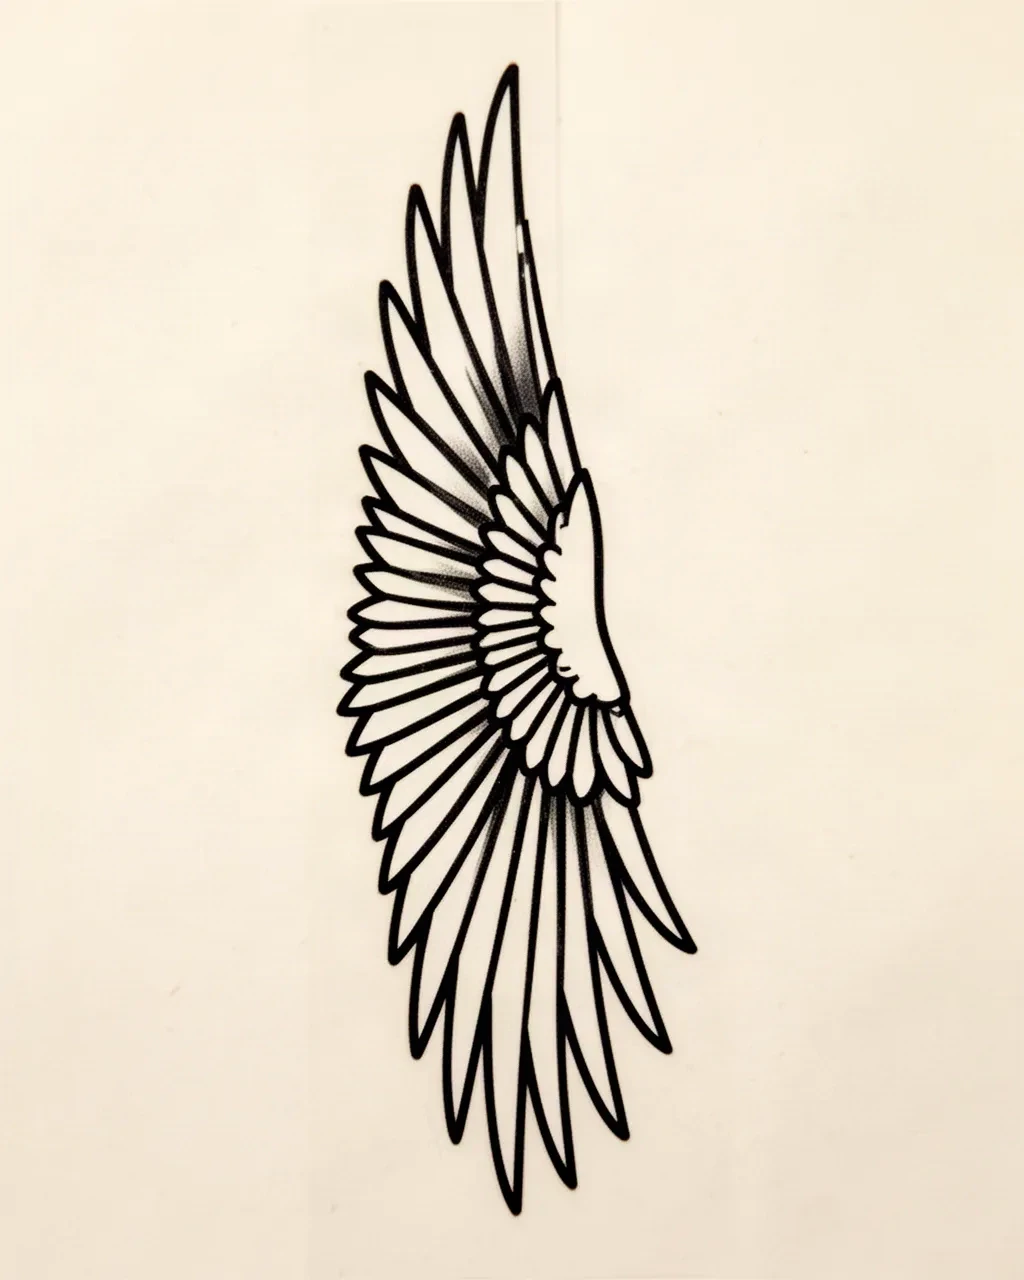
Forearm wing stencil reference

Fit one wing to the forearm axis before print

A single feathered wing lives or dies on axis: the leading edge must run with the limb, the quill fan must point one way, and every primary gap must survive taper and wrap. Name outer or inner flow first, then prove direction, gaps, and span size before the stencil reaches skin.

Built for working artists preparing a standalone forearm wing. This page covers stencil preparation and visual review only, not tattoo application or healing advice. It is not a wing image gallery, a sleeve planner, or an angel, eagle, or insect-wing guide.

Wing-to-forearm axis framework

One wing, one axis, two flows.

A forearm is a tapered tube, not a flat poster. The wing axis must agree with the limb axis first; outer and inner flows then decide how much span the field allows and which viewing angle the wing serves.

Original studio illustration of a single feathered wing stencil with its leading edge straight along a vertical axis and every primary feather fanning one direction toward the wrist end, with visibly open gaps between the primaries.

Reference wing

Lead with the limb axis, fan the quills one way

Outer-flow reference: the leading edge holds one straight vertical axis, the quill fan points one way toward the wrist end, and every primary separation stays open. Compare any reference against this before choosing a flow.

Original illustration for stencil review, not StencilStudio app output, a client result, or a scale reference.

Outer flow

Wing rides the visible outer panel, wrist to below the elbow

The leading edge runs with the limb axis and the quill tips fan toward the wrist or slightly toward the side edge. The outer panel is the broadest and flattest forearm field, so a single wing keeps its full span here without crossing the side turn. It reads at distance and takes daily sun on that face.

Best when the wing is the focal and must read from across the room. Accept sun-facing line mass and keep the span inside the flattest span so the stencil does not bridge the muscle dome or spill past the side edge.

Check: Center the leading edge on the flattest outer span, run the quill fan with the limb toward the wrist, and judge sun-facing line mass at true size before print.

Inner flow

Wing sits on the softer underside, read when the wrist turns up

The leading edge still runs with the limb axis, but the composition stays slimmer and reads at close range. Feather rows shorten and separations widen because the inner field is narrower and thinner, with more visible veins. Wide outer-flow spans forced here wrap past the visible edge and break on rotation.

Best for a personal, close-read wing or a memorial feather accent. Keep the span slim, protect every gap, and judge with the wrist turned up in a relaxed hanging arm.

Check: Keep the full span inside the inner visible width, shorten the longest primaries first when width exceeds the field, and confirm the read with the wrist turned up.

Axis decision in one pass

Run the leading edge with the limb, then let width decide

  1. 1. Lay the axis. Place the leading edge parallel to the limb from elbow side to wrist side. If the reference needs a diagonal that fights the limb, it is the wrong reference for this forearm.
  2. 2. Measure the field. Tape the usable width of the intended flow. A span wider than the field forces a choice: shorten the primaries, move to outer flow, or reassign to a sleeve plan.
  3. 3. Name the audience. Distance read goes outer, private close read goes inner. The side edge carries no wing focal; it only turns primaries out of view.

Generic forearm zone flow, full taper mechanics, and zone-by-zone length tables stay with the forearm owner linked below. This framework covers only the wing-to-axis decision that the generic zone guide does not make.

Feather direction and gap retention

One fan, open gaps, no opposing rows.

Under taper and wrap, a wing stencil fails at the separations: opposing fans split the read and even spacing pinches shut at the wrist end. Judge direction and gaps at transfer size before changing span or density.

PASS

Quill tips fan one way toward the wrist

One leading edge with the limb axis, primary feathers in a single ranked fan toward the wrist, open skin between each primary at transfer size, one short secondary row near the leading edge only.

Verdict: Stencil-ready when every primary separation stays visibly open at 1:1 with the arm hanging relaxed, the fan points one way, and no feather crosses the limb axis against the fan.

REWORK

Feathers split into two opposing fans

Primary tips point half toward the wrist and half toward the elbow, often because a spread-wing photo was shrunk to fit without redrawing direction.

Verdict: Rework when tips oppose: pick the wrist-side fan, redraw or remove the opposing row, and re-check that the remaining separations hold at 1:1.

REWORK

Primary gaps close near the wrist end

Even spacing drawn flat, then wrapped onto taper: separations that looked open on screen pinch shut toward the narrower wrist end once curved.

Verdict: Rework when the narrowest wrist-side gap closes at true size: widen wrist-side separations, shorten one secondary barb row, or shorten the span before reprinting.

REWORK

Span crosses the side edge and breaks on rotation

A wide wing drawn for a flat panel, with outer primaries landing past the visible edge so they disappear from the main view and reappear only on rotation.

Verdict: Rework when any primary crosses the side turn: shorten the span to the visible field, move the focal to the outer panel, or reassign the job to a sleeve plan instead of forcing the width.

One fan, one direction

Every primary tip points within the same wrist-side fan. A single opposing feather reads as an error at distance and doubles the separations that can close under wrap.

Rank the rows, then thin from the short end

Name the longest primary row the protected row. When gaps crowd, shorten or remove the shortest secondary row first and never touch the protected row until the support rows are gone.

Widen gaps toward the wrist

Taper pinches even spacing shut at the narrow end. Draw wrist-side separations slightly wider than elbow-side separations, then confirm the narrowest one at 1:1 on paper.

Keep barbs off the gaps

Fine barb texture inside a primary separation is the first detail to close on curved skin in motion. Keep barbs short of the gap line or remove them where the separation is narrowest.

Insect-wing vein construction, with symmetric paired wings and membrane cells, belongs to the butterfly and death-moth owners. Those wings follow different spacing logic and this fan-and-gap system does not apply to them.

Forearm-width exact-size verification

Prove the span against the measured arm.

Long wing spans hide one closing gap among many correct ones. Lock millimeters for the chosen flow, print true-size, and pass every check below before transfer.

Starting spans by wing placement
PlacementStarting pointDecision rule
Outer focal wingLeading-edge length about 120 to 170 mm, span width about 60 to 90 mmSize by leading-edge length first. If primary separations close at 1:1, widen wrist-side gaps or remove one secondary row before enlarging the span.
Inner slim wingLeading-edge length about 80 to 130 mm, span width about 30 to 50 mmSize by gap survival, not length. When a separation merges, shorten the longest primary or widen local spacing rather than thinning every quill.
Small feather accentLength about 40 to 70 mm, three to five primaries maximumSingle short fan only. Any enclosed barb pocket at this size needs a gap check at 1:1 with the wrist turned up.

Span verification sequence

Seven checks from tape measure to measured print

  1. Measure the client forearm: usable outer width, usable inner width, and wrist-to-elbow length for the chosen flow, in millimeters.
  2. Lock the leading-edge length and span width in millimeters before export, matched to the measured field, not to the screen preview.
  3. Export a true-size PDF with no fit-to-page scaling and print on plain paper.
  4. Inspect every primary separation at 1:1, narrowest wrist-side gap first, and confirm each one stays visibly open.
  5. Dry-fit the paper stencil on the actual forearm with the arm hanging relaxed, palm neutral, and mark where any primary crosses the side turn.
  6. Photograph front, side, and three-quarter views, then rotate the wrist up and re-check inner-flow reads.
  7. Measure the physical print with a ruler; resize and reprint when any gap closes or any primary leaves the visible field.

These starting spans are stencil-prep guides, not placement rules. Full forearm-zone length tables and taper compensation detail stay with the forearm owner; angel wingspan-at-height prep stays with the angel owner. This sequence covers only span-to-width verification for a single wing.

Transfer prep

Anchor the leading edge, then re-check the fan

Wing stencils skew when they are aligned flat and pressed in one motion. Run these steps while the stencil is still easy to lift and reposition.

  1. Set the anatomical neutral first: arm hanging relaxed, palm neutral, elbow soft, before any mark goes on skin.
  2. Mark the forearm centerline plus the leading-edge top and bottom anchors, then add one quill-tip reference mark toward the wrist end.
  3. Dry-fit the uncut stencil against the anchors and cut short relief slits where taper or the side turn resists.
  4. Press from the leading edge outward so excess length moves toward the primaries, not into the anchor line.
  5. Photograph front, side, and three-quarter views and confirm the fan still points one way before committing.
  6. Re-check with the wrist turned up for inner flow, and with slight elbow bend for outer flow near the elbow transition.
  7. If the stencil bridges the outer dome or an edge lifts on the turn, cut one more short relief slit or shorten the span rather than forcing it flat.

Production handoff

Turn the verified wing into a true-size file

Once the axis, fan, gaps, and span pass on paper and on the arm, lock the file with the same production tools the neighboring owners use.

Prove gaps at 1:1 Anchor on the hanging arm Measure the print

FAQ

Forearm wing decisions, answered

Short answers for the axis, direction, gap, sizing, and transfer questions that recur on single-wing forearm placements.

Match the viewing job to the flow. Choose outer flow when the wing is the focal and must read at distance as a full single-wing span, accepting daily sun on that face. Choose inner flow for a slimmer, close-read wing judged with the wrist turned up. This page recommends keeping the full span inside the visible field of the chosen flow; when the span exceeds the inner width, move to outer flow or shorten the span rather than wrapping primaries past the side edge.

From wing plan to working stencil

Turn the approved wing reference into a stencil draft.

Start from the wing that passed the axis, fan, gap, and span checks, then continue on iPhone for body fit, exact-size print, mirror and professional export.