

Blackout field-coverage reference

Plan the blackout field before it becomes solid black

A blackout stencil is a coverage plan, not a motif. Set the field bounds and stop limits first, reserve the skin breaks that keep solid density readable, then verify exact-size transfer before the stencil reaches skin.

Built for working artists preparing blackout fields. This page covers stencil preparation and visual review only, not tattoo application or healing advice. Blackout stays highly visible and sessions run long, so confirm the client understands the placement and the process before prep continues.

Blackout field reference

Name the field before drawing the fill.

Solid black behaves differently on each field because the curvature, movement, and neighboring work differ. Name the field type first, because each one sets different bounds and different stops.

Limb panel

Solid-black block wrapping part of a forearm, upper arm, calf, or thigh

The most common blackout field. One reading face carries the density while the wrap carries the risk. Plan the front face as the finished panel and let the sides fall away cleanly, instead of drawing one flat rectangle and wrapping it blindly around the limb.

Check: Name the reading face first, keep full density inside it, and stop the field where the limb turns away from that view.
Sleeve or leg band section

A stacked blackout section that joins existing work above and below

A joining field, not a standalone panel. The top and bottom joins are the whole job: each one needs a deliberate edge treatment (hard line, skin gap, or patterned transition) agreed before the fill is drawn, or the section reads as an unfinished middle.

Check: Draw both join edges before any fill, keep the same edge logic at top and bottom, and dry-fit the joins against the existing work.

Torso or back block

A large flat blackout area on the chest, ribs, or back

The largest and flattest blackout field, and the most punishing to transfer. Breathing, posture, and spine curvature all move the skin between stencil prep and application, so this field is verified standing in the session posture and transferred in sections from one anchor.

Check: Verify in the session posture, split the stencil into manageable transfer sections, and keep one anchor edge fixed while the rest follows.

Cover-up field

Solid black placed to absorb an existing tattoo inside the new field

A field with a hidden constraint: the old piece sets minimum bounds. The blackout must fully contain the darkest parts of the old work with margin to spare, and any reserved skin break must sit clear of old lines that could show through or call attention to the cover.

Check: Map the old piece on the body first, set blackout bounds outside its darkest edges, and keep every skin break clear of old line clusters.

Density decisions for every blackout field
DecisionQuestionRule
Field boundsWhere does the black start and stop?Every edge is a drawn line with a named stop: a joint crease, a muscle edge, an existing tattoo boundary, or a measured clearance from one. A field that simply fades out has no transferable edge.
Edge treatmentHard line, skin gap, or patterned transition?Pick one treatment per field and hold it on all sides. Hard edges read boldest and show every wobble, skin gaps forgive small placement shifts, patterned transitions hide joins but need their own vetting at size.
Density zonesOne flat fill or ranked zones?Large fields read better with one dominant full-density mass plus deliberate relief: reserved breaks, a border frame, or one negative-space motif. Uniform flat fill with no relief reads as an unfinished patch at distance.

Planning example: a forearm panel read from the front is a limb-panel plan with a clearance frame plus one flow channel, not a sleeve section stretched sideways. A blackout section joining a shoulder piece above and a forearm piece below is a stacked-section plan with matching join edges, not a bigger limb panel. Name the reading view and the neighbors first, then the field follows.

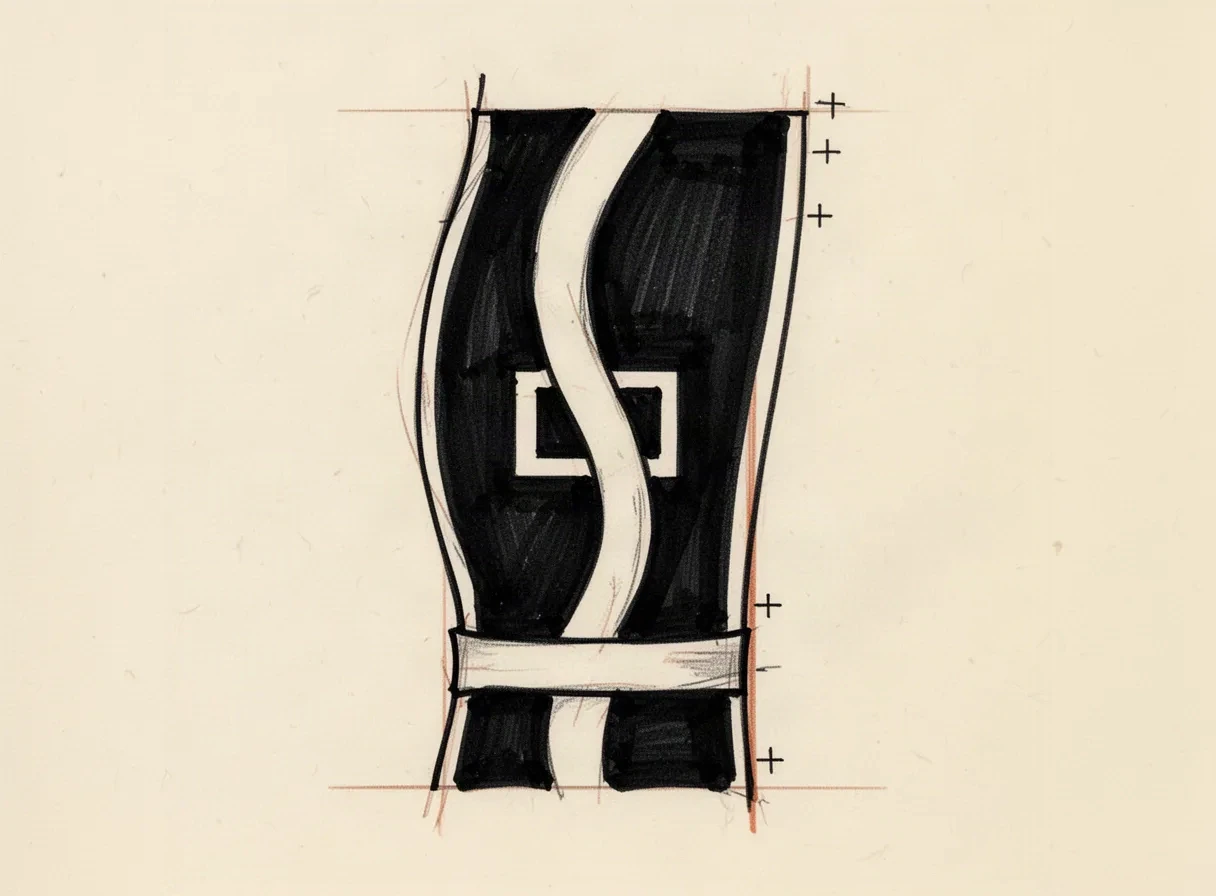
Ink schematic of a limb-panel blackout field showing a reserved skin margin around the field perimeter, a lengthwise flow channel through the black mass, one bold negative-space motif, and a reserved join gap where an adjacent section begins.
Original schematic drawn for this guide, not a to-scale diagram or StencilStudio output. It shows one limb-panel field with the four break constructions listed below: a reserved perimeter frame, a lengthwise flow channel, one bold negative-space motif, and a join gap beside adjacent work. Judge your own break widths on a measured 1:1 print, because the schematic does not carry dimensions.

Skin-break reservation

Reserve the skin first, then fill the black

At blackout density there is no partial tone to fall back on: either skin stays open or the field closes into one mass. Draw the breaks before the fill, keep them connected, and judge them at true size.

Skin-break planner for blackout density
Break typeConstructionWhy it holds
Boundary clearance frameA continuous reserved-skin margin running inside the full field perimeterProtects every edge at once. The frame absorbs small placement shifts and keeps the outer line from merging with creases, existing work, or rub zones.
Flow channelOne wide reserved stripe following the limb or torso direction through the fieldGives the eye a path through solid density and gives long fields a direction. Channels that follow the body direction survive bending and breathing better than cross-grain breaks.
Negative-space motifOne simple reserved shape (line motif, numeral, small emblem) held open inside the blackWorks only when the motif is bold at final size with no fine interior counters. One surviving motif beats three that merge into accidental holidays.
Join gap for stacked workA reserved band separating the blackout section from existing tattoos above and belowStops the section from visually bleeding into neighboring work and gives each session its own clean edge to finish against.

Vet at final size

Prove the field on paper before it becomes permanent

Screens lie about blackout density because every mass looks equally dark. Run this checklist on a measured 1:1 paper field while the plan is still cheap to change.

  • Print the field outline at 100 percent with scaling off and measure it with a ruler before judging anything on screen.
  • Cut the paper field to its outer bounds and tape it on the body in the session posture to confirm the bounds and reading face.
  • Trace every reserved skin break on the 1:1 print and confirm each one reads as open skin at arm's length.
  • Bend the joint or shift the posture through its full range and confirm no break pinches shut and no edge slides into a crease.
  • Confirm the narrowest reserved gap is the deliberate widest-necessary one, not the leftover space between fills.
  • Confirm every edge has a named stop (crease, muscle edge, existing work, or measured clearance) with no edge left to chance.
  • Photograph the taped paper field from the reading view and from both sides before approving the plan.
  • Confirm the field still reads as finished with exactly the breaks drawn: if it needs imagined detail to work, redraw it.

Stop limits

Every edge needs a stop it can hold.

Blackout edges fail where the field meets movement, existing work, or high-visibility skin. Set each stop before drawing fill, then confirm it on the body dry-fit.

Stop limits by boundary
BoundaryRiskStencil-stage check
Joint creases (elbow, wrist, knee, armpit)Fill placed into a crease cracks visually with every bend and heals as a broken edgeHold a clear skin margin above and below each crease and confirm it survives a full bend test on the paper dry-fit.
Existing tattoo boundariesBlackout that overlaps old work without a plan creates a ragged join neither piece ownsStop at a deliberate join edge with a reserved gap or a shared hard line, and dry-fit the join against the existing piece.
Hands, feet, and face-adjacent skinMaximum visibility and distinct healing behavior; an edge that drifts here becomes the whole storySet the stop at least one clear margin back from these zones and confirm the client understands the visibility before prep continues.
Cover-up minimum boundsA field drawn smaller than the old piece leaves dark ghosts visible at the edgesContain the darkest old lines with margin on all sides, verified on the body rather than on a photo.

Neck-specific stops (jaw edge, ear cartilage, hairline, collar line, plus head-turn stretch) stay with the blackout neck owner linked below. The stops above cover limb, torso, and cover-up fields where creases, muscle edges, and existing-work joins control the plan.

Exact-size transfer verification

Prove the solid field before skin

Dense fill hides one closing break among many correct ones. Run this sequence with scaling off and a ruler in hand, while the stencil is still cheap to re-cut.

  • Lock millimeter dimensions and export a true-size PDF with no fit-to-page scaling, including multi-page tiling for fields larger than one sheet.
  • Assemble the tiled sheets, measure the full field plus the narrowest reserved break, and re-tape the assembly on the body.
  • Mark the anchor edge plus top and bottom stop anchors on skin before the transfer touches down.
  • Transfer in sections from the anchor edge so the free end cannot drag the field off its stops.
  • Cut short relief slits where curvature resists (inner elbow, wrist turn, rib curve) before pressing, not after a lift fails.
  • Check transfer ink load inside the solid area: patchy carbon becomes a patchy fill plan, so re-lay any starved section.
  • Confirm every reserved break is still open and connected after positioning, then photograph all views before committing.
  • Record the approved dimensions and stop positions so multi-session work returns to the same map.

Failure-point checks

Four blackout failures and the check that catches each

When a blackout field stencil fails, it fails in one of these four ways. Match the symptom to the row before changing break mass or field size.

Blackout failure points and stencil-stage fixes
FailureLikely causeStencil-stage check
Reserved breaks closing at densityGaps drawn on screen at zoom, never measured at 1:1, or isolated skin islands with no connection to a boundaryMeasure the narrowest gap on the physical print, widen or connect it, and re-test through the full movement range.
Field drifting past its stopsNo named stop per edge, or a flat stencil wrapped onto a curved limb without an anchor sequenceName every stop, mark the anchor edge on skin, and re-transfer in sections from the anchor.
Tiled sheets misaligned on large fieldsMulti-page assembly joined without overlap marks or measured against the body only after transferAssemble with overlap registration, measure the full assembly, and dry-fit on the body before any transfer layer is cut.
Cover-up edges showing throughBounds set from a photo instead of the body, with no margin past the darkest old linesRe-map the old piece on skin, expand bounds past its darkest edges, and move reserved breaks clear of old line clusters.
Reserve breaks first Name every stop Measure the print

FAQ

Blackout field decisions, answered

Short answers for the field-shape, skin-break, stop-limit, sizing, and routing questions that recur on solid-black field plans.

Name the field type first (limb panel, stacked section, torso block, or cover-up field), draw every edge as a line with a named stop, and prove it with a 1:1 paper cutout taped on the body in the session posture. If the paper field holds its bounds through the full movement range and reads finished from the reading view, the shape is transferable. This page covers stencil preparation and visual review only, not tattoo application or healing advice.

From field plan to working stencil

Turn the approved blackout field into a stencil draft.

Start from the field that passed the bounds, skin-break, and transfer checks, then continue on iPhone for body fit, exact-size print, mirror and professional export.